fusible link smoking

-

67barracuda

Well-Known Member
Joined
May 24, 2004
Messages
651
Reaction score
77
Location
Jackson Michigan
Ok, new motor is in. Thought I hooked up everything correctly, but guess not.
Before starting I turned key to run position and the fusible link wire starting smoking. I also noticed the harness is getting kind of brittle. Where should I begin to look first, and should I get a new harness? Classic industries has them, anyone buy one from them? How are they?
The harness was removed to have engine compartment painted while engine was being built.
A color wiring diagram would be helpful if anyone has one.
 
If it's kind of brittle I would replace it with a better used or a new one.
 
Pictures of the new 418 motor built by MRL Performance
 

Attachments

  • IMG_1860.jpg
    89.5 KB · Views: 589
  • IMG_1862.jpg
    95.8 KB · Views: 557
If it's smoking!!!! Unhook the battery!!!!

What did you have powered up?

This is either indicative of a short, a bad connection in the bulkhead connector, or the link failed and is just "finishing up" LOL

Remove the battery ground. Wire a 12V test lamp in series with the ground connection. A glow means a small current. A bright lamp means more.

Make sure the ammeter connections are "safe" and that the alternator charge wire is "safe."
 
Battery is unhooked. Had nothing powered up just key was in run position when I hooked up the battery. I'll check the bulk head connection, as the painter reconnect the harness to the car and I didn't check it.
 
New MRL motor and a 50 year old wiring harness. Here's your sign.
 
Headers look nice!! I am working on a collapsible u joint bolt on stub shaft setup for my manual conversion. That picture helps me do some planning before the box arrives. Lot of little things you can do to the factory harness to eliminate a good majority of the issues, but if you are spending that kind of cash "416" - put a new painless setup in it and be done with it.
 
Agreed, ordered a new front harness last night. No one had the modified electronic in stock, it said 1-4 weeks, I sure hope it more like 1 not 4 weeks. I really want to get this thing done.
 
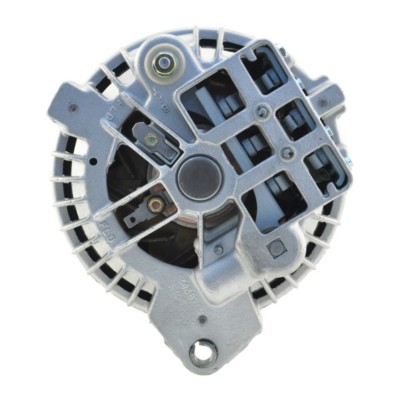
Ok, is this the right set up and alternator to use?
 

Attachments

  • IMG_1864.jpg
    67 KB · Views: 495
  • IMG_1866.jpg
    81.1 KB · Views: 516
"Not optimum" and "maybe" or "maybe not."

There are TWO "general" types of Mopar alternators...........69 and earlier, with one grounded field (brush) and 70 / later so called "isolated field" with both field (brushes) isolated from ground.

It's not clear to me whether the second field connection on your alternator is ACTUALLY insulated. You need to check that with a multimeter

Additionally, the "old style" (69 /earlier) regulator which you have pictured is originally "mechanical" and aftermarket replacements in the last few years are actually electronic. To find out, look under the base. Two large wirewound resistors means a mechanical regulatr which you do NOT want.
 
Depends on what you want to spend. If you want a decent increase in alternator without spending a bunch go find a "squareback." These came out? about? 72? and have improved design. EVEN THEN you must be careful. This is a photo of a NAPA unit which SHOULD be isolated field, but rather seems to have one brush grounded instead. You have to check

NWMDC


If you want to add one more wire, you can use the 70/ later "flat" regulator, but this is not hugely necessary.

You can use the one you have (grounded brush) or a newer one and ground one brush, and then just buy a brand name replacement for what you have (regulator) So far as I know, all replacement regulators are electronic.
 
OK, while waiting for the new harness and electronic regulator I was checking the starter wires. Is the solenoid terminal just a ground for the starter. when I check the post to the engine it is a closed circuit.
 
Checked alternator fields, check them to be isolated from the alternator case. Is this correct? Will do the denso swap late next summer, just cant afford it now.
 

Attachments

  • IMG_1873.jpg
    50.6 KB · Views: 439
Your alternator allows either charging option. Best path depends on what engine harness you will use. Since appears you plan to use the later 1971+ electronic ignition (have 4-pin ECU box), you should get a harness for a say 1971 to 1973 small block (1974 started some new stuff). Such harness would also have connectors for the later 1970+ Vreg w/ triangle connector. You wouldn't want to use your old mechanical Vreg w/ electronic ignition anyway.

If for some reason, you want the old-style charging, you can get an electronic Vreg that looks and works like the old box. Just ground one field terminal w/ a jumper to use that.

Personally, I would use a GM HEI ECU and lose the ballast resistor, but that requires more custom wiring. If you price Year One engine harnesses (from M+H), you might find custom wiring smart.
 
Try disconnect the main power wire that goes from the alternator to the battery. My New alternator did not come with the proper spacer on it and when I connected it to the alternator without the proper insulating spacer it would blow the fuseable link every time. Just a thought.
 
I've had the new harness on order for a couple weeks now, so I called yearone for a delivery date. They informed me that it would be another 8 weeks. I looked around and Classic Industries showed one in stock, so I order it. Its the stock one not modified to for ECU, but it shouldn't be to hard to modify it. Hoping to get it before the weekend and get back at it.
 
Got the harness for the engine compartment and the under dash on should be here this week. I found the wiring harness under the dash to have wires cut and spliced from the bulk head running through firewall. Decide to just get a new one
 

Attachments

  • IMG_1887.jpg
    51.1 KB · Views: 318
The dash is back together with new wiring harness and starting to make some progress on the engine harness.
 

Attachments

  • IMG_1981.jpg
    40.6 KB · Views: 304
  • IMG_1982.jpg
    56.4 KB · Views: 291
Dad and I had the same issue with his 67 cuda elec ign. Within literally 5 minutes on the phone with Del/67Dart273 "we" had the issue solved.
Thanks again Del!
Listen to Del lol
 
PLEASE LISTEN UP. BEFORE you connect the battery to this, make some tests so you do NOT burn up the car.

"What you need." You need a HEAVY test lamp as well as your "regular" 12V test lamp.

What works well is a junk stop / tail socket and bulb. (1157)

When you go to hook up the battery and test circuits in your new harness, do NOT ground the battery directly. Rather, ground the battery THROUGH the bulb. This will not only give you an indication of current flow (that you may not want!!!) but also will PROTECT the harness in case of any shorts.

HOW TO:

A stop / tail socket can be wired several ways to provide different loading.

1....Heaviest......Connect a wire to the socket shell, either by soldering, or something like a hose clamp

Connect the second wire to BOTH the socket wires by twisting them together. This powers both filaments.........heavy load

2......Slightly less load........Connect to the socket shell and the turn /stop wire

3.......Lighter yet...............Connect to the socket shell and the tail wire

4.......Lightest of all. Don't connect the socket shell. Use the two wire connections for your electrical hookup. Leave the socket shell disconnected. This creates a "light" bulb with the two filaments in series

5........Lightest of all mod one / version 3.3.........Don't use the above lamp, instead use your 12V test lamp.

You can do all kinds of 'stuff' with these combinations, testing for shorts, looking for parasitic drains, and I used to use my 10A battery charger to charge my bike, by putting a test lamp in series to drop the amperage to the bike battery.
 
Not exactly a fuse, but rather for current limiting. VISIBLE current limiting. Depending on how large the bulb is in the series ground, "if it lights" it gives you an indication of how heavy the load on the system is.

Example: Perfectly normal car, all shut off. The lightest bulb, the 12V test lamp should NOT light.

If you turn the dome light on, the test lamp will likely show brightly

If you replace the test lamp with something like the stop light in the junk socket, then with the dome light "on" they both likely will light up about the same, not full brilliance.

With a lamp hooked up in the ground, you can have a direct short in the system, and all that will happen is that your series ground lamp will light. This protects the system, and the harness.
 
-
Back
Top