Low buck 360 build

-

Mean416

Well-Known Member
Joined
May 10, 2021
Messages
1,127
Reaction score
1,163
Location
Georgia
Hey guys, I've been making some good progress with this build so I figured I'd make a build thread. I have a 72 dart that I have to sell. I was building a 418 stroker for it but I need to put that project on pause for financial reasons. I decided to drop in a low cost 360 in the car and sell it. At first I was scrounging around for a 5.9 magnum but decided that would be too much headache to swap. And I found a "freshly" machined 360 on Facebook for $600. It's a mid 70s era 360 4 barrel long block. It had been bored 30 over and decked. New pistons had been installed. Then for whatever reason, the guy let it sit and collect rust in the garage. So I took a look at it and decided I'd try to clean it up and put it together. So this is a thread about a very basic 360 buildup that shouldn't cost much, but would still make 300+ hp easily. I'm not taking it back to the machine shop, I'll just clean up things as best as I can, and throw it together. Follow along on this razorblade rebuild and let's get this dart going again!

A few general specs on the car and engine:
72 dart with low miles. It's got the gold colored paint. Picked it up last year, had a 408 with (likely) a blown head gasket. Would run but only very roughly.
IMG_20210508_162835_01.jpg

Car has 3:55 gears and what I believe to be a sure grip. It's definitely a clutch type diff. It's got a 727 with a shift kit and a mild aftermarket converter. 2500ish stall.

The 360 I'm building has 30 over enginetech factory replacement dish pistons. So it's not going to be a high compression engine. No worries, it'll run great on 87.

Here's the thread where we selected the cam: Thread 'Help me select a cam' Help me select a cam

Ended up going with the comp cams 265 DEH. 20-417-3 (DEH) 211/227, 110 LSA .442/.462 lift

I'll run headers and probably a Carter/Edelbrock 750.
 
Last edited:
Depending on the amount of rust….
I’ve cleaned up some really ugly cylinders with a green scotch pad and trans fluid as a lube.

Besides the short block, what parts do you have/need?
 
This is what I was working with. Put the block in the stand and pressure washed everything

IMG_20220828_120126.jpg


IMG_20220828_131148.jpg


IMG_20220828_120146.jpg


IMG_20220828_131154.jpg


IMG_20220828_131156.jpg


IMG_20220828_131621.jpg
 
Depending on the amount of rust….
I’ve cleaned up some really ugly cylinders with a green scotch pad and trans fluid as a lube.

Besides the short block, what parts do you have/need?
I used a ball hone on the cylinders. They had a significant amount of rust accumulation. They look great and I've measured them and they are in spec.

About the only thing I need at this point is a carburetor. I've collected pretty much everything else for the build. Looking for a Carter 750
 
Get crackin. I wanna see the outcome. lol
 
Hope that pile of main caps are numbered correctly. :)

Nothing like a nice basic build. Should be a lot a fun. :thumbsup:
 
When I first got the block I spent a minute with some wd40 and a fine steel wool pad (first thing I could find laying around) and cleaned one of the cylinders up.

So you can see these should clean up well. More on that later though.

IMG_20220828_131317.jpg
 
Hope that pile of main caps are numbered correctly. :)

Nothing like a nice basic build. Should be a lot a fun. :thumbsup:
I believe they are numbered 1-4 right? I have to go look now. Are there instances where they weren't installed in order from the factory?

I have a dual bore indicator so I'll check all bearing clearances anyway.
 
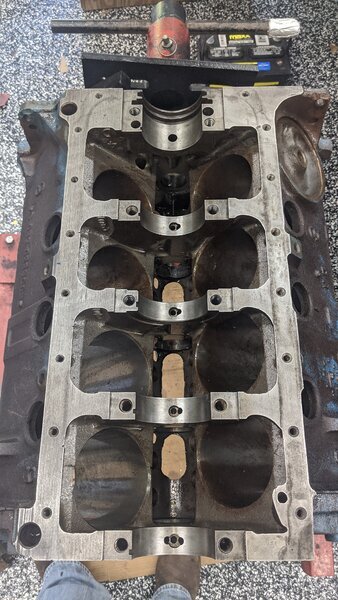
So post initial cleanup I moved on to cleaning up the mains, main register areas. It wasn't a pretty picture to start with.

IMG_20220918_155156.jpg


A bit of wd40 and some careful time with a razor scraping the rust away.

IMG_20220918_162959~2.jpg
Better indeed. But I believe I'll work on this some more. Next stop, addressing the heads.
 
So the heads had a valve job done, but they left a nasty step under the bottom cut. These would've made for very poor performance. So I decided to go ahead and do a very mild bowl blend and short side smoothing. Emphasis on very. I'm not spending days porting cast iron heads.

IMG_20220925_144922~3.jpg
 
A couple hours work with the die grinder and a burr, the bowls were done as they were going to get. I also removed the smog bump in the exhaust ports and a very minor port match, which probably will not make much difference.

These old 360 heads had the strangest exhaust short side radii. Anyway I smoothed it as much as I could without going crazy with anything. Just left with a burr finish, no sanding rolls.

IMG_20221003_084902.jpg


IMG_20221003_084911.jpg
 
Time for some cylinder honing fun! Nothing like a good old fashioned ball hone to make that surface grunge disappear! Before:

IMG_20220925_173652.jpg


After:
IMG_20220925_180252.jpg


IMG_20220925_180245.jpg


Looks all nice, fresh, and clean now!
 
Lookin good! You did more with the bowl blend than you probably think. That can make a nice difference.
 
I confirm that the main caps are numbered 1-4.

Did some cleanup work in the caps, and installed replacement bearings. My crank is a 10/10 regrind so I got the associated bearings. These are from engine tech. Dirt cheap :D

Before cleanup:
IMG_20220918_163537.jpg


After initial cleanup:
IMG_20220918_170204.jpg


After more thorough cleanup, and then with bearings installed:
IMG_20221006_183748.jpg


IMG_20221006_192414.jpg
 
Here's the crank that came with it. I think I can just scuff this with a scotchbrite pad what do you guys think?

IMG_20220918_151238.jpg


Just kidding. This crank will definitely require a regrind. In this image I had mocked the crank up with a couple cleaned up journals and some old bearings. I was making a quick check of piston to valve clearance. With the dished pistons and them being over .100 down in the hole, I had miles of clearance. Like .300! So no worries there.

I did get a replacement crank as well. Scored this for I think $290 shipped.

IMG_20221005_113019.jpg
 
-
Back
Top