Mocking Up Firewall for Master Cylinder Studs

-

MuuMuu101

Well-Known Member
Joined
Jul 6, 2012
Messages
1,919
Reaction score
312
Location
MidWest
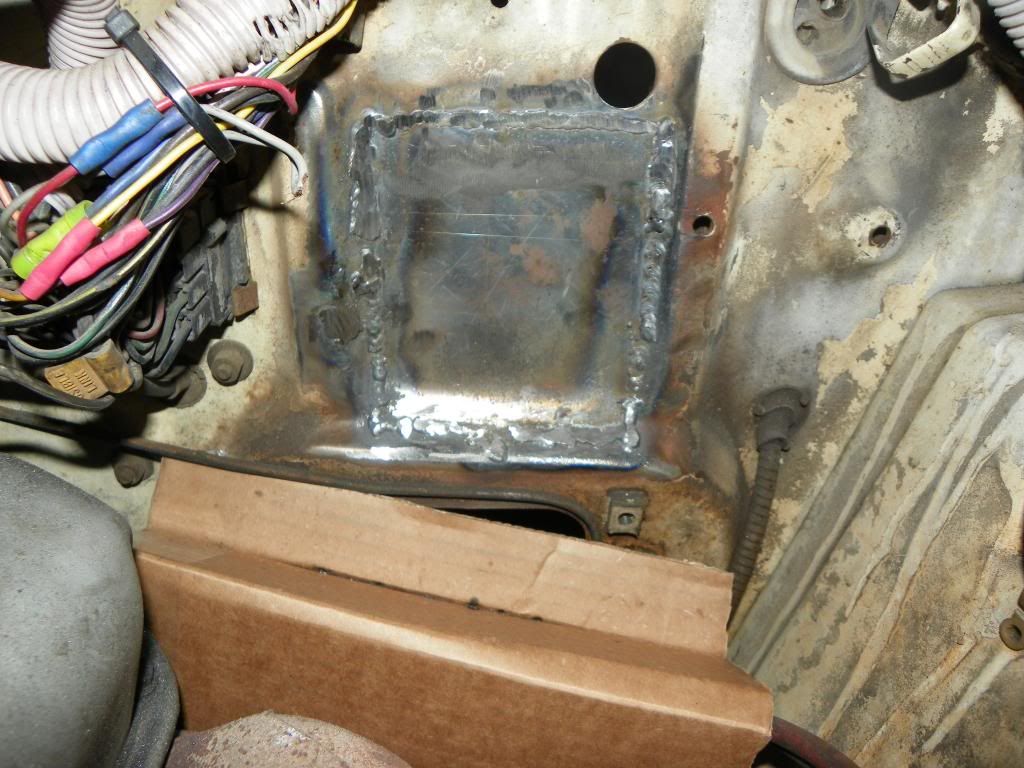
Ok guys, so this is what I'm dealing with. The previous owner made swiss cheese out of my firewall trying to install power brakes. I decided to fix the problem by cutting the firewall out and welding in a new replacement panel in its place. I just bought an automatic brake pedal w/ mount out of a 75 Valiant and I need to mock up the holes for the studs that mount the MC to go though.

Just to let you know, I plan on installing a NAPA Master Cylinder for a 1980 Diplomat converting it over to manual brakes. It has a 1 1/32 bore and is of the 2 hole mount. I was also planning on buying the 4 to 2 master cylinder adapter plate from someone.

Unfortunately, I'm not really sure how I'd go about doing this. One member mentioned pressing out the studs from the brake mount and installing the brake pedal marking where to cut the holes on the firewall. Thanks for your help in advance.

Also, what would be a good way to clean the welds more. My main problem is that I've got wire awfully close to the firewall and I don't want to cut those as electrical circuits is complete black magic to me. :banghead:

 
i would use the 2" abrasive discs on a 90* die grinder to clean up the welds.

where are the master cylinder studs? they should be coming thru that plate. they connect the master to the under dash bracing. you need them or when you push on the brake pedal your pushing the fire wall toward the engine.
 
LIttle late now, LOL. I'd a mocked up the pedal assy in the car, scribed lines to mark the stud locations and THEN welded in the patch. Without removing the stud'n maybe welding them back in the hanger bracket, as Rusty says, "hell if I know."
 
Ok here's the back story. My old firewall was swiss cheese. To get the aftermarket/GM power booster on there the previous owner cut 4 new holes on the firewall and the brake pedal assembly cutting off the studs. As a fix, my friend and I decided to cut off the mounting tabs on the brake pedal mount and make new mounting tabs utilizing bolts as studs. I had already made the tabs. After the tabs were welded on the brake pedal mount, we were going to mock up the holes originally for the firewall. But as of recently, it doesn't seem like my friend is too interested in helping me with my car (now no access or skills with a welder to weld tabs on there) so I bought the newer brake pedal mount instead. Now I'm stuck with little tools and skill trying to tackle this on my own. :/
 
Power brakes mounted...


Removed...


As you can see the studs were sheared and holes were drilled into the brake pedal assembly...


Cut it out...


And that's what came out...


Cleaned weld area and made new patch panel...


Old vs. New Mounting tabs. They never got welded on as we started to get busy with school at this point...


Then the panel was welded in hopes of using the new mounting tabs as a mock up. Unfortunately it didn't work out and I decided to make a change of plans going with the new brake pedal assembly as I had a bad cut on the old one that would make it difficult to weld. So does it look like this panel is going to have to be cut out, a cardboard template made, new replacement panel cut and bent and rewelded in... Please say no... -_-
 
I changed my 1967 firewall to a two hole but cutting and welding the studs. Take the piece you cut out to get your bearing on where it should go. I measured two holes level between the two studs on each side and drilled, no big deal. then I cut a center hole by grabbing the next size up hole saw (for adjust-ability), and the extra metal on the flange covers it well.

there are a few pics in my build thread and some more here: http://1967barracuda.shutterfly.com/pictures/451
 
Just a suggestion, but why not section a part of a firewall from a junkyard car, with studs and holes all drilled? It'd be a matter of laying it in where it fits the existing curves, cutting, welding, and done?

Surely someone on here knows of a car going to the scrapper, or has a hulk with a little-needed piece like that.

looks like he already has the sheet metal in, and little means to redo it. but it is a good opportunity to redrill for a 2 hole!
 
Just a suggestion, but why not section a part of a firewall from a junkyard car, with studs and holes all drilled? It'd be a matter of laying it in where it fits the existing curves, cutting, welding, and done?

Surely someone on here knows of a car going to the scrapper, or has a hulk with a little-needed piece like that.

Rhinodart offered months ago, but at that point I already had the material. I should have taken his offer then. :banghead: Right now I have no access to a welder so I'm stuck with what I've got. I only plan on cutting from here.
 
Just came back from Home Depot and bought a Grinder and hole saw that's just the next size up from the center register of my MC. Since my swiss cheese sheet metal only fits one way on my brake pedal assembly, I was thinking about using that and forming it so it hugs the firewall (I may be holding it upside down in the picture). Then mark the holes for the MC studs and connect the opposite holes to see where the lines cross. And technically, at that point, the MC should be located in that location, correct? Does my idea sound dumb?
 

Attachments

  • 101_0272.jpg
    64.6 KB · Views: 290
  • 101_0273.jpg
    78.9 KB · Views: 281
Make a template from an original firewall. Multiple layers of masking tape works nicely because you can stick it to your sheet metal.
 
Anybody know if 67/ 8 firewalls are the same? I have a parts car, can make a template.
 
Thanks guys! I really appreciate the help. I feel like I can get this car running much sooner than I was expecting. :D

Dr. Diff, I'm going to be calling you soon with regards to ordering a 4-2 MC adapter if you still have them available. I ordered your adjustable pushrod about 6 months ago and was very pleased with your price and shipping time.
 
I took these measurements off the 67 parts body as accurately as I can. You should be able to just lay these out on your welded in plate with a pair of dividers

The secondary measuring points are

The edge of the bulkhead connector hole as a secondary check From the edge of the bulkhead connector hole to the top left master cyl (MC) is 2 5/8"

The far right mounting boss as pointed out in the photo just above the inner fender bend
From that hole to the top right MC hole is 4 1/8"

The main points to use for measurement were the two upper bolts for the steering column plate and the upper right accelerator pedal mount hole as pointed out in the photo

TOP LEFT MC
From left steering plate hole, 5 3/8,
from right steering plate hole, 5 7/8


3 1/2 from top right accel pedal hole

2 5/8 from right edge of bulkhead connector hole

================================

TOP RIGHT MC

from left steering plate hole, 7 1/2
from right steering plate, 4 9/16
from far right bulkhead hole, 4 1/8

=================================

BOTTOM LEFT MC

From left steering plate, 4"
from right steering plate, 4 5/8
From top right accel hole, 2 7/8

==================================

BOTTOM RIGHT MC

From left steering plate, 6 1/2
from right steering plate, 2 3/4

Bottom MC holes are 1 7/8 vertically on center from top MC

all 4 are 3 /1/4" horiz. centers
 

Attachments

  • _MG_6759cs.jpg
    69.2 KB · Views: 254
  • _MG_6760cs.JPG
    146.8 KB · Views: 264
  • _MG_6762cs.jpg
    57.4 KB · Views: 262
Just came back from Home Depot and bought a Grinder and hole saw that's just the next size up from the center register of my MC. Since my swiss cheese sheet metal only fits one way on my brake pedal assembly, I was thinking about using that and forming it so it hugs the firewall (I may be holding it upside down in the picture). Then mark the holes for the MC studs and connect the opposite holes to see where the lines cross. And technically, at that point, the MC should be located in that location, correct? Does my idea sound dumb?

Doesn't sound dumb, sounds like this:

I changed my 1967 firewall to a two hole but cutting and welding the studs. Take the piece you cut out to get your bearing on where it should go. I measured two holes level between the two studs on each side and drilled, no big deal. then I cut a center hole by grabbing the next size up hole saw (for adjust-ability), and the extra metal on the flange covers it well.

there are a few pics in my build thread and some more here: http://1967barracuda.shutterfly.com/pictures/451
 
Thank you all! I'll take a look at it tonight and hopefully get some work done! :prayer:
 
Got a little carried away while grinding and made two breaks in the welds you can see through from the inside of the car. FML...
 
:banghead: :violent1::banghead:
 

Attachments

  • 101_0275.jpg
    71.5 KB · Views: 248
I would just prime it with metal etching primer and cover the oops w/ fiberglass, or you could use Bondo Hair (has chopped fiberglass) then regular Bondo. There is no structural concern.

I think using your cut-out part as a template is fine. 67Dart273 spent a bunch of time making a template for you, so verify against his. I don't think it matters much if your brake centerline is off 1/8" as long as the bracket doesn't bump into anything under the dash and your pedal doesn't wind up in a funny place. Since you will use a 2-bolt MC, you probably could have used your original bracket w/ missing studs and drilled 2 new holes for your MC. That is what I plan for my 64 Valiant. If that doesn't work for some reason, I will just use a 4-2 bolt adapter since I still have my 4 studs. If you bugger up your 2nd brake bracket, I have one w/ pedal from a 74 Dart auto I'll never use and I will be passing near Covina next weekend. PM if you need it. Real cheap.
 
Going to start mocking up the holes for the MC and grinding down welds again. Hopefully I don't screw up anymore. All these mess ups make it really hard for me to get motivated to work on the Dart. Taking it slow, I don't want to get too ambitious with the Dart...
 
Got to work on the Dart for a couple hours tonight. Getting better with the grinder but still made a couple mistakes. I am going to need to cut, repatch a small piece of the firewall, refill and grind the welds on some new holes I made. I figure I'll either buy or borrow a welder within the next month or so. Almost done grinding the welds but have hit a couple trouble spots. I've printed the measurements to mock up the holes for my pedal assembly so I may be doing that early tomorrow afternoon. Anyways here's my progress. It's not very pretty. I just want to get this nightmare over with. This sucks.
crazy.gif
 

Attachments

  • 101_0277.jpg
    73.4 KB · Views: 254
-
Back
Top