We fit a 275/60R15 in the 73 with no problem. 15x8 wheel. Can't remember if it was 4.25 or 4.5 back spacing. It's whatever wheel vinyl question recommended for an A body.I dont want to tub however i have noticed that the duster has quite a large wheel arch lip and then also the wheel tub doesnt go straight up like in other cars, is there any ways of making the tub a bit more roomy without mini tubbing for example?
You are using an out of date browser. It may not display this or other websites correctly.
You should upgrade or use an alternative browser.
You should upgrade or use an alternative browser.
OzyDuster74 body ready for paint!!
- Thread starter Ozyduster
- Start date
-
Did you run offset shackles to get leafs in? I am also shortening diff to give the perfect position for the wheel.We fit a 275/60R15 in the 73 with no problem. 15x8 wheel. Can't remember if it was 4.25 or 4.5 back spacing. It's whatever wheel vinyl question recommended for an A body.
No stock A body housing with super stock springs and a snubberDid you run offset shackles to get leafs in? I am also shortening diff to give the perfect position for the wheel.
O nice, the tubs are so small was worried have isues fitting inside the tub as don't want the back jacked up. I even trimmed the fold in the wheel arch to get more space in the tub without tubbing. Giving the wheels and car to diff builder so when cuts the 8, 3/4 down can make sure its exactly right. As its a B body diff its too wide.No stock A body housing with super stock springs and a snubber
Any pics of yours?
Unfortunately no but I should be able to get some Monday.
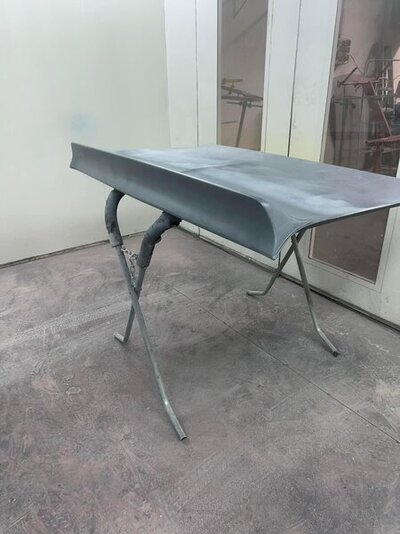
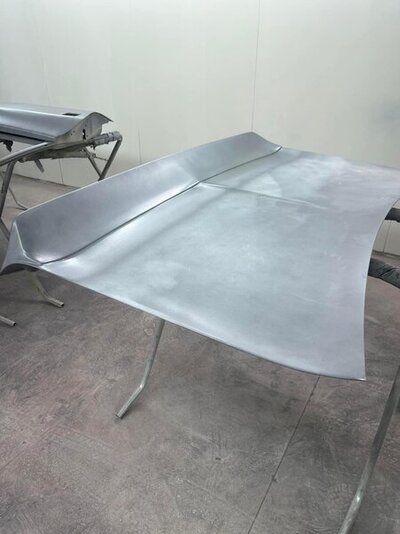
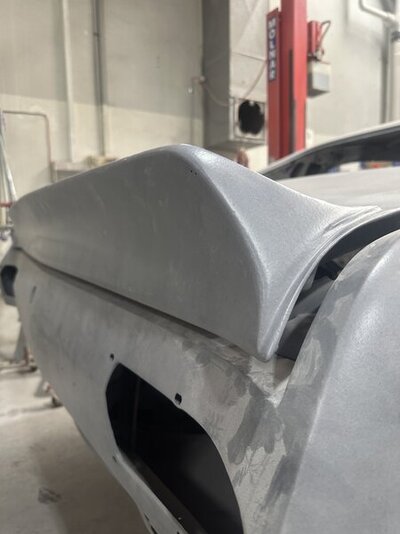
So the duck tail is taking shape, have built the thickness of the tail up to then trim to get a more even leading edge thickness as was all over the place.
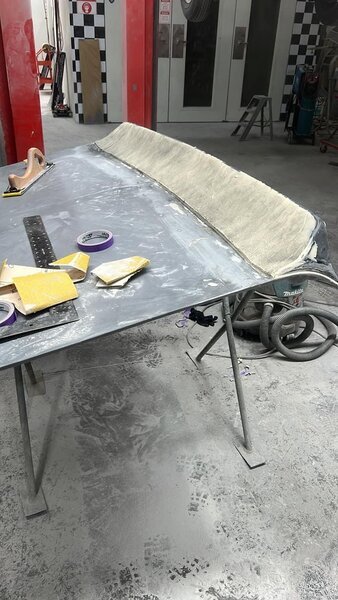
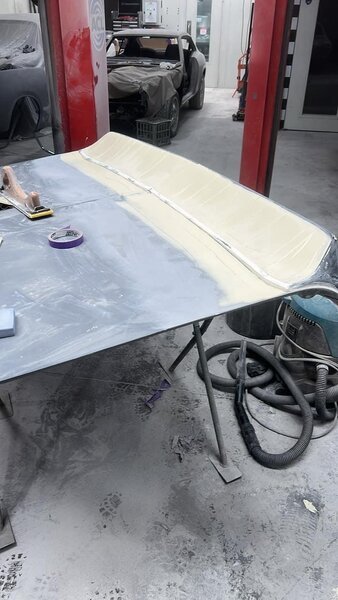
Then have bogged the face to get rid of the highs and lows, i am super super anal with panel on my cars. My other projects have always had show stopping panel and paint. I want this car to really stand out from a crowd, but tastefully modified etc.
Currently have taken the front guards off and prepped all the underside of guards for paint. My chassis stiffening is in the mail from interstate as the Australian chargers have same floor pan. So looking forward to getting that welded in so i can lay colour mixed Raptor liner on the under side of the car.
My diff is all built just waiting to cut it down to length which he will do with the car in his shop. Still tossing up on if to run wilwoods on the rear otherwise ill use Australian Ford disk brakes as same stud patern as mopar. Just run wilwood on the front. Due to running a newer motor and needing engineering my car has a brake test so not sure the standard brakes would pass the testing

Didn't happen there was a car on the lift.Unfortunately no but I should be able to get some Monday.
So lucky with this car, pulled the front guards off and zero rust behind them. Remember this car was a beater when i got it wasnt even drivable and never had a resto other than very bad crash repairs. I was expecting rust in this area for sure. Pretty much in factory condition, lot of sand blasting dust in there so good to remove that as have been sucking and blowing it from every hole in the car.
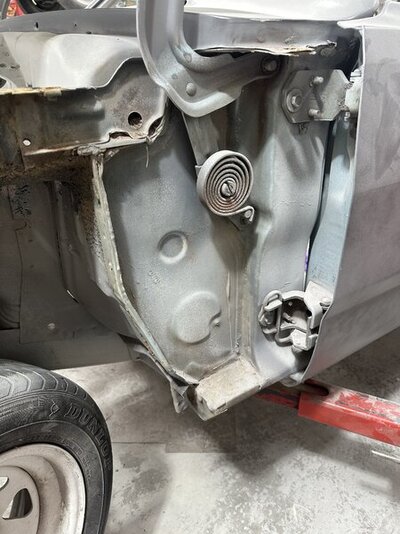
Back of guards to bare metal, acid wash and prime. Not sure if the guards had been off before, was odd as when bolts removed looked like the guards were glued on to the body with some kind of polyurethane. We are also re seam sealing the entire car as obviously its all been removed and also gone super brittle
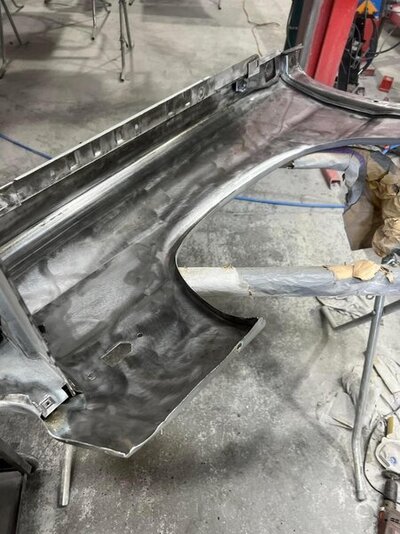

Back of guards to bare metal, acid wash and prime. Not sure if the guards had been off before, was odd as when bolts removed looked like the guards were glued on to the body with some kind of polyurethane. We are also re seam sealing the entire car as obviously its all been removed and also gone super brittle

Yep ill get some up today as will put the boot lid back on, concentrating on getting the back of guards and frame rails in primer as bare metal currently
Nice job, can you post some pictures of it mocked up on your car to see what it’s gonna look like?
I really rate it, changes the whole look, especially as want a pro street look etc as running the wheels in my profile pic. Not everyone will like it.Nice job, can you post some pictures of it mocked up on your car to see what it’s gonna look like?
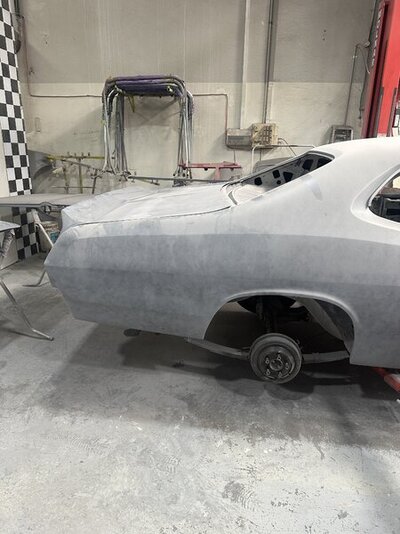
The duck tail took quite a lot of work as has a lot of lumps and bumps in it, also took a lot of work to get the edges of it even as they were all different thicknesses etc. We decided to finish the lower section flush with the trunk lid, some people run a shadow line along here like the camaro but the casting was not even close to straight so easier to blend it in than try recreate a straight line etc if that makes sense
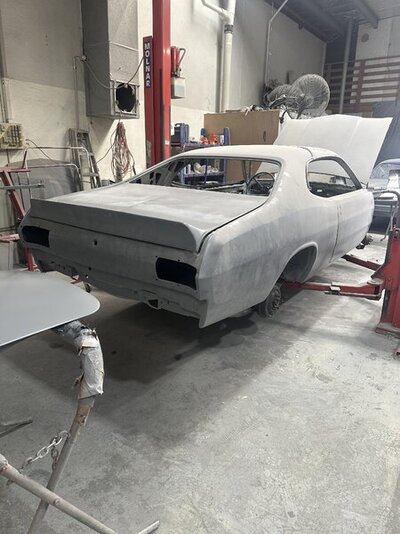
You can see here we kept a 3mm shadow line down the sides but as i said not one along the bottom. I probably would have prefered a shadow line but was easier this way.
Looks like you've done some nice work there!
So you have a US made, LH drive car in Oz? If you've ever had it out on the street, are they common enough there that you don't get looks?
When I had Bazza's VG at my place last summer, I damn near caused crashes with it whenever I took it out for test drives and what-not, as people here are NOT used to seeing RH drive cars.
Last edited:
Probably seen two dusters in the last 4 years lol. Left hand hook classics are kind of common here as so expensive to restore Australian stuff. I guess to make sense of it once finished with the 6.4 it would be worth 80-100k where as in the states no where near that.Looks like you've done some nice work there!
So you have a US made, LH drive car in Oz? If you've ever had it out on the street, are they common enough there that you don't get looks?
When I had Bazza's VG at my place last summer, I damn near caused crashes with it whenever I took it out for test drives and what-not, as people here are NOT used to seeing RH drive cars.
View attachment 1716227939
We did a tintable bedliner. Same color as the rest of the car.
https://www.forabodiesonly.com/mopar/attachments/body-and-paint-35-jpg.1714961649/
Paint and body work:
https://www.forabodiesonly.com/mopar/showcase/1968-barracuda-notchback-paint-and-body-2014.10252/
https://www.forabodiesonly.com/mopar/attachments/body-and-paint-35-jpg.1714961649/
Paint and body work:
https://www.forabodiesonly.com/mopar/showcase/1968-barracuda-notchback-paint-and-body-2014.10252/
No kidding! Bazza wants to keep his VG a "driver" for that very reason, I think.Left hand hook classics are kind of common here as so expensive to restore Australian stuff. I guess to make sense of it once finished with the 6.4 it would be worth 80-100k where as in the states no where near that.
As for what they're worth, in Oz or NZ his VG would easily get 2X anything he could get for it here, so I completely understand where you're coming from there.
Anyway, nice ride you got there!
Nice work. Are you adding a front spoiler?I really rate it, changes the whole look, especially as want a pro street look etc as running the wheels in my profile pic. Not everyone will like it.
View attachment 1716227927
The duck tail took quite a lot of work as has a lot of lumps and bumps in it, also took a lot of work to get the edges of it even as they were all different thicknesses etc. We decided to finish the lower section flush with the trunk lid, some people run a shadow line along here like the camaro but the casting was not even close to straight so easier to blend it in than try recreate a straight line etc if that makes sense
View attachment 1716227933
You can see here we kept a 3mm shadow line down the sides but as i said not one along the bottom. I probably would have prefered a shadow line but was easier this way.
View attachment 1716227934
Yep
Yep my wife is Canadian and i said if we ever move there i am taking my cars. I know my 355 stroker ss 1998 Holden ute would turn a few heads lol Its immaculate had a full ground up rebuild. But only two seats so no good for the kidsNo kidding! Bazza wants to keep his VG a "driver" for that very reason, I think.
As for what they're worth, in Oz or NZ his VG would easily get 2X anything he could get for it here, so I completely understand where you're coming from there.
Anyway, nice ride you got there!
The cuda looks amazing mate, yep we are going to use Raptor liner and tint it to body colour to make it look more professional under neath. With all the running gear brand new or powder coatedWe did a tintable bedliner. Same color as the rest of the car.
https://www.forabodiesonly.com/mopar/attachments/body-and-paint-35-jpg.1714961649/
Paint and body work:
https://www.forabodiesonly.com/mopar/showcase/1968-barracuda-notchback-paint-and-body-2014.10252/
Well its time to start on the chassis connectors!!
Body work all completed and ready for paint! Has a few small areas that just need a little bit of love, very minor couple panel gaps i want perfect that most likely just a bad factory gap. Loving the look of the ducktail it transforms the rear of the car. I will also start work on the rear bumper conversion and compressing the front bumper mounts, removing metal etc

Couldn't resist and put one of the rear wheels on, actually fitted, however the diff is going to be cut down so the whole tyre fits in the fender. Currently very close but i dont like the look where the tyre hangs out, a bit old school for me.
You can see in the 2nd image the way it is i cant tuck once lowered. I have about half an inch to the leaf spring so with the offsets will have nearly an inch i can shorten the diff to get a perfect fit.
The lines on the car are absolutely mint!!!


Body work all completed and ready for paint! Has a few small areas that just need a little bit of love, very minor couple panel gaps i want perfect that most likely just a bad factory gap. Loving the look of the ducktail it transforms the rear of the car. I will also start work on the rear bumper conversion and compressing the front bumper mounts, removing metal etc
Couldn't resist and put one of the rear wheels on, actually fitted, however the diff is going to be cut down so the whole tyre fits in the fender. Currently very close but i dont like the look where the tyre hangs out, a bit old school for me.
You can see in the 2nd image the way it is i cant tuck once lowered. I have about half an inch to the leaf spring so with the offsets will have nearly an inch i can shorten the diff to get a perfect fit.
The lines on the car are absolutely mint!!!
Like you, willing to slightly narrow the rear to keep the wheels / tires tucked in. 275/60/15 on 8" rim with 4" backspacing. Cut the housing down a total of 1" and took 1/2" off each axle, Dr.Diff off set hangers on front , Mopar offset shackles on rear.


Hahah
Why didnt you run Dr diff front and back?
Hhaha exact same wheel size as me, i also cut the lip back around the edge of the fender to help fit the tyre inside, as really dislike the look where the rubber sticks past the fender. Looks great mate!!!Like you, willing to slightly narrow the rear to keep the wheels / tires tucked in. 275/60/15 on 8" rim with 4" backspacing. Cut the housing down a total of 1" and took 1/2" off each axle, Dr.Diff off set hangers on front , Mopar offset shackles on rear.
View attachment 1716234397
View attachment 1716234398
Why didnt you run Dr diff front and back?
Hahah
Hhaha exact same wheel size as me, i also cut the lip back around the edge of the fender to help fit the tyre inside, as really dislike the look where the rubber sticks past the fender. Looks great mate!!!
Why didnt you run Dr diff front and back?
Just like the OEM look of the offset Mopar shackles.
275/60/15 on 15 x 7 4.25" backspace stock 5th ave rims.
Stock A body 8.75 with big bolt axles. Hd springs with 1" lowering block, stock shackles.

Stock A body 8.75 with big bolt axles. Hd springs with 1" lowering block, stock shackles.
Nice! I have one inch drop calverts which probably not enough but need to pass the pits first. I may need to add a block as well. Are the hd standard height or lower?275/60/15 on 15 x 7 4.25" backspace stock 5th ave rims.
Stock A body 8.75 with big bolt axles. Hd springs with 1" lowering block, stock shackles.
View attachment 1716234791
-

