You are using an out of date browser. It may not display this or other websites correctly.
You should upgrade or use an alternative browser.
You should upgrade or use an alternative browser.
Sand-blasting cabinets?
- Thread starter hemizach
- Start date
-
fishy68
Tyr Fryr's Inc.
I have the same blaster Glenn and my compressor is only 9.7 cfm @ 90 psi and it powers it fine. Definetly sounds like a screwed up gun to me. Why don't you just take your receipt along with the gun back to Harbor freight and tell them you have it already loaded with sand and it'd be a ton of work to return it and see if they have another gun to swap you? They have been pretty good with me when I got defective stuff.
cudaman51
Well-Known Member
take it apart and check the siphon orifice behind the tip.
phish1270
phish1270
The tips are ceramic. The siphon tube is not clogged. Air comes out of the siphon tube & the tip. There is nothing clogged. My understanding is that the air pressure rushing over the siphon tube should create suction which picks up the media & "blasts" it out the tip. My gun sends air out the tip & out the siphon tube. I will try taking the tip off & changing it. I may go to Northern tool & get a new gun & try it before I give up, put everything back in the box & throw it through the window at HF.
clhyer
Well-Known Member
- Joined
- Feb 24, 2007
- Messages
- 3,734
- Reaction score
- 320
I have the same setup and have had good service from it. I've also had decent customer service when I have gone into the store with a problem. I would almost bet they would exchange the gun with another one in the store if you just took the gun back in.
Still, take the ceramic tip out and without the tube in the sand see if you get more air flow out the nozzle end.
I would still like to see a better pic of the gun.
C
Still, take the ceramic tip out and without the tube in the sand see if you get more air flow out the nozzle end.
I would still like to see a better pic of the gun.
C
phish1270
phish1270
Thanks for all the help guys. I am going to try to mess with it a little this afternoon. It is barely 20 out & the garage takes a while to heat up. I have had good luck at HF with returning things but they are not very close. I will see what happens with no tip & the other supplied tips later. I like to call it my "just the tip" game! I had to say it. lol
needsaresto
Well-Known Member
- Joined
- Nov 13, 2004
- Messages
- 7,603
- Reaction score
- 265
take it apart and check the siphon orifice behind the tip.
I will second this. The orifice is small and can easily clog.
Welding tip cleaners work great for this!
irelandmoss
Well-Known Member
Check TP tools. They have various sand blast cabinets. And their prices are not too bad. I have a bench top and there is just not the room inside. I'm looking a one from TP that has a work area of 58"x28"x28" and comes with a vacuum for
only $1400.00.
Bill
only $1400.00.
Bill
This one from Summit is good for the price. A customer of mine has one and it works well. toolmanmike
http://www.summitracing.com/parts/SUM-919050/
http://www.summitracing.com/parts/SUM-919050/
needsaresto
Well-Known Member
- Joined
- Nov 13, 2004
- Messages
- 7,603
- Reaction score
- 265
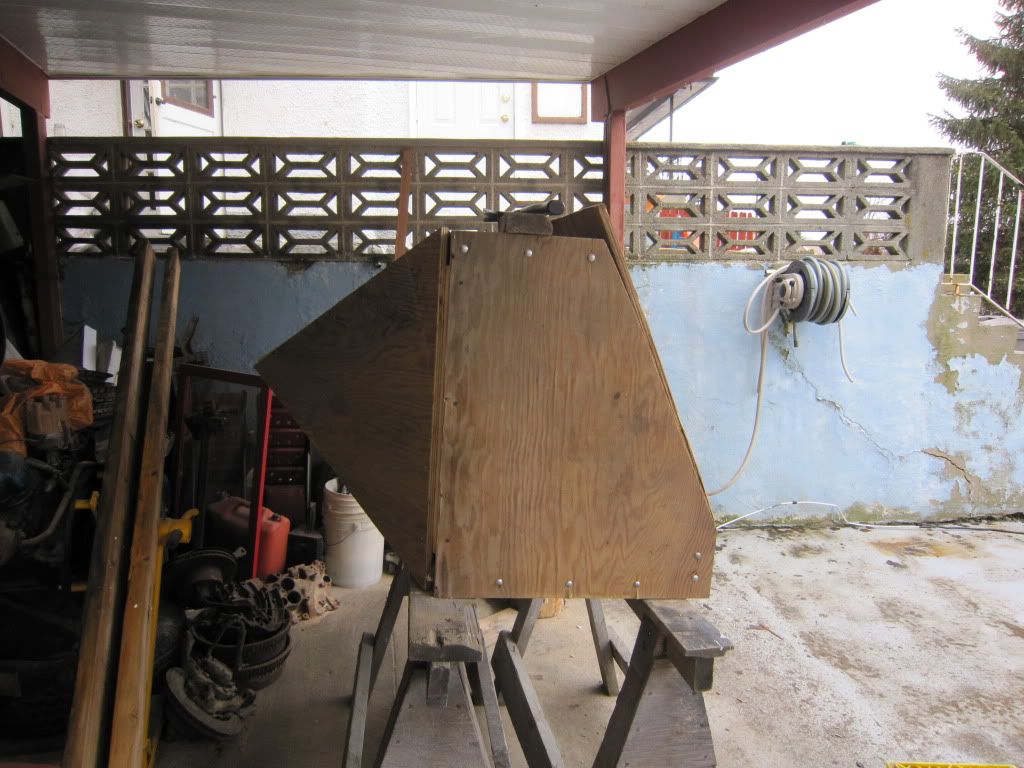
Made some more progress yesterday. I mated the hopper and cabinet,then mounted the lid. I siliconed the hopper gaps as well.Dug around in the shop and found four nice swivel casters with plastic sockets.Amazing he crap I have scrounged up over the years!
Now I have to drill hand/arm holes and mount the legs with casters


Now I have to drill hand/arm holes and mount the legs with casters
cudaman51
Well-Known Member
now you have to build a trap door at the bottem to drain the sand to change it
rmchrgr
Skate And Destroy
Too bad I don't have a pic of the one I built out of melamine board a few years ago. It has a light, an evac system, a drain/sifter, mesh to put parts on, a plexiglass viewing window, hand cutouts with rubber gloves, a lower shelf for supplies and bucket and it all rolls on casters. Big enough to put a rear end in. Too bad my crappy pressure blaster couldn't keep up.
Total cost around $200 + about 3/4 of a day's work.
Total cost around $200 + about 3/4 of a day's work.
needsaresto
Well-Known Member
- Joined
- Nov 13, 2004
- Messages
- 7,603
- Reaction score
- 265
now you have to build a trap door at the bottem to drain the sand to change it
Nope,sand just drains into a pail. I'll just screen it as it goes in.
needsaresto
Well-Known Member
- Joined
- Nov 13, 2004
- Messages
- 7,603
- Reaction score
- 265
Too bad I don't have a pic of the one I built out of melamine board a few years ago. It has a light, an evac system, a drain/sifter, mesh to put parts on, a plexiglass viewing window, hand cutouts with rubber gloves, a lower shelf for supplies and bucket and it all rolls on casters. Big enough to put a rear end in. Too bad my crappy pressure blaster couldn't keep up.
Total cost around $200 + about 3/4 of a day's work.
Lol,I have all this stuff to go on yet,just didnt mention it.
phish1270
phish1270
Thanks for all the help guys. I am going to try to mess with it a little this afternoon. It is barely 20 out & the garage takes a while to heat up. I have had good luck at HF with returning things but they are not very close. I will see what happens with no tip & the other supplied tips later. I like to call it my "just the tip" game! I had to say it. lol
Well it has been a couple weeks but I have the cabinet working great now. The gun came with 4 different sized tips. The smallest one was already on the gun & did not work. I took it off & started trying the others & they all work so the smallest one is either bad or my compressor could not work it. I do have a couple of questions since I am new to blasting. I am doing the UCAs & LCAs for a disc brake swap. Is it ok to do the disc brake spindles? I was planning on taping off the smooth machined area that the rotor mounts on but wanted to blast the rest. I have 70 grit aluminum oxide media & Black Diamond 40/60 grit. Also I want to clean up the dust shields but they are what appears to be aluminum, is glass bead or walnut shells better for that? Also, what/when do I use the different sized tips? Thanks for all the help.
Stack all the parts in the cabinet in a pile if you can. The "blow by" will do some of the blasting for you on the parts you aren't working on just then, and it'll save time and wear/tear on your compressor.
Use lots of duct tape on the machined area of the spindles -- you don't want to blast those. You can use rubbing alcohol to remove the tape goo and then use some crocus cloth on the spindles to really clean and shine them up without removing any metal material.
Either of your medias will be fine for the aluminum dust shields. Glass bead is used if you want to achieve a "soft" finish on your metal. Since a soft finish is the last thing I need for my powders to adhere, I use Black Beauty slag for almost everything.
Can't help you out with the tip question. I only use one size. :-D
Have fun and be careful!
phish1270
phish1270
Stack all the parts in the cabinet in a pile if you can. The "blow by" will do some of the blasting for you on the parts you aren't working on just then, and it'll save time and wear/tear on your compressor.
Use lots of duct tape on the machined area of the spindles -- you don't want to blast those. You can use rubbing alcohol to remove the tape goo and then use some crocus cloth on the spindles to really clean and shine them up without removing any metal material.
Either of your medias will be fine for the aluminum dust shields. Glass bead is used if you want to achieve a "soft" finish on your metal. Since a soft finish is the last thing I need for my powders to adhere, I use Black Beauty slag for almost everything.
Can't help you out with the tip question. I only use one size. :-D
Have fun and be careful!
Thanks a bunch Cudachick! I am slowly learning or is it learning slowly.
needsaresto
Well-Known Member
- Joined
- Nov 13, 2004
- Messages
- 7,603
- Reaction score
- 265
The cabinet has progressed some. I'll get some pics up tommorow! Got the cabinet assembled and up on legs. The lid is now mounted as well.
needsaresto
Well-Known Member
- Joined
- Nov 13, 2004
- Messages
- 7,603
- Reaction score
- 265
I mounted an old self inflating air mattress motor to the back of the hopper.It should provide plenty of suction for dust removal. However I dont want it sucking the grit into itself and then spitting it outside,so a 318 2bbl air filter will surround it but I need to double stack them. I'll hold it down with a 318 2 bbl air housing lid!

Then I cut another hole in the hopper and siliconed an old bathroom light fixture into it.The idea is to provide a sealed light that can take a bit of a whack so I'll build a small steel cage around it.

I mounted the lid with a piano hinge.It's the only way to go really.It added a lot of strength to the structure.

It has legs and wheels now too! Cant really see em but the wheels are a plastic set I have had forever but thier a bit sturdier than the usual plastic crap. I ended up bracing and gusseting the legs.

I had a small piece of plywood kicking around that made a perfect shelf for blasting small stuff! Couple passes with the belt sander and it fit perfect!

I need to wire up the light,drill a couple more small holes for sand/air lines and make some sleeves/gloves.I figure I'll wander down to the sally ann and buy an old jacket with heavy sleeves,sew on some work gloves and viola!
Another good idea I had is to use some corner bead around the edges of the lid as it's kind of rough.
Then I cut another hole in the hopper and siliconed an old bathroom light fixture into it.The idea is to provide a sealed light that can take a bit of a whack so I'll build a small steel cage around it.
I mounted the lid with a piano hinge.It's the only way to go really.It added a lot of strength to the structure.
It has legs and wheels now too! Cant really see em but the wheels are a plastic set I have had forever but thier a bit sturdier than the usual plastic crap. I ended up bracing and gusseting the legs.
I had a small piece of plywood kicking around that made a perfect shelf for blasting small stuff! Couple passes with the belt sander and it fit perfect!
I need to wire up the light,drill a couple more small holes for sand/air lines and make some sleeves/gloves.I figure I'll wander down to the sally ann and buy an old jacket with heavy sleeves,sew on some work gloves and viola!
Another good idea I had is to use some corner bead around the edges of the lid as it's kind of rough.
-


