In this chapter I am going to go through installing the freeze plugs and oil galley plugs in the block...
This is the next step to continue after part 1 & 2 where we tore the block down and cleaned it up, then put the cam bearings in... If you missed it, you can find it here...
How to Rebuild a Small Block Part 1: Block Prep
How to Rebuild a Small Block Part 2: Cam Bearing Install
*************************************************************************
Hello everyone, it's Krazykuda here to show you how to rebuild a small block... This article is to help any newbies through rebuilding a small block Mopar LA engine, but may have a few tips that some of you seasoned builders may find useful... If you haven't ever built an engine, I will show you what you need to know to do it yourself...
The goal of this series is to show what you can do at home in your own garage... Go at your own pace and ability and then take it to someone knowledgeable for what you are not capable of doing yourself or don't have the proper equipment/tools for...
Keep checking back in from time to time as this is a work in progress and I plan to keep updating it as I build more engines and can show you more variations...
I am going to break this into sections that you can follow along with and make sense to do in 'stages' when you build... Plus you can then jump to the section that you are working on to help keep from sorting through one very long thread to find what part that you are working on when you are doing it....
*************************************************************************
*** Important Note *** Sometimes things may not go right and you will run into a snag/road block... Do not get in a hurry to finish and take short cuts that may compromise your build...
Step back, take a break, and think about it for a while... Or seek help from other experienced people or professionals to overcome the problem... Do it right and don't take any unnecessary chances that may compromise the integrity of your build...
If you don't fix the problem correctly, it may come back to haunt you and cost even more time and money than if you took the time to think about it and research it to fix the problem correctly...
This has been a public service announcement from krazykuda....
*************************************************************************
Freeze plugs:
We went with the Mancini Racing Federal Mogul rebuild kit C for this build, it comes with:
Rod bearings, Main bearings, Cam Bearings, Freeze Plugs, Oil Pump, Gasket Set, Moly Rings and Cast Pistons
Here' the link for all of the kits:
Engine Rebuild Kits
Here's the one that we used:
Sealed Power Engine Rebuild Kit - 360
It comes with this freeze plug package, but it doesn't have all of the oil galley plugs in it, only a couple..


However, Mancini offers a more complete kit that I have a few of... If you call them when ordering the kit, they can make substitutions for the difference in cost, they did it for us on the pistons so we could upgrade to the higher compression pistons vs the low compressions that come standard in their kit....


Here they are all spread out, there's one large freeze plug missing that I may have grabbed for another build once... But this kit is more complete as it has the threaded oil galley plugs and two kinds of rear cam bearing plugs....

Here's the large freeze plug, it's 1 5/8" diameter...

Here's the smaller freeze plug for the left front of the block and two for each head....

Here are the two small ones that go behind the camshaft thrust plate in the front of the engine, they are 19/32" diameter...

*************************************************************************
First you want to use the small wire brush from the kit and remove any rust/scale/grit from the freeze plug holes in the block... Here's my favorite Harbor Freight wire wheel kit and the 4" wire wheel that doesn't come in the kit, so you have to buy them separately...

Here's the part number of the kit...

Now take the smallest wheel in the kit and use it to clean up the bores/holes for the freeze plugs...


Here's some pictures of a couple of holes that are cleaned up and ready for the freeze plugs...


Now I use any of the flavors of RTV to put around the outside of the plug to help make sure it's sealed...

I like the clear RTV...

Find a socket that is slightly smaller diameter than the inside of the cup plug so you drive it in with pressure around the inner lip of the plug, not in the center where you can distort the plug and add more crown as you drive it in... Go just inside the inner diameter of the lip with a little clearance so you are driving it in without distorting the crown of the plug...


Now put a bead of RTV around the outside of the freeze plug...


Then tap it in with the socket trying to keep it square in the bore and not let it get cocked/crooked... If you feel it begin to get crooked, bias the side that's not as deep and try to get it even with the other side...


You want the lip of the cup plug to be just below the chamfer of the bore/hole for the plug for best results...

Then take your finger and smooth out the RTV around the plug and make it seal better and look nice...

Repeat this for all of the freeze plugs in the block... The three large 1 5/8" plugs on the driver's side....


The three large 1 5/8" ones on the passenger side....


The one large 1 5/8" on the right/passenger side and one smaller 1 1/4" diameter plug on the left/driver's side of the front of the block...


Then the two large 1 5/8" plugs in the rear of the block....


*************************************************************************
Rear Cam Plug:
Now is also a good time to install the rear cam plug... There are a few different styles, here is the one that we used in this build...

Put a bead of RTV around the outside lip of the cam plug...

Try to smooth it out some with your fingers without taking too much off... Leave a small bead for sealing...

Now place it in the bore with the crown facing the rear/outward, it will push all the way in loosely...

Bottom it out in the bore for the cam tunnel....

Now take a ball peen hammer and pound the crown straight to increase the outside diameter of the cam plug and make it fit tighter... You want to deform the crown as that is what makes the interference fit to keep the plug in...


It should look something like this...

Then smooth out the RTV....


Then we checked to make sure that it was tight by using a long 1/2" extension and pressing on it with light pressure to make sure it was tight...

*************************************************************************
Oil Galley Cup Plugs:
For this build the block that we started with had the oil galley plugs in the front of the block next to the cam already out... I have had a bad experience with my first engine that the machine shop left these out and I had to find out why my oil pressure was too low... It turned out to be these two plugs that go behind the camshaft thrust plate were left out, so I always make sure that all of my blocks have these... (I had to pull the engine and tear it down 4 times before finding the problem - so now I check for them every time...)


These take the small 19/32" cup plugs... I install these 'dry' and don't use any silicone on them as I don't want any of the dried silicone to get into the oil galley and block/clog something... These should be installed dry with no RTV... You can use some penetrating oil to lube them to make them go in easier if you wish...

My first try was with an 11/32" socket....

Well that 11/32" socket was too tight of fit to the inner lip of the cup plug and the socket got stuck in the plug while it was in the block and I had to destroy it to get my socket out... The plug came out with the socket and I had to grab another plug from another kit to replace this one...
Lesson learned...

I then downsized to a 5/16" socket to drive this plug in and all went well...

Now the plug is in the bore, just under the chamfer...

Take a flat blade screwdriver and a hammer and make 4 stakes 90° apart to help keep it good and tight...

Here it is with all four stakes...

Now install the one for the other side....

And here it is with the four stakes to hold it in real tight...

Here's what it should look like when both of the plugs are installed and staked in....


*************************************************************************
Threaded Oil Galley Plugs:
Now make sure that all the rest of the oil galley plugs are installed... I would start with the rear of the block as that's where most of the rest are....
Here are the three on the outside of the rear of the block...


Here is the one in the back of the left/driver's side lifter galley... You have to look down through the distributor hole to see it... You have to have the outer one removed first before you can remove or install this one... This has a internal square head drive that you can just use a 3/8" ratchet extension to install and remove... They don't call out a torque for these in the back of the engine chapter of the service manual, but they should be good and tight....


After you have verified those, then look for the one that goes under the oil fliter plate or 90° oil filter adapter... This one also takes a 3/8" ratchet/socket extension....


Now the last one is one of the press fit cup plugs and is hidden under the rear main bearing cap... I usually don't remove this one and leave it in, but if you removed yours, it goes in about 2 1/4" deep.... I believe that this one is also the 19/32" diameter plug like the two in the front by the camshaft...


Here's trying to look down the hole directly...


*************************************************************************
Water/Coolant Drain Plugs:
Now the last two plugs that we havent' done yet are the water/coolant drain plugs in the side of the block...
These don't come in any of the plug kits that I've seen, but they are standard 1/4" pipe plugs that you can get at any hardware or home improvement store... They have 1/4" pipe thread...

You will want to use some type of sealer on these, either RTV or teflon tape will do...
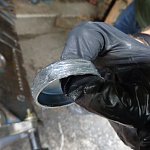
I use teflon tape...

When using teflon tape, pay attention to the direction that you wrap the tape.. You want to make it like this so it won't unravel while you are threading it into the hole... You want about 3 or so layers of tape wrapped around the thread and try not to let any get past the bottom of the plug, just keep it on the threads...

Now install it into the block... The drain plug holes are in the center of the block between the freeze plugs on each side...

Get it started a few threads...

And all tight...

Congratulations!!! You now have all of the hardware installed in the block and are ready to move onto section 4 Pre-Flight Inspection before installing the crankshaft...
How to Rebuild a Small Block Part 4: Pre Flight Inspection After Machine Shop Before Assembly
This is the next step to continue after part 1 & 2 where we tore the block down and cleaned it up, then put the cam bearings in... If you missed it, you can find it here...
How to Rebuild a Small Block Part 1: Block Prep
How to Rebuild a Small Block Part 2: Cam Bearing Install
*************************************************************************
Hello everyone, it's Krazykuda here to show you how to rebuild a small block... This article is to help any newbies through rebuilding a small block Mopar LA engine, but may have a few tips that some of you seasoned builders may find useful... If you haven't ever built an engine, I will show you what you need to know to do it yourself...
The goal of this series is to show what you can do at home in your own garage... Go at your own pace and ability and then take it to someone knowledgeable for what you are not capable of doing yourself or don't have the proper equipment/tools for...
Keep checking back in from time to time as this is a work in progress and I plan to keep updating it as I build more engines and can show you more variations...
I am going to break this into sections that you can follow along with and make sense to do in 'stages' when you build... Plus you can then jump to the section that you are working on to help keep from sorting through one very long thread to find what part that you are working on when you are doing it....
*************************************************************************
*** Important Note *** Sometimes things may not go right and you will run into a snag/road block... Do not get in a hurry to finish and take short cuts that may compromise your build...
Step back, take a break, and think about it for a while... Or seek help from other experienced people or professionals to overcome the problem... Do it right and don't take any unnecessary chances that may compromise the integrity of your build...
If you don't fix the problem correctly, it may come back to haunt you and cost even more time and money than if you took the time to think about it and research it to fix the problem correctly...
This has been a public service announcement from krazykuda....
*************************************************************************
Freeze plugs:
We went with the Mancini Racing Federal Mogul rebuild kit C for this build, it comes with:
Rod bearings, Main bearings, Cam Bearings, Freeze Plugs, Oil Pump, Gasket Set, Moly Rings and Cast Pistons
Here' the link for all of the kits:
Engine Rebuild Kits
Here's the one that we used:
Sealed Power Engine Rebuild Kit - 360
It comes with this freeze plug package, but it doesn't have all of the oil galley plugs in it, only a couple..
However, Mancini offers a more complete kit that I have a few of... If you call them when ordering the kit, they can make substitutions for the difference in cost, they did it for us on the pistons so we could upgrade to the higher compression pistons vs the low compressions that come standard in their kit....
Here they are all spread out, there's one large freeze plug missing that I may have grabbed for another build once... But this kit is more complete as it has the threaded oil galley plugs and two kinds of rear cam bearing plugs....
Here's the large freeze plug, it's 1 5/8" diameter...
Here's the smaller freeze plug for the left front of the block and two for each head....
Here are the two small ones that go behind the camshaft thrust plate in the front of the engine, they are 19/32" diameter...
*************************************************************************
First you want to use the small wire brush from the kit and remove any rust/scale/grit from the freeze plug holes in the block... Here's my favorite Harbor Freight wire wheel kit and the 4" wire wheel that doesn't come in the kit, so you have to buy them separately...
Here's the part number of the kit...
Now take the smallest wheel in the kit and use it to clean up the bores/holes for the freeze plugs...
Here's some pictures of a couple of holes that are cleaned up and ready for the freeze plugs...
Now I use any of the flavors of RTV to put around the outside of the plug to help make sure it's sealed...
I like the clear RTV...
Find a socket that is slightly smaller diameter than the inside of the cup plug so you drive it in with pressure around the inner lip of the plug, not in the center where you can distort the plug and add more crown as you drive it in... Go just inside the inner diameter of the lip with a little clearance so you are driving it in without distorting the crown of the plug...
Now put a bead of RTV around the outside of the freeze plug...
Then tap it in with the socket trying to keep it square in the bore and not let it get cocked/crooked... If you feel it begin to get crooked, bias the side that's not as deep and try to get it even with the other side...
You want the lip of the cup plug to be just below the chamfer of the bore/hole for the plug for best results...
Then take your finger and smooth out the RTV around the plug and make it seal better and look nice...
Repeat this for all of the freeze plugs in the block... The three large 1 5/8" plugs on the driver's side....
The three large 1 5/8" ones on the passenger side....
The one large 1 5/8" on the right/passenger side and one smaller 1 1/4" diameter plug on the left/driver's side of the front of the block...
Then the two large 1 5/8" plugs in the rear of the block....
*************************************************************************
Rear Cam Plug:
Now is also a good time to install the rear cam plug... There are a few different styles, here is the one that we used in this build...
Put a bead of RTV around the outside lip of the cam plug...
Try to smooth it out some with your fingers without taking too much off... Leave a small bead for sealing...
Now place it in the bore with the crown facing the rear/outward, it will push all the way in loosely...
Bottom it out in the bore for the cam tunnel....
Now take a ball peen hammer and pound the crown straight to increase the outside diameter of the cam plug and make it fit tighter... You want to deform the crown as that is what makes the interference fit to keep the plug in...
It should look something like this...
Then smooth out the RTV....
Then we checked to make sure that it was tight by using a long 1/2" extension and pressing on it with light pressure to make sure it was tight...
*************************************************************************
Oil Galley Cup Plugs:
For this build the block that we started with had the oil galley plugs in the front of the block next to the cam already out... I have had a bad experience with my first engine that the machine shop left these out and I had to find out why my oil pressure was too low... It turned out to be these two plugs that go behind the camshaft thrust plate were left out, so I always make sure that all of my blocks have these... (I had to pull the engine and tear it down 4 times before finding the problem - so now I check for them every time...)
These take the small 19/32" cup plugs... I install these 'dry' and don't use any silicone on them as I don't want any of the dried silicone to get into the oil galley and block/clog something... These should be installed dry with no RTV... You can use some penetrating oil to lube them to make them go in easier if you wish...
My first try was with an 11/32" socket....
Well that 11/32" socket was too tight of fit to the inner lip of the cup plug and the socket got stuck in the plug while it was in the block and I had to destroy it to get my socket out... The plug came out with the socket and I had to grab another plug from another kit to replace this one...
Lesson learned...
I then downsized to a 5/16" socket to drive this plug in and all went well...
Now the plug is in the bore, just under the chamfer...
Take a flat blade screwdriver and a hammer and make 4 stakes 90° apart to help keep it good and tight...
Here it is with all four stakes...
Now install the one for the other side....
And here it is with the four stakes to hold it in real tight...
Here's what it should look like when both of the plugs are installed and staked in....
*************************************************************************
Threaded Oil Galley Plugs:
Now make sure that all the rest of the oil galley plugs are installed... I would start with the rear of the block as that's where most of the rest are....
Here are the three on the outside of the rear of the block...
Here is the one in the back of the left/driver's side lifter galley... You have to look down through the distributor hole to see it... You have to have the outer one removed first before you can remove or install this one... This has a internal square head drive that you can just use a 3/8" ratchet extension to install and remove... They don't call out a torque for these in the back of the engine chapter of the service manual, but they should be good and tight....
After you have verified those, then look for the one that goes under the oil fliter plate or 90° oil filter adapter... This one also takes a 3/8" ratchet/socket extension....
Now the last one is one of the press fit cup plugs and is hidden under the rear main bearing cap... I usually don't remove this one and leave it in, but if you removed yours, it goes in about 2 1/4" deep.... I believe that this one is also the 19/32" diameter plug like the two in the front by the camshaft...
Here's trying to look down the hole directly...
*************************************************************************
Water/Coolant Drain Plugs:
Now the last two plugs that we havent' done yet are the water/coolant drain plugs in the side of the block...
These don't come in any of the plug kits that I've seen, but they are standard 1/4" pipe plugs that you can get at any hardware or home improvement store... They have 1/4" pipe thread...
You will want to use some type of sealer on these, either RTV or teflon tape will do...
I use teflon tape...
When using teflon tape, pay attention to the direction that you wrap the tape.. You want to make it like this so it won't unravel while you are threading it into the hole... You want about 3 or so layers of tape wrapped around the thread and try not to let any get past the bottom of the plug, just keep it on the threads...
Now install it into the block... The drain plug holes are in the center of the block between the freeze plugs on each side...
Get it started a few threads...
And all tight...
Congratulations!!! You now have all of the hardware installed in the block and are ready to move onto section 4 Pre-Flight Inspection before installing the crankshaft...
How to Rebuild a Small Block Part 4: Pre Flight Inspection After Machine Shop Before Assembly