This is the first stage for assembling the engine... If you go to a machine shop for your block work, this is where you want to begin... In this chapter I am going to go through inspecting the block after a machine shop to make sure everything was done properly and give some sources for parts... Not every machine shop is familiar with Mopars and can make mistakes, you want to verify that they did their work properly and catch it now before you begin to assemble the engine...
This is the next step to continue after Sections 1 - 3 where we tore the block down and cleaned it up, then put the cam bearings, freeze plugs, and oil galley plugs in... If you missed it, you can find it here...
How to Rebuild a Small Block Part 1: Block Prep
How to Rebuild a Small Block Part 2: Cam Bearing Install
How to Rebuild a Small Block Part 3: Install Water Jacket and Oil Galley Plugs
*************************************************************************
Hello everyone, it's Krazykuda here to show you how to rebuild a small block... This article is to help any newbies through rebuilding a small block Mopar LA engine, but may have a few tips that some of you seasoned builders may find useful... If you haven't ever built an engine, I will show you what you need to know to do it yourself...
The goal of this series is to show what you can do at home in your own garage... Go at your own pace and ability and then take it to someone knowledgeable for what you are not capable of doing yourself or don't have the proper equipment/tools for...
Keep checking back in from time to time as this is a work in progress and I plan to keep updating it as I build more engines and can show you more variations...
I am going to break this into sections that you can follow along with and make sense to do in 'stages' when you build... Plus you can then jump to the section that you are working on to help keep from sorting through one very long thread to find what part that you are working on when you are doing it....
*************************************************************************
*** Important Note *** Sometimes things may not go right and you will run into a snag/road block... Do not get in a hurry to finish and take short cuts that may compromise your build...
Step back, take a break, and think about it for a while... Or seek help from other experienced people or professionals to overcome the problem... Do it right and don't take any unnecessary chances that may compromise the integrity of your build...
If you don't fix the problem correctly, it may come back to haunt you and cost even more time and money than if you took the time to think about it and research it to fix the problem correctly...
This has been a public service announcement from krazykuda....
*************************************************************************
In my three decades of building engines, I have used Mancini Racing and Summit as my main sources for parts... I like to cross check the prices on parts that they both carry to get the best deal...
I prefer Mancini over Summit as they started out catering to Mopar and I like to support the guys that support our hobby... Yeah, sometimes they make mistakes, but everybody does once in a while, they have been good to work with me through issues in the past especially since I've been a long time customer...
Mancini Racing:
Maicini Racing home page:
Mancini Racing Mopar Performance Parts - Yahoo Top Service Award Winner!
Mancini Racing A engine home page:
A - Engine Parts
Summit Racing is also a good source and has treated me very well... I ordered some Rhoades lifters from them to put in my "home stock" and three years later I found out that they sent me lifters for a Chevy instead of a Mopar and they exchanged all three sets for me with no hassles...
Summit Racing home page:
Fast Free Standard Shipping on Orders Over $99.00 at Summit Racing
I've also heard good things about Jeggs, but have never used them...
JEGS High Performance Parts | Aftermarket Auto Parts & Accessories
*************************************************************************
References/Brief Engine History:
Now before you start building you need some good references... I have found the factory service manuals to be a valuable source of information, who else knows more about these than the people who made them???
However I would like to point out that there was an error in some of the early service manuals where they called out the wrong torque spec for the rocker arm bolts which will overstretch or even cause them to break, so be aware of that... The correct torque for the rocker arm bolts is 200 in * lbs (inch pounds)...
There is a great site to download service manuals and some other great information that is run by a fellow FABO member at Mymopar.com...
MyMopar home page:
MyMopar - Mopar Forums & Information
My Mopar reference index:
MyMopar - Mopar Forums & Information - MyMopar Tools/Reference
Here's the link for them to download copies of the factory service manuals... If they don't have the specific year one for your car, find one close/comparable and use that one... I prefer to use the 68 - 71 manuals for most of my information... Since 71 was the year of my first Mopar and also was the first year for the 360, that is a great one for references to engine specs...
Here's the link for free downloads of service manuals:
MyMopar - Mopar Forums & Information - Service Manuals
I'm also partial to the 68 service manual as that's my favorite year for the Barracuda and the first year of the 340... My favorite A-body Mopar is the 68 Barracuda fastback 340 Formula S...
273's were made from 64 - 69... 64 - 67 had solid lifter camshafts and adjustable rocker arms, where the 68 & 69 273's had the standard hydraulic camshafts/lifters and rocker arms...
Also the 64 & 65 273's had a unique intake bolt with smaller diameter and different angle than the 66 and later small blocks... If you have a 64 or 65 273 all you have to do is change the heads to 66 and later 273 or 318 heads to be able to run the more available intake manifolds... 66 & 67 273 and 67 318 had closed chamber heads with smaller combustion chambers and are good to run for higher compression... The 68 and later 273/318 had open chamber heads with larger combustion chambers...
The LA 318 started in 67 and ran through 91... The Magnum 318 came out in 92 and ran through 2002.... However, the short block is similar to the LA engine and most of this will apply to those...
The 340 started in 68 and ran through 73... 68 - 71 were the best years with forged cranks, 10.5 compression, and 2.02 intake valves.. 72 the 340 got lower compression and 1.88" intake valves... 73 was the same as 72, but with a cast iron crank...
The 360 started in 71 and the LA 360 ran up to 91, then the Magnum 360 was made from 92 - 2002...
The 88 - 91 318 and 360 had the roller cam and also is compatible with the LA intakes and exhaust parts, so there are many choices of intakes to fit those engines, where the magnum series does not have as many intake choices as the LA versions... These blocks are nice to build an LA engine with a roller cam...
*************************************************************************
Oil Galley Plug Verification:
The first step after getting the block back from the machine shop, or if you did your own work as described in articles 1 - 3, is to verify the oil galley plugs are all in... My first small block (a 71 340) the machine shop left out two oil galley plugs and it had too low of oil pressure especially after warming up... It took me 4 times to pull the engine and tear into it to find the problem after some good advice from a fellow Mopar guy (shout out to Ken Neve)... So now I have learned where all the oil galley plugs are and verify they are all in before I assemble any block....
The first two oil galley plugs that I check are the ones that I had problems with on my first build... They are in the front of the block near the camshaft and are hidden by the camshaft thrust plate when the engine is assembled... I've had people say that they are not needed as the camshaft thrust plate covers them, however in my experience they are necessary to get proper oil pressure...

Here they are in the red circles...

Now the next ones to check for are the three in the back of the block...

Here they are in the red circles...

Now the next one to verify is the one on the driver's side lifter galley... You have to look down through the distributor hole to see it... To remove or install it, you need to have the one on the outside of the block removed to get access...

Here it is in the circle

While you are there, you want to verify that the distributor/oil pump drive gear brass bushing is there also...

Now you want to check for the one that goes behind the oil filter base....

Here it is in the red circle...

Now the last one you want to verify is the one that goes under the rear main bearing cap...

Here it is in the red circle...

From another angle...


If it was removed, it should be installed to 2 1/4' depth...


Now you want to check that the rear camshaft plug is in...

Here it is in the red circle...

Now that you have verified all the oil galley plugs are in so you get proper oil feed and pressure, now check to make sure all of the water jacket plugs are in...
*************************************************************************
Freeze and Drain Plugs:
Start with the left/driver's side (the one without the oil filter)...

Here they are in the red circles...

Now for the right/passenger side plugs (the side with the oil filter)...


Now check the ones in the rear of the block...


Now the two in the front of the block...


Now check for the coolant drain plugs on the side of the block.... Here's the driver's side...


Now the one on the passenger side...


You can also substitute petcocks for the drain plugs if you are going to pull the engine often, like in a race car and you have the room for them to fit...
*************************************************************************
Probe all oil holes:
Now that you've verified all of the oil galley and water jacket plugs, you want to probe the oil holes in the main bearing bores and the ones for the head oiling...
Start with the center holes in all 5 mains...


Put a straightened wire coat hanger through each hole and look for it to come out the camshaft bore... This will make sure that the cam bearings are properly installed and there are no blockages in the holes... These holes feed the oil to the cam journals... Put the wire in gently so you don't nick/scratch the cam bearings...
Here's the front of the block to cam bearing #1...

Here you can see the tip of the probe sticking out to the camshaft bore...

Now do the next one one for cam bearing #2...


Then cam bearing #3 which is the thrust bearing...


Now do cam bearing #4....


Now for the rear main bearing....


Now is a good time to check the side holes in the main bearings which feed oil to the camshaft galley... Start with the front main and stick the probe in the hole and mark the depth with your fingers or a marker... You can see that the front main has two side holes at an angle for each lifter galley, probe both to make sure they go through to the lifter galley...


Start with the one side...

Then mark with your fingers and check the depth, it should go to the bottom of the lifter galley hole that you can see here when compared to the outside of the block to the lifter galley plug...


Now using that mark, check the 3 middle main bearing side holes...


Then when you are done with those, check the other side of the front main which feeds the other side lifter galley with oil...


Now turn the block over and check the oil feed holes for the heads and rockers that feed from the #2 and #4 cam bearings...
The left side head is fed from #2 cam bearing...


Look in the #2 cam bearing hole to verify that the probe goes all the way through...

Now check the right side head/rocker oil hole that feeds from #4 cam bearing...


Ok now you have verified that all of the oil feed holes in the block are clear and not blocked... This will ensure that the oil will get through the engine properly...
It's better to catch any issues now and get them corrected, than after the engine is installed and you start it for the first time to discover the problem... It's easier to fix now, either fix it yourself or take it back to the machine shop to correct their mistake... Catching it now will save you the trouble of pulling the engine and tearing it down to fix the problem which will cost a set of gaskets to repair...
*************************************************************************
Congratulations, your block is now ready to assemble... Now move onto section 5 for crank install....
How to Rebuild a Small Block Part 5: Crankshaft Install
This is the next step to continue after Sections 1 - 3 where we tore the block down and cleaned it up, then put the cam bearings, freeze plugs, and oil galley plugs in... If you missed it, you can find it here...
How to Rebuild a Small Block Part 1: Block Prep
How to Rebuild a Small Block Part 2: Cam Bearing Install
How to Rebuild a Small Block Part 3: Install Water Jacket and Oil Galley Plugs
*************************************************************************
Hello everyone, it's Krazykuda here to show you how to rebuild a small block... This article is to help any newbies through rebuilding a small block Mopar LA engine, but may have a few tips that some of you seasoned builders may find useful... If you haven't ever built an engine, I will show you what you need to know to do it yourself...
The goal of this series is to show what you can do at home in your own garage... Go at your own pace and ability and then take it to someone knowledgeable for what you are not capable of doing yourself or don't have the proper equipment/tools for...
Keep checking back in from time to time as this is a work in progress and I plan to keep updating it as I build more engines and can show you more variations...
I am going to break this into sections that you can follow along with and make sense to do in 'stages' when you build... Plus you can then jump to the section that you are working on to help keep from sorting through one very long thread to find what part that you are working on when you are doing it....
*************************************************************************
*** Important Note *** Sometimes things may not go right and you will run into a snag/road block... Do not get in a hurry to finish and take short cuts that may compromise your build...
Step back, take a break, and think about it for a while... Or seek help from other experienced people or professionals to overcome the problem... Do it right and don't take any unnecessary chances that may compromise the integrity of your build...
If you don't fix the problem correctly, it may come back to haunt you and cost even more time and money than if you took the time to think about it and research it to fix the problem correctly...
This has been a public service announcement from krazykuda....
*************************************************************************
In my three decades of building engines, I have used Mancini Racing and Summit as my main sources for parts... I like to cross check the prices on parts that they both carry to get the best deal...
I prefer Mancini over Summit as they started out catering to Mopar and I like to support the guys that support our hobby... Yeah, sometimes they make mistakes, but everybody does once in a while, they have been good to work with me through issues in the past especially since I've been a long time customer...
Mancini Racing:
Maicini Racing home page:
Mancini Racing Mopar Performance Parts - Yahoo Top Service Award Winner!
Mancini Racing A engine home page:
A - Engine Parts
Summit Racing is also a good source and has treated me very well... I ordered some Rhoades lifters from them to put in my "home stock" and three years later I found out that they sent me lifters for a Chevy instead of a Mopar and they exchanged all three sets for me with no hassles...
Summit Racing home page:
Fast Free Standard Shipping on Orders Over $99.00 at Summit Racing
I've also heard good things about Jeggs, but have never used them...
JEGS High Performance Parts | Aftermarket Auto Parts & Accessories
*************************************************************************
References/Brief Engine History:
Now before you start building you need some good references... I have found the factory service manuals to be a valuable source of information, who else knows more about these than the people who made them???
However I would like to point out that there was an error in some of the early service manuals where they called out the wrong torque spec for the rocker arm bolts which will overstretch or even cause them to break, so be aware of that... The correct torque for the rocker arm bolts is 200 in * lbs (inch pounds)...
There is a great site to download service manuals and some other great information that is run by a fellow FABO member at Mymopar.com...
MyMopar home page:
MyMopar - Mopar Forums & Information
My Mopar reference index:
MyMopar - Mopar Forums & Information - MyMopar Tools/Reference
Here's the link for them to download copies of the factory service manuals... If they don't have the specific year one for your car, find one close/comparable and use that one... I prefer to use the 68 - 71 manuals for most of my information... Since 71 was the year of my first Mopar and also was the first year for the 360, that is a great one for references to engine specs...
Here's the link for free downloads of service manuals:
MyMopar - Mopar Forums & Information - Service Manuals
I'm also partial to the 68 service manual as that's my favorite year for the Barracuda and the first year of the 340... My favorite A-body Mopar is the 68 Barracuda fastback 340 Formula S...
273's were made from 64 - 69... 64 - 67 had solid lifter camshafts and adjustable rocker arms, where the 68 & 69 273's had the standard hydraulic camshafts/lifters and rocker arms...
Also the 64 & 65 273's had a unique intake bolt with smaller diameter and different angle than the 66 and later small blocks... If you have a 64 or 65 273 all you have to do is change the heads to 66 and later 273 or 318 heads to be able to run the more available intake manifolds... 66 & 67 273 and 67 318 had closed chamber heads with smaller combustion chambers and are good to run for higher compression... The 68 and later 273/318 had open chamber heads with larger combustion chambers...
The LA 318 started in 67 and ran through 91... The Magnum 318 came out in 92 and ran through 2002.... However, the short block is similar to the LA engine and most of this will apply to those...
The 340 started in 68 and ran through 73... 68 - 71 were the best years with forged cranks, 10.5 compression, and 2.02 intake valves.. 72 the 340 got lower compression and 1.88" intake valves... 73 was the same as 72, but with a cast iron crank...
The 360 started in 71 and the LA 360 ran up to 91, then the Magnum 360 was made from 92 - 2002...
The 88 - 91 318 and 360 had the roller cam and also is compatible with the LA intakes and exhaust parts, so there are many choices of intakes to fit those engines, where the magnum series does not have as many intake choices as the LA versions... These blocks are nice to build an LA engine with a roller cam...
*************************************************************************
Oil Galley Plug Verification:
The first step after getting the block back from the machine shop, or if you did your own work as described in articles 1 - 3, is to verify the oil galley plugs are all in... My first small block (a 71 340) the machine shop left out two oil galley plugs and it had too low of oil pressure especially after warming up... It took me 4 times to pull the engine and tear into it to find the problem after some good advice from a fellow Mopar guy (shout out to Ken Neve)... So now I have learned where all the oil galley plugs are and verify they are all in before I assemble any block....
The first two oil galley plugs that I check are the ones that I had problems with on my first build... They are in the front of the block near the camshaft and are hidden by the camshaft thrust plate when the engine is assembled... I've had people say that they are not needed as the camshaft thrust plate covers them, however in my experience they are necessary to get proper oil pressure...
Here they are in the red circles...
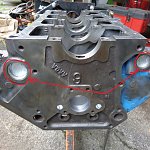
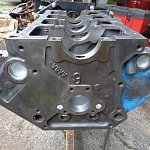
Now the next ones to check for are the three in the back of the block...
Here they are in the red circles...
Now the next one to verify is the one on the driver's side lifter galley... You have to look down through the distributor hole to see it... To remove or install it, you need to have the one on the outside of the block removed to get access...
Here it is in the circle
While you are there, you want to verify that the distributor/oil pump drive gear brass bushing is there also...
Now you want to check for the one that goes behind the oil filter base....
Here it is in the red circle...
Now the last one you want to verify is the one that goes under the rear main bearing cap...
Here it is in the red circle...
From another angle...
If it was removed, it should be installed to 2 1/4' depth...
Now you want to check that the rear camshaft plug is in...
Here it is in the red circle...
Now that you have verified all the oil galley plugs are in so you get proper oil feed and pressure, now check to make sure all of the water jacket plugs are in...
*************************************************************************
Freeze and Drain Plugs:
Start with the left/driver's side (the one without the oil filter)...
Here they are in the red circles...
Now for the right/passenger side plugs (the side with the oil filter)...
Now check the ones in the rear of the block...
Now the two in the front of the block...
Now check for the coolant drain plugs on the side of the block.... Here's the driver's side...
Now the one on the passenger side...
You can also substitute petcocks for the drain plugs if you are going to pull the engine often, like in a race car and you have the room for them to fit...
*************************************************************************
Probe all oil holes:
Now that you've verified all of the oil galley and water jacket plugs, you want to probe the oil holes in the main bearing bores and the ones for the head oiling...
Start with the center holes in all 5 mains...
Put a straightened wire coat hanger through each hole and look for it to come out the camshaft bore... This will make sure that the cam bearings are properly installed and there are no blockages in the holes... These holes feed the oil to the cam journals... Put the wire in gently so you don't nick/scratch the cam bearings...
Here's the front of the block to cam bearing #1...
Here you can see the tip of the probe sticking out to the camshaft bore...
Now do the next one one for cam bearing #2...
Then cam bearing #3 which is the thrust bearing...
Now do cam bearing #4....
Now for the rear main bearing....
Now is a good time to check the side holes in the main bearings which feed oil to the camshaft galley... Start with the front main and stick the probe in the hole and mark the depth with your fingers or a marker... You can see that the front main has two side holes at an angle for each lifter galley, probe both to make sure they go through to the lifter galley...
Start with the one side...
Then mark with your fingers and check the depth, it should go to the bottom of the lifter galley hole that you can see here when compared to the outside of the block to the lifter galley plug...
Now using that mark, check the 3 middle main bearing side holes...
Then when you are done with those, check the other side of the front main which feeds the other side lifter galley with oil...
Now turn the block over and check the oil feed holes for the heads and rockers that feed from the #2 and #4 cam bearings...
The left side head is fed from #2 cam bearing...
Look in the #2 cam bearing hole to verify that the probe goes all the way through...
Now check the right side head/rocker oil hole that feeds from #4 cam bearing...
Ok now you have verified that all of the oil feed holes in the block are clear and not blocked... This will ensure that the oil will get through the engine properly...
It's better to catch any issues now and get them corrected, than after the engine is installed and you start it for the first time to discover the problem... It's easier to fix now, either fix it yourself or take it back to the machine shop to correct their mistake... Catching it now will save you the trouble of pulling the engine and tearing it down to fix the problem which will cost a set of gaskets to repair...
*************************************************************************
Congratulations, your block is now ready to assemble... Now move onto section 5 for crank install....
How to Rebuild a Small Block Part 5: Crankshaft Install