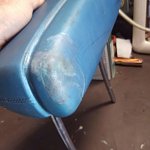
I recently added bucket seats to my 69 Swinger restoration. I bought a pair of used 68 buckets with headrests. My interior is white and the headrests blue. Problem: I need a color change and restoration. So here's what I did.
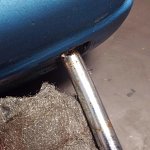
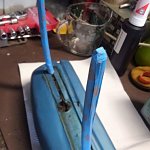
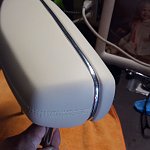
1) Since mine were in pretty good shape all I had to do was a color change. Very carefully remove the chrome band. A blow dryer or heat gun can be useful. DO NOT APPLY MUCH HEAT JUST ENOUGH TO LOOSEN THE OLD GLUE. DON'T PULL ON THEM AS THE VINYL WILL TEAR ESPECIALLY IF ITS HOT. You may need a very sharp razor blade to help loosen in troublesome areas. I had to do that at one end.
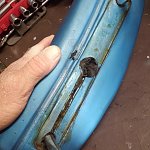
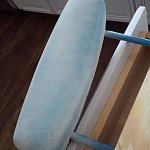
2) Once the chrome is off remove the black gasket on the bottom. I salvaged mine as old as they were.
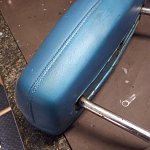
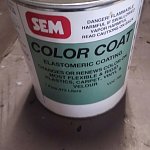
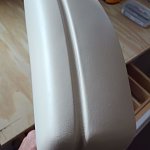
3) The first seven pics are of the SEM paint material and the before pics of the headrests. I took a door panel to the paint shop and they matched it perfectly.
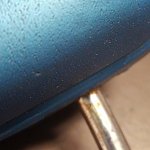
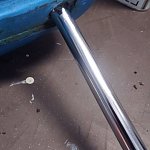
4) Clean the chrome shafts with a #0000 steel wool or appropriate cleaner.
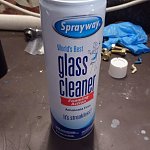
5) Wear clean rubber gloves and use Sprayway or equivalent glass cleaner to remove all dirt from headrest. You can also scrub them with water and dish washing soap, but the Sprayway was way easier. I did this several times and used my wifes toothbrush!
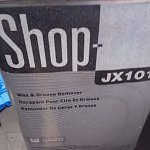
6) Next step is to clean, clean, clean with wax and grease remover. Dont touch them with your bare hands or you will introduce body film grease. A real problem for paint.
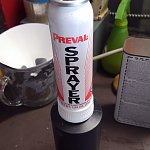
7) For small jobs I love the Prevail Sprayer, available from Home Depot and most paint and body shop supply houses. They come with a smaller glass jar which holds more than enough paint for this job.
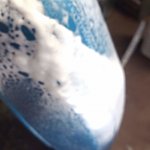
8) The SEM does not require any thinning or catalyst so its pour and shoot. I used about a half jar. I started by spraying a very light tack coat. Also dont forget to use an adhesion promoter for plastic or vinyl before spraying. SEM makes that in a spray can.
9) The stuff drys fast so I followed by a little heavier second and third coat. DON'T TOUCH IT TO SEE IF ITS DRY EXCEPT ON THE BOTTOM WHERE THE GASKET GOES. Don't get in a hurry!
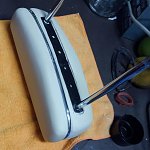
10) I let mine dry overnight before handling them. Then remove the tape from the chrome shafts.
11) My chrome adhesive bands came from Legendary when I ordered the interior. VERY IMPORTANT: THEY USE 3M TAPE. DONT USE ANY OTHER CHROME STRIPS UNLESS IT HAS 3M. There is also 3/8 and 1/4". Mine were 1/4". Not sure where the 3/8 is used. I have seen this stuff in auto parts stores but I am not sure of the quality.
12) Start in the middle at the bottom center and peel the adhesive cover off as you place the new chrome in the groove. Make sure you get it centered.
13) My Legendary instructions said to use super glue on the ends and corners, but I am waiting to see if they lift. So far so good and its been about a month in Texas heat. Super glue on the ends OK, but trying to apply on the corners I would use extreme caution!.
14) I reused my black gaskets and glued them down with 3M weatherstrip adhesive. Spray it on the gasket then apply.
Presto, brand new looking headrests! Feel free to IM me if you have any questions or if you like I can do it for you.
Well its been a year since I have done these and they still look like the day I finished them. IM me if you have any questions. Good luck.
1) Since mine were in pretty good shape all I had to do was a color change. Very carefully remove the chrome band. A blow dryer or heat gun can be useful. DO NOT APPLY MUCH HEAT JUST ENOUGH TO LOOSEN THE OLD GLUE. DON'T PULL ON THEM AS THE VINYL WILL TEAR ESPECIALLY IF ITS HOT. You may need a very sharp razor blade to help loosen in troublesome areas. I had to do that at one end.
2) Once the chrome is off remove the black gasket on the bottom. I salvaged mine as old as they were.
3) The first seven pics are of the SEM paint material and the before pics of the headrests. I took a door panel to the paint shop and they matched it perfectly.
4) Clean the chrome shafts with a #0000 steel wool or appropriate cleaner.
5) Wear clean rubber gloves and use Sprayway or equivalent glass cleaner to remove all dirt from headrest. You can also scrub them with water and dish washing soap, but the Sprayway was way easier. I did this several times and used my wifes toothbrush!
6) Next step is to clean, clean, clean with wax and grease remover. Dont touch them with your bare hands or you will introduce body film grease. A real problem for paint.
7) For small jobs I love the Prevail Sprayer, available from Home Depot and most paint and body shop supply houses. They come with a smaller glass jar which holds more than enough paint for this job.
8) The SEM does not require any thinning or catalyst so its pour and shoot. I used about a half jar. I started by spraying a very light tack coat. Also dont forget to use an adhesion promoter for plastic or vinyl before spraying. SEM makes that in a spray can.
9) The stuff drys fast so I followed by a little heavier second and third coat. DON'T TOUCH IT TO SEE IF ITS DRY EXCEPT ON THE BOTTOM WHERE THE GASKET GOES. Don't get in a hurry!
10) I let mine dry overnight before handling them. Then remove the tape from the chrome shafts.
11) My chrome adhesive bands came from Legendary when I ordered the interior. VERY IMPORTANT: THEY USE 3M TAPE. DONT USE ANY OTHER CHROME STRIPS UNLESS IT HAS 3M. There is also 3/8 and 1/4". Mine were 1/4". Not sure where the 3/8 is used. I have seen this stuff in auto parts stores but I am not sure of the quality.
12) Start in the middle at the bottom center and peel the adhesive cover off as you place the new chrome in the groove. Make sure you get it centered.
13) My Legendary instructions said to use super glue on the ends and corners, but I am waiting to see if they lift. So far so good and its been about a month in Texas heat. Super glue on the ends OK, but trying to apply on the corners I would use extreme caution!.
14) I reused my black gaskets and glued them down with 3M weatherstrip adhesive. Spray it on the gasket then apply.
Presto, brand new looking headrests! Feel free to IM me if you have any questions or if you like I can do it for you.
Well its been a year since I have done these and they still look like the day I finished them. IM me if you have any questions. Good luck.