You are using an out of date browser. It may not display this or other websites correctly.
You should upgrade or use an alternative browser.
You should upgrade or use an alternative browser.
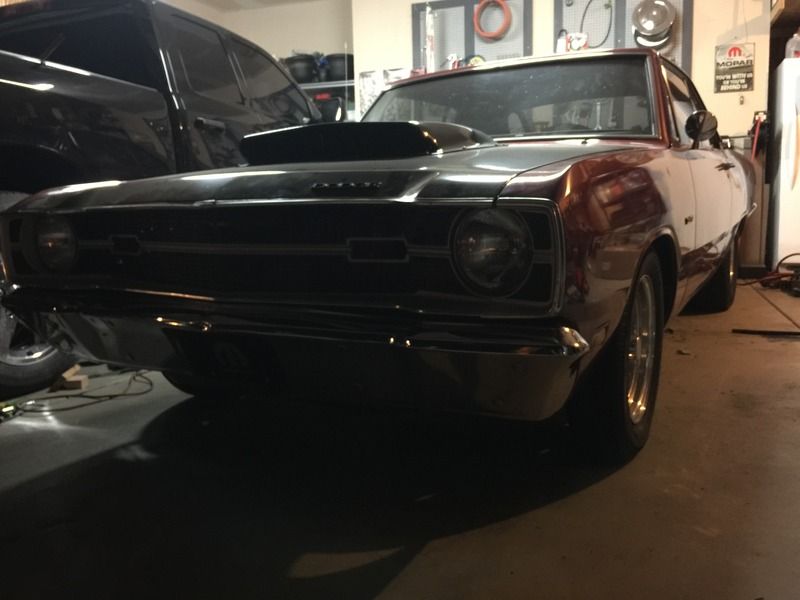
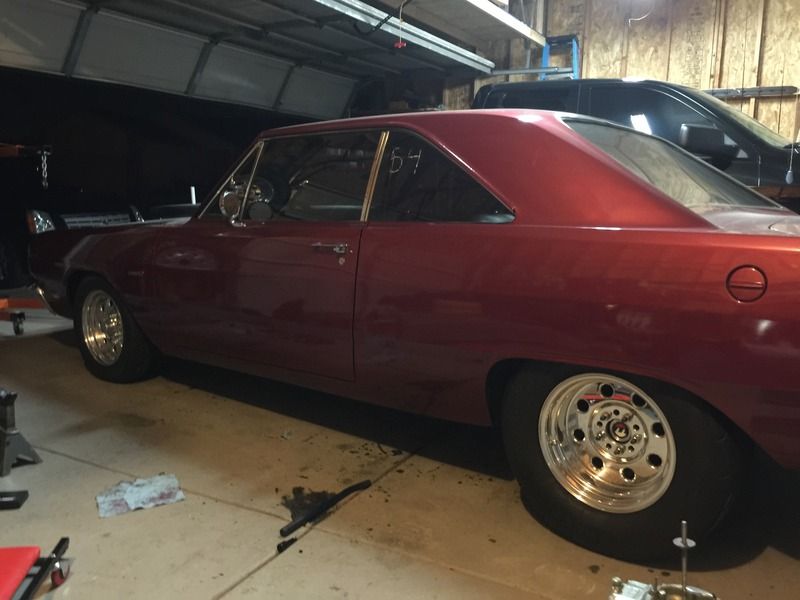
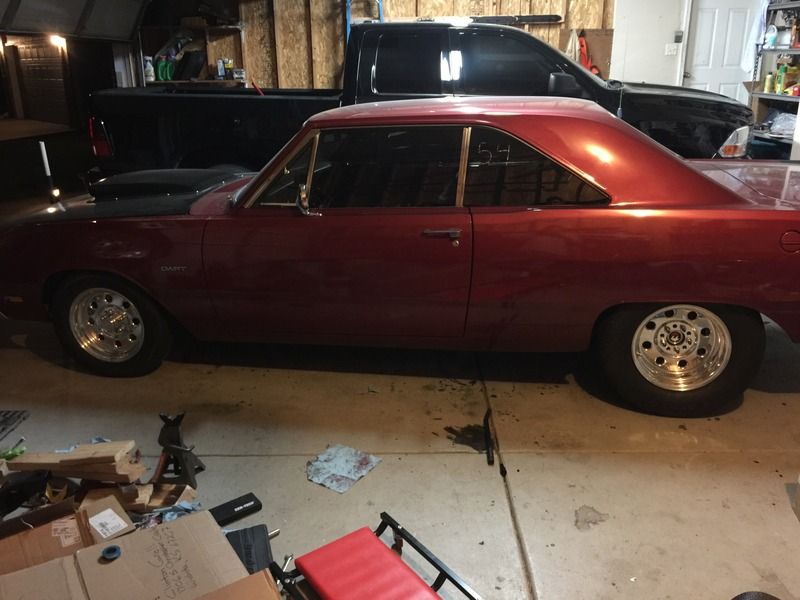
1969 Dart Street/Strip (Re)Build
- Thread starter clinteg
- Start date
-
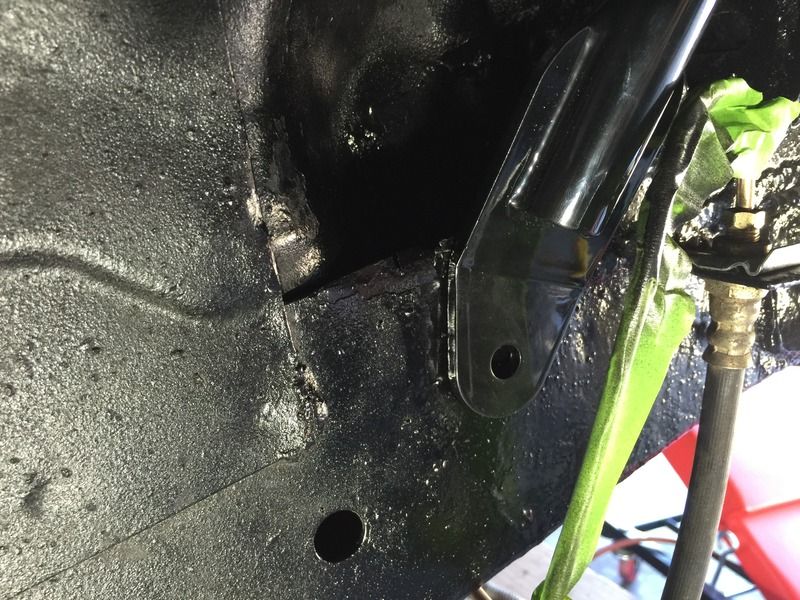
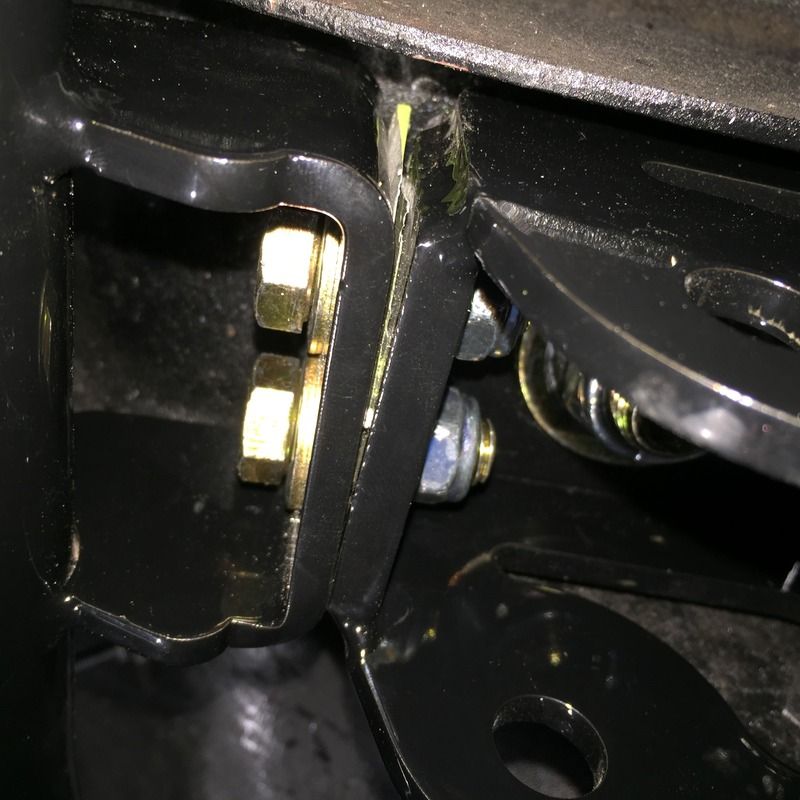
Moving forward. Installing the passenger side, there was a pretty big gap between the frame and hoop.

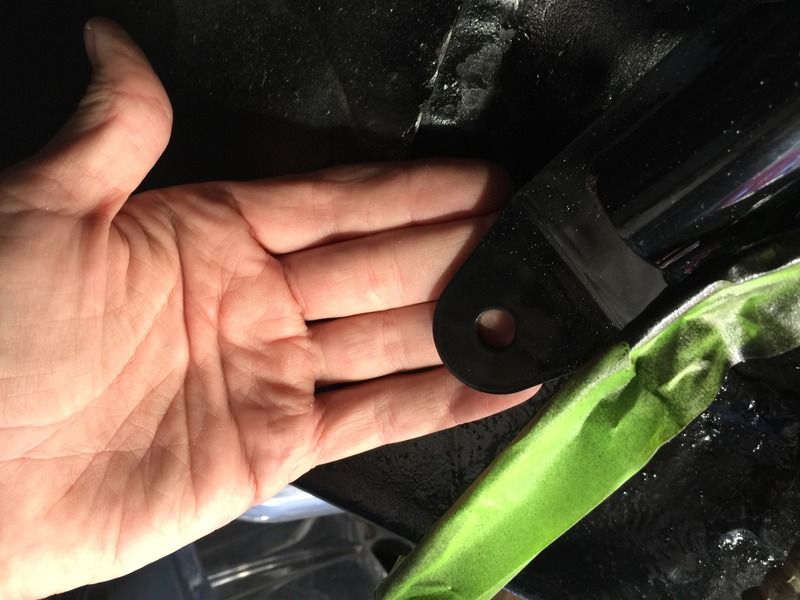
The front side was sitting good to the frame so I made a double tapered filler like so.
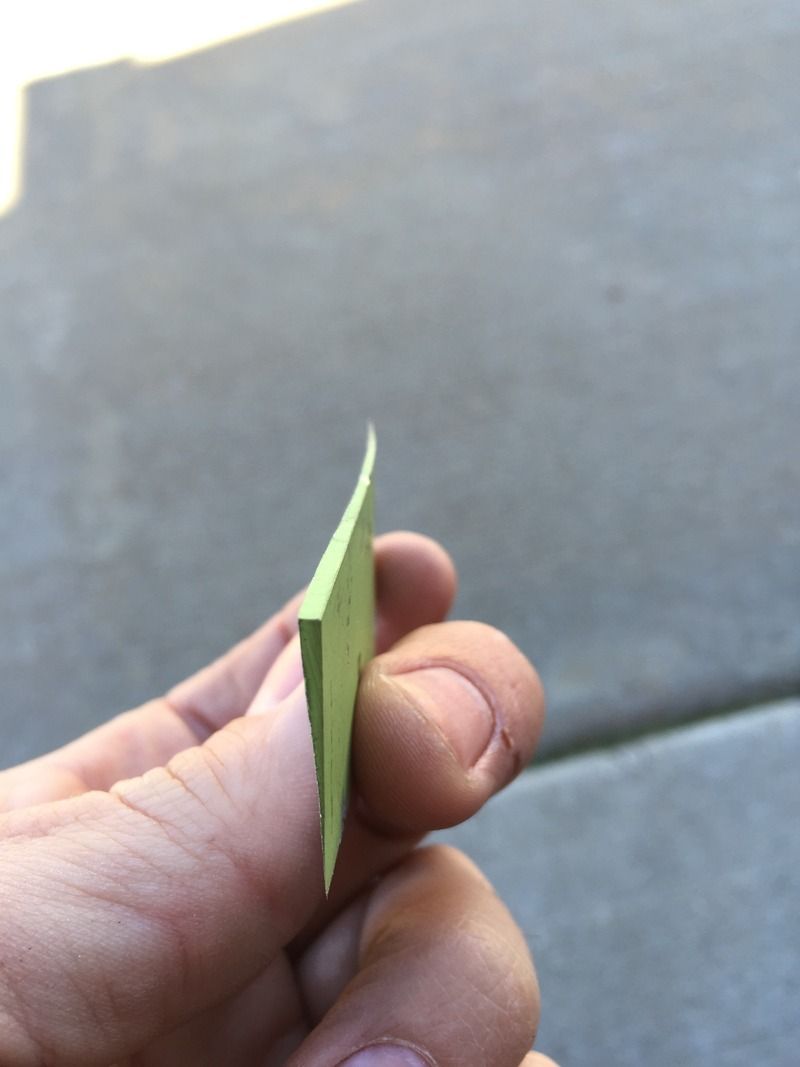
Now the hoop sits really well.
On to cleaning the threads. These parts were dipped so many times that threads were horribly rusted. I first ran a wire brush to clean the loose rust.
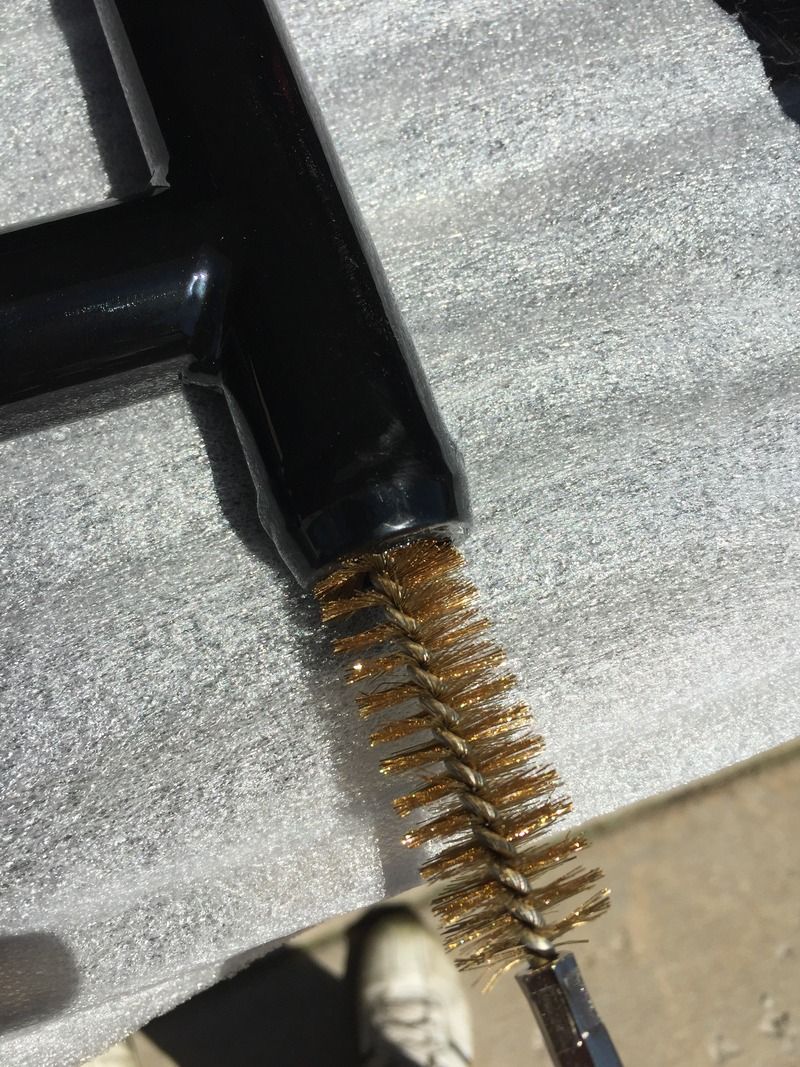
I then ran a tap through the threads. I'm really glad I didn't skip this step. These threads were really really bad. The UCA threads felt like I was tapping new threads. I had to put them in a vice to even clean them.
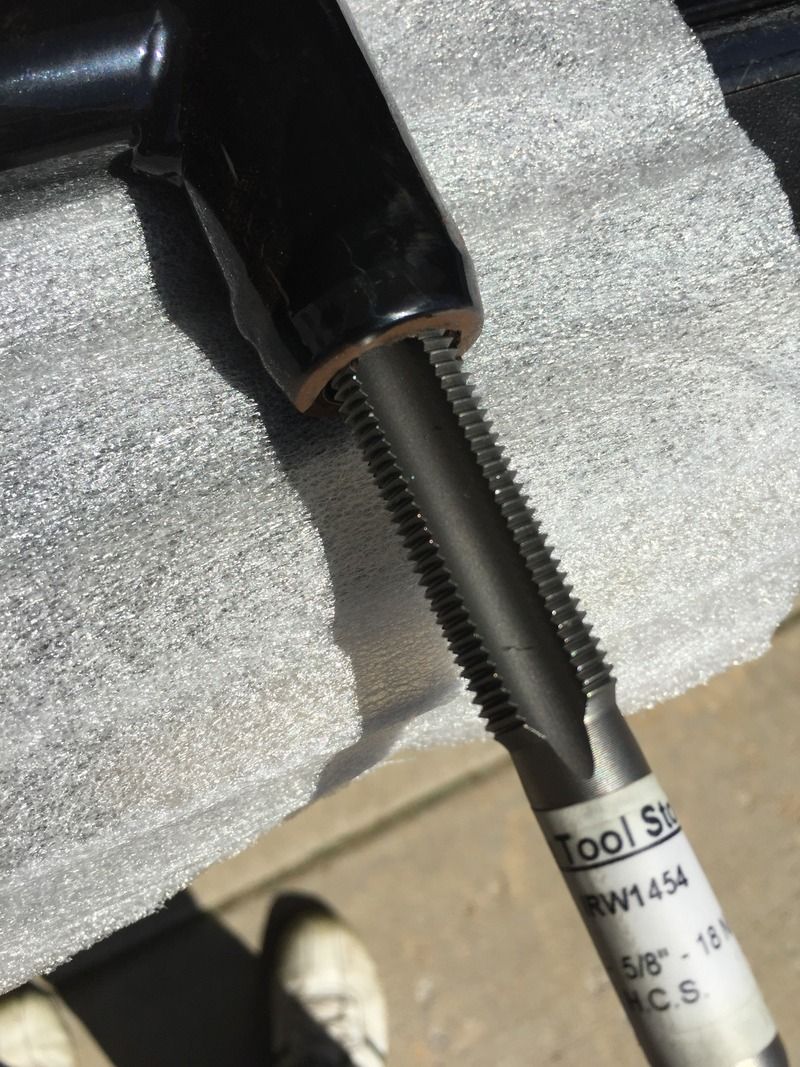
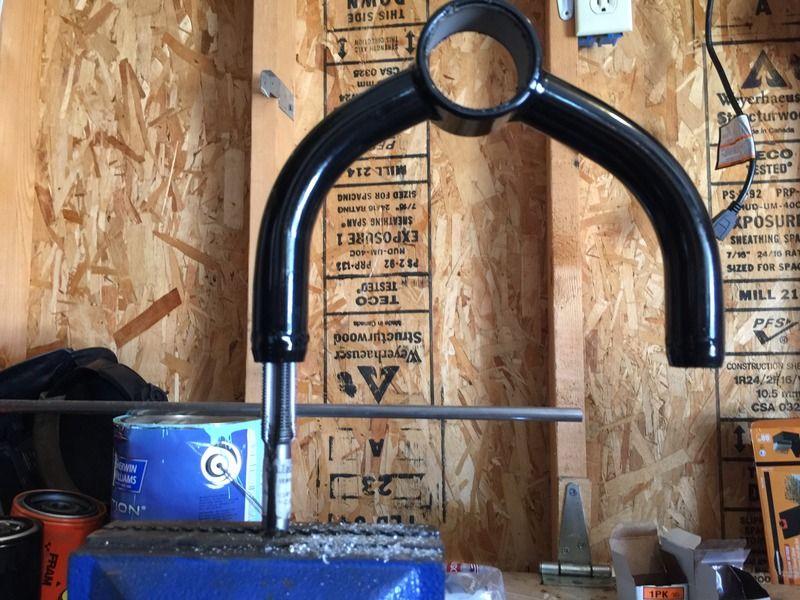
A final cleaning with a new brush wrapped in cloth was done.


The front side was sitting good to the frame so I made a double tapered filler like so.

Now the hoop sits really well.


On to cleaning the threads. These parts were dipped so many times that threads were horribly rusted. I first ran a wire brush to clean the loose rust.

I then ran a tap through the threads. I'm really glad I didn't skip this step. These threads were really really bad. The UCA threads felt like I was tapping new threads. I had to put them in a vice to even clean them.


A final cleaning with a new brush wrapped in cloth was done.


Too bad. The rack just won't fit this pan.
Then I ran into another issue. The engine needed moved about 1/8 inch forward. The motor mounts wouldn't align at all.
So I tried moving the engine and it wouldn't budge, even with the trans bolts loose. Which by the way, one of the trans bolts was about to fall out! So I had a busted motor mount AND lose transmission bolts! Jeez this thing was about to fall apart! I had to resort to hoisting the engine to move it around easily.
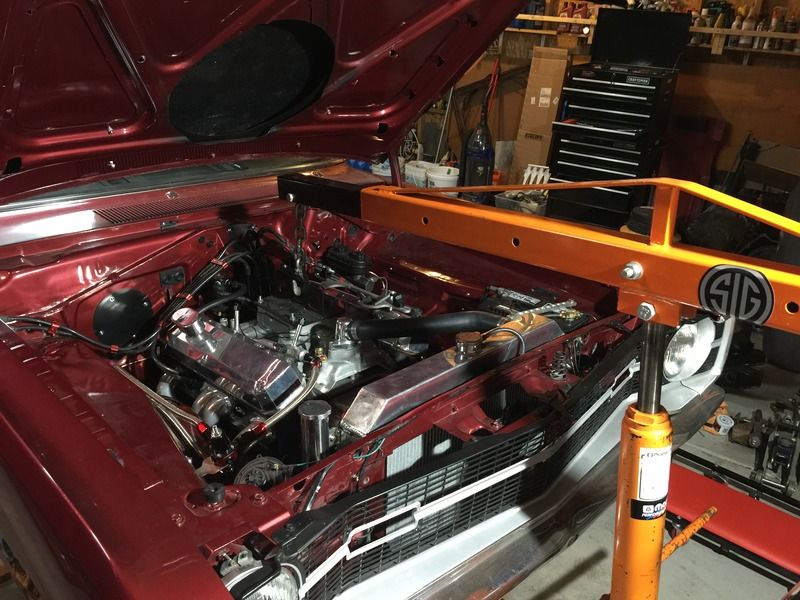
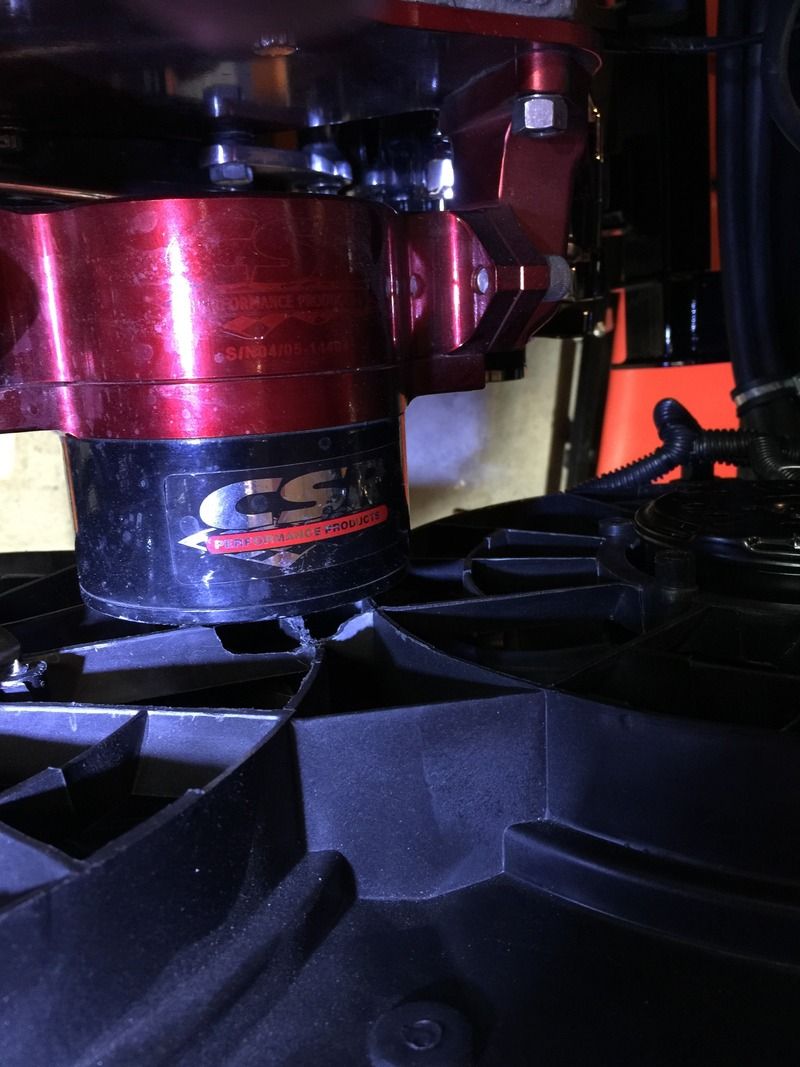
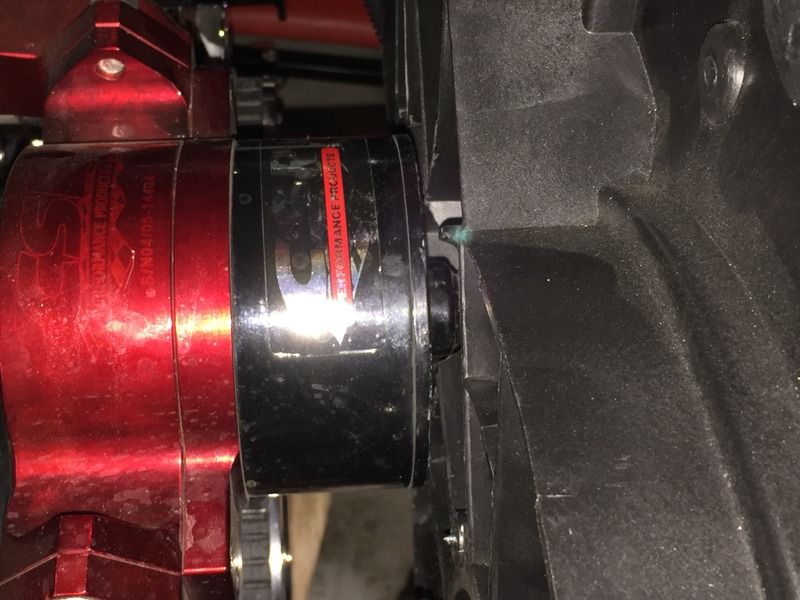
Moving the engine forward created another problem. The water pump was now really into the fan shroud. So with little to no space, I had to grind out the shroud for clearance.


Then I ran into another issue. The engine needed moved about 1/8 inch forward. The motor mounts wouldn't align at all.


So I tried moving the engine and it wouldn't budge, even with the trans bolts loose. Which by the way, one of the trans bolts was about to fall out! So I had a busted motor mount AND lose transmission bolts! Jeez this thing was about to fall apart! I had to resort to hoisting the engine to move it around easily.

Moving the engine forward created another problem. The water pump was now really into the fan shroud. So with little to no space, I had to grind out the shroud for clearance.


younggun2.0
Well-Known Member
I wonder if you could trim the engine mount insulator sleeves on the backside and put couple washers up front? That would move engine back that 1/8"-3/16"
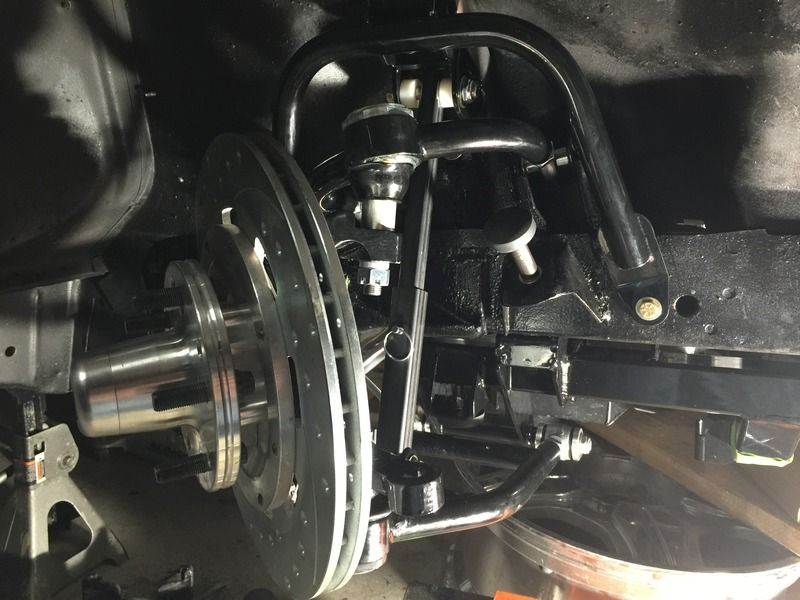
Installed the UCA. Pretty straightforward here except I changed the bushings out with the heims I had on my other control arms.
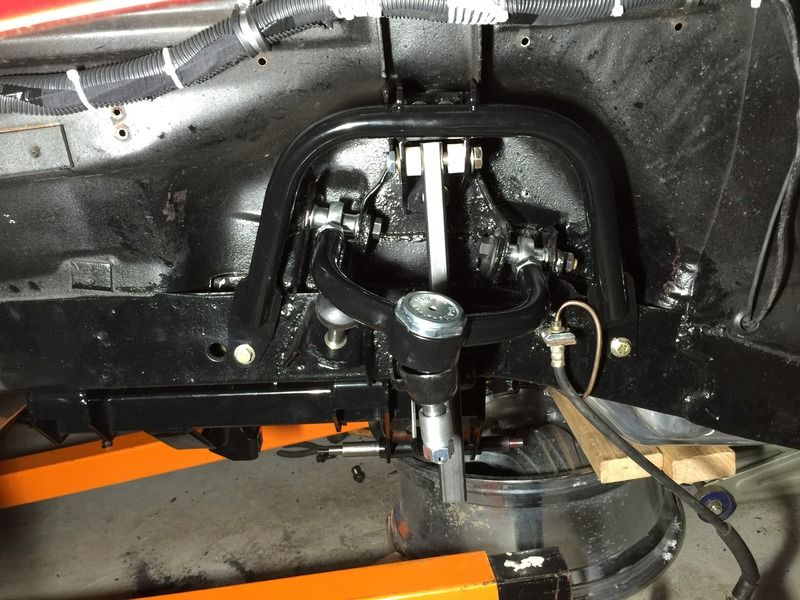
LCA and spindle attached
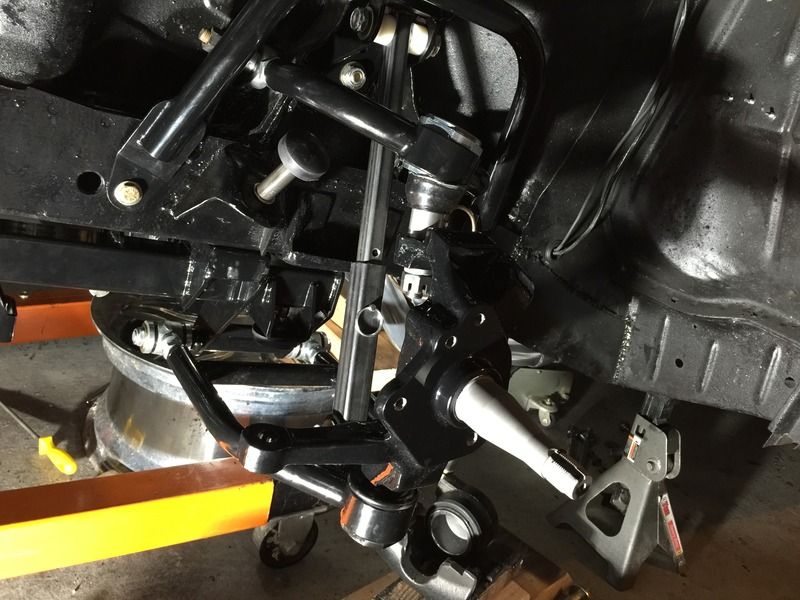
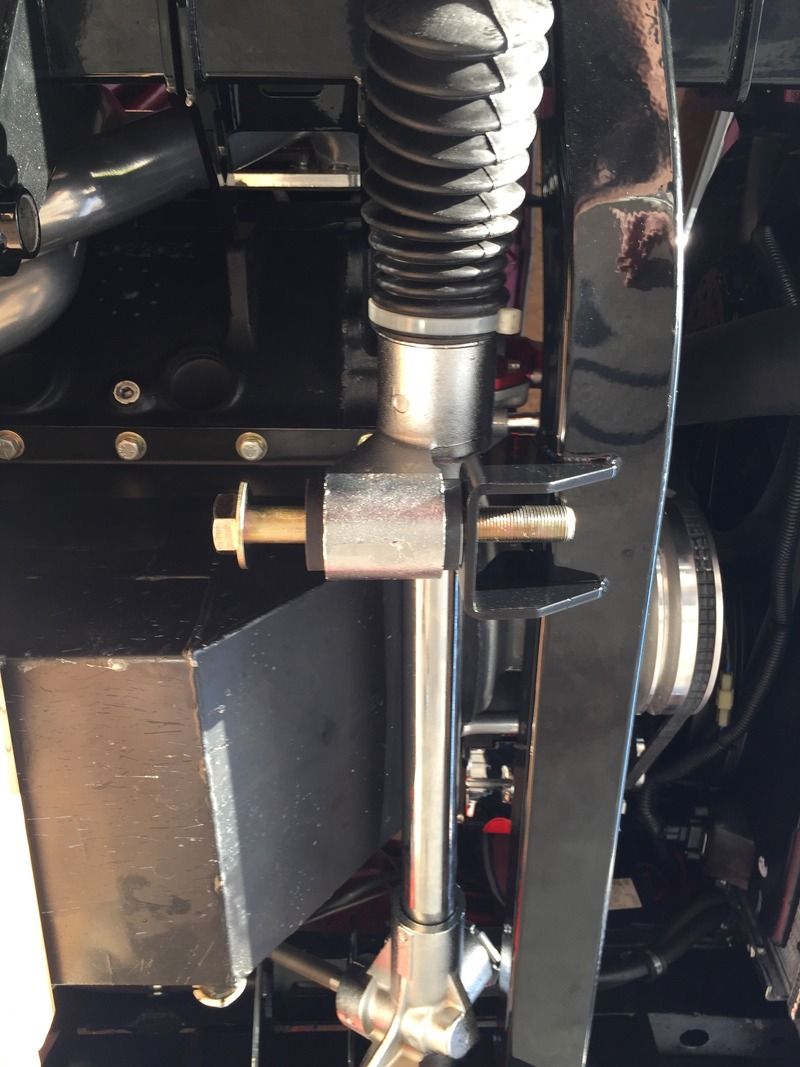
I seem to have an issue here with the dust boot that I have yet to figure out

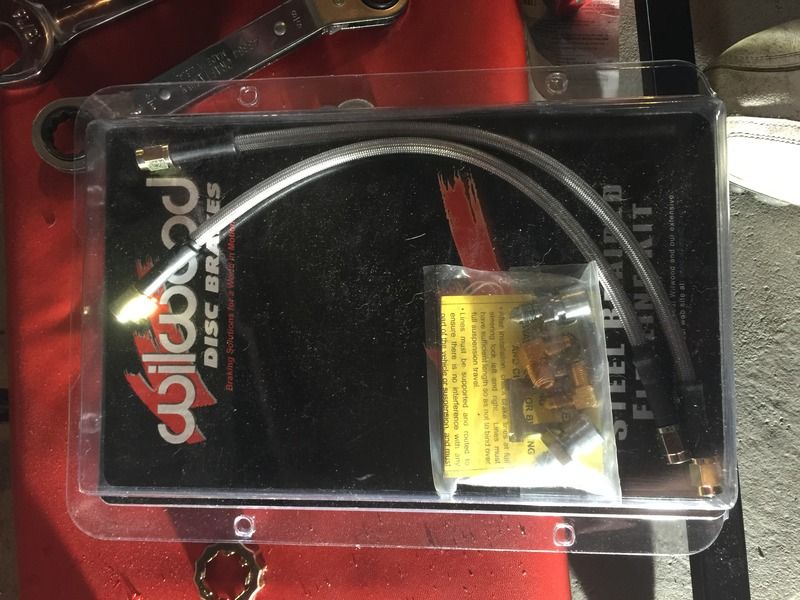
Time to install brakes. I bought a set of 12.19" Wilwoods and picked up this line kit from summit.
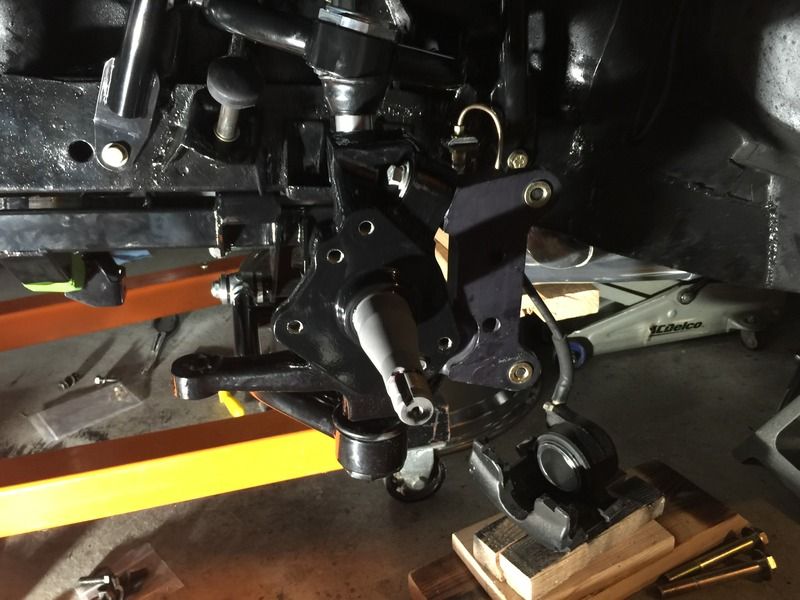
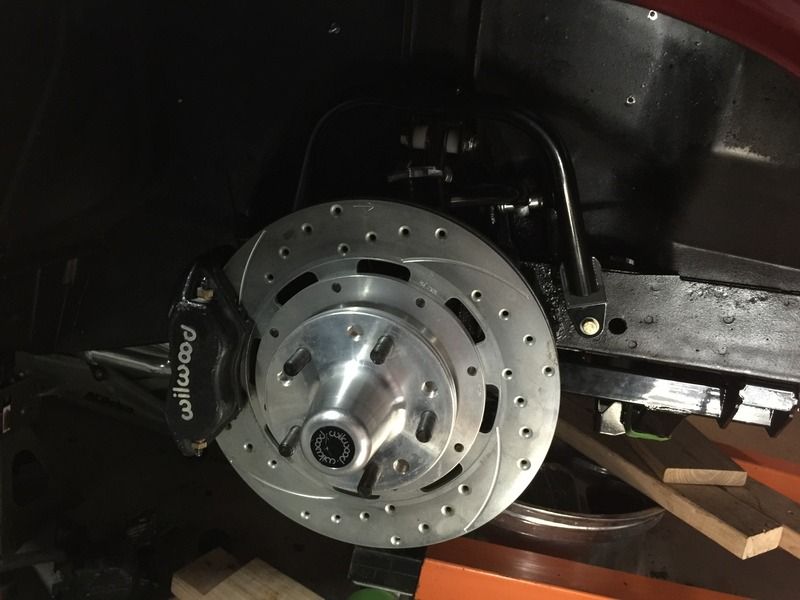
Caliper bracket on
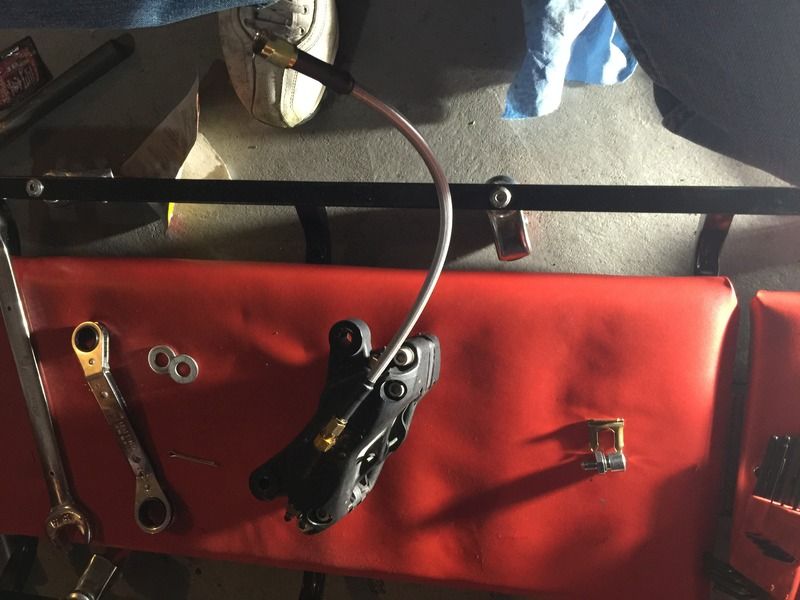
Line attached
Rotor installed. Pretty big rotor on a 15" wheel!

LCA and spindle attached

I seem to have an issue here with the dust boot that I have yet to figure out

Time to install brakes. I bought a set of 12.19" Wilwoods and picked up this line kit from summit.

Caliper bracket on

Line attached

Rotor installed. Pretty big rotor on a 15" wheel!


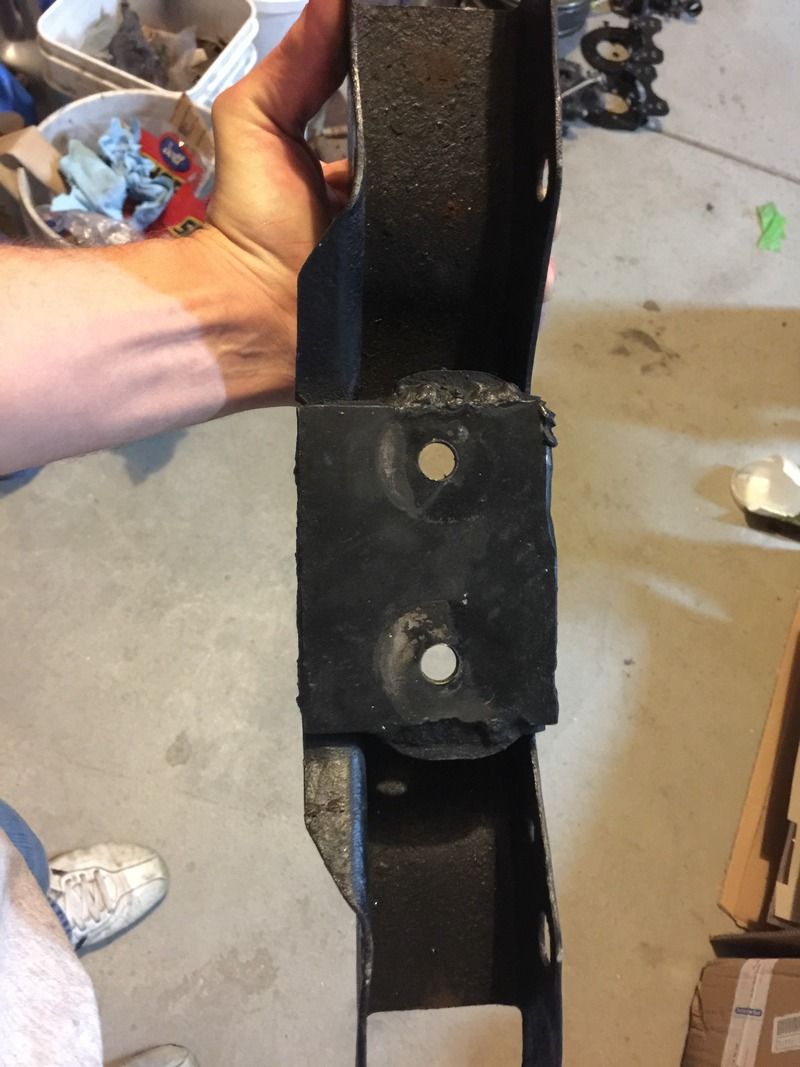
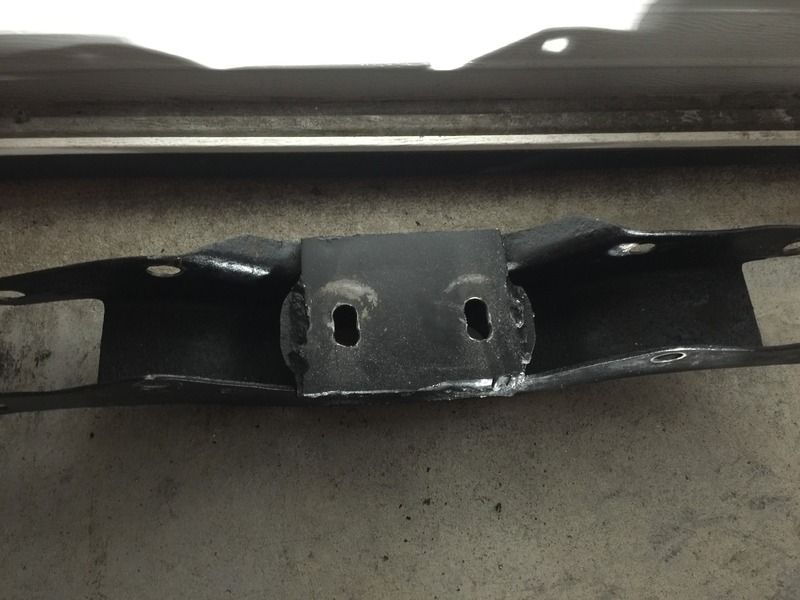
When I went back to install the transmission mount, I found my issue as to why the engine and trans wouldn't move. Previous owner welded a plate to the top of the crossmember and drilled two holes with no slop!. So I had to pull that out and fix it.
Eventually I got it back on the ground. With the 2" drop spindles, this is the highest ride height. Will be using a 12" spring with this setup.
I'll lower the rear another inch or so to level the car out.


Eventually I got it back on the ground. With the 2" drop spindles, this is the highest ride height. Will be using a 12" spring with this setup.


I'll lower the rear another inch or so to level the car out.


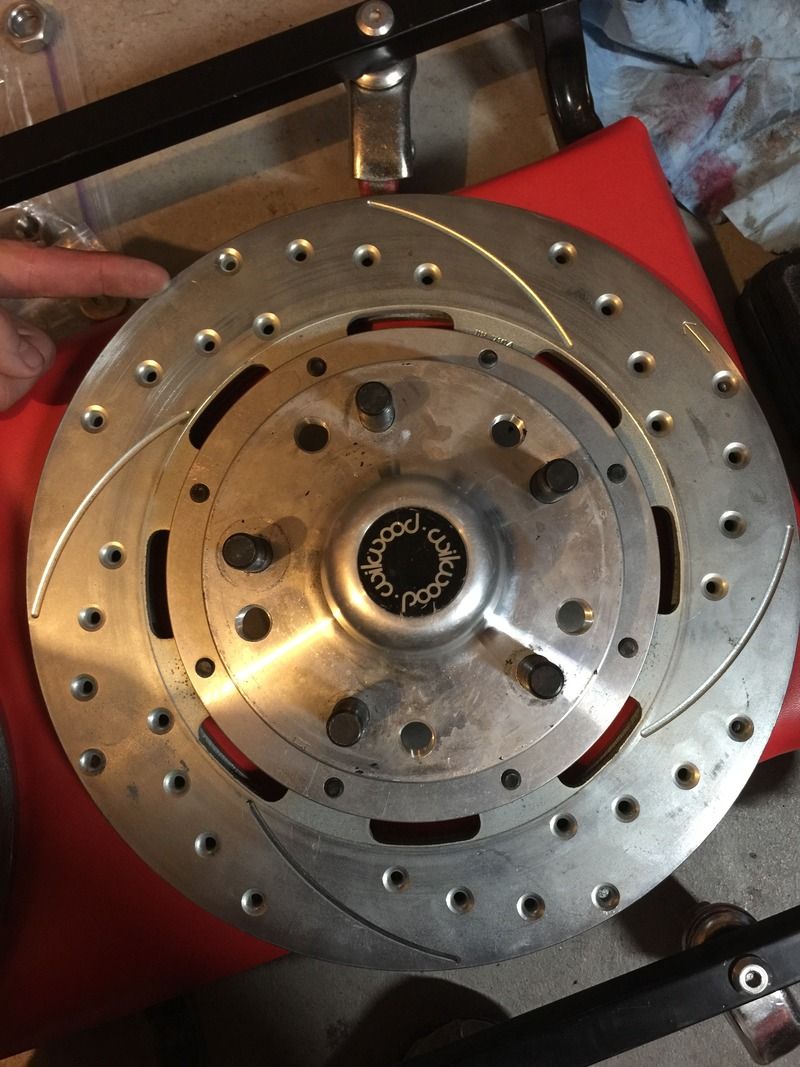
And here's a really unfortunate finding. These Wilwood rotors are warped or bent. I measured .012 runout on one and .010 runout on the other. I called Wilwood and they said that is way excessive. I'm sending them in to get checked out. So this means my car will be down for another 3 weeks probably. You can see in the pic where the pad would scrape one side of the rotor when I would spin it. The hub actually measures out .006 which would project to .012 to the rotor. So I believe the hub is the bad part. Could a guy catch a break???

winstoninwisc
Taint easy livin free,season ticket ona 1wayride
dam aftermarket junk But love the car and the year hope things go smoother I neeed to sell and get a 12 month a year heated shop , this weather has been crazy luv the color
keep pushn on
keep pushn on
wade
Well-Known Member
hey clint, your doing an awesome job on that thing. hey do you have a part number for the willwood break lines? im running the same one and need the flexable lines for my dart
First off, nice car you got going. Looking good
Second, any chance the car may have been repaired after an accident at some point in it's life? Just curious as the amount of fabbing you had to do to get the HDK in there seems excessive to me.
Also, in regards to the inner fender crushing down 3/16ths of an inch, could you have sourced longer bolts and maybe shimmed it to help prevent that? Not sure I like the idea of my inner fender crushing that far.
Dartswinger70
Well-Known Member
I had my fill of body guys, and most of it was other peoples horror stories. it will be ok, its a long road, but in the end your car will be right. Its worth the effort.
dam aftermarket junk But love the car and the year hope things go smoother I neeed to sell and get a 12 month a year heated shop , this weather has been crazy luv the color
keep pushn on
Yeah that was a big disappointment with the Wilwoods. Nothing new to me. Everything I buy ends up being half assed junk it feels like. I'm NOT disappointed with the HDK kit though!
hey clint, your doing an awesome job on that thing. hey do you have a part number for the willwood break lines? im running the same one and need the flexable lines for my dart
Thanks! Line kit is Wil-220-7056
First off, nice car you got going. Looking good
Second, any chance the car may have been repaired after an accident at some point in it's life? Just curious as the amount of fabbing you had to do to get the HDK in there seems excessive to me.
Also, in regards to the inner fender crushing down 3/16ths of an inch, could you have sourced longer bolts and maybe shimmed it to help prevent that? Not sure I like the idea of my inner fender crushing that far.
Anything is possible. I had to do a lot of frame and UCA mount repair in the front a couple years ago so things could have gotten tweaked when I cut the top of the frame out. I also had the extra plate on the shock tower support behind that corner fitting which pushed it out. That's why the passenger side hoop gap was so bad. The only amount of fabbing I actually had to do were the shims. And keep in mind, I'm really anal about little stuff like that. I don't like to put any preload into bolts. Working as an Aircraft Engineer has made me more aware of things like this. Most people wouldn't even think twice about it, put the bolts in and go. It probably would be fine.
As I mentioned earlier, a longer bushing would prevent the inner fender from pulling in. Or you could try some washers between the fender and shock tower support. I'm not sure where you got that the fender caved in 3/16ths but I don't believe it was near that much. I don't have the straightest car out there and Denny probably made the kit based on a good clean straight car. My inner fenders have bondo in them and are wavy so it's not really ideal to use it as a good reference. Pretty sure that's why the paint cracked so easily. I'm working with a nice kit and putting it into a car that has questionable bodywork and a lot of metal repair. Check out YoungGun2.0's install. He started with a good car and his install went really smooth. That's the difference when you have a straight car and a car that's questionably straight. I can't knock the HDK kit. It's the nicest stuff I've ordered for this car, period.
I had my fill of body guys, and most of it was other peoples horror stories. it will be ok, its a long road, but in the end your car will be right. Its worth the effort.
I feel like I already arrived at end of the road when I got the car together and was able to take it to the track, local shows, etc. It was a long road to get to that point and it felt like I was driving through the ditch the whole time to get there! Stuff I'm doing now is just going above and beyond to make it nicer to drive. I hate fixing other people's "mods" but like you said, it will be right when I fix it.
Yeah that was a big disappointment with the Wilwoods. Nothing new to me. Everything I buy ends up being half assed junk it feels like. I'm NOT disappointed with the HDK kit though!
Thanks! Line kit is Wil-220-7056
Anything is possible. I had to do a lot of frame and UCA mount repair in the front a couple years ago so things could have gotten tweaked when I cut the top of the frame out. I also had the extra plate on the shock tower support behind that corner fitting which pushed it out. That's why the passenger side hoop gap was so bad. The only amount of fabbing I actually had to do were the shims. And keep in mind, I'm really anal about little stuff like that. I don't like to put any preload into bolts. Working as an Aircraft Engineer has made me more aware of things like this. Most people wouldn't even think twice about it, put the bolts in and go. It probably would be fine.
As I mentioned earlier, a longer bushing would prevent the inner fender from pulling in. Or you could try some washers between the fender and shock tower support. I'm not sure where you got that the fender caved in 3/16ths but I don't believe it was near that much. I don't have the straightest car out there and Denny probably made the kit based on a good clean straight car. My inner fenders have bondo in them and are wavy so it's not really ideal to use it as a good reference. Pretty sure that's why the paint cracked so easily. I'm working with a nice kit and putting it into a car that has questionable bodywork and a lot of metal repair. Check out YoungGun2.0's install. He started with a good car and his install went really smooth. That's the difference when you have a straight car and a car that's questionably straight. I can't knock the HDK kit. It's the nicest stuff I've ordered for this car, period.
I feel like I already arrived at end of the road when I got the car together and was able to take it to the track, local shows, etc. It was a long road to get to that point and it felt like I was driving through the ditch the whole time to get there! Stuff I'm doing now is just going above and beyond to make it nicer to drive. I hate fixing other people's "mods" but like you said, it will be right when I fix it.
I got the 3/16ths crush from this post.
i did a dry fit on mine before powder coat. then when it was all painted it was just a simple final assembly. your doing a great job and my inner fender did crush a bit too. it was only about 3/16" but it did move.
For all the repair work made to your factory tower.....you are fortunate. I remember we discussed mods to that shock mount before you even ordered.......glad that was not needed.
I did a Hemi install where the right tower had been hammered for valve cover clearance. (The HDK does not require that modification). Regardless , a small section of the rear of the HDK upper shock mount had to be milled off to get a solid fit.
Of the cars I have personally installed HDKs in....over 25....I have never noticed even ONE that the sheet metal was pushed away significantly from the factory upper shock mount. One of the functions of the HDK upper shock mount is to strengthen /reinforce the factory shock mount. The sheet metal inner fender has NO structual support whatsoever.....it is just there.
It is hot roddin....Enjoy the ride.
Of the cars I have personally installed HDKs in....over 25....I have never noticed even ONE that the sheet metal was pushed away significantly from the factory upper shock mount.
John's car had no modifications as mine did but yet still he had the same thing happen. Are these unique situatiions?
Would be easy for anyone to go look at their shock tower support and look through the hole and see if there's a gap between the support and inner fender. If those two parts aren't COMPLETELY mated together, there's going to be some crush there. Regardless it doesn't bother me all that much. I'm looking at what I'm getting out of the kit in the end.
It would only bother me if the car was freshly painted,as crushing it would mess up the paint. Otherwise, it could be worked around. Anyway, enjoy your kit
just so we are both on the same page...you are referring to the lower mount hole in the upper shock mount?
sometimes, it is necessary to remove undercoating, road grime, etc out of that 3/4 hole to get the spacer bushing to seat. .....I always used a small grinder bit with a flat face because the sheet metal was against the upper shock mount..... never notice any gap. I will have to pay attention to the next few I see. It will not change anything. I want it to snug up tight.
most admiring your build would not even know that bolt head is there and it is hard to see on 90% of them.
It would only bother me if the car was freshly painted,as crushing it would mess up the paint. Otherwise, it could be worked around. Anyway, enjoy your kit
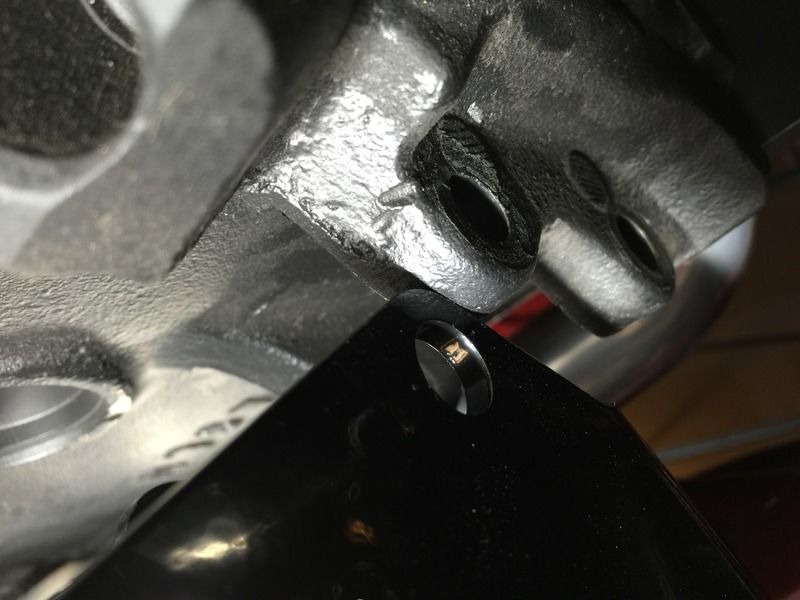
Just to clear the air here because I feel like I'm unintentionally giving Denny's kit a bad rap about the inner fenders. I went to measure how much it actually moved. As best as I can measure, it moved 1/10th of an inch. But that only seemed to be on the driver's side. The passenger side looks just fine and I can't even tell that it actually moved. The paint isn't damaged or anything. Again, the reason the driver's side cracked is because there's bondo underneath and who knows what else and if you know anything about bondo, you know that if it is disturbed, it will crack. YoungGun2.0 has a nice paint job and it didn't bother his paint at all. I took a picture of the passenger side so you can see that there's no issues other than my bolt might be a bit short because I added the extra plate which changed the thickness and caused that.

So please don't think that this will happen to your car if you install his kit. That's just what happened to mine and really only on one side that has questionable bodywork. That's all.
Tracking. Thanks for clearingJust to clear the air here because I feel like I'm unintentionally giving Denny's kit a bad rap about the inner fenders. I went to measure how much it actually moved. As best as I can measure, it moved 1/10th of an inch. But that only seemed to be on the driver's side. The passenger side looks just fine and I can't even tell that it actually moved. The paint isn't damaged or anything. Again, the reason the driver's side cracked is because there's bondo underneath and who knows what else and if you know anything about bondo, you know that if it is disturbed, it will crack. YoungGun2.0 has a nice paint job and it didn't bother his paint at all. I took a picture of the passenger side so you can see that there's no issues other than my bolt might be a bit short because I added the extra plate which changed the thickness and caused that.
So please don't think that this will happen to your car if you install his kit. That's just what happened to mine and really only on one side that has questionable bodywork. That's all.
just so we are both on the same page...you are referring to the lower mount hole in the upper shock mount?
sometimes, it is necessary to remove undercoating, road grime, etc out of that 3/4 hole to get the spacer bushing to seat. .....I always used a small grinder bit with a flat face because the sheet metal was against the upper shock mount..... never notice any gap. I will have to pay attention to the next few I see. It will not change anything. I want it to snug up tight.
most admiring your build would not even know that bolt head is there and it is hard to see on 90% of them.
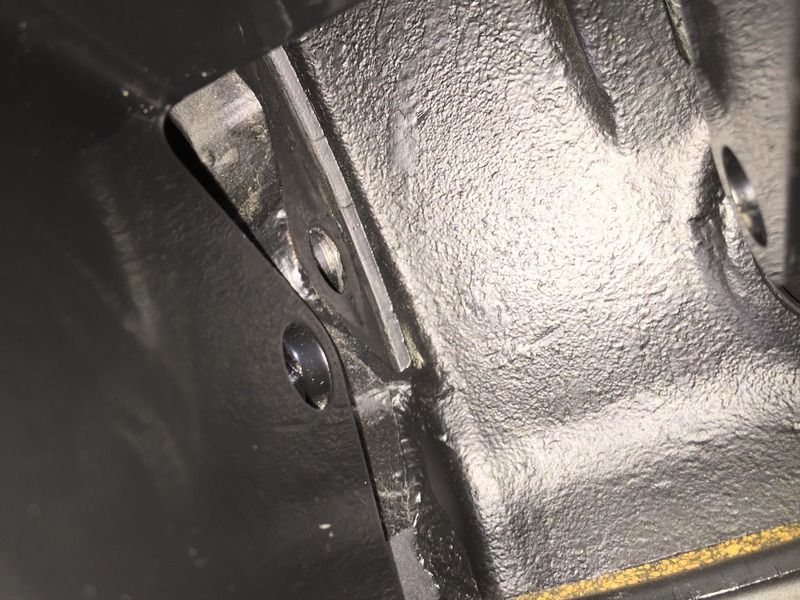
Yes the lower mount hole in the upper shock mount with the bushing. As bad of shape as things were in, I'm kinda surprised it wasn't worse. Go back to page 3 or 4 of this thread and anyone can see how bad the problems were with the rust.
And I totally agree. If someone looking at the car notices that bolt, I'd be really surprised. They're going to be looking at things like the radiator, valve covers, headers, k frame, the nice R&P from Speedway, a mostly wire free engine bay, and I ALWAYS get a comment about how big those damn spark plug wires are and why did I do that. Then they might look underneath to take a peek at the suspension. Maybe. Doubt that bolt will even be in their minds with all the other things to look at.
BTW the front tires are 165/80/15
Thanks Clint....I appreciate it when anything is brought to my attention....only way to try and make things better.
I looked Johns over....looks flat as a pancack to me (post 117)
http://www.forabodiesonly.com/mopar/showthread.php?t=315369&page=5
I looked Johns over....looks flat as a pancack to me (post 117)
http://www.forabodiesonly.com/mopar/showthread.php?t=315369&page=5
junior636
Well-Known Member
What ball joint are you using Clint? They pretty much all do that with aftermarket arms. The threaded cup is taller than the stock mounting point and doesn't let the boot push up and seat the way is supposed to. The QA1 ball joints do have a nice dust boot that actually stays on and seals up, you could try those if it bothers you too much. The QA1's the body is actually longer i believe so it comes past the threaded cups you get with aftermarket arms and allows you to seal the boot.
-


