1965 Dodge Dart Charger

-
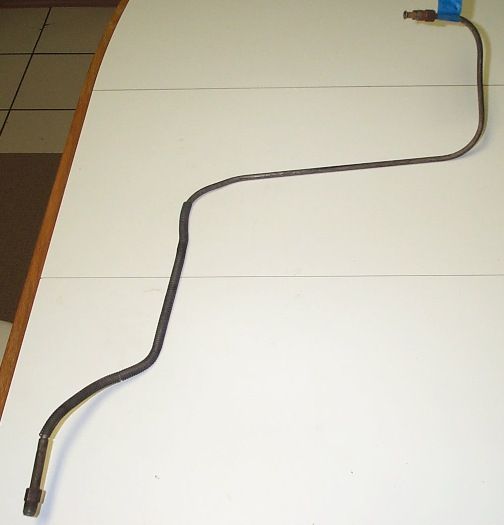
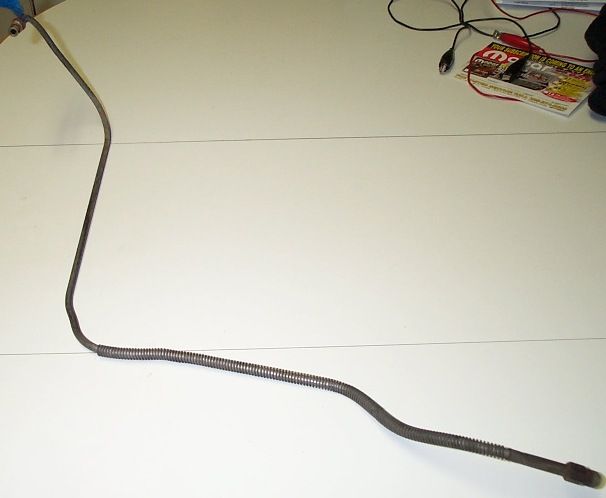
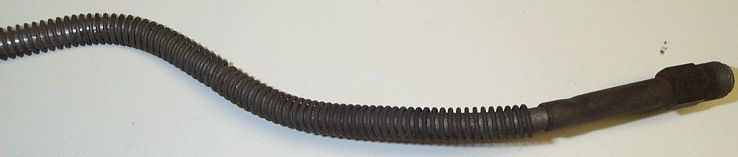
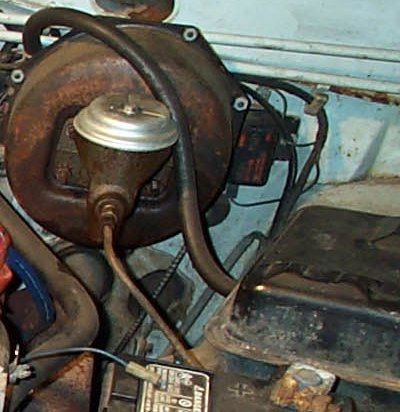
This might help on the brake lines, from 65 Valiant but routing should be the same. Wonderful work you're doing!

brake1_zpscb7d7b3b.jpg


brake4_zps368b46dc.jpg

brake5_zpsa52dc105.jpg

brake4_zps368b46dc.jpg

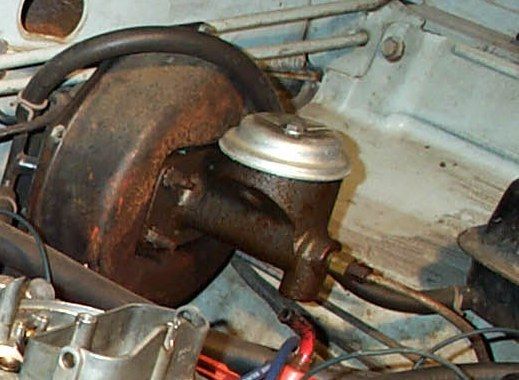
Thanks for the nice comments and thanks for the great picture. Would it be possible to measure the brake line end to end? In that case I can fabricate one myself!

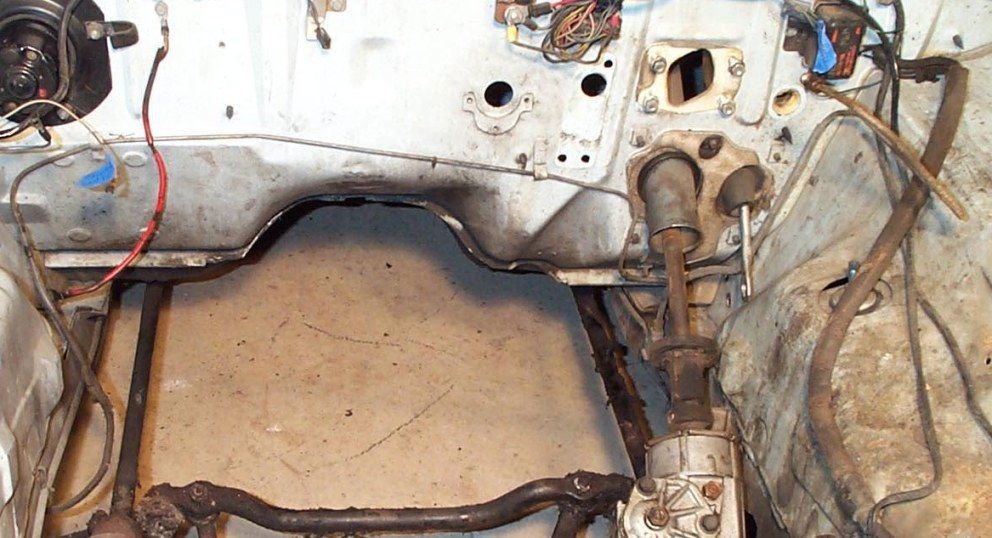
Thanks Rog for the numbers. Will check into that tomorrow.
 
Would it be possible to measure the brake line end to end? In that case I can fabricate one myself!

Assuming you mean the line from the MC to tee: tip-to-tip is 37-1/4" overall. There is also 12-3/4" of coil armor on the bottom plus a metal sleeve at the end. The center-center from the MC tip to the straight piece is 6-3/8". I'll let you do the metric conversion! This is a very complicated line with many odd bends & will be hard to duplicate. Took some pics but hard to see all the weird bends. Good luck!
brake6_zps87924866.jpg

brake7_zps56b5db70.jpg


brake5_zps403716a1.jpg

Thanks for the superb pictures. I will make a new brake line tomorrow.

I started to add some mouldings on the quarter panel. The work was a pleasure and it looks good with green clips with right sealer. Now it's possible to see it from the underside with right color on the clips and well as right finish on the PAL nuts.

I found a paper board that goes on the inside of the hardtop (C-pillar post) I guess that had it in Place to smoothen out the headliner, but I'm not sure.
 

Attachments

  • 001.JPG
    98.3 KB · Views: 663
  • 003.JPG
    93.6 KB · Views: 657
  • 006.JPG
    122.7 KB · Views: 650
  • 004.JPG
    70.1 KB · Views: 655
After glass beading the front and rear clips on the upper door mouldings I had the painter doing a mixture of green paint so I get them in right green color. Sweet!!

The rear axle cover was Another strange thing. Some where I bought an NOS one and didn't know it when I assembled the rear axle. However I need to find a NOS plug. They have a red paint in the center of the plug. Any help for finding one would be gladly appriciated.
 

Attachments

  • unname2.jpg
    30.9 KB · Views: 589
  • unnamed4.jpg
    37.2 KB · Views: 586
Finally the clips for the door mouldings are done and is in mint condition. The chrome nuts are done too but they were tricky!

The bracket for the parking brake is back and now I wonder what finish it should have? Bare, silver cad, silver zinc, black painted or cosmoline treated? Any info out there?

396 Signet! Thanks for the info around the brake line. Now it's manufactured and mounted in the right position. Thanks!

After boiling some water I was able to get the rubber hose on the
F-connection for the windshield washer system. But it was old for sure!
 

Attachments

  • 005.JPG
    90.1 KB · Views: 590
  • 004.JPG
    118.3 KB · Views: 595
  • 003.JPG
    77.2 KB · Views: 601
  • 002.JPG
    98.8 KB · Views: 604
  • 001.JPG
    105.6 KB · Views: 602
This isn't the first time I've noticed it in your pics, but I'm kind of surprised at your windshield washer tank. They were not yellowed like that from the factory -- they were milky white. The yellowing is due to age. Reproduction tanks are available in the correct white colour but also in "pre-yellowed" for people who misbelieve that they came that way when new.
 
This isn't the first time I've noticed it in your pics, but I'm kind of surprised at your windshield washer tank. They were not yellowed like that from the factory -- they were milky white. The yellowing is due to age. Reproduction tanks are available in the correct white colour but also in "pre-yellowed" for people who misbelieve that they came that way when new.

Dan! You are so right. I think too that it's not the factory color. But this one is date coded cortect December 64! So the question remains, is it possible to bleech the bottle so I get the correct milky look?
 
No—the yellowing is permanent and won't come out.

Thanks Dan! I will check with the judge!

I have done some serious polishing on the outer windshield mouldings for the rear glass. They are mostly bent and have bunch of scratches.

My question is if any FABO member have a nice set without any marks or dents for sale?

Thanks FABO!

:glasses7:
 

Attachments

  • 001.JPG
    149 KB · Views: 512
After bringing up all the parts for the steering column it took 20 minutes to assemble it!! All parts are new or NOS except for the turn signal switch which is a super reproduction made by slantsixdan! Excellent work! Now I'm just waiting for the plastic connection to the dash wiring harness.
 

Attachments

  • 001.JPG
    116.9 KB · Views: 491
  • 002.JPG
    115.3 KB · Views: 498
After going through all the vendors that repop the firewall insulation pad I was at a dead end. Jim at DMT will use my old extra insulation pad for samples but I cannot wait for that. Besides that will the new one be exact like the old one but I daubt that they can repop the seam cutting marks into it. But I'm not sure. He does great stuff for sure.

So after some close examination I started to clean the old one tro get a good ground. After that I vent inside and asked my wife where the black shoe polish was!!!! Some discussions later I was out and started to soften up the old firewall pad. Two rounds and I was done. There is some marks in the picture where the shoe polish hasn't sucked up into the pad but I was thrilled by the result! And this one is factory also!!

:glasses7:
 

Attachments

  • unnamed.jpg
    30.5 KB · Views: 454
  • bild 1.jpg
    31.4 KB · Views: 448
Today when I got back home from work I checked out the firewall insulation pad. It looked like it had never been out of the car. I guess that will be the closest I can get.

On my way home I stopped by a building material supply and bought some 1" yellow insulation and a tube of glue. Finally back home I glued the backside of the pad and added the insulation material. Then I took a sissor and cut by the markings. Finally mounted to the firewall it looks good with new studs.

One year ago I was able to buy a NOS heater set-up! Now it was time to mount the heater box. I found some small scratches on the heater box but was able to "restore" it! I was lucky to find a assembly line worker stamp No "35" too. The included gasket was dried out big time! The gaskets from DMT mounted up well including glue and all. Finally in place it looks like it did back on the assembly line.
 

Attachments

  • 011.JPG
    101.3 KB · Views: 454
  • 009.JPG
    109.2 KB · Views: 468
  • 008.JPG
    129.3 KB · Views: 443
  • 007.JPG
    109.8 KB · Views: 457
  • 005.JPG
    96.1 KB · Views: 454
  • 004.JPG
    126.2 KB · Views: 446
  • 003.JPG
    120.6 KB · Views: 447
  • 013.JPG
    98.3 KB · Views: 434
  • 014.JPG
    115.4 KB · Views: 441
  • 015.JPG
    113.6 KB · Views: 445
Anyone bought the rear window weatherstripping for 65 Dart? I know there is several vendors but I want one that works. I cannot find an NOS one!

Any suggestions that works well?
 
I started out with the headliner bows today. First of all they have different lenght, different bent and different color markings!! Of cause I didn't Think of that when I disassembled the car.

Anyway that seems to be a small problem compare to the centor bow where the dome light is located. It is bent and needs to be adjusted. My solution is that I need to loose the bow on one side and then adjust if and re-weld itin place.

I have no experience of this Before so I thought I should ask the FABO crowd!

:coffee2:
 

Attachments

  • 003.JPG
    109 KB · Views: 411
  • 002.JPG
    87.3 KB · Views: 402
  • 001.JPG
    99.3 KB · Views: 424
Not sure if this picture helps Ulf but it was taken on a very early build 1966 Valiant Signet with power brakes, it shows the brake line for the master cylinder and it appeared to be factory, the master cylinder was a factory Mopar part with a PN too.

 
Not sure if this picture helps Ulf but it was taken on a very early build 1966 Valiant Signet with power brakes, it shows the brake line for the master cylinder and it appeared to be factory, the master cylinder was a factory Mopar part with a PN too.


Thanks Keith for the Picture. It was big help for me. The brass sleeve that I had mounted on my car was different then the one in the Picture you showed me. The factory ones seems to have sharp corners compare to newer ones that have rounded corners. Some polishing and work and the set-up was done. Thanks again Keith! BTW, is that P/B setup for sale? My friend Johan wants one.

The horn buttom is done too. Johan did a super job once again, He's skills is beyond what a man can do! Hats off Johan!

My NOS voltage regulator that I was able to buy has no stamped date codes on it. But is has ink stamped date codes on the under side. My question to the FABO crowd is if you have seen an early A-body with date codes on the black cover?

The voltage regulator in the Technical Service Manual doesnot have any date codes on!
 

Attachments

  • 003.JPG
    115.8 KB · Views: 352
  • 002.JPG
    128.7 KB · Views: 366
  • 001.JPG
    117.6 KB · Views: 378
  • 009.JPG
    133.4 KB · Views: 370
  • 008.JPG
    148.9 KB · Views: 368
  • 007.JPG
    127.7 KB · Views: 363
  • 006.JPG
    104.2 KB · Views: 370
  • 005.JPG
    118.2 KB · Views: 374
  • 004.JPG
    116.8 KB · Views: 355
The voltage regulator in the service manual is an airbrushed photo of a 1961-'62 regulator—no surprise it has no date codes. Beyond that, I don't know if a date code should be visible on the cover.

66340Sedan's photos remind me, though—this thread's now 85 pages long; I can't recall if master cylinder lids (tall vs. short) were discussed!
 
That booster is still in the car hidden deep in the woods at a junkyard, so hidden I have a hard time finding it....but yes, I can grab it when the snow melts. I am sure it needs an overhaul, but is all there. Remember you were wondering about the gasket between the master cylinder? I pulled the master off and took those pics earlier for you, I think I even sent you part of the old gasket? Can't remember that part. I stashed the master cylinder and cover inside the car too.

BTW, this car has power brakes but has front drums, not discs.....I though all PB cars had discs?
 
The voltage regulator in the service manual is an airbrushed photo of a 1961-'62 regulator—no surprise it has no date codes. Beyond that, I don't know if a date code should be visible on the cover.

66340Sedan's photos remind me, though—this thread's now 85 pages long; I can't recall if master cylinder lids (tall vs. short) were discussed!

I remember some discussion but it may have been in another thread where I posted pics of my dads 1966 Barracuda Formula S....his has factory discs and I posted a pic of the engine bay and some noticed that on the master cylinder it had the taller cover on it.....not sure what the difference was.
 
That booster is still in the car hidden deep in the woods at a junkyard, so hidden I have a hard time finding it....but yes, I can grab it when the snow melts. I am sure it needs an overhaul, but is all there. Remember you were wondering about the gasket between the master cylinder? I pulled the master off and took those pics earlier for you, I think I even sent you part of the old gasket? Can't remember that part. I stashed the master cylinder and cover inside the car too.

BTW, this car has power brakes but has front drums, not discs.....I though all PB cars had discs?

Yes, I'm interested in the setup!

Dan! School me on the master cylinder lids, long versus short!
 
I found this old picture I posted back in 2008, poor quality due to resizing it....but you can see the extra tall master cylinder cover but also, the MC is bigger as well....another member pointed out in the old thread that it is a pretty rare part.....why would it be bigger? I have never seen another one like it. Car is a 66 Barracuda S with manual discs.
 

Attachments

  • 66dad.jpg
    100.2 KB · Views: 373
I found this old picture I posted back in 2008, poor quality due to resizing it....but you can see the extra tall master cylinder cover but also, the MC is bigger as well....another member pointed out in the old thread that it is a pretty rare part.....why would it be bigger? I have never seen another one like it. Car is a 66 Barracuda S with manual discs.

I had a 66 Formula S with disc brakes and that extra reservoir! Did it need extra brake fluid for disc brakes?
 
-
Back
Top