63 Dodge Dart, now let me see;)

-
I'll be darned, yes, that's about what I paid for it several years ago~ however mine was submerged under Harvey flood waters and kind of shows it, but still functions just fine.

like this then? Manual A/C Hose Crimper Kit 71550 Air Conditioning Press Hose Crimping Pliers | eBay
mind you there's different types from cheap manual ones to hydraulic ones with prices all over the place A/C Hose Crimper for sale | eBay

When we were getting flooded, I saved my AC machine, but lost a lot of other things, the nasty water got up to 6', just below the instrument panel of the machine :(
https://postimages.org/]
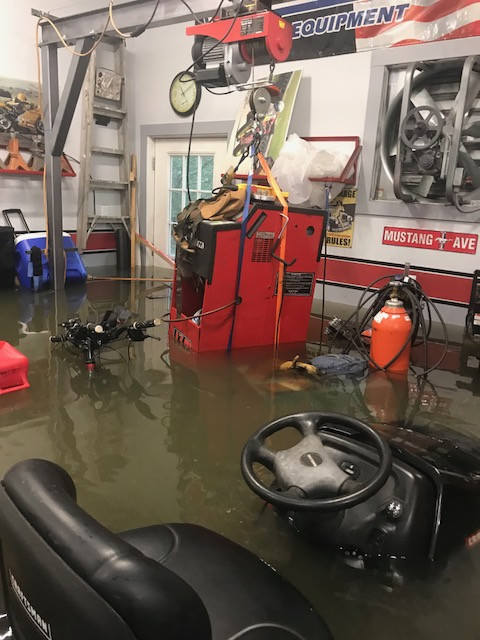
[/url]
 
That is a great way of thinkin!! If we lose our sense of humor, may as well hang it up;)

I knew the answer about the noggin knockers before I asked....lol. You have a great sense of humor that sometimes encourages silly questions. :) Susan & I are the same way. She is a quilter, and is really good at it. I couldn't care less on what she spends on fabric and stuff...and she's the same way about my cars and parts. Our plan is, to run out of money right at the split second the line goes flat for the last one of us!

:lol:
 
IT's always neat to pull a special tool from my special tools cabinet to do that special job. I bought this AC hose crimper a long time ago. Just didn't want to be dependent on having the sleeves crimped when I can do it myself. I have used it many times. Hopefully not the last time after this build. Still waiting on special AC fittings. This AC install was not store bought to just install you know~
hm, need to make dinner~

View attachment 1716441964

View attachment 1716441965
And you cook too!!!!! wow
Wife and I were in Conroe HEB (our trip to the city!) and I asked the old guy (old like me) in our checkout line,,,, just how can two old people buy this many groceries!!???? I told him someone must break into our home every couple weeks and steal all their groceries!!!! :BangHead: :BangHead:
 
:lol: :lol:

And you cook too!!!!! wow
Wife and I were in Conroe HEB (our trip to the city!) and I asked the old guy (old like me) in our checkout line,,,, just how can two old people buy this many groceries!!???? I told him someone must break into our home every couple weeks and steal all their groceries!!!! :BangHead: :BangHead:
 
Got a little done today on the AC~ waiting for one more special fitting before pulling a vacuum. Also got the fuel line connected from the tank to the fuel pump.

aC fittingsa.jpg


AC fittings.jpg


I'll be taking the evaporator back out again, mainly to drill a hole for the drain. Also I'll be making a protector out of 18 gauge plate to cover this foot well area and use the insulation I have to double the thickness.
AC evap.jpg
 
Last edited:
Hi! While still waiting for one little AC fitting, I went ahead and took care of the hood, I had semi-prepped it a while back, but still required filling some "low spots". The decklid is going to require massive work, omg~ I have been searching for a deck lid, but they're kind of hard to come by. So, even though mine will require a lot of body filler~ it will suffice for now, but I will continue my search for one.
Once the darned AC fitting arrives, I can finish the AC lines, vac and charge to make sure there are no leaks. Then the dash can go in ;)

hood stuffe.jpg


hood stuffd.jpg


hood stuffc.jpg


Hood stuffb.jpg


Hood stuffa.jpg


probably should have painted this long hood latch bar black, but I had some leftover Sage, can always paint it black later if I should decide so;)
hood stuff.jpg
 
Hi! While still waiting for one little AC fitting, I went ahead and took care of the hood, I had semi-prepped it a while back, but still required filling some "low spots". The decklid is going to require massive work, omg~ I have been searching for a deck lid, but they're kind of hard to come by. So, even though mine will require a lot of body filler~ it will suffice for now, but I will continue my search for one.
Once the darned AC fitting arrives, I can finish the AC lines, vac and charge to make sure there are no leaks. Then the dash can go in ;)

View attachment 1716444899

View attachment 1716444900

View attachment 1716444901

View attachment 1716444902

View attachment 1716444903

probably should have painted this long hood latch bar black, but I had some leftover Sage, can always paint it black later if I should decide so;)
View attachment 1716444904
Too bad shipping would kill from up here because there is a nice deck lid on a 4 door canadian valiant in an old wrecking yard up here (Canadian valiants used Dart back halves). I cut the inner roof structure out of it when I had to rebuild mine and needed the inner brace.
 
Worked on this thing for the last couple days, After all the thin layers of body filler, I put it in high build primer just to make me feel better. It may look ok in the picture but I assure you guys, it is not ok. It wasn't so much a rust issue, it's that the trunk lid "skin" came un-attached to the frame and the entirety of the skin was bowed up. So, smart me, (several months ago if not longer), devised a way to pull it back down and used those vises and boards to pull it back down and used body panel adhesive to glue it back down. After a day, removed the clamps, low and behold it was hill valley, horrible! So that's what the real problem is. I really don't expect the epoxy to hold for the long haul, but will give me time to search for another lid.
This weekend we have family, so taking a couple day break.

The AC fitting I've been waiting for was lost in the mail and came today, but I ordered another one to use as well. It's obviously not crimped in the picture.
dne' ;)

trunk lid high build.jpg


Trunk lid stuff.jpg


AC fitting 90 degree.jpg
 
Last edited:
Worked on this thing for the last couple days, After all the thin layers of body filler, I put it in high build primer just to make me feel better. It may look ok in the picture but I assure you guys, it is not ok. It wasn't so much a rust issue, it's that the trunk lid "skin" came un-attached to the frame and the entirety of the skin was bowed up. So, smart me, (several months ago if not longer), devised a way to pull it back down and used those vises and boards to pull it back down and used body panel adhesive to glue it back down. After a day, removed the clamps, low and behold it was hill valley, horrible! So that's what the real problem is. I really don't expect the epoxy to hold for the long haul, but will give me time to search for another lid.
This weekend we have family, so taking a couple day break.

The AC fitting I've been waiting for was lost in the mail and came today, but I ordered another one to use as well. It's obviously not crimped in the picture.
dne' ;)

View attachment 1716445243

View attachment 1716445246

View attachment 1716445249
Is the sorta self leveling polyester primer worth a try?? Just wondering.
 
hm, I'm unfamiliar with that, I'm making slooooowww progress with what I'm doing, had it been earlier on, I may would have researched the idea;) :thankyou:

Is the sorta self leveling polyester primer worth a try?? Just wondering.
 
Spray a couple 1960s custom painted Lace Panels on the trunk lid only. (like racing stripes)

Will take your eye off the slight ups and downs in the deck lid body work.

689744ac244e83fcb23c1711e85739b4-3313752374.jpg


4d97c50b8dc84b2b3195fa61aa0750b1-297993420.jpg


I like the dark green as an accent color to your Sage green body color. Done in basecoat, no clear, no shine on top of the sage...

An added tweek to your blacked out chrome accents.


☆☆☆☆☆
 
@barbee6043 may have been talking about Feather Fill high build primer. The longer the sanding block you use, the better off you will be. Of course, if the lows are REALLY low, it would probably be a waste of time and money on the Feather Fill. You can always skim coat the whole decklid and have a 100 lb lid....lol. :poke:
 
I guess if I have anything going for me, it's the matt color~ hopefully will mask it a tad, plus not that many people look at the trunk area;)

This popped up a few days ago on FBM (about 4 hours away)~ I don't know why the first page is black, but it's a complete supposedly running '63~ I'd hate to buy it just to take what I need which is just a decklid and windshield, plus my husband would definitely say NO, but darn :BangHead:
1963 Dodge Dart · 170
That might be a dent on the left side horizontal part of the decklid.
 
I don’t completely understand what is happening with the original lid. Is it now concave and creased somewhere. Yeah that other lid has issues!
 
lol, pike, the picture doesn't show the real problem. What happened, the "glue"? which hold the sheetmetal or skin had lost its hold and allowed the skin to raise off the framework. Picture the oil canning effect, but the entire skin of the decklid was that way. Or might say a really big bow. I could push it down which led me to epoxing it back down seen in the picture, but led to a hill and valley look. Also the back end was bent in a lot. I was able to beat that back out somewhat. I see that alot in Darts, even like the one in the FB ad. I hope that explains it better;)

Trunk lid stuff.jpg
 

ah! Can the panel adhesive be removed, spacers added, (between the frame and skin), and then glued back together ya think?

My ‘65 had run into a corner and I could never get the curve on top right. …& it lived in flat black primer for years. Every time it rained I was reminded of my inferiority! Until I horse traded the lid from a car in the woods kinda situation….

I’m sure your solution will be awesome whatever it is! Can’t wait
 
-
Back
Top Bottom