You are using an out of date browser. It may not display this or other websites correctly.
You should upgrade or use an alternative browser.
You should upgrade or use an alternative browser.
68 4-door "Sleeper"
- Thread starter 4door68
- Start date
-
lo234me
Well-Known Member
Lurker here to!! I have been watching the build, and yes I also have a 68 Dart 4-door!! I had a 383 4 speed in mine. I picked up a 2003 5.7 hemi from a truck. My problem is making the 4 speed stufff work woth the 5.7. I am sill purchasing parts so I have no thread. Once I get everything together, than I wil attack it full bore!!! I kind like to have my parts all laid out and ready to go before I jump into it!! But keep up the good work!! Your car is sweet, and you are definately not alone!!!
CMS
Member
Just subscribed. Incredible modification skills and I can relate to the A body"conundrum". I affectionately call my 68 Valiant B!/@$ because she bites me quite frequently.
MoparDart68
Well-Known Member
Also a lurker, but have commented a few times when you first started this project. Looking fantastic, keep up the excellent work..
Just noticed this thread has over 11,800 views. Maybe everyone is just speechless?
Just noticed this thread has over 11,800 views. Maybe everyone is just speechless?
airwoofer
Drivetrain limit explorer
Nice seeing another "More Doors" '68 on here. Cool idea making it into a sleeper with a hemi under the hood.
That looks like the Dart I had while in college. I took it with me to FL when I graduated and left it there when I drove my vette off to learn to fly in the USAF a year later. As expected it was a very reliable car except for the headliner.
PapstXX
Well-Known Member
x3rock on,brother!
Wow! I didn't think to look at the number of views. I guess there are a lot of lurkers here. Sorry about my rant.
Just noticed this thread has over 11,800 views. Maybe everyone is just speechless?
That looks like the Dart I had while in college. I took it with me to FL when I graduated and left it there when I drove my vette off to learn to fly in the USAF a year later. As expected it was a very reliable car except for the headliner.
That's interesting. I had to leave my Dart behind when I graduated from University of Florida and got a job in Chattanooga. (I couldn't take 2 cars) It still ran great when I gave it away to someone who really needed a car.
I always missed that car, which is why I bought this one.
I was able to get my shifter working great... or so I thought. Below, you can see my "shift" in the rod. I had to do this when I moved the steering column over.
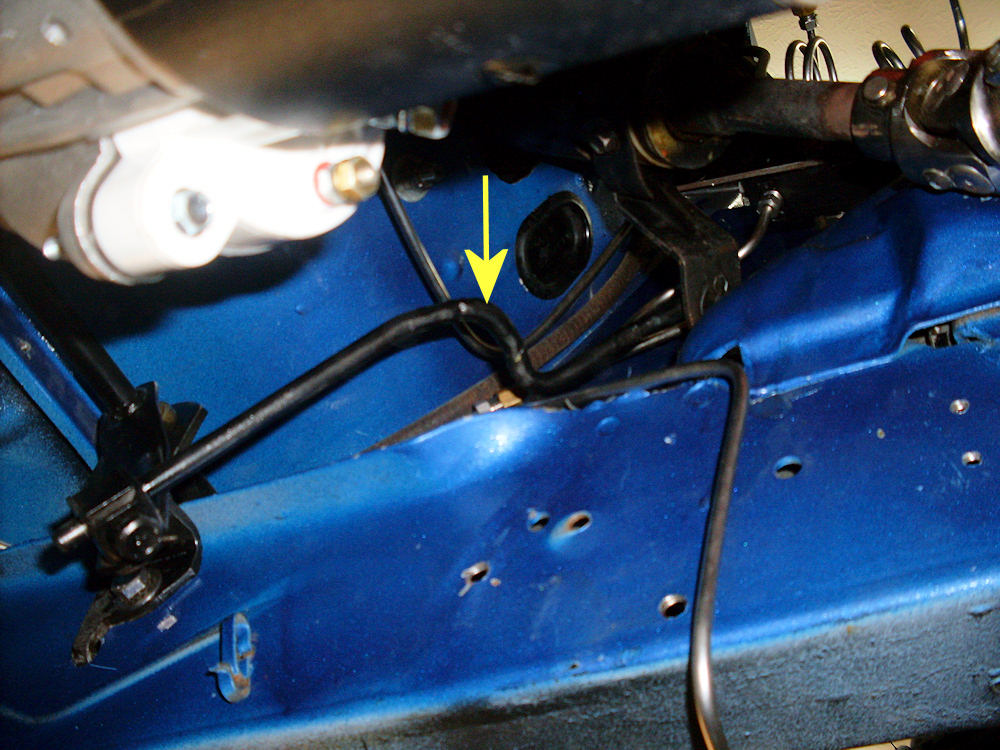
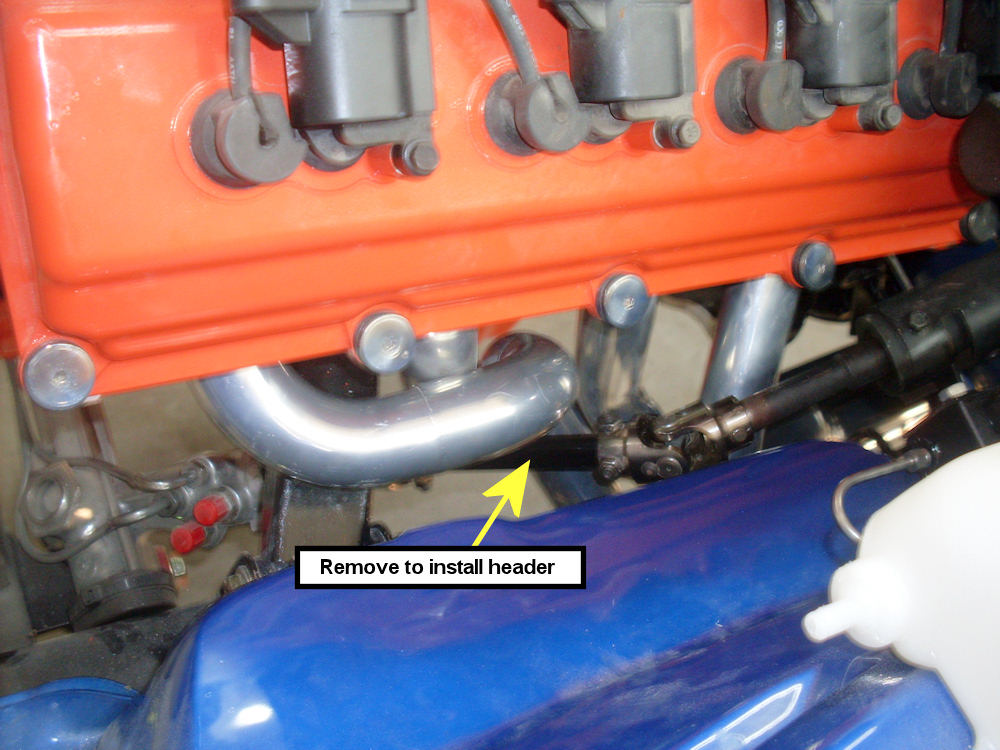
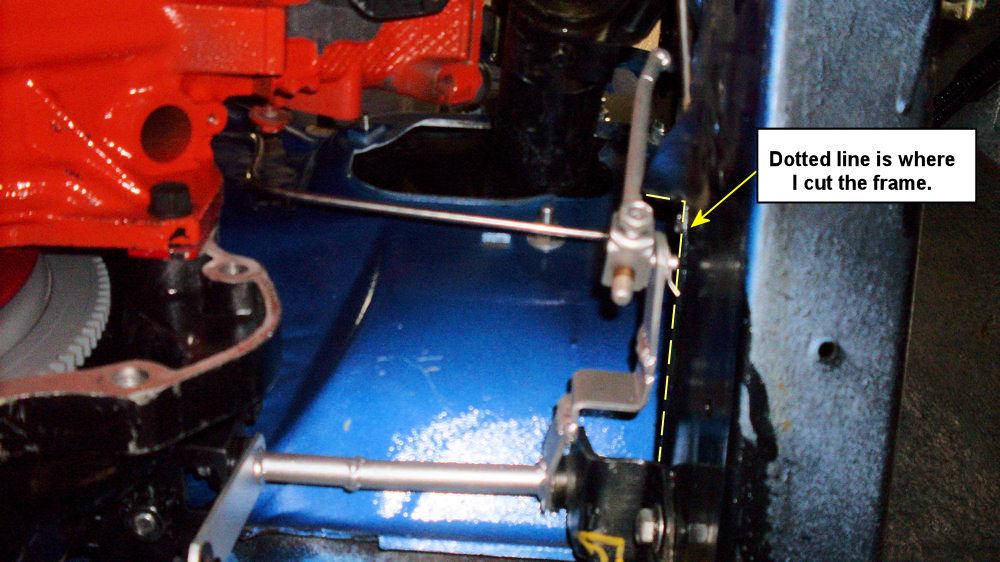
Also, for anyone else putting TTI headers on a 5.7 hemi with the Alterktion k-frame. I discovered that you need to remove this part of the steering column before you attempt it. Knowing that ahead of time would have saved me at least an hour.
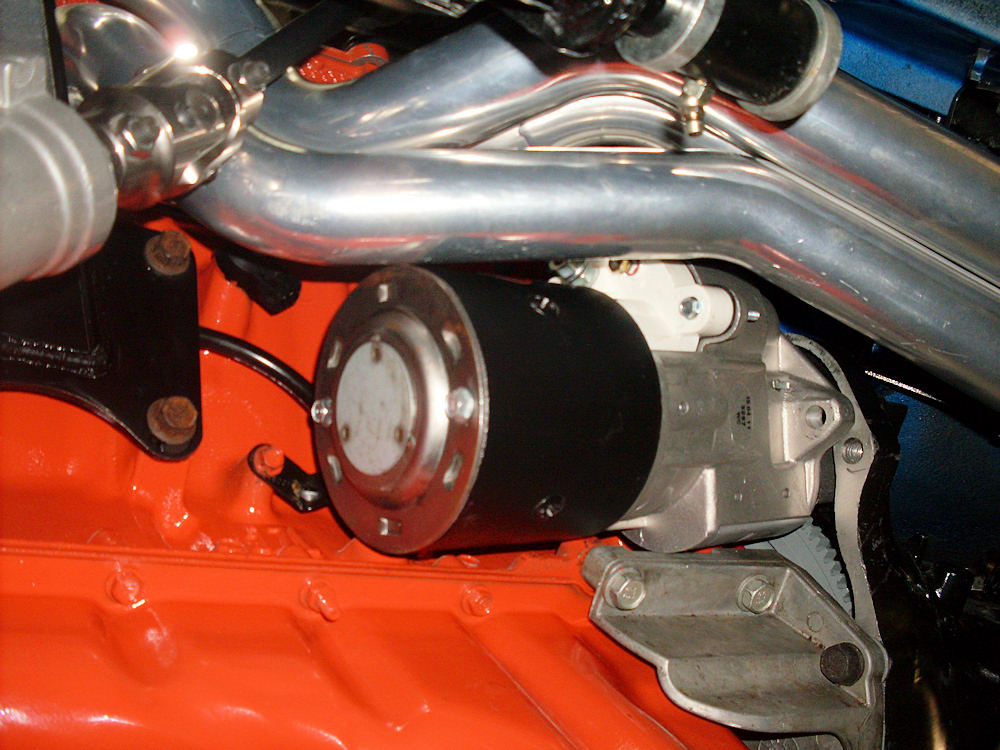
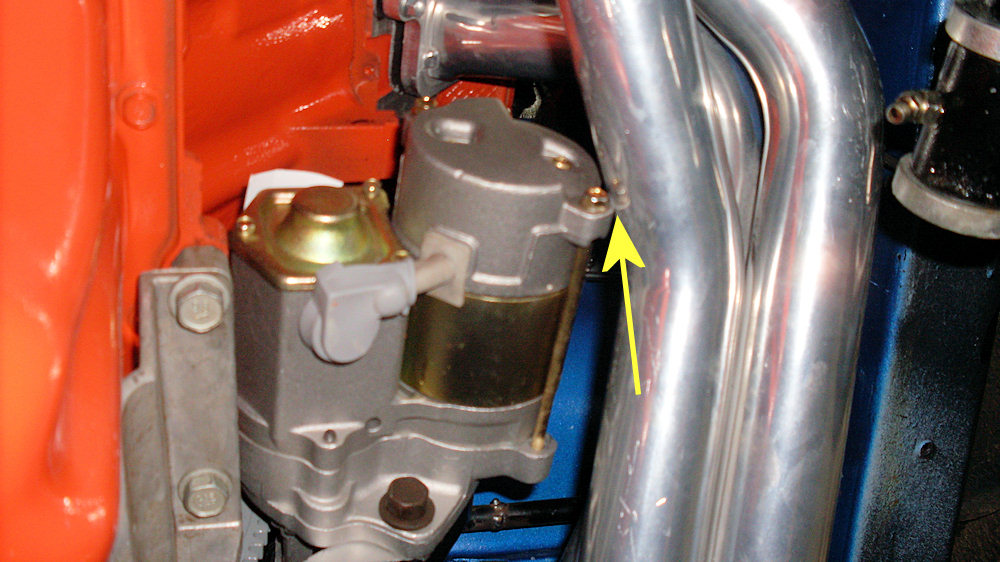
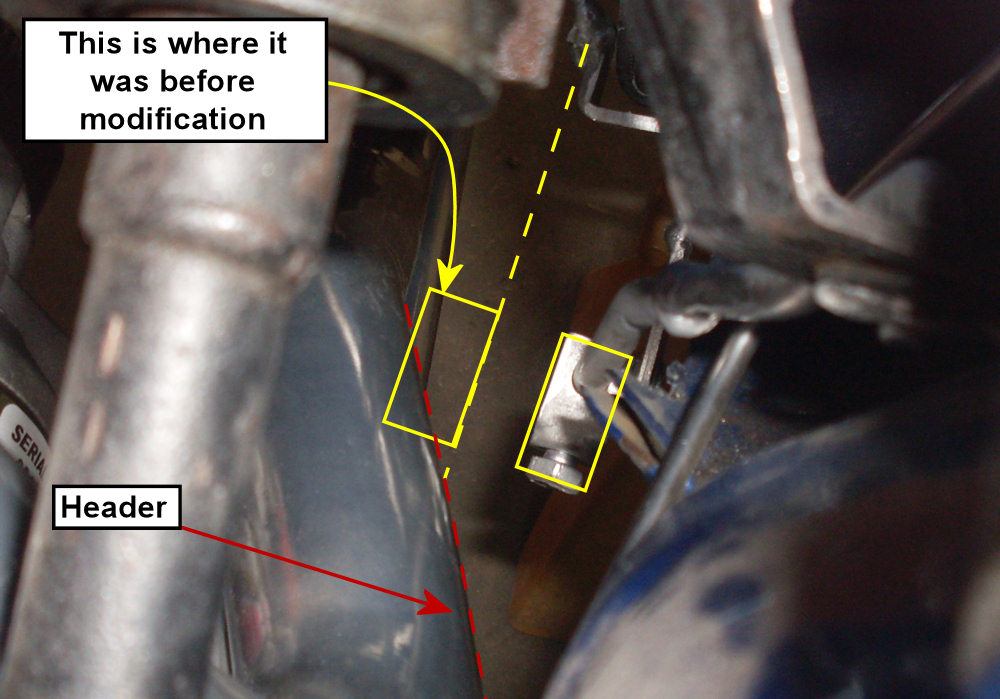
This is where I discovered a new batch of problems that I am going to have to figure out. First of all, if you go to Advance Auto and get a starter for a 727 transmission, the one that you get won't fit. It hits the header.
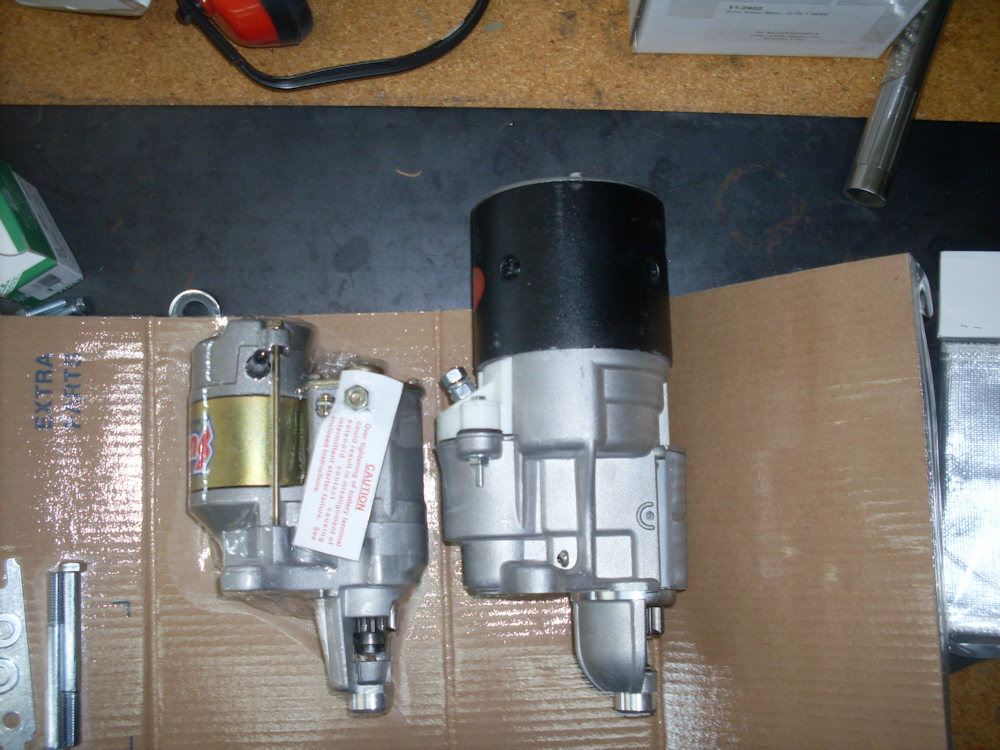
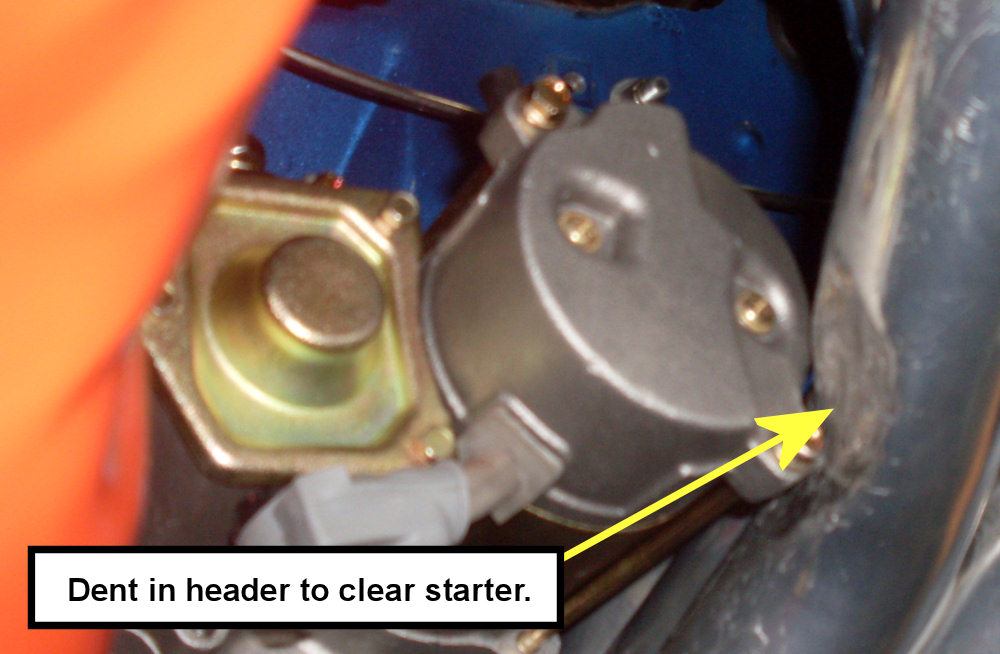
I ordered a mini-starter. It is a LOT smaller.
The only problem is that it still hits the header, but just barely. As much as I hate to do it, I am going to have to put a small dent in the header.
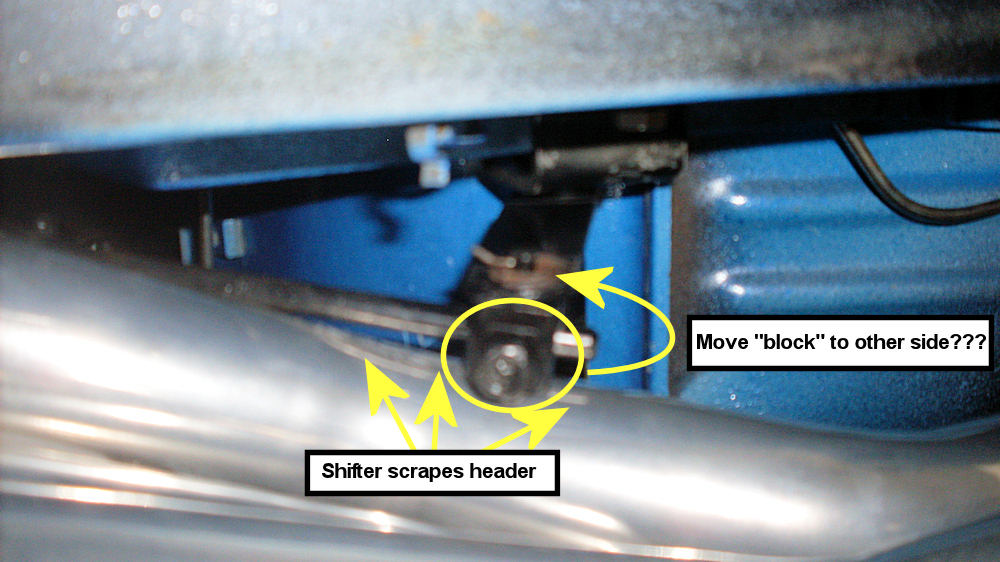
Finally, I am going to have to re-modify the shift linkage as it scrapes the header. My initial plan is to cut the rod (Huh, huh, huh... I said "rod") and rotate it 180 degrees so that the "block" that is on there is away from the header.
I will probably have to do other modifications as well. So, all of you who want to put a new hemi into and a-body with a column shift, (I must be the only one) I will put the steps here if I can make it work.
Also, for anyone else putting TTI headers on a 5.7 hemi with the Alterktion k-frame. I discovered that you need to remove this part of the steering column before you attempt it. Knowing that ahead of time would have saved me at least an hour.
This is where I discovered a new batch of problems that I am going to have to figure out. First of all, if you go to Advance Auto and get a starter for a 727 transmission, the one that you get won't fit. It hits the header.
I ordered a mini-starter. It is a LOT smaller.
The only problem is that it still hits the header, but just barely. As much as I hate to do it, I am going to have to put a small dent in the header.
Finally, I am going to have to re-modify the shift linkage as it scrapes the header. My initial plan is to cut the rod (Huh, huh, huh... I said "rod") and rotate it 180 degrees so that the "block" that is on there is away from the header.
I will probably have to do other modifications as well. So, all of you who want to put a new hemi into and a-body with a column shift, (I must be the only one) I will put the steps here if I can make it work.
MoparDart68
Well-Known Member
bump
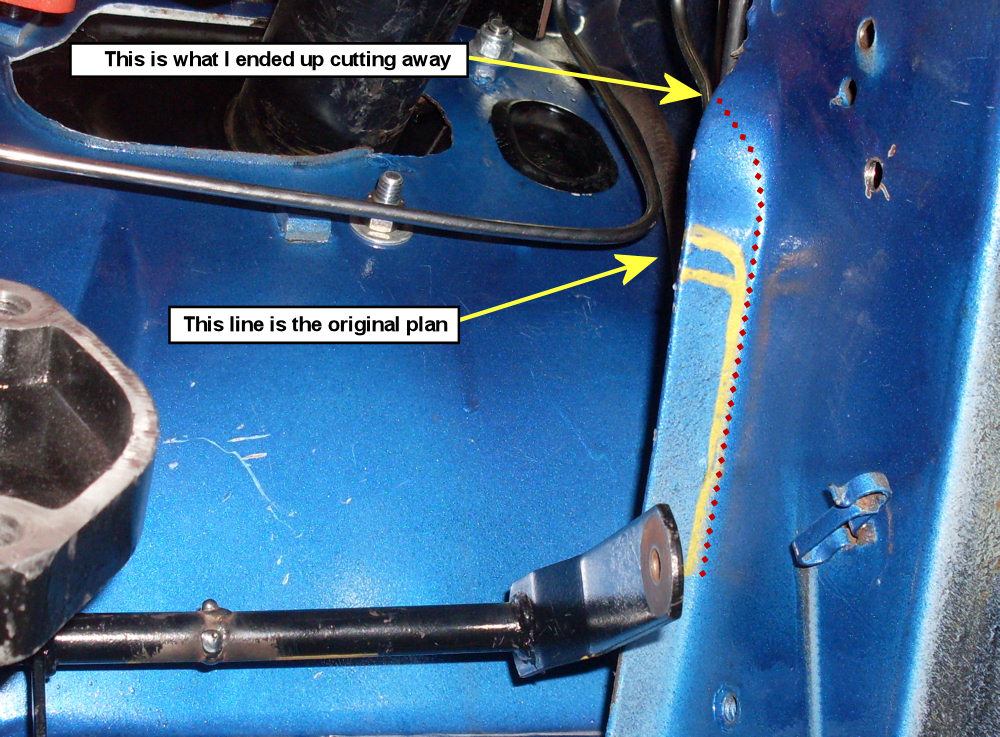
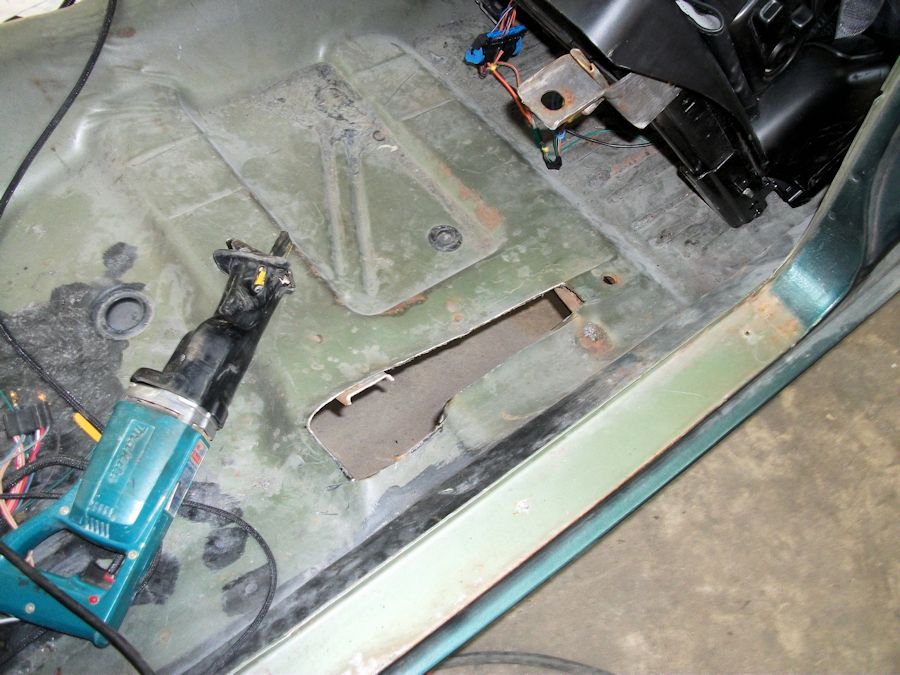
I have good news to report. I was able to get the shift linkage AND the starter to clear the header. That's good, too. I was beginning to get discouraged. It's not easy finding information online about putting a modern hemi into a Dart with a column shift transmission. Since I don't have anyone else's record to go on, I have to figure it all out. But, my plan seems to be working out. My plan was to move the shift bracket toward the outside. I cut the sheet metal away.
First, I made a cardboard mock up.

Then, I shifted the linkage toward the frame.
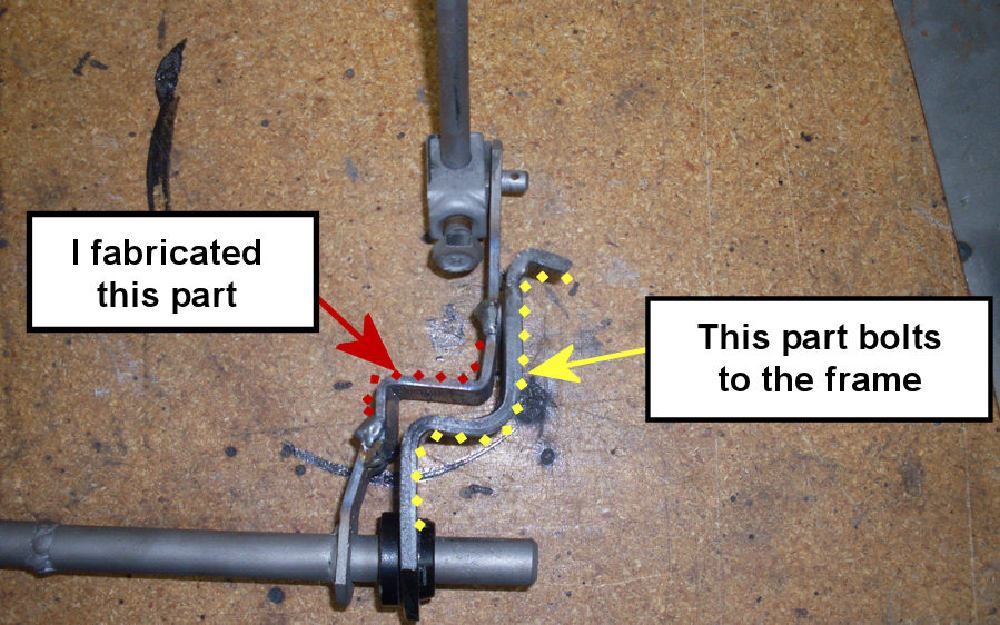
I was able to move it over enough to clear the header. Also, I ran out of my black spray bomb, so I used some silver that I had. Actually, I think I like the silver better. It shows up better in pictures.
This next pic shows how well the modification worked to clear the header.
Finally, I had to beat the crap out of the header to clear the mini-starter.
That's all for now. All of you people who are putting a modern hemi into a column-shift, 4-door Dart A-Body using an alterktion k-frame may continue with your work now. (cricket sounds).
First, I made a cardboard mock up.
Then, I shifted the linkage toward the frame.
I was able to move it over enough to clear the header. Also, I ran out of my black spray bomb, so I used some silver that I had. Actually, I think I like the silver better. It shows up better in pictures.
This next pic shows how well the modification worked to clear the header.
Finally, I had to beat the crap out of the header to clear the mini-starter.
That's all for now. All of you people who are putting a modern hemi into a column-shift, 4-door Dart A-Body using an alterktion k-frame may continue with your work now. (cricket sounds).
Thank you for the bump... It really does feel better knowing that people are interested.
bump
you learn well grasshopper......
it's great to watch you attack every challenge and come up with a good solution...even though it often takes a couple of tries....
Welcome to the club ,my friend!
Mopar to ya'
Denny
it's great to watch you attack every challenge and come up with a good solution...even though it often takes a couple of tries....
Welcome to the club ,my friend!
Mopar to ya'
Denny
SpeedracerX
Still on this side of the dirt member
Thank you for the bump... It really does feel better knowing that people are interested.
Im still interested, I know that much...
needsaresto
Well-Known Member
- Joined
- Nov 13, 2004
- Messages
- 7,625
- Reaction score
- 281
I just subscribed, and am watching. It took a while to skim through and catch up,as you've been busy!
Everything looks great so far,and I must say that installing a 5.7 is the equivalent of rolling a snowball downhill.Good for you sticking with it!
Everything looks great so far,and I must say that installing a 5.7 is the equivalent of rolling a snowball downhill.Good for you sticking with it!
I want to start wiring everything up, but I can't really start on that until I get the dashboard finished. I want to get the guages and switches in.
In an earlier post, I showed where I cut the sheet metal out of the dash. That way I could just start from scratch. I bought some sheet metal and took it to a local machine shop that had a sheet metal brake to put the bend in it. I welded it into place.

After grinding all the welds smooth, I decided to take the entire dash down to the bare metal by putting it into the blast cabinet.

I primed the entire dash with a urethane primer (Dupont Nason.. I think) to prevent it from rusting while I did the bondo work.

I spent a lot of time sanding and smoothing the bondo in the corners. I bought some hole saws to cut the holes for the guages. I put the big hole saw into a 1/2 inch drill and was drilling away. I had my head low so that I could see that the hole saw was level and not going in at an angle. All of the sudden, the hole saw snagged and came to a complete stop, but the drill didn't stop. It smacked me right in the lip. I ended up getting 3 stitches.

I am almost ready to paint the dash. My plan is to paint the part that you "see" the same blue as I am going to paint that car. The top of the dash will be flat black to reduce glare on the windshield. I painted the back side of the dash with some white Rustoleum. That way, it will reflect light when I work behind the dash after it is installed.

Here are the guages that I will be putting in. I got them from www.speedhut.com. The speedometer is GPS based, so I won't have to worry about cables and transmission gears and rear end gear ratios. The speedometer will also tell you top speed, quarter mile time, altitude(???), etc., and it has the turn signal indicators built in.

I also received my gas tank from Rock Valley. It has the fuel pump already installed and will provide the pressure necessary for the fuel injection.

That's all for now. Thanks for watching!
In an earlier post, I showed where I cut the sheet metal out of the dash. That way I could just start from scratch. I bought some sheet metal and took it to a local machine shop that had a sheet metal brake to put the bend in it. I welded it into place.
After grinding all the welds smooth, I decided to take the entire dash down to the bare metal by putting it into the blast cabinet.
I primed the entire dash with a urethane primer (Dupont Nason.. I think) to prevent it from rusting while I did the bondo work.
I spent a lot of time sanding and smoothing the bondo in the corners. I bought some hole saws to cut the holes for the guages. I put the big hole saw into a 1/2 inch drill and was drilling away. I had my head low so that I could see that the hole saw was level and not going in at an angle. All of the sudden, the hole saw snagged and came to a complete stop, but the drill didn't stop. It smacked me right in the lip. I ended up getting 3 stitches.
I am almost ready to paint the dash. My plan is to paint the part that you "see" the same blue as I am going to paint that car. The top of the dash will be flat black to reduce glare on the windshield. I painted the back side of the dash with some white Rustoleum. That way, it will reflect light when I work behind the dash after it is installed.
Here are the guages that I will be putting in. I got them from www.speedhut.com. The speedometer is GPS based, so I won't have to worry about cables and transmission gears and rear end gear ratios. The speedometer will also tell you top speed, quarter mile time, altitude(???), etc., and it has the turn signal indicators built in.
I also received my gas tank from Rock Valley. It has the fuel pump already installed and will provide the pressure necessary for the fuel injection.
That's all for now. Thanks for watching!
R4Sedan
Larry
your building a really nice car keep it up!
roadrunnerh
Well-Known Member
WOW, I just saw this thread (relatively a newbie here). You are doing some very very impressive work - you should be proud! Unchartered territory! Keep it up, I know I will be watching. :thumbup::thumbup:
MoparDart68
Well-Known Member
Man, you have some mad skills. As my Dad always says, "if you're not bleeding at the end of a job, you didn't do it right." Keep up the good work, hope you heal up ok.
smalblokmopar
Well-Known Member
You now you sitting around with your buddy talking **** then one thing leads to another and your like lets put a hemi in the dart sound easy right. Then it goes in and everything hits everything lol. Your build makes me want to sell the duster since there seems to be about thuosands of them showing up on here latly and go for the four door sleeper its a awesome build keep going looks great.
Man this thing is gonna be a beast. Nice work on the upper lip.
dusterbd13
Well-Known Member
your timing was perfect. i was looking at the autometers in my duster earlier tonight, and wondering how to make the speedo more accurate, and get warniong lights.
then you posted up the speedhut gauges.
i want them now. badly.
but unfortunately, ill have to wait until they make a 5 inch size.
looking good on yours. the stitches wont scar much. be about a hairline, if any.
michael
then you posted up the speedhut gauges.
i want them now. badly.
but unfortunately, ill have to wait until they make a 5 inch size.
looking good on yours. the stitches wont scar much. be about a hairline, if any.
michael
your building a really nice car keep it up!
Thank you. I appreciate feedback. It keeps me motivated.
WOW, I just saw this thread (relatively a newbie here). You are doing some very very impressive work - you should be proud! Unchartered territory! Keep it up, I know I will be watching. :thumbup::thumbup:
Unchartered for sure. I haven't seen anyone else do an A-body, column-shift modern hemi transplant. I am making it up as I go.
Man, you have some mad skills. As my Dad always says, "if you're not bleeding at the end of a job, you didn't do it right." Keep up the good work, hope you heal up ok.
The doctor did a good job. The scar is minimal. I just wish I had a better story about how I got my scar.:sad10:
Man this thing is gonna be a beast. Nice work on the upper lip.
LOL. The first stitches I have ever had in 46 years. I have had cuts that probably needed stitches, but this is the first time I actually got stitches. If it wasn't in my face, I probably wouldn't have gotten stitches.
your timing was perfect. i was looking at the autometers in my duster earlier tonight, and wondering how to make the speedo more accurate, and get warniong lights.
then you posted up the speedhut gauges.
i want them now. badly.
but unfortunately, ill have to wait until they make a 5 inch size.
looking good on yours. the stitches wont scar much. be about a hairline, if any.
michael
I really like the speedhut guages. They are not deep, so you don't need to worry much about clearance issues. I did not know that they didn't make a 5 inch, though. BTW, I bought the "Legacy" Series guages. I wanted the white background and black letters. Supposedly, this is best for daytime driving and, at my age, easier to see with bifocals.
This isn't the greatest picture in the world. It doesn't show the damage very well. The 43 year old foam on the dash is cracked and has big dips in it. You can see all the way to the metal in parts. I am going to re-foam the dash.
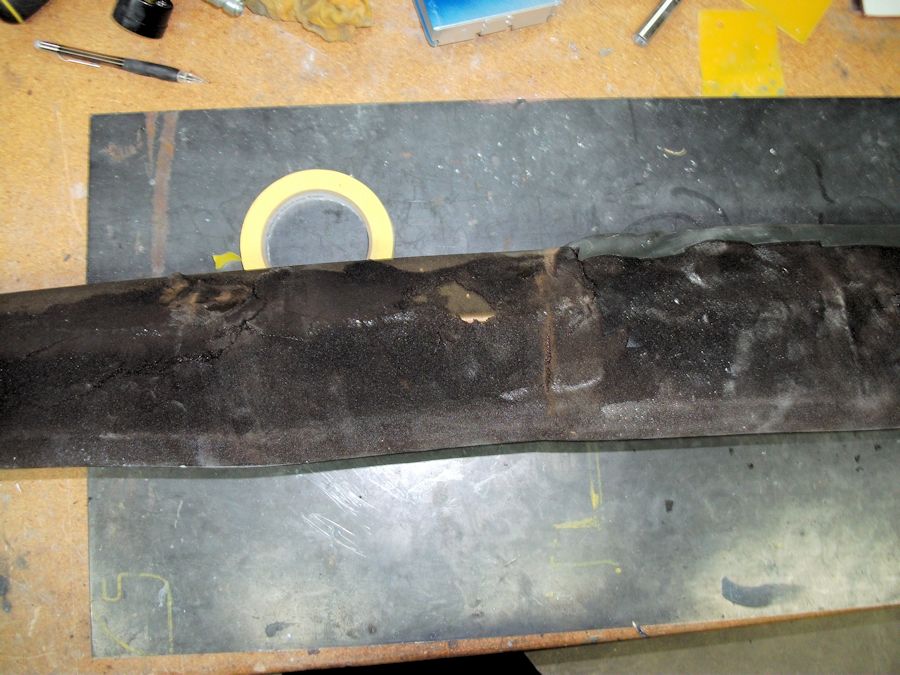
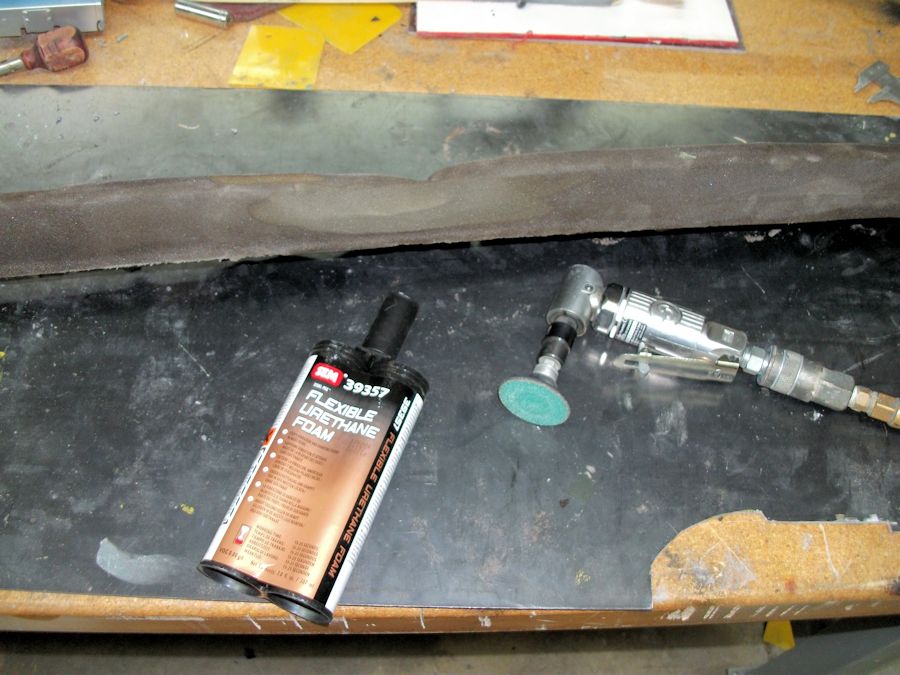
I looked around and did searches for how to re-foam a dash and came up with nothing. Once again, I am going into unchartered territory. I used a die grinder with a 50 grit roloc disk to shape the existing foam and remove the crusty dried out foam. I bought some SEM urethane foam.... It was expensive as HELL!!!
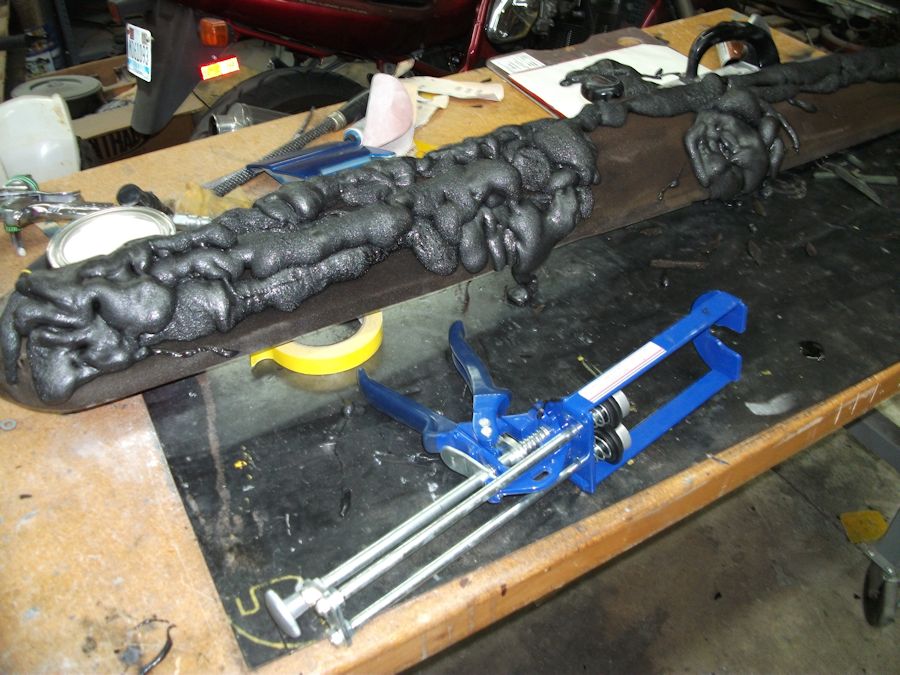
Here is the dash after squirting the foam. It foams up quick. Also, it looks like crap/
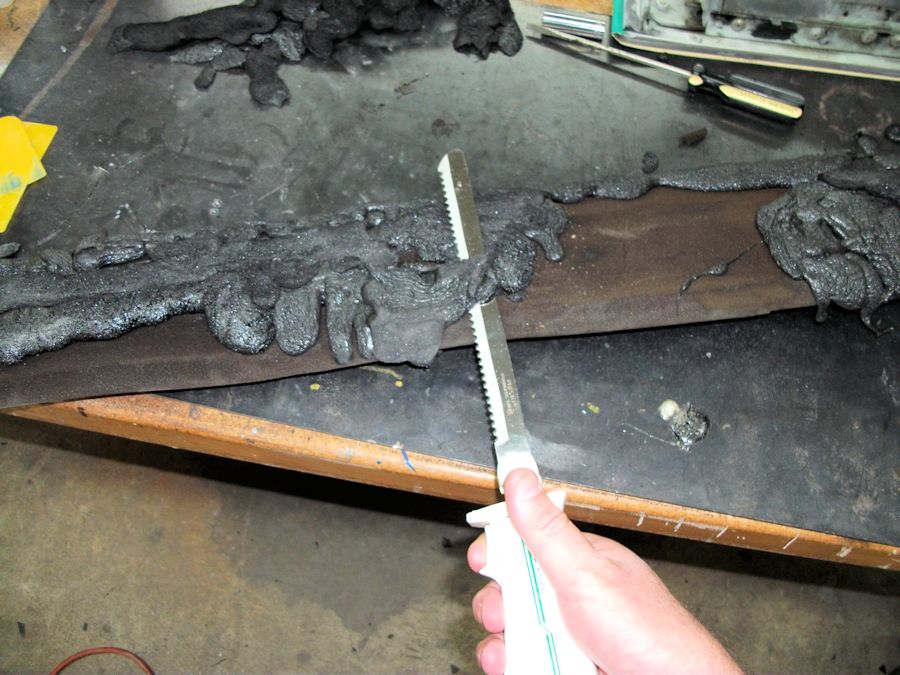
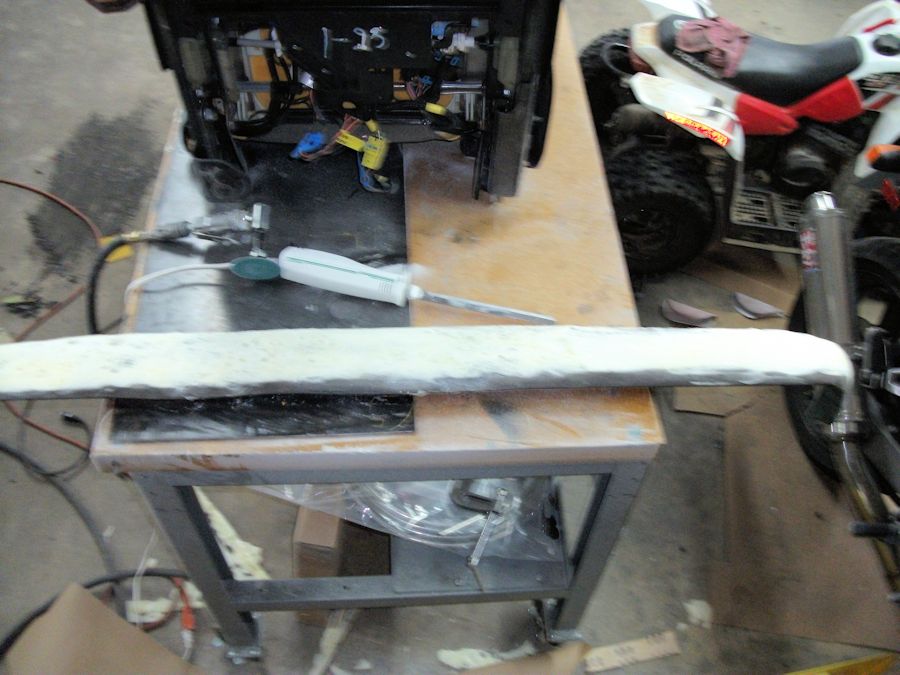
I needed to trim the new foam, so I used an electric knife. It works great!!!
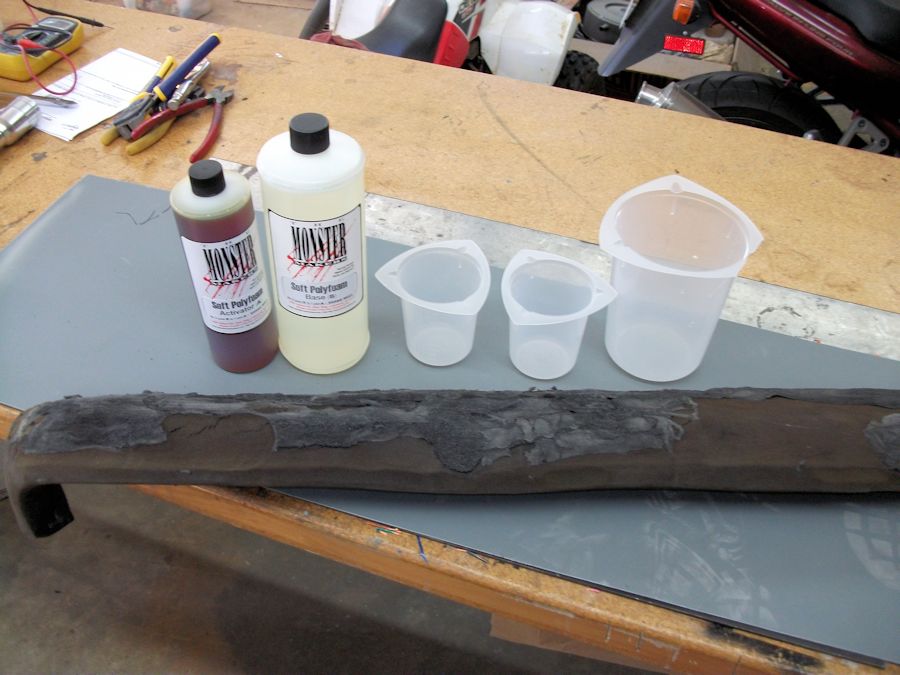
The SEM foam wasn't enough to do the job and I wasn't about to spend another $45 on another pack of foam. I searched the internet for "flexible two part urethane foam" and I found www.monstermakers.com and bought some. It is WAY cheaper than the SEM foam. Also, the SEM foam didn't bond well to the existing foam.
Here is the dash pad after I poured the foam on. This stuff foams up FAST, too.
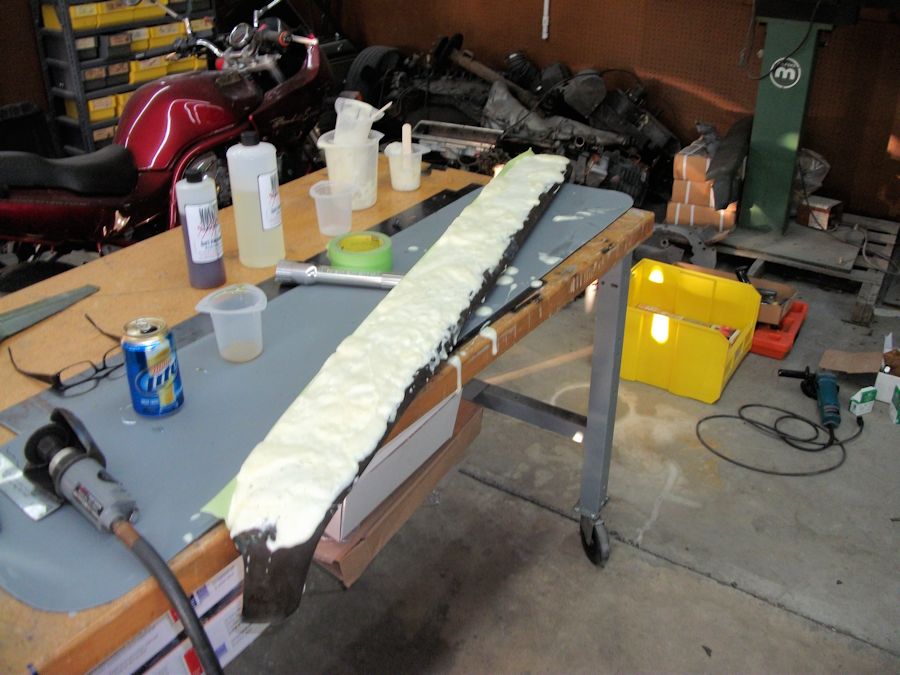
This is another blurry picture, but I got it looking good. I trimmed it with an electric knife and finished it with a die grinder with a 50 grit roloc disk.
I used some brown craft paper to make a pattern. (I forgot to take a picture of that process), and I bought some black leather grain vinyl somewhere online. This is a picture of the backside of the vinyl with my paper patterns on it. I cut out the vinyl. I got out my wife's sewing machine, but I don't have any black thread. I will get some tomorrow.

On another note, I bought some seats out of a 2005 Cadillac Deville. I like them because the seatbelt is built INTO the seat. Also, it is electric.
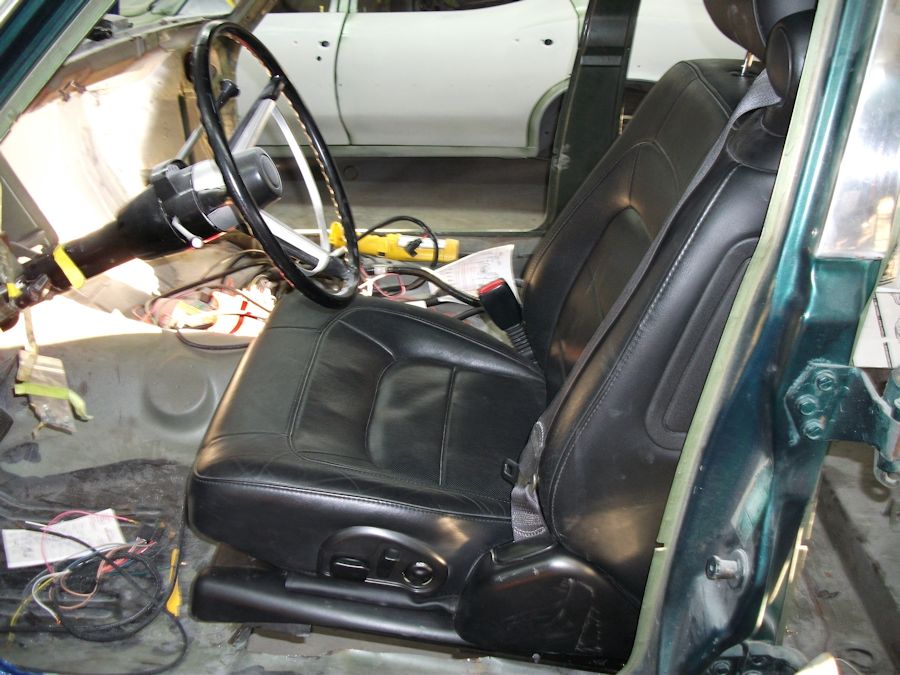
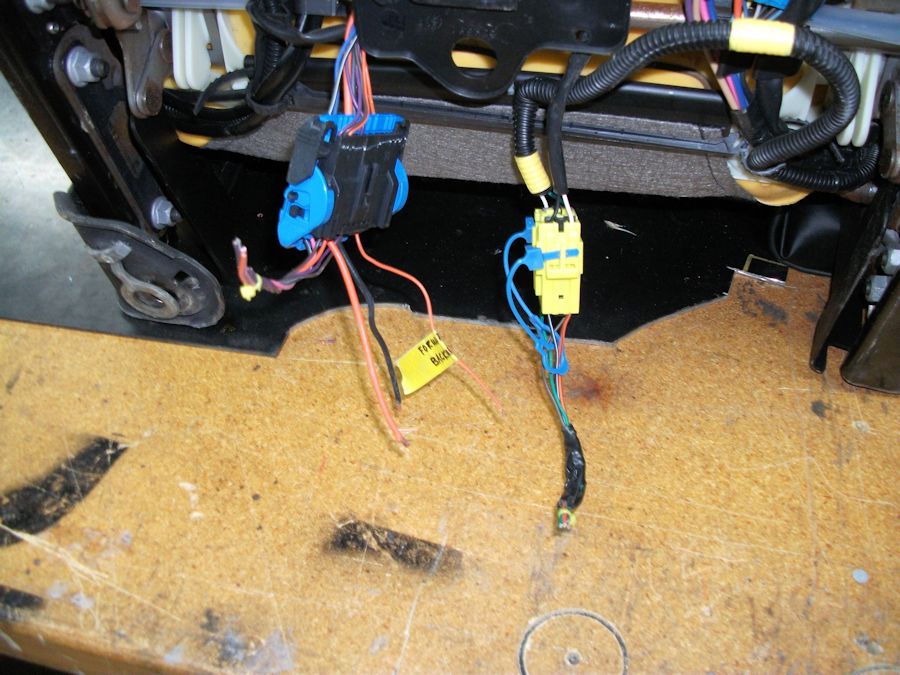
The seat has a lot of wiring. It is a heated AND air-conditioned seat with a side curtain airbag, air pillows for lumbar support, and "is-the-seatbelt-fastened" sensors. I did a lot of testing to find just the right wires to get the seat to do what I needed it to do. I want it to move forward and backward, adjust the tilt of the back, and adjust the height. Once I figured that out, I was done (although, heated seats WOULD be nice) All I had to do was hook up 3 wires and I was done.
The problem, though, is that the "hump" for the bench seat tilts the bucket seats back too much. So, I am cutting out the "hump" and I will have to weld in some new metal to get the proper tilt on the seats.
I looked around and did searches for how to re-foam a dash and came up with nothing. Once again, I am going into unchartered territory. I used a die grinder with a 50 grit roloc disk to shape the existing foam and remove the crusty dried out foam. I bought some SEM urethane foam.... It was expensive as HELL!!!
Here is the dash after squirting the foam. It foams up quick. Also, it looks like crap/
I needed to trim the new foam, so I used an electric knife. It works great!!!
The SEM foam wasn't enough to do the job and I wasn't about to spend another $45 on another pack of foam. I searched the internet for "flexible two part urethane foam" and I found www.monstermakers.com and bought some. It is WAY cheaper than the SEM foam. Also, the SEM foam didn't bond well to the existing foam.
Here is the dash pad after I poured the foam on. This stuff foams up FAST, too.
This is another blurry picture, but I got it looking good. I trimmed it with an electric knife and finished it with a die grinder with a 50 grit roloc disk.
I used some brown craft paper to make a pattern. (I forgot to take a picture of that process), and I bought some black leather grain vinyl somewhere online. This is a picture of the backside of the vinyl with my paper patterns on it. I cut out the vinyl. I got out my wife's sewing machine, but I don't have any black thread. I will get some tomorrow.
On another note, I bought some seats out of a 2005 Cadillac Deville. I like them because the seatbelt is built INTO the seat. Also, it is electric.
The seat has a lot of wiring. It is a heated AND air-conditioned seat with a side curtain airbag, air pillows for lumbar support, and "is-the-seatbelt-fastened" sensors. I did a lot of testing to find just the right wires to get the seat to do what I needed it to do. I want it to move forward and backward, adjust the tilt of the back, and adjust the height. Once I figured that out, I was done (although, heated seats WOULD be nice) All I had to do was hook up 3 wires and I was done.
The problem, though, is that the "hump" for the bench seat tilts the bucket seats back too much. So, I am cutting out the "hump" and I will have to weld in some new metal to get the proper tilt on the seats.
needsaresto
Well-Known Member
- Joined
- Nov 13, 2004
- Messages
- 7,625
- Reaction score
- 281
Hmm to bad on the sem,I usually had good luck in the shops with that brand. I agree it syre is pricey!
Those Caddy seats are something else!
Those Caddy seats are something else!
-
Similar threads
- Replies
- 11
- Views
- 396
- Locked
- Replies
- 1
- Views
- 182
- Replies
- 0
- Views
- 207
- Replies
- 3
- Views
- 199


