Carpet help please!!!

-

Dusterdude72

IN MOPAR MUSCLE MAGAZINE
Joined
Aug 15, 2009
Messages
4,720
Reaction score
206
Location
MI 49203
OK everyone.

working on my 1972 duster.

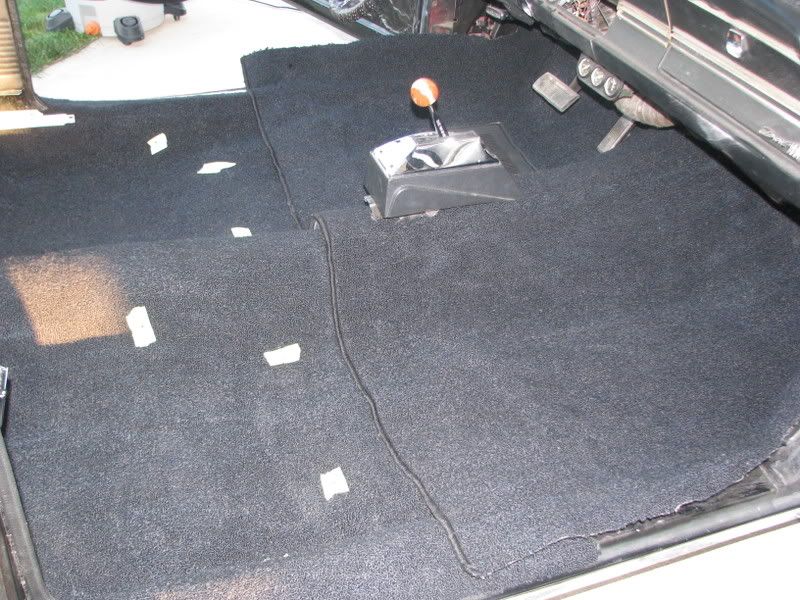
cleaned my floors and insulated them and ran power seat wires and speaker wires and so on in preparation for installing my new carpet.

The carpet set is an two piece ACC that I picked up through yearone.

now, I am confident that I can install this carpet (even though I have never installed a carpet set all by myself yet but I have had help doing them before so I have a general idea.

anyhow......my questions are......does anyone have multiple detailed interior pictures they could let me see? I need to see where the carpet is tucked under trim and where the carpet is cut at and how everyone else has theres layed out in other dusters and a-bodies all together.

also, any detail pictures of headliner/sail panel/package tray and what not as I am getting ready to put my new headliner in.

also, any tips from those who have " been there, done that" would be great and much appreciated.

thanks

P.S> auto trans that I converter over to manual column with B&M cable floor shift.
 
Hey, I cant offer any pics, but I did a carpet swap and column auto to console conversion at the same time in my 67 coronet. I cant remember if it was 1 or 2 piece, but I believe 1 piece. Once you have removed the the seats, trim and kick panels, lay your carpet out in the sun to make it a little more flexible to work with. I trimmed a little at a time to get to where I needed to. I trimmed very little for the console. The carpet went under the door sills as far as it could before going over the lip?? Hope that makes sense. Not much more I can help you with. Hope it works out for ya!! Nothin like a new rug to spruce up the interior.

4spdragtop
 
Thanks for the input.

the hole car is going to be new when done, already have all the mechanical aspects prettym uch wrapped up and the interior will be done after I finish up these things and then its down to body work.

if anyone else has any input and or pics ....feel free to chime in ,thanks
 
I install carpet as a living no brainier to me and you will have no problem doing it.As Steve said warm it up for sure.Ok lay it in, line it up and before you cut it in put some weight on all 4 flat areas were ones foot will rest,you want that flat.Then cut away.
 
right now It looks like I have to much material in the trans hump area, I can push the carpet flat, so I will have to dlo some tweaking and see what I come up with......also I was thinking of using contact cement to keep it in place...good idea?

hardest part is making sure I have everything where I want it and then trying to cut all the holes where they need to be (seat belt bolts ,shifter bolt holes,seat bolt holes,high beam switch and so on).

I was really hoping to see some pictures to see where the carpet tucks under what trim and what not because my carpet was junk in the car when I got it and I have no trim or anything in my car right now....its all gutted ....so I have nothing to go off of for an example......I don't need anyone to rip there car apart and take pictures....just some general referance pictures and pictures along the edges of the carpet where the carpet would normally tuck under sill plating and back seat and tuck in at the firewall and so on.

any help is appreciated and thank you to those who have already chimed in with some tips!.

trying to get this carpet installed before night time comes but don't want to just "jump" into it without getting a little better idea of things first.
 
anyone? we have over 16,000 members here at fabo....I am sure a few of you have carpet LOL
 
Here is the only pic I took while installing my carpet set.

10-01-08015.jpg


The tape was to help me locate the seat belt holes. After centering the carpet, I started trimming around the edges with a GOOD set of scissors. I cut off a little at a time so that I didn't cut off too much. The back was laid first and it fits into the footwells of the back seat. Then I laid the front piece in, and pulled up as high as I could under the dash. I left about an extra inch or so around the edges to go under the sill plates and the front kick panels. I cut the hole for the shifter by laying the carpet on top of the shifter, and then slicing it open. I gradually made the hole bigger until the shifter came all the way through and the carpet laid flat. I didn't use any adhesive to hold the carpet in place, but I did put a piece of two sided tape between the two pieces of carpet where it is kinda humped up on top of the trans tunnel.

Hope this helps.
 
As far as holes are concerned,you have holes in the floor already,for shifter or console make all your new holes,than install carpet,go underneath car and use these holes as your template punching thur with knife or what ever !!!
Hope this help
 
Thanks for the pic and the bit of advice, I will keep everything you mentioned in mind.


as for poking holes from underneath, I cant really do that with my install.

the seat belt bolt holes are captive inside the framing of the car itself (no through and through holes).....and my shifter its an aftermarket B&M pro ratchet shifter and I welded the mounting plate to the floor board and the mounting holes are in the plate itself ,not through the floor pan.

the only holes I can poke from underneath will be my seat mounting holes and maybe my inner seat belt holes, everything else I was thinking of putting a dot of red paint on and then pressing the carpet down to it (when I pull the carpet back up.....the red dot left on the carpet would show me where to cut my hole.

I am sure I can figure it out....I just want to make sure I do it right the first time so my carpet looks good is all.

thanks for the help guys I appreciate it!
 
Sorry, no pictures, but one tip nobody mentioned, you may already know, but DON"T DRILL THROUGH THE CARPET!!! the drill bit will catch the carpet and pull a runner all the way across before you even know it is happening. The best way I found for cutting holes is to install a bolt in the hole, feel for it and cut an "X" across it from the top, then press the carpet around it. That way, you know it is in the right spot. If you mark the holes from underneath, then remove the carpet and cut or burn your holes, they may not be where you thought they should be when you put it back. Just take your time and enjoy that "new-car" smell.
 
are you planing any sound deadner
 

Attachments

  • 100_1733.jpg
    161.6 KB · Views: 196
  • 100_1735.jpg
    93.7 KB · Views: 188
It's a four-door, but the floor is the same. I had a FABO member mention to me that the vinyl floor pad (under pedals) is too far back. It appears fine to me. Some advice, don't cut too much off the top (where the carpet goes under the dash). Keep the carpet as high up on the firewall as possible, then make your cuts along the top where stuff like the steering column, heater box, and accelerator linkage go. Good luck.

FYI, I'm just a novice. The only other time I installed carpet was in my old Duster. It's pretty easy.
 

Attachments

  • IMG_1194.jpg
    127.8 KB · Views: 184
  • IMG_1193.jpg
    162 KB · Views: 181
  • IMG_1195.jpg
    119.7 KB · Views: 179
  • IMG_1192.jpg
    133.2 KB · Views: 192
Thanks for the tips and pics guys, much appreciated!.

Yes I already installed sound deafened on my floors, I'd post pics but I'm on my phone right now.

As for the drill bit pulling runners, I assumed as much and I read accosts.come install directions and they said to do the same procedure so you were right on the money, thanks

The biggest thing was I needed pictures of how far up the firewall the carpet should go and if I should cut a recess around the column and gas pedal to move the carpet up even further on the firewall and so I could see what hold the edges of the carpet and where because I have all my sill plates and kick panels stacked in my trunk right now and would just like to have some reference.

Again, thank you guys for the info and pics, the more the better so feel free to chime in

I'll check the pics out later on my computer ( bug bombing my house right now because my little ones cat picked up some fleas and I have to wait so long before we can go inside lol) thanks again
 
Here's a picture of the original stock carpet after I removed it. Notice the inserts cut out of the top for the steering column, accelerator linkage, and heater box vent.
 

Attachments

  • trimmed carpet.jpg
    63.6 KB · Views: 186
When putting a hole in the carpet for a seat or whatever DO NOT use a knife or razor blade. Use a old soldering iron, it is faster and cleaner than a knife and it will also melt the carpet so it won't come apart later. The cheap round irons also fit through most bolt holes so you can make the holes from under the car.
 
When putting a hole in the carpet for a seat or whatever DO NOT use a knife or razor blade. Use a old soldering iron, it is faster and cleaner than a knife and it will also melt the carpet so it won't come apart later. The cheap round irons also fit through most bolt holes so you can make the holes from under the car.

Thanks for the tip bud, I just so happen to have one of those cheaper irons!
 
Soldering iron is a good idea I have used it many times and like it was pointed out it seals the hole so unraveling is not a concern. once the carpet is laid in use a small scratch awl to find your holes....it does little damage when/if you miss.
 
OK, just now able to get back in the house and I have been busy cleaning and what not.

But I wanted to say thanks everyone for the tips and the pictures!!!!!

If anyone with other pictures or tips wants to jump in than please feel free to do so.

Ill throw in some pictures of what I have been doing with the floor so far.

right now I just have the carpet sitting in the duster until I get all the info gathered up I want and know all the tricks you guys do on these a-bodies .....I want it to look as good as I can make it to look so I figured I would ask the best people for advice and who other than my pals here at FABO , thanks again guys!!!!

The floors were nice and solid and had a factory finish on them, I took a wire wheel on a grinder and some sand paper and brought it all down to bare metal and I then primed it and then painted it black, then I went over the front floor pans with this really tough and expensive panel/seam sealer that works great for sound deadening aswell and has a rubbery texture when dry.

then I decided to convert to newer power bucket leather seats so I welded in seat mounting support plates just for that added strength just in case something were ever bad to happen or from years of use and abuse I didnt want the square stock I used to make my seat brackets to punch a hole in the thin metal floor boards.

then I welded in my shifter mounting plate.

then just the other day I lathered down the floor pan and ceiling with contact cement aswell as my sound deadening material.

stuck all my matting down and used aluminum tape to clean up my edges and what not and keep it looking clean.

I figured I would just run the material up the firewall a bit and on the front and rear floor pan and I didnt bother putting any under the seats....between the seam sealer,primer and paint,undercoating under the car, sound deadner in the car,insulation under the carpet and the carpet.....it should be pretty quite inside.

interior will be just about finished after carpet and headliner are in.

sorry for the long post guys.
 

Attachments

  • DSCI1025.jpg
    140.5 KB · Views: 167
  • DSCI1023.jpg
    73.6 KB · Views: 157
  • IMG_0045.jpg
    135.6 KB · Views: 162
  • DSCI1421.jpg
    69.4 KB · Views: 167
  • l_c41da58f5dd5480fbc3a0f6ace8151c2.jpg
    71.6 KB · Views: 155
  • l_3e5a8c2bdf97438cbffe7d2edfd11f4f.jpg
    71.7 KB · Views: 176
  • l_83e69e810895483aa845799344375bda.jpg
    39.8 KB · Views: 171
  • l_2c57079047eb404b80e527940834ee5f.jpg
    58 KB · Views: 153
  • DSCI0646.jpg
    53.6 KB · Views: 163
more pics

as you can see, interior is getting closer and closer to done.....came a long way since I got it.

all mechanical aspect of the car I have pretty much done alreadt, and almost all interior I have done.

saving the body work for last.
 

Attachments

  • IMG_0250.jpg
    116.6 KB · Views: 148
  • IMG_0245.jpg
    127.5 KB · Views: 152
  • IMG_0244.jpg
    111 KB · Views: 157
  • IMG_0225.jpg
    75.8 KB · Views: 158
  • IMG_0221.jpg
    88.6 KB · Views: 159
  • 38992_1429650773748_1007204303_31032333_2870494_n.jpg
    86.5 KB · Views: 153
  • DSCI1029.jpg
    128.8 KB · Views: 162
  • DSCI1028.jpg
    120.6 KB · Views: 182
  • IMG_0252.jpg
    108.1 KB · Views: 157
Soldering iron is a good idea I have used it many times and like it was pointed out it seals the hole so unraveling is not a concern. once the carpet is laid in use a small scratch awl to find your holes....it does little damage when/if you miss.

Thanks for the tips.

I love FABO , so many people that actually know what they are talking about and won't just feed you some BS and steer someone in the wrong direction.

Thanks again guys!....even something as "simple" as a bit of help on a carpet install means alot, I want to make sure I get it right the first time and with no F'ups lol
 
-
Back
Top