"Demon Stripes install" ???????

-

Oldmanmopar

Going left turning right
FABO Gold Member
Joined
Jan 8, 2009
Messages
13,347
Reaction score
12,996
Location
Danielsville Pa. 18038
Why almost every Demon I see has the Quarter stripes on to Low?

I have worked on and owned several Demons with original paint and stripes. The Gas Cap on all those cars was painted the color of the stripe handle down including the handle. The stripe was even with the top of the handle. Guys now are putting them under the handle and putting the part of the stripe on cap under the handle.

These stripes when purchased from Chrysler had the fuel recess already cut in the stripe and could only go on in one location. Now when you get repo's they do not have this cut in and you can flop them from side to side and put them where ever you want. And the cut the opening.

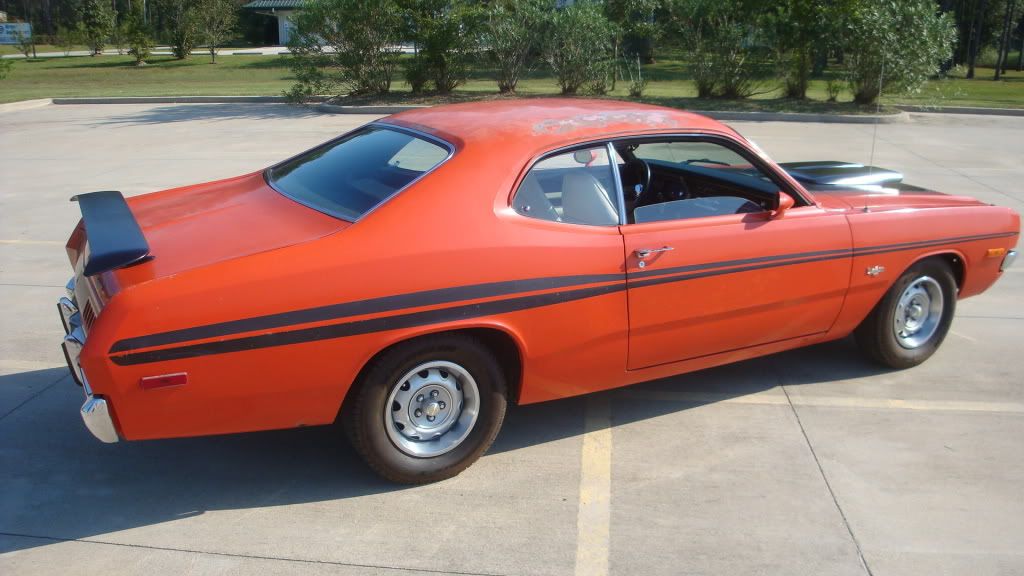
Here is a picture of a a original paint original stripe Demon. The top of the bottom stripe goes on the center body line from front to rear.

Also the top stripe is wider the front of the quarter
 

Attachments

  • Picture 389.jpg
    80.7 KB · Views: 871
..and i see a lot of '70 Dusters with the double stripe rising up and back down on the rear quarter and others with it straight... ( the gap true to the body line)
i think straight is correct but am not sure.
 
how about all the 340s leaning tha wrong way on the 71,2,3 340 stripes.ya gotta be smokin somthing to do that.thanks for the demon stripe info...were about to put some on a 72.
mike
 
I had just informed someone with a restored Demon that his stripes were installed wrong.

He like many others on this site refuse to believe me.. Some are on to low and some are upside down. There is a left and a right stripe on a Demon so there is a top and a bottom

. OEM's had the fuel opening cut in already so you couldn't screw them up. Why aren't the repops that way.

A member was just here that owns a Demon. his car is original and correct maybe he will Chime in. I forgot his user name. But I believe They look stupid when they are put on to low. Wheel well trim touches the stripe when this is done. and the upper and lower stripe is contoured totally different. The lower stripe should have less of an arch.
 
Well Crap !!!! Mine are wrong, I didn't know that.....that will bug the heck outta me .... going to cost me......some day !! Wait, did my car video trigger this thread? lol
 
Here's a few pics of what appears to be correct side stripe location on 72 Demon. Also, a correct 72 tail panel stripe, (with no Demon decal, or even a place for it.)

And then my 72 Demon's incorrect 71 tail stripe, with decal. I used the 71 because I like it better and don't care...

Lastly, my old 73 Dart Sport 340. I always liked this side stripe better than the Demons.
 

Attachments

  • 79022.jpg
    83.5 KB · Views: 713
  • 79023.jpg
    82.4 KB · Views: 667
  • Demon 408 Tail.jpg
    118.5 KB · Views: 662
  • Mag20Article.jpg
    103.9 KB · Views: 648
  • Driveway pic.jpg
    74 KB · Views: 678
Thanks for this oldman.. I always thought the stripe was being put on too low on the restored ones i see. For some reason they just didn't look right with so much stripe sitting on the wheel lip flare.

With regards to the painted half of the gas cap, would this also be true for white stripe versions? And would I be correct in presuming the white is painted over the body color?

Grant
 
Here's a few pics of what appears to be correct side stripe location on 72 Demon. Also, a correct 72 tail panel stripe, (with no Demon decal, or even a place for it.)

And then my 72 Demon's incorrect 71 tail stripe, with decal. I used the 71 because I like it better and don't care...

Lastly, my old 73 Dart Sport 340. I always liked this side stripe better than the Demons.

Both of your tail light stripes are on wrong. The blue 72 the stripes are to close together. and the lower is to close to the tail light, The black 71 the swhole stripe needs to be moved down. The stripes above and below the tail lights are not suppose to be the same distance 3/8 top 5/8 bottom

The lower stripe is to be farther away then the top stripe.see picks below for reference from original stripe placements. Start looking at different cars no one puts them where they were originally. because they don't know

The last pic is of someone elses car from the past. Correct placement also from new never touched. notice at the very back of the stripe the center of the stripe is above the body line. That is correct
 
I find alot of people just do not care, as long as they are on the car , thats great .And there is a times when you see them to low its because the stripe itself is to wide on the lower portion over the rear wheel , made from a shop who did not do there homework.
 

Attachments

  • side view 2 (640x480).jpg
    113.4 KB · Views: 573
The only one I have loaded

That's okay, I think I can see enough of the key lock opening to prove my theory. I centered the opening in the stripe with the key lock opening, and that's the way your picture appears to me as well, centered over the key lock opening. So, it seems my stripe was not cut correctly because if I lower the top to meet the measurement you're showing the stripe will cover the upper part of the key opening by about 1/8". Thx.
 
factory paint/stripes
DemonFirstdayHome28_zpsf8580cba.jpg

FirstDayHome32.jpg

FirstDayHome21.jpg
 
One thing that you need to remember,factory stripes were installed by people. Even when these cars were brand new, there was quite a bit variation on the placement. Jim-Bob might have been great at following the directions and a perfectionist, but Billy-Bob might have sucked and not really cared. As such, even though they used the same stripes, they may have ended up in different locations especially on the lower part of tail panel.
 
I recently picked one up with 27k on the clock from the original owner. Steve and I talked about this over the weekend. I can confirm what oldmanmopar is saying. It's crazy what he knows about these cars. It's interesting to listen to someone with that kind of knowledge and who is willing to share it.
 
I would like to know how the stripes were applied during assembly.
Doesn't seem to be any issue with air bubbles.
How did they maintain alighnment?
 
thanks for this thread ...this is what makes FABO the best site ever ......im a long way from paint and stripes but i have a 71 and a 72 demon and when im ready for stripes ...im a coming lookin for this thread ....THANKS
 
The OEM stripes had the area for the fuel cap already cut in. I put many on they only went on with the bottom of the top stripe even with the bottom of the fuel hole. The passenger went where ever but they were usually matched. .

My after market Duster tail stripe was not correct . The lock hole had to be trimmed to the side. I thought my lock wasn't center it was the stripe,
 
Very cool info! Since were on the decal placement topic.. What about the 1970 Swinger 340 stripe? I've seen those put on to far forward before. Ever notice the original advertisement for the 70 Swinger doesn't have a complete stripe? http://i228.photobucket.com/albums/ee186/Turbo_Rampage/E59B6432-37A8-4100-8177-8AAF8710A4BF-5939-00000492AA2B2411_zpsed90b141.jpg It doesn't extend into the rear valance at all (plus it has the earlier headrests in it) You'd think they'd have it correct for a car advertisement, so i'm not surprised if every car is slightly different.

I would like to know how the stripes were applied during assembly.
Doesn't seem to be any issue with air bubbles.
How did they maintain alighnment?


Soapy water is what they most likely used. I put all the decals on my 1989 Daytona Shelby (alot of decals!) and i used soap water with a squeegee (like the one you use for tinting windows) and that way you can slide the decal wherever you want, squeegee all the water/soap out from under it and then let it dry for a bit and then peel the paper off. I didn't have any bubbles, dirt trapped underneath or any issues of lifting doing it this way. If you go this method wait until all the water has evaporated off before trimming it or you can tear the decal since it wont be full adhered to the panel
 
-
Back
Top