I get a little shakey on the wiring of the early rigs. You have a shop manual/ wiring diagram?
I have a manual and all seems good
Scroll down this thread, there's a link for a 66 shop manual:
http://www.forabodiesonly.com/mopar/showthread.php?t=132309&highlight=click+save
Here are some useable ones:
http://www.mymopar.com/downloads/1965/65DartA.jpg
http://www.mymopar.com/downloads/1965/65DartB.jpg
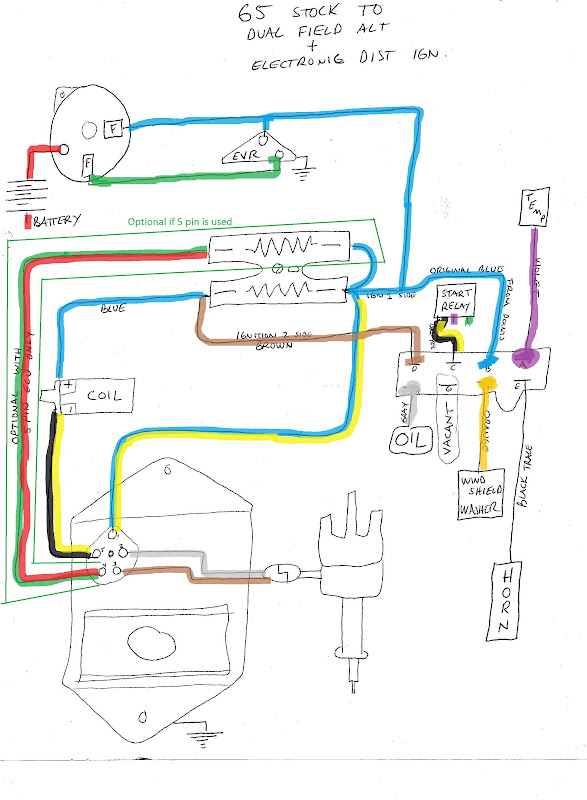
First, Mopars don't have an alternator light, just an oil light and ammeter Does your oil warning light come on? What color is the stray wire?
I stand corrected ... you are right of course. They do not come on
(Temp sender should be violet, oil sender should be gray)
Temp sender is violet .. I don't see a grey wire
Does the car crank but not fire, or not crank? Is it stick or automatic?
the car does not crank ... it is automatic
If automatic, the neutral safety switch is on the trans, has one wire comes up over the top of the trans and hooks to ONE of the two "push on" terminals of your starter relay.
yes that is correct and I never removed it from the starter relay only from the transmission end. Cleaned and re-attached when tranny put back in
Unhook ONE of the push on terminal wires on the start relay, hook your test lamp to first one, then the other, and turn the key to start, determine which wire is "hot" with key in "start."
I will try this
HOOK THAT WIRE back up to either push on terminal.
Ok
Temporarily clip lead the opposite terminal to ground, and the engine should crank.
will try and let you know
If it does, check out the wire to the neutral safety, the switch itself, or the trans shift linkage
this catches my interest as I have not hooked up the tranny cables to the floor shifter as yet. not sure which one goes where. Perhaps this is the reason of no start.
IF not, and if the other wire to the 'push on' terminal is getting juice from the key "in start" then you may have a bad relay. Try jumpering across the two EXPOSED terminals of the relay, and see if the starter cranks.
will try
According to diagram "B" the wire coming from the ign switch to the relay is black/ yellow, and the one to the neutral safety is brown
and these seem to be correctly connected
As far as the oil sender (near distributor) being different, it normally is either a flat spade or a "button head" and what LOOKS like a spade female actually slips over the "button head" horizontally
")


