Rbob
Well-Known Member
For those of you who would like to give it a try, you may learn something from my mistakes. First I hired a professional who never did a Barracuda before but had done hundreds of others. That was the first mistake, if you hire get someone with experience with your vehicle.
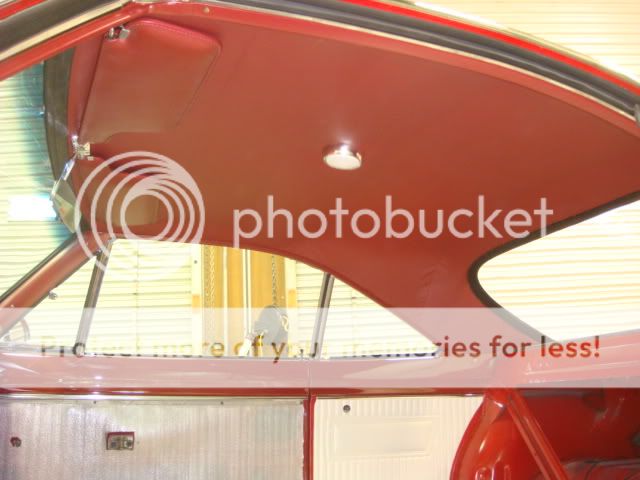
It has wrinkles and over stretched in the rear sail panel, and I could not install the rear glass because he wrapped the headliner over the back glass pinch-weld. So I called him and asked him to make some adjustments as this would not do. He came over and refunded my money except for $50 for the insulation he put in the roof.
Great, he is out nothing but his labor and I am out $$ for another headliner...........
So I removed the old one and when I undid the rear sail panel I could tell by positioning the material that it was stretched the wrong direction. So I decided that I could do this headliner myself after seeing the trouble spots.
Some of these tips I did not discover until I was installing the interior so this is what will save some headaches for you.
1. Lay the headliner out and let it warm up if possible.
2. Do not cut the rear listings (material that the bows go through), you want the headliner out as far as possible. This is where my wrinkles came from and I would have to buy a 3rd headliner to fix this. The other listings I cut slits maybe 1.5" to 2" and that worked fine.
3. I just used pieces of U-shaped molding to clamp the headliner into position and weldwood contact cement and brushed it on when it was where I wanted.
4. The sail panel cardboard, no directions and they sit in the back corner, seemed simple enough but put this all the way down till it is touching the rear shelf or it will show. The rear part of the headliner will just glue on the flat of the rear shelf and does not wrap over the pinch-weld so glue will be all that holds it in the rear. I used a plastic spreader to push the headliner down into the corner.
I watched a video on PUI Interiors a couple times and it helped, start in the rear with the wires for the rear bow and then move to the front. Do not worry about the first time around, just go around a second time and re-adjust and tighten a bit more. Then move to the rear and working from the center out. I took my time in the rear corners and you have to cut relief cuts in the window opening to get it make the corner and stretch. You will notice in the video that he slaps outward on the headliner to get the material to slide towards the sail panel, that works well.
I am confident that I could do a perfect job next time, just do not want to do it again on this one after the windows and trim are in.
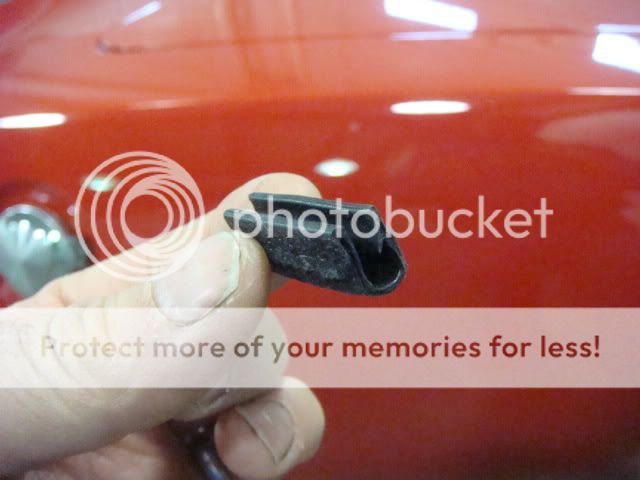
One thing that sucks is the rear glass weatherstrip does not fit correctly and there is a gap at the top and the top rear corners. Maybe it was my glass install but I tried that twice but could not get it any tighter.
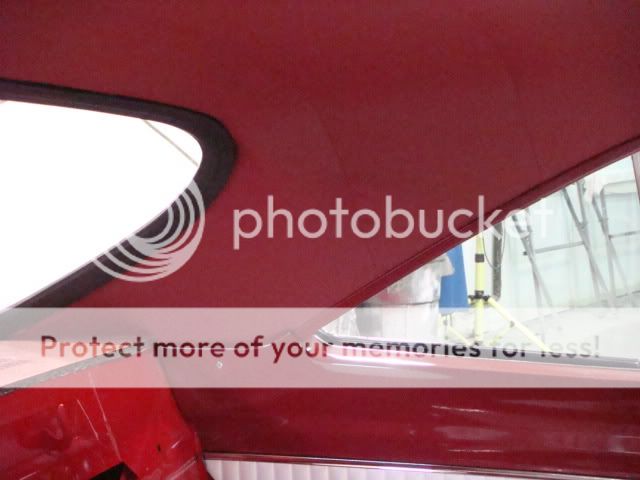
I have a couple pics but I will take one tomorrow of the rear sail panels showing the wrinkles and imperfections that still piss me off.
This looks worse with the camera flash!


Every day I discover things I wish I had known.
It has wrinkles and over stretched in the rear sail panel, and I could not install the rear glass because he wrapped the headliner over the back glass pinch-weld. So I called him and asked him to make some adjustments as this would not do. He came over and refunded my money except for $50 for the insulation he put in the roof.
Great, he is out nothing but his labor and I am out $$ for another headliner...........
So I removed the old one and when I undid the rear sail panel I could tell by positioning the material that it was stretched the wrong direction. So I decided that I could do this headliner myself after seeing the trouble spots.
Some of these tips I did not discover until I was installing the interior so this is what will save some headaches for you.
1. Lay the headliner out and let it warm up if possible.
2. Do not cut the rear listings (material that the bows go through), you want the headliner out as far as possible. This is where my wrinkles came from and I would have to buy a 3rd headliner to fix this. The other listings I cut slits maybe 1.5" to 2" and that worked fine.
3. I just used pieces of U-shaped molding to clamp the headliner into position and weldwood contact cement and brushed it on when it was where I wanted.
4. The sail panel cardboard, no directions and they sit in the back corner, seemed simple enough but put this all the way down till it is touching the rear shelf or it will show. The rear part of the headliner will just glue on the flat of the rear shelf and does not wrap over the pinch-weld so glue will be all that holds it in the rear. I used a plastic spreader to push the headliner down into the corner.
I watched a video on PUI Interiors a couple times and it helped, start in the rear with the wires for the rear bow and then move to the front. Do not worry about the first time around, just go around a second time and re-adjust and tighten a bit more. Then move to the rear and working from the center out. I took my time in the rear corners and you have to cut relief cuts in the window opening to get it make the corner and stretch. You will notice in the video that he slaps outward on the headliner to get the material to slide towards the sail panel, that works well.
I am confident that I could do a perfect job next time, just do not want to do it again on this one after the windows and trim are in.
One thing that sucks is the rear glass weatherstrip does not fit correctly and there is a gap at the top and the top rear corners. Maybe it was my glass install but I tried that twice but could not get it any tighter.
I have a couple pics but I will take one tomorrow of the rear sail panels showing the wrinkles and imperfections that still piss me off.
This looks worse with the camera flash!
Every day I discover things I wish I had known.