trunk seal

-

Garry

Well-Known Member
Joined
Sep 25, 2010
Messages
199
Reaction score
5
Location
Louisville,ohio
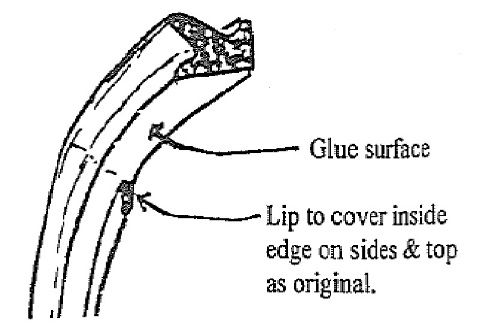
Ok I want to confirm the application of this seal. As you can see in the picture. Does that slight curve in the end profile of the molding(to the right where there is light glare) go around the lip across the top and sides? What about across the bottom? The detail on the car seems different does it just lay flat on that flatter area or still wrap that lip? A good picture would help if anyone is so inclined.
 

Attachments

  • DSC01075.jpg
    31.5 KB · Views: 427
  • DSC01076.jpg
    59.1 KB · Views: 453
Something doesn't look right with the profile shown in your pic, at least in regards to the factory setup. There should be a square end with a little ridge that follows the lip of the trunk seal surface. The "U" part always faces out. This ridge goes away on the rear edge of the trunk where there is no lip. Only place I ever found that had the true dual-profile seal was Gary Goers, he has his little catalog online. Gary is one of the best guys in the business, very honest & makes some really rare stuff that others don't, he specializes in early 300's. If you're totally confused I could take a pic or two.
 
It looks a little like mine from my Dart Sport. The rubber was different. If I can hobble to the garage and uncover it, I can show you what mine looked like. I was sent the style you show originally, but that wasn't right. Then I struggled on how they actually sat. I finally figured it out. I'll try and get some pics later.
 
Hey 396 could you show those pictures? I am really confused now.

Here's the correct profile that shows the lip (hijacked from Goers catalog)-

trunkweatherstrippic_zpsa4329525.jpg
 
yea I will try to find this guys catalog on line, that looks better than the " new" junk what I ended up with.
 
Goers is for the most part a one man band & prefers snail mail. Don't expect next day service. A few hints on the install-

-- Set up the weatherstrip on the car using those spring loaded clips with the rubber tips.
-- Use a good weatherstrip adhesive. I like the 3M black stuff.
-- Attach about a foot at a time, don't try to glue to whole darn thing at once.


and
--don't stretch it.
--be easy on the curves see above. I let mine sit in the heat for a day clipped to the trunk in position to help form it.
should come out great.
 
So that "V" shaped side goes to the outside and the squared side faces the trunk opening ... see Signet diagram above
 
See it this helps. I'm not sure what vehicle you have. This is from my 70 Dart. I've included a photo of the trunk seal end with notes. The second photo shows it going around the lower corner near the bumper. You can see from looking from the quarter panel view where that "top of the V" lip compresses down so it looks like a double lip all around the outer edge.

What everyone else said is good information when installing these. It's not difficult but you do want to take your time and be clean as you work with the adhesive. I agree the 3M black is the way to go. Follow the instructions on the tube.

View attachment DSCN0819.jpg

View attachment DSCN0820.jpg
 
See it this helps. I'm not sure what vehicle you have. This is from my 70 Dart. I've included a photo of the trunk seal end with notes. The second photo shows it going around the lower corner near the bumper. You can see from looking from the quarter panel view where that "top of the V" lip compresses down so it looks like a double lip all around the outer edge.

What everyone else said is good information when installing these. It's not difficult but you do want to take your time and be clean as you work with the adhesive. I agree the 3M black is the way to go. Follow the instructions on the tube.

View attachment 1714695742

View attachment 1714695743

This is exactly what I have, and it looks like the same type of lip on your car. The install photo is great. There were no instructions with mine and I had to figure it out on my own. I did not get it right the first time.
 
Mine looks like #10 (square side). Mine are a perhaps a bit too tall, so closing the trunk takes a good slam, but it gets easier as it ages. For my 65 Newport, I bought decades ago (J.C. Whitney) and my 65 Dart a few years ago (rockauto?), but both look the same.
 
Folks here have mentioned NO INSTRUCTIONS and none came with mine either. What I'm wondering is do the sellers get reorders from buyers who just fumbled around and wound up with a mess The best I can figure is to look at the old stuff (if there's enough left) and try to duplicate the routing. Of course this requires ASSuming that the previous install was done correctly.

BC
 
Just a heads!...I had a double layer over the bottom half because exhaust fumes were being sucked in from the tail pipes.
 
Folks here have mentioned NO INSTRUCTIONS and none came with mine either. What I'm wondering is do the sellers get reorders from buyers who just fumbled around and wound up with a mess The best I can figure is to look at the old stuff (if there's enough left) and try to duplicate the routing. Of course this requires ASSuming that the previous install was done correctly.

BC

A OEM replacement part goes on the same as OEM was so instructions shouldn't be needed. It's when the OEM is missing that we should question before proceeding.
Most of this aftermarket stuff is made by people in China who have never even seen the application. Their rare and poorly written instructions are of little help anyway.
Back when I produced console mounting brackets I also provided a template to aid in their proper placement. Today AMD provides the brackets but... When I asked them if they were interested in my locating template, They didn't even reply.
I've found that most aftermarket vendors have no interest in my or your happy moparing. Their only interest is pictures of dead presidents.
 
Mine was replaced with a flat piece of foam by the PO, so I had no way to know how they were originally installed. My first set I installed incorrectly. I bought a second set and all my hood seals and door whiskers and such from www.justmopar.com and it came with instructions. It takes a bit of a slam to shut as has been mentioned, but as the summer wore on it got easier. No water in the trunk after a car wash now, though!
 
See it this helps. I'm not sure what vehicle you have. This is from my 70 Dart. I've included a photo of the trunk seal end with notes. The second photo shows it going around the lower corner near the bumper.

Rob, where did you buy yours ?
 
-
Back
Top