I started on this project a while back, finally got around to taking some pictures.
Anybody that owns one of these cars knows how weak the aft lighting is. My big issue is the daylight visibility Here in the desert with 10,000 foot candles pounding on the light they can be dim in full sun.
The housings are 47 years old, and have very little space inside. The lenses are hard to find, and take a beating from a larger bulb. I had already replaced the 1157's with 3496's. Still not thrilled with the performance I started on new circuit boards for LED's. I used the same automotive grade TL series that Cadillac, BMW & Toyota use. Rated for service to 110c and recommended for stop / tail light service. I moved the drivers outside of the reflector, and placed the LED's on the same plane as the OEM bulb filament. The back of the double sided board has the heat sink for the LED's
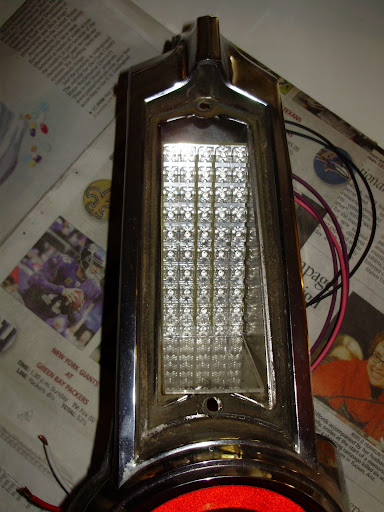
It is tight, but 50 units fit. They are driven in 3 sections, with 3 drivers for reliability.
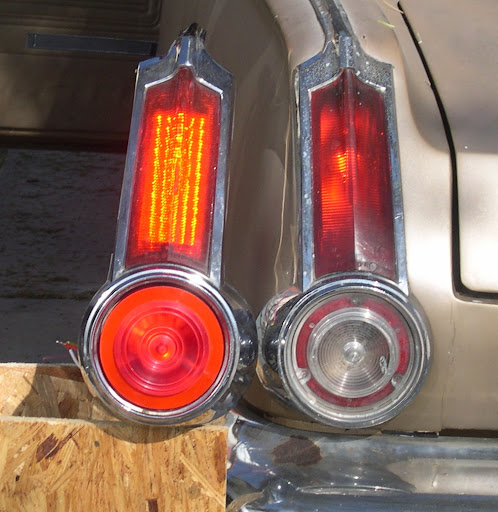
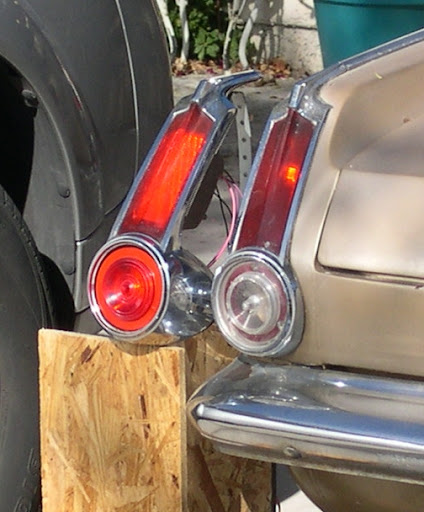
With the brake pedal depressed, engine running the 3496 on the right vs the LED board on the left. Taken from 8 feet back, and about 5 feet from the ground, direct sunlight @ 11am:
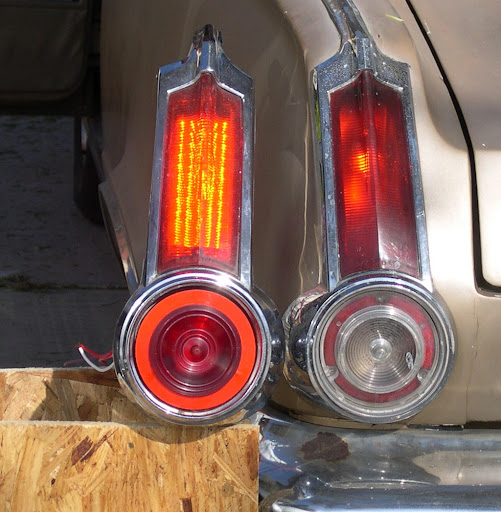
Quite a bit brighter.
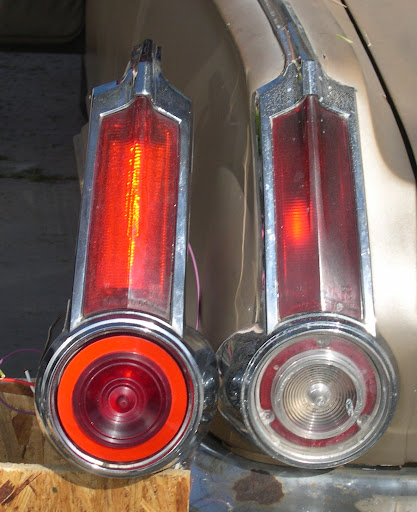
The red lens in place of the back up light is something else I am experimenting with. Since the OEM red reflector is so weak I originally molded clear lenses and used the red reflective material. I decided to make some red ones to run a regular bulb just in case the LED's develop a problem. I loaded a 2357 in the housing, since the lens will take a beating:
That lens is less likely to "false light" in the sun like the upper lens. It is however a little lower than optimal. Still better than nothing. Even if I did not add the LED's I think I would go with the red lens. The back up lights were never great, and I will replace them with a couple of H1 units under the bumper.
This photo was taken 45 degrees off axis, and 25 feet back. The LED's have a 45 degree angle of output, and are still plenty bright from two lanes over:
For the tail lights I only run the center row, like on the new Cadillac. It seems bright when you compare it to weak OEM tail light, but around here we have a lot of street lighting - you can read a newspaper on most streets at night. I can of course adjust the drive down should it be necessary:
It has been a fun project. It was not simple or cheap. It does work well.
B.
Anybody that owns one of these cars knows how weak the aft lighting is. My big issue is the daylight visibility Here in the desert with 10,000 foot candles pounding on the light they can be dim in full sun.
The housings are 47 years old, and have very little space inside. The lenses are hard to find, and take a beating from a larger bulb. I had already replaced the 1157's with 3496's. Still not thrilled with the performance I started on new circuit boards for LED's. I used the same automotive grade TL series that Cadillac, BMW & Toyota use. Rated for service to 110c and recommended for stop / tail light service. I moved the drivers outside of the reflector, and placed the LED's on the same plane as the OEM bulb filament. The back of the double sided board has the heat sink for the LED's
It is tight, but 50 units fit. They are driven in 3 sections, with 3 drivers for reliability.
With the brake pedal depressed, engine running the 3496 on the right vs the LED board on the left. Taken from 8 feet back, and about 5 feet from the ground, direct sunlight @ 11am:
Quite a bit brighter.
The red lens in place of the back up light is something else I am experimenting with. Since the OEM red reflector is so weak I originally molded clear lenses and used the red reflective material. I decided to make some red ones to run a regular bulb just in case the LED's develop a problem. I loaded a 2357 in the housing, since the lens will take a beating:
That lens is less likely to "false light" in the sun like the upper lens. It is however a little lower than optimal. Still better than nothing. Even if I did not add the LED's I think I would go with the red lens. The back up lights were never great, and I will replace them with a couple of H1 units under the bumper.
This photo was taken 45 degrees off axis, and 25 feet back. The LED's have a 45 degree angle of output, and are still plenty bright from two lanes over:
For the tail lights I only run the center row, like on the new Cadillac. It seems bright when you compare it to weak OEM tail light, but around here we have a lot of street lighting - you can read a newspaper on most streets at night. I can of course adjust the drive down should it be necessary:
It has been a fun project. It was not simple or cheap. It does work well.
B.