Zac_F71's 71 Demon

-
LOL I live 1 mile south of Milltown. Small world. If your ever going by, stop in!!!! Right on HWY 35 :D
Ha My close uncles live in Luck and Fredric, My Grandpa owns St. Croix Valley Hardwoods in Luck.. I plan on coming down for Mopars in the park Saturday and Sunday, and the Street Machine Nat's I hope to have the car there (Demon)

I'll PM ya next time I come out to WI - we usually end up hanging out in Siren as my Grandpa owns land up there..
 
ha my close uncles live in luck and fredric, my grandpa owns st. Croix valley hardwoods in luck.. I plan on coming down for mopars in the park saturday and sunday, and the street machine nat's i hope to have the car there (demon)

i'll pm ya next time i come out to wi - we usually end up hanging out in siren as my grandpa owns land up there..

ok! :d
 
Well small update - got the flex plate, mounted that up with new ARP bolts, went to install the motor last night - still no go - the driver side header doesn't fit.. mostly cause of the column

SO the motor is coming back out as well as the column to get modified (take column shift linkage parts out) and I need to pound in a couple pipes to clear the steering box/steering linkage and double check that the oil pump clears the QA1 K member, going to be a busy day haha

So while the motor was in I mocked up a bunch of stuff - got a water pump and mounted it up, as well as the mini alternator - I have maybe 2.25" between the rad/water pump - SO the clutch fan I bought doesn't fit at all - have to buy a dual 10" electric fan setup and pray it fits

Will post pics tonight or tomorrow of progress and the mock up I did
 
Well wrecked the Hedman headers beating them (bent the flanges), SO looking for new/used headers (have my eye on a pair of TTI's local), and in the mean time I am tieing up all the stuff I've put off due to the headers

cut up the column for floor shift - need to get JB weld and a small amount of filler for it
drilled the floor, mounted the Hurst Pro-Matic 2 shifter, and got it all hooked up
Installed the Lokar kick down cable
mocked up the Toyota alternator, water pump, and a few other things - found out a mechanical fan will not fit, so I have to yet again buy another electric fan setup

and mocked up the Grant Tuff Wheel steering wheel at the end of the night

I have a ton of pics which I will upload in the AM, and then I'm running to get hardware for the waterpump/housing oh and JB weld/dremel cutting disc's
 
HUGE progress made! got under the left and right A pillar's patched thanks to my uncle SO I'll be back on schedule after some grinding of the welds!
 
HUGE progress made! got under the left and right A pillar's patched thanks to my uncle SO I'll be back on schedule after some grinding of the welds!

Where the hell are the pics???????????!!!!!!!!!!!!!!???????????????? :protest:


:D
 
Ok I'll post up the pics in a few posts to less confuse us haha -

trying the motor for the first time!


Well got the motor in and went to hoof the trans in, it doesn't fit around the headers! SO out it came to install the trans first -


Then tried the motor again..
got it in 4 bell housing bolts in and F me the flex plate doesn't line up- out it comes again


I moved on from that til I got a new flex plate - vacuumed the glass off the floor and took the bench seat(s) out -


5 days later.. the new flex plate shows up!
'

time to stab it in again! Nope still don't fit-


While it was in I mocked up the front dress/ radiator - the $290 electric fan didn't fit - sent it back, ordered a new clutch fan, nope didn't fit either..


bit the bullet and started pounding on the headers to get them to fit - still don't fit - the 4 tubes that face the centerlink/ idler/pitman arms need to be pounded near flat to clear from the look of it - I bent the flange as well so I'll have to bolt them to a spare head and pound on them more - if not I was offered a pair of TTi's..
 
So I pulled the motor back out for at least the 6th time and left it out - moved on to the interior to get a windshield installed at work - which I ordered will be $200 or so installed LOL

So here it basically were I am -

Pulled the steering column out, and started in on the mods to it -


Drilled the holes and mocked up the Hurst Promatic 2 shifter


Got my 2nd wind and installed the shifter completely, and also installed the Lokar kick down cable -


End of the night interior mock up! Grant Tuff wheel, and 1 bucket seat temporarily in..
 
So I again moved on - pulled the dash out, as well as the heater box - to restore both. Also to repair a little rot I didn't know was as bad as it was - The rust was just patched last night I need to grind it down and finish pulling the old trim clips out of the channel

The dash was stripped, pressure washed at work, and am currently filling holes in it, will be starting filling work on those tomorrow, then prime/paint it!


Heater core was replaced in 1987! LOL going to reuse it since it's in great shape!


Ha ya.. Gotta drop the trans again as well to transport the car to my work to install the windshield hopefully it starts warming up here!
 
Well got the dash sanded, filled in 7 non factory holes and am getting it in primer currently..

Going to tackle the heater box tomorrow after work, and then grind the patch down/prime that, and install the heater box..

Hope to have the dash in by Thursday..
 
Another HUGE update coming more than likely tomorrow - still busy working on the car and garage at this point LOL -

got the heater box cleaned/restoredish lol
cleaned up the patch on the lower A pillars
sanded, primed, and painted the cowl, A pillars, and 2" above the windshield on the roof

Going to clear the paint, and install new wiper seals, go through the wiring, and tidy up a few things under the dash, as well as paint the dash tonight, and try to finish the steering column sanding/painting

Til tomorrow!
 
Lots done! Will post up pics tonight! Had a hard drive in one of our computers basically die so had to switch computers..
 
Looking good, I see you got your shifter. Except for the incredible engine, tranny, torque converter, upgraded suspension, strong rear end, new radiator and in depth rust repair it's just like my car....lol Will ck back tonight for those new pics.
 
Well a day and a half late but oh well haha keep in mind these are all from the past month or so..

captions will be with every pic..

Dash cleaned up, filled in 4-5 non factory holes here -


Dash in full primer -


Front of dash painted - (sorry no pics of painting the top)


Only pic of rebuilding the wiper pivots, Mancini kit came with press in grease zerks-


With the under dash pretty much done (sorry no pics of putting the heater box back together- it wasn't fun so that's why) - here I removed all the rotted trim clips - clean I might add - didn't have to redrill 1 hole which was nice!


metal all cleaned up, and new trim clips installed!


Taped off for prime/paint - 6 hours or so of sanding -


Primed!


A local auto parts store mixes paint into a spray can - hello GF3 Medium Green!


Heater controls repainted to match the instrument cluster-
 
pics cont...

Sorry no pics of cleaning up the column..

$15 radio delete plate - has 3 holes drilled in it hence the sticker LOL it's fitting -


Dash in! put the pad, and glove box in first- (cleaned up the dash harness - again no pics - still have fix a couple things (cigarette lighter, and I bought a working glove box light I want to wire in as well as a modern CD player(hidden of coarse)


rebuilt coupler - perfectly clamped by hand - of coarse had to pound it on the box so it fell back off - luckliy I have one of the couple clamp recall pieces that was not easy to install but works great!


Straightened up a dual gauge mount - mounted it in 2 existing holes on the back on the dash - will be a volt/wideband o2 gauges here - both white faced


Heater control/ radio delete plates installed - they look great!


The ever daunting task of the headliner - I ended up gluing 90% of it in as it is just way to hard with the rear window in - it is clipped in in the top rear and front, rest is glued - still need to find clips for the sides before I can put the interior back in-


Deck and front dash speaker - (speaker was in the dash before the heater controls went in)


At my work getting the windshield in! - Gasket in place!


Sucker is in! - had to sit at work for 4 days cause they didn't know it took a locking strip - sucked!
 
pics cont,

Got a couple repro gas caps and of the 3 I have - got 2 to work - painted this one with more GF3 - no more Black gas cap! haha (lost the original over 10 years ago)


Cleaned, primed, and painted the portion under the battery tray - matches better than the pic shows..


Finally assemble the new fuel tank, w/ 3/8" sending unit - the pick needed to be bent quite a bit for the gasket flange to sit flush in the tank but got it in perfect! - here is it painted with Eastwood Alumiblast - supposed to look like cast aluminum but makes the tank look great! - painted the top side of the tank semi gloss Black -


Picked up a nice pair of factory 15x7 steel wheels for $100 at Mopars in the Park car show - they're soaking in oven cleaner to strip the paint - were pressure washed after this -


All cleaned up! - bare steel -


Gloss Black!


Ordered a pair of brand new 275/60/15 Cooper Cobra's from work and had them mounted on the steel wheels!


Offset and back space are perfect with the 68-70 B body 8.75!
 
pics cont..

My other scores at Mopars -
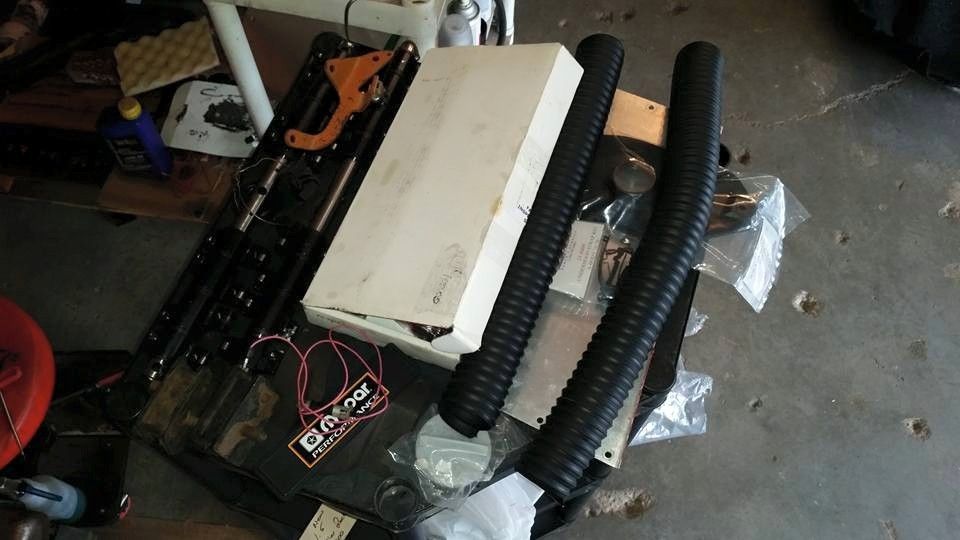
2 sets of adjustable Big Block roller rockers
new heater defrost tubes, carpet kit, glove box light, big block motor mount isolators, 2 15x7 steel wheels, radio delete plate, big block throttle cable bracket, and more I'm forgetting and not pictured is the toy treasures we found as well - spent $1,500 with the one night hotel and stuff.. was a super fun weekend!


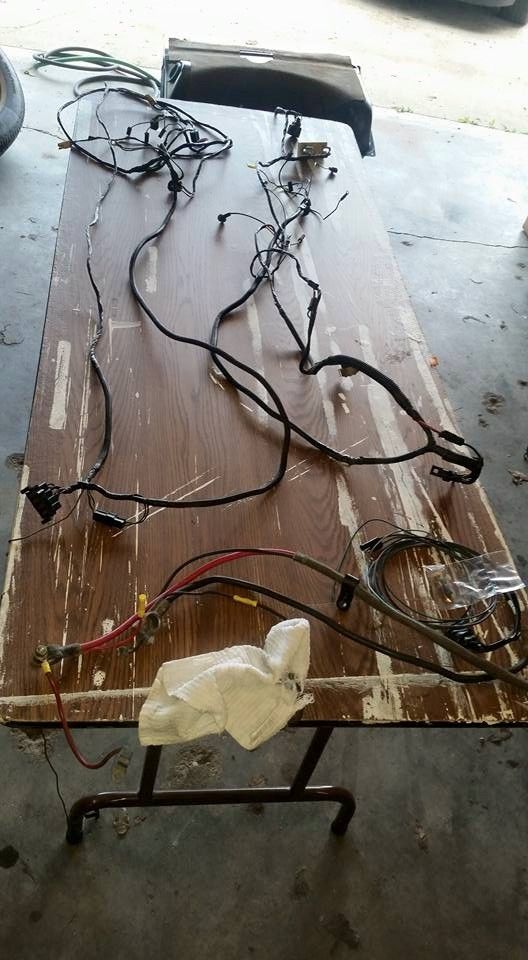
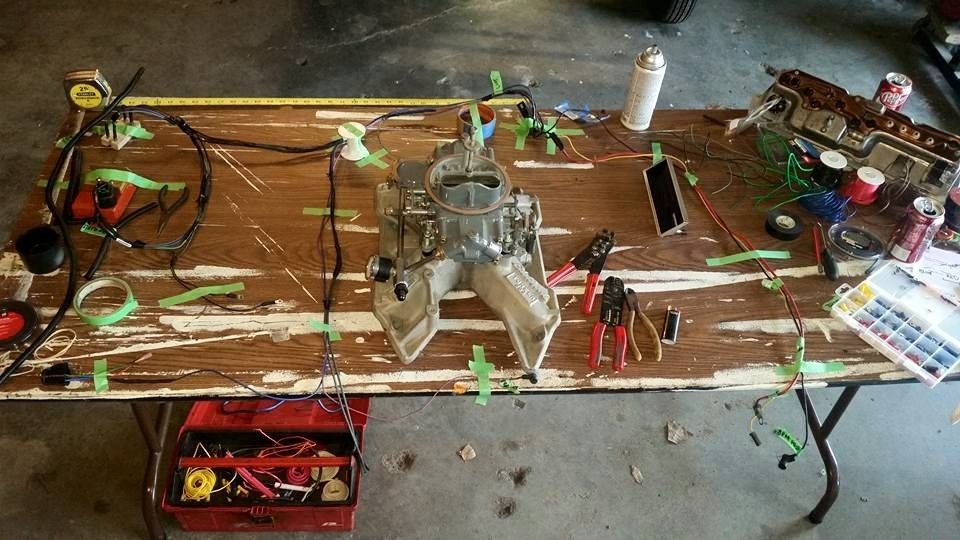
Back to work! - starting on the engine harness - mess -


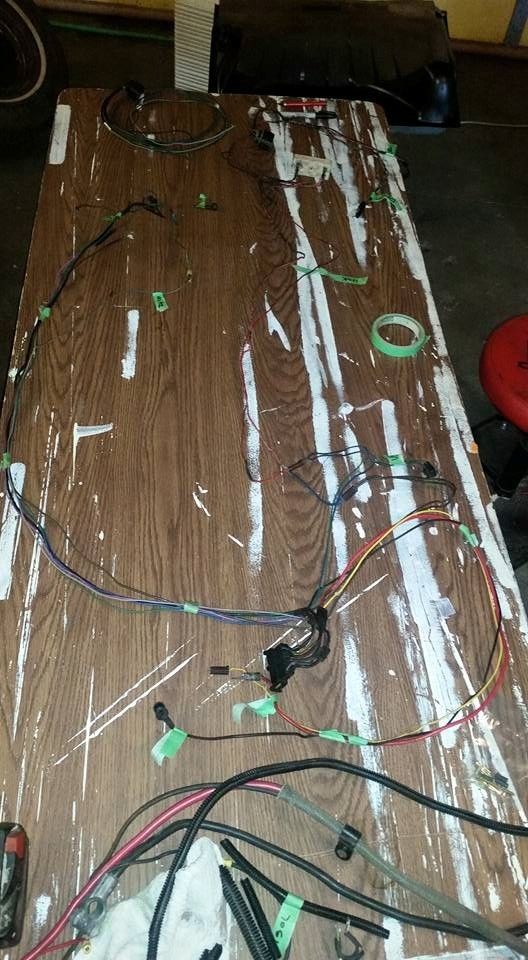
Setting up and labeling everything -


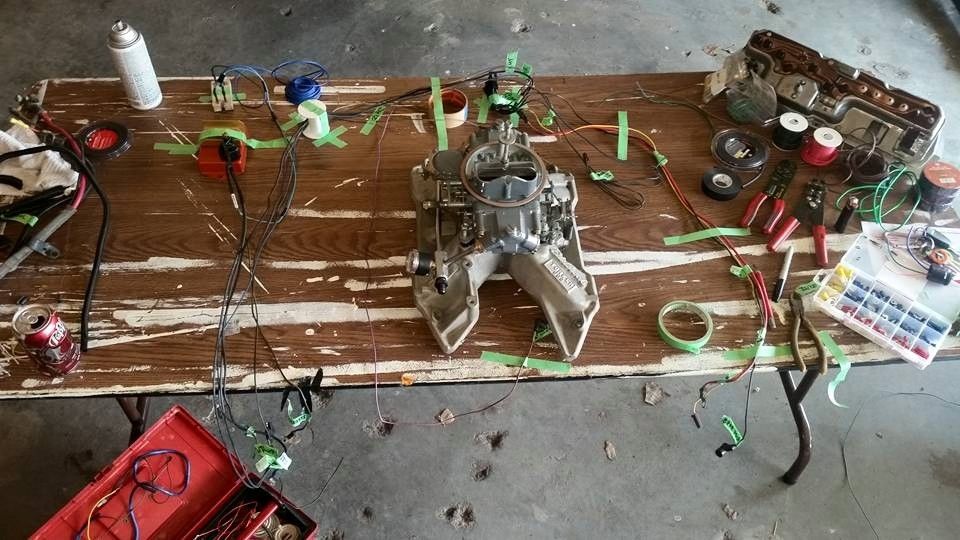
It starts! - some serious mock up was needed to make sure it'll fit when it goes back in -


Done as of Sunday or so - need Green wire to run the alternator charge sense wire - everything will look stock once it's wrapped up! - gotta have CLEAN wiring!


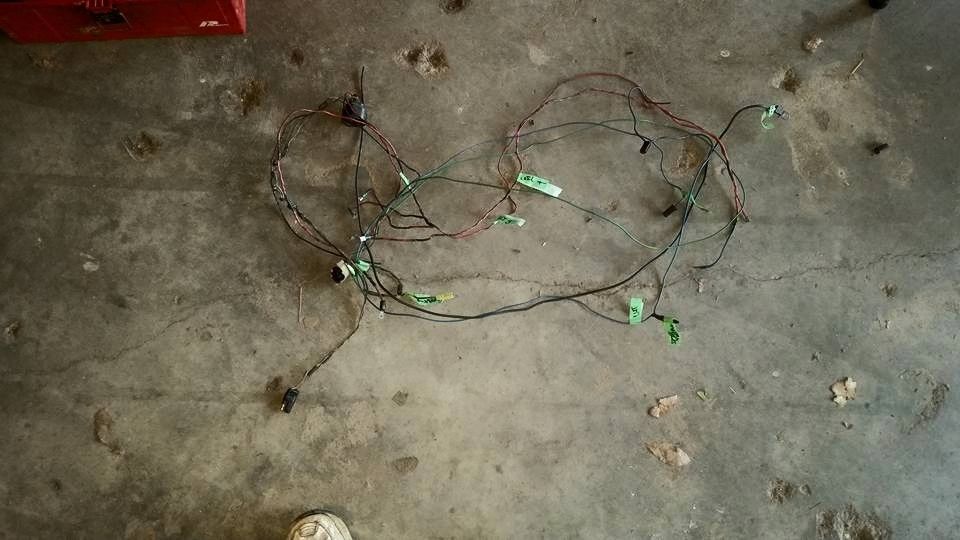
90% sure my car originally came with electronic ignition as half of the wiring was under the factory wrap, the half that wasn't, YIKES - amazing it didn't start on fire LOL - this is the mess I cut out and redid -


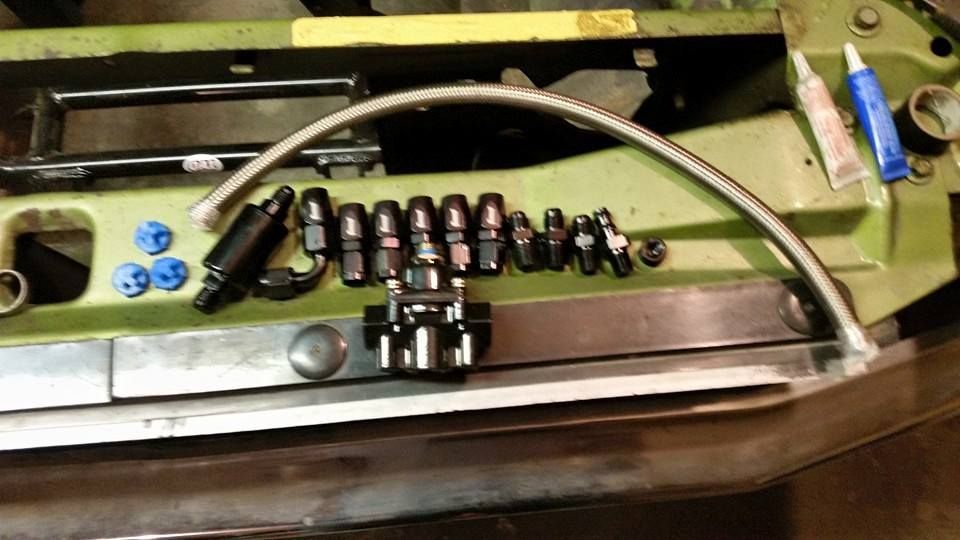
Not sure if these 2 made it or not BUT are older - assembling the fuel system fro mteh pump to the carb - all the Summit Racing AN fittings (-6 = 3/8")


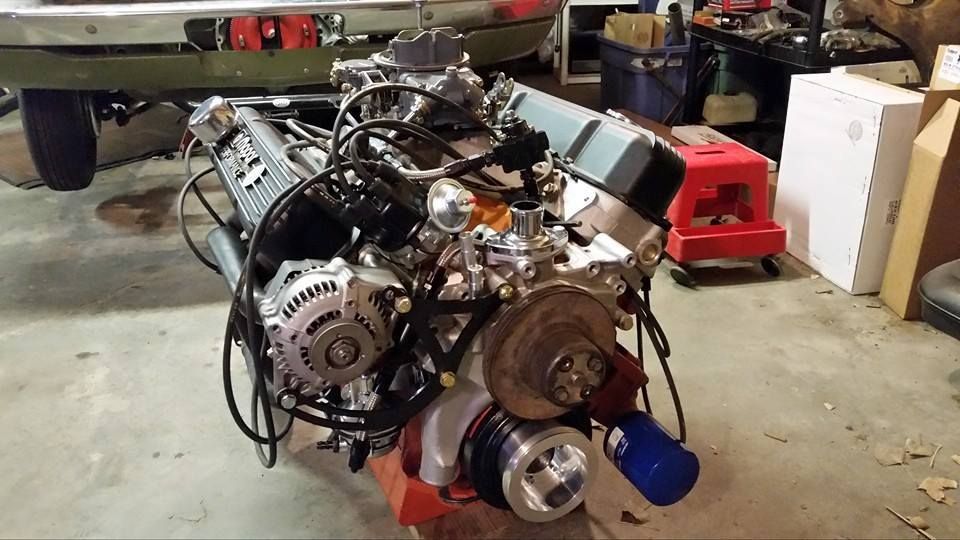
And on the motor! -here I also installed the 440source blem aluminum water pump housing (reading the timing is not going to be easy at all..), the Milodon water pump, aluminum under drive crank pulley (I have since painted the water pump pulley), and the Mancini mini alternator bracket, and the Toyota Denso 120amp alternator
 
Post #133 first picture
I am pretty sure the steering linkage is supposed to go thru the header......
 
Nope goes above it in my case anyway- I had it all bolted in lined up - tubes need more pounding to clear...
 
In today's world, there is no excuse for that much aggravation.
I guess manufactures money is in the newer cars, where you can sell a bunch of parts, vs small, one off batches.
 
-
Back
Top