Very nice ! Looks like a good job on the inner fenders to me sir , enjoying this build.
You are using an out of date browser. It may not display this or other websites correctly.
You should upgrade or use an alternative browser.
You should upgrade or use an alternative browser.
1966 Dodge Dart
- Thread starter rod7515
- Start date
-
rod7515
Well-Known Member
I continue to work on the dash. Ive tried to keep it looking somewhat stock but changing it to fit my needs. The biggest change was the gauges and cutting the radio bezel to fit around them. Now with the radio area changed I needed to find a place for a radio. I decided to put it into the glove box area. Couple of days ago I had an idea, and heres what it led to:
First I had some aluminum angle that I cut and fit around the old mounting area for the cardboard glove box. The angle ended up being 1 1/2" X 1 1/2". I tried 1" x 1" at first but it didnt give me enough clearance for the door to close:
View attachment IMG_0879.jpg
My friend welded this up and with some flat aluminum plate i made a faceplate. Cut an opening for the radio to go thru and ended up with this:
View attachment IMG_0878.jpg
Here it is in the bracket and mounted in the dash:
View attachment IMAG0589.jpg
View attachment IMAG0591.jpg
View attachment IMAG0594.jpg
View attachment DSCN0550.jpg
View attachment DSCN0553.jpg
Here is the look with the glove box door closed:
View attachment DSCN0556.jpg
Rod
That turned out great!
rod7515
Well-Known Member
Its been a long time since I last posted but ive been out working on the car every chance I get. Ive made some progress but its not as visible as past progress has been. Ive decided to hide as many wires from view as I could to make the engine compartment look cleaner. So Ive read so many posts about what others have done to move the battery to the trunk and to change the wiring to a heavier gauge. I beat myself up for quite a few weeks trying to get all the answers. I ended up buying stuff I didnt end up using but in the end I went with a 4 post battery cutoff switch, I decided to keep the original style starter relay. Its complicated but its similar to the stock wiring. My worst nightmare was that I decided not to take any wires out thru the original bulk head. Instead I put a piece of aluminum in its place to block it off while looking good. If I knew I was heading in this direction at first I could have just added metal and welded the hole in the firewall shut but i wasnt planning on doing most of the things I have done. Guess its just what you would call winging it as I go. Ive mounted all electrical components that were out under hood such as regulator, coil, ignition box, starter relay, Continous duty solenoid, to under the dash. Of course this means custom wiring to and from each component which I find to be a slow process in making and adding. Laying under the dash at my size and age is a challenge! I also had to add in the trunk cutoff switch and fuel pump relay then run the wiring from cutoff switch to front of car. Since I usually work alone its taken quite a while to climb in and out and get this completed. I am finally down to wiring in the ignition box before I can attempt to start the engine. Hoping that to be this next weekend. Cant wait to hear it running. Once its running I will still need to run the wires for the parking/turn signals, horn, then add headlight relay kit, electric fan relay, and Im sure a few I havent figured out yet. Here are some of the dumb stuff thats happened to me lately with this thing. I got excited last weekend thinking I would get far enough with wiring that i could start it so I added oil to the engine. Then I started with making wires and heater hoses. Then thought i would prime the oil pump, hit the drill to turn shaft and after about 5 seconds you could feel the pressure, about that time I see a gusher straight out of oil switch hole. Yep I forgot to put the oil gauge line on. cleaned up that mess then thought i better fill the trans so when I start it i wont forget to have fluid in. Added 6 qts and all looks good. Put car up in air to work on fuel pump relay wires and see trans fluid running to the ground. Throw a pan under it and check whats leaking only to find when the trans was rebuilt they didnt put a neutral safety switch in. Cleaned that mess up! Now thats another issue since I could only find a switch for 67 and newer and they all have 3 prongs coming from them and my original switch had only the ground for neutral and park. So Ill need to figure out which way those switches are wired. Here are a few pics from the recent work. The first pic shows the ignition box and regulator just above it. Since then Ive added my continous duty solenoid just above the regulator. The second pic shows the coil mounted just below the wiper motor and the third shows the starter relay mounted just above the steering column area. Also in the third pic is the stud that will carry power to the front of the car. This helps me from using the distribution block.


rod7515
Well-Known Member
Forgot to mention I have made some aluminum kick panels so I can mount these items. Also some extra pics of the bulk head cover I made, the kick panel, plugs wires and heater hoses.


rod7515
Well-Known Member
In order to run the wires without coming thru the bulkhead I decided to put them inside an aluminum tubing under the front fenders. Here you can see I put the field wire and power wire to the alternator in tube.


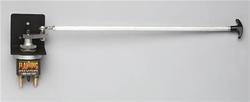
Also here are some pics of the final cutoff switch I ended up using. Again its a 4 post switch that will shut everything off once pushed. Many ways to do this and I think they all would work but this way I think answers best for what I am looking to do. If you have any questions on this just shoot me a message and I will be happy to go deeper into what I did.


The reason for the added arm on the switch was because the setup for the 4 post switch would have cost another $40 to make it work. I took the arm from my original 2 post switch and adapted it with some help from my welding buddy to save that. LOL, just couldnt see buying what I could already use and the chance of someone wanting my old brand new switch is probably slim!
Hope to post in the next week that Its running!!
Rod
Also here are some pics of the final cutoff switch I ended up using. Again its a 4 post switch that will shut everything off once pushed. Many ways to do this and I think they all would work but this way I think answers best for what I am looking to do. If you have any questions on this just shoot me a message and I will be happy to go deeper into what I did.
The reason for the added arm on the switch was because the setup for the 4 post switch would have cost another $40 to make it work. I took the arm from my original 2 post switch and adapted it with some help from my welding buddy to save that. LOL, just couldnt see buying what I could already use and the chance of someone wanting my old brand new switch is probably slim!
Hope to post in the next week that Its running!!
Rod
This is a fun build, nice work!
That engine bay looks super tidy! I wonder how you manage to get all your sparks plug wires running straight to the plugs, though. Mine are crossed more than once.
What's the difference between a 2-post and a 4-post cut-off switch? I wouldn't mind buying that new unused 2-post switch from you.
What's the difference between a 2-post and a 4-post cut-off switch? I wouldn't mind buying that new unused 2-post switch from you.
rod7515
Well-Known Member
It could be the difference in where the distributor is indexed. My TDC points directly to the rear of the carb. Also I am running my wires in between the other wires going thru the cap instead of around the cap. I can take a better pic of that when I get home tonight and post it for you. As for the switch it is available if you are interested. Just shoot me a PM. The difference between them are the amount of posts to connect to. the first switch I had was 2 posts in the rear of the switch.
 The posts here are either 3/8" or 7/16" lugs if I remember correctly. One carries current in and the other carries current out. If switch is pushed it kills the flow.
The 2nd and the one I ended up using has 4 posts on the back. 2 large lugs 1/2" and 2 small lugs 3/16" I think.
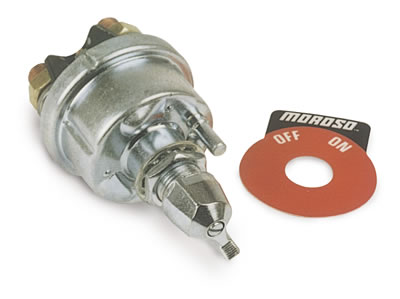 In this pic you can barely see the one small post but the 2 large ones are visible. This allows you to not only run the heavy load thru the large lug but also a smaller accessory circuit thru the smaller lugs. Each of the paired lugs where separate from the other but to push the switch kills power to both outs. Thats about the best I can explain it. I could have made either one work but decided to go with the 4 post. Again shoot me a PM if your interested.
Thanks Rod
The 2nd and the one I ended up using has 4 posts on the back. 2 large lugs 1/2" and 2 small lugs 3/16" I think.
Thanks Rod
Plug wires do look neat. I would also like to see how you did it. It looks like 3 and 2 are reversed.Forgot to mention I have made some aluminum kick panels so I can mount these items. Also some extra pics of the bulk head cover I made, the kick panel, plugs wires and heater hoses.
View attachment 1714938957 View attachment 1714938958 View attachment 1714938959
Ah, ok, now I see it. The flat MSD cover hides the crossing. Very neat.It could be the difference in where the distributor is indexed. My TDC points directly to the rear of the carb. Also I am running my wires in between the other wires going thru the cap instead of around the cap. I can take a better pic of that when I get home tonight and post it for you.
I'll PM you re the switch.
rod7515
Well-Known Member
360DartGT66, dont give up on your dreams of getting that Corvette. I bought my vette 10 years ago then a second about 6 years ago. I put way to much money into my 2nd vette which is a 72. It turns heads everywhere I go. Drives like a dream. 383 Stroker, Overdrive trans and 411 gears.

Rod
Rod
*drooool*360DartGT66, dont give up on your dreams of getting that Corvette. I bought my vette 10 years ago then a second about 6 years ago. I put way to much money into my 2nd vette which is a 72. It turns heads everywhere I go. Drives like a dream. 383 Stroker, Overdrive trans and 411 gears.
View attachment 1714939126
Rod
That's the one. Not very different from a '71, is it? Is it a Stingray? I bet it smokes tires good with that setup. Thanks for posting (and checking out my thread, obviously!)!
rod7515
Well-Known Member
Well after spending the past week running and splicing wires, adding new ends, shrink wrapping everything and waiting for advice from members past experiences I fires up the 408 for the first time. The open headers make lots of noise! But it sure sounded good. I had a smile from ear to ear! The actual startup took about 5 seconds of cranking and then it fired up. Set the timing at about 16 initial and it had about 38 at 3K. It has 55 lbs of oil pressure at idle and hits 70 when rev'ed. The throttle response is very quick, very impressive.
Thanks Rod
Thanks Rod
Sb449valiant
Well-Known Member
Please post a video of your engine runing....thanks for sharing.....ü
rod7515
Well-Known Member
Not sure how to do a video. I will try later tonight to video it then post.
Rod
Rod
It's best to post them on Youtube then link them here.Not sure how to do a video. I will try later tonight to video it then post.
Rod
zkx14
Duster De-ruster
was wondering why it sounded like thunder when there were no storms in the area, lol I'll have to get over and check it out it again soon.Well after spending the past week running and splicing wires, adding new ends, shrink wrapping everything and waiting for advice from members past experiences I fires up the 408 for the first time. The open headers make lots of noise! But it sure sounded good. I had a smile from ear to ear! The actual startup took about 5 seconds of cranking and then it fired up. Set the timing at about 16 initial and it had about 38 at 3K. It has 55 lbs of oil pressure at idle and hits 70 when rev'ed. The throttle response is very quick, very impressive.
Thanks Rod
rod7515
Well-Known Member
Believe me, its noisey.it brought out both neighbors! Told them the mufflers wont be much quieter once they get put on.. love open header noise!!
Rod
Rod
rod7515
Well-Known Member
OK, here is a quick video of the car with engine running and a brief tour where some components are located now. Its my first ever you tube video. Had to get help from my son to figure out how to do this. Hope it works! Here is the address:
Nothing fancy, hope it is what you were looking for.
Rod
Nothing fancy, hope it is what you were looking for.
Rod
zkx14
Duster De-ruster
Good show Rodney!
Great video! Thanks for posting!OK, here is a quick video of the car with engine running and a brief tour where some components are located now. Its my first ever you tube video. Had to get help from my son to figure out how to do this. Hope it works!
Nothing fancy, hope it is what you were looking for.
Rod
Than engine sounds pretty hot.
rod7515
Well-Known Member
Not a lot of progress the past few weeks. Summer is here and wife likes the beach and I have to keep momma happy!! The time i have spent has been on wiring. Im in the process of trying to get everything run from under the dash out to frt of car using the aluminum tubing like I did for the Alternator wires. I find what use to take me 20 minutes years ago now takes me 3 times that long today. Also staying focused is harder to do as well. With the holiday approaching I will have even less time. The one thing I am hoping for is that the body man will show up to finsih the quarter panels. Once that is done I think I can do the rest of the car myself. I've contacted the guy that painted my vette which I posted for 360dartgt66 a few posts ago, and he said he would spray this one as well. I have to have every thing ready so all he will do is come and spray. I will supply all paint but the good news is he said he will do it for $400. Was going to paint it myself but for that price I dont think its worth me taking a chance on screwing up and redoing it. Paints not cheap!
Thanks to the kind words from everyone on the start up. I forgot to tell you I also had fuel leaks at some of the line fittings before startup but they were because of not having everything tight enough. But once I went over each fitting connection again we are in good shape. Oh, forgot to say I did buy a set of 4:56 gears for the spare 489 carrier I have. Will be buying a spool and getting those set up some time this summer as well.
Thanks Rod
rod7515
Well-Known Member
Things have been very slow working on the dart. I did get a call from the guy thats is to be working on the body for me and since he hasnt had time to come to the house to work he ask if I wanted to bring it to the body shop that he works out and he would spend time each night after work until he has it done. Told him at this time I would rather the work be done at my house since I have no brakes lines and no steering column installed. Also if its at the house I can still do something during the evenings if I have some spare time.
Now Ive spent some time wiring in the electric fans and Ive been trying to adjust the kick in and out thermostat settings for them. Im close to being happy with my settings so I plan on moving on to running the rest of the wires from under the dash to the front. I finally found someone that has a nice tube bender for 5/8" tube so I can bend the tube to carry these wires and not be seen. I need to run at least 8 wires inside the tubing so thats the reason for the 5/8" tubing instead of the 1/2" tubing(which I can only get 7 wires inside) I used for the alt wires under the passenger fender. I hope to start spending some more time in the evenings working on it. But I have decided to not worry about trying to be ready for this fall and plan on the spring.
Rod
Things have been very slow working on the dart. I did get a call from the guy thats is to be working on the body for me and since he hasnt had time to come to the house to work he ask if I wanted to bring it to the body shop that he works out and he would spend time each night after work until he has it done. Told him at this time I would rather the work be done at my house since I have no brakes lines and no steering column installed. Also if its at the house I can still do something during the evenings if I have some spare time.
Now Ive spent some time wiring in the electric fans and Ive been trying to adjust the kick in and out thermostat settings for them. Im close to being happy with my settings so I plan on moving on to running the rest of the wires from under the dash to the front. I finally found someone that has a nice tube bender for 5/8" tube so I can bend the tube to carry these wires and not be seen. I need to run at least 8 wires inside the tubing so thats the reason for the 5/8" tubing instead of the 1/2" tubing(which I can only get 7 wires inside) I used for the alt wires under the passenger fender. I hope to start spending some more time in the evenings working on it. But I have decided to not worry about trying to be ready for this fall and plan on the spring.
Rod
Good job keeping the car at home. You wonder why it can be called "body shop jail" sometimes. Two weeks can easily turn into nine months of side work in the body shop.
-
Similar threads
- Replies
- 10
- Views
- 368
- Replies
- 9
- Views
- 351


