1974 Dart Swinger

-
7373 My 73 Dart Sport 340 has power disc brakes no A/C..stock.Also Button,s I,m guessing you don,t want the window trim??
 
7373 My 73 Dart Sport 340 has power disc brakes no A/C..stock.Also Button,s I,m guessing you don,t want the window trim??


My only thought on that is cause it's a 340 car. i could be wrong, it's happened once or twice....
 
Frostygreen318,
You said that your vac line from the distributor was connected to the air cleaner houseing. I tracked mine down today and mine is run into the side of the carb, (see first picture). I didn't run it that way, it was already that way when I bought the car.

I went to see the original owners son today about some paperwork and he had "some goodies" for me. He said he was cleaning out a room in his house and he found the original DART and Swinger emblems in a drawer. One of the Dart emblems is broken in two pieces but I might be able to fix it unless I can track down another one somewhere else. Does anyone know what the proper "catches" were that went on the back studs of the emblems that held them in place? They fit perfectly back in their holes as can be seen in the final picture.

Vac line left.jpg


Vac line right.jpg


Emblems spread.jpg


Emblems on fender.jpg
 
They had little plastic sleeves that slipped over the stud, it held it tight without using any nuts. I believe you can buy these now from somewhere.
 
Button,

My
distributer is currently connected directly to the vacuum amplifier. (since I have an older air cleaner without the OSAC valve mounted on the outside of the cleaner housing where it should connect) I am trying to determine if the current "plumbing" is OK and get the engine running better. Been tracking down vacuum hose diagrams.

Thanks for the additional pictures. I was looking for the emblem retainers also so may be someone will post a manufacturer. I know they are available.

Thanks again!
 
give therse guys a call: http://www.rtspecialties.net/
they seem to have just about anything hard to find...

maybe this is what you need? they don't show a pic but the description sounds right ....


PUSH IN EMBLEM NUT 1/8 STUD

Price: $0.50
 
that car apears to be the same color mine was when i got it i was 16 years old.
i think that color is called alvracado gold. dont see many that color.
PICT0004.jpg

Picture016.jpg

ur car is coming along great
i wish now i would have gone the same rought as yall did and built a street car instead or trying to build a race car.
i got mine when i was 16 im 19 now and the car still has LOTS of work left to do
 
Frostgreen318,
Here are three pictures for you of my old original air cleaner housing I removed for the chrome Edelbrock filter. It does have the OSAC inlet on the side of it. It has those letter as well as "CARB" in even bigger letters. Keep in mind that our Dart was originally sold as a California car in LosAngeles, so I don't know if that effects the vac system at all. The piece of wood you see merely holds the wire in place that keep the filter lid on. There's even a brand new Fram air filter inside with less than 50 miles on it. When we repainted it, I carefully covered the small sticker on the side that was there. You can't really read what ever it originally said, but I wanted to keep it original looking as much as possible. If you find those diagrams, let me know.

MOPARkid340,
Our car is Avecado Gold Poly, but I've also seen it called Avecado Gold Irid, (short for iridescent?). We just call it Avecado Gold Poly. I wish the eintire car looked as good as the engine bay paint did once we cleaned it up. This spring we plan to remove the hood and replace the rubber and padding on it's underside. At that time we'll clean and wax the underside of the hood so it looks just as good as the tops of the wheel wells.

7demon2,
Thanks for the heads-up on the fastener site. Looks like a good find and even if they don't work, we wont be out a ton of money. That site could help a lot of people on this DG.

AIR FILTER TOP.jpg


AIR FILTER BOTTOM.jpg


AIR FILTER SIDE.jpg
 
Button,

Thanks again for more good pictures. The vac hose goes from carb to OSAC, then to distributor.

My car is California also. I now have 73, 74, & 75 service manuals. If you want 74 vacuum diagrams PM me with your email and I will scan and send to you.

Thanks
 
I took these pictures this evening of various electronics under the hood. I'm assuming what some of these are due to the fact that my Haynes manual stinks as a reference for these, (manual came with the car). Are these in the order that they appear, the starter relay, ballast resistor, and emergency starter? And just what is an emergency starter anyways? If you loose your keys or something?! The item above the blower motor is what?, the ballast resistor?
The underhood shot is of the old hood insulation. The Paddock has two types of replacemnts for this. A reproduction for $24.95 with mounting clips, and a molded hood pad for $92.95 that has no clips. We also plan to replace the rear hood to cowl seal which the Paddock has for $23.95. Does anyone know of any other good places that might be even cheaper? Remember, we're not going for a conqours restoration here.

electric starter relay.jpg


electric ballast resistor.jpg


electric emergency start.jpg


hood bottom.jpg
 
Button,

The item above the blower motor is the EGR time delay. It connects to the solenoid at the rear of the engine by the choke control.

By the way, did you get the info I emailed you today? I was having some email issues.

FrostyGreen318
 
Button,

Just taking a shot at the "Emergency Start" - I'd say it's for use if the starter relay fails you can get it started. I'm going with this assumption because it states "ignition key must be on". We used to take a screw driver and jump from one terminal to the other, on the relay, to "bump" the engine over . . . I don't think my 73 ever had the emergency start device shown in the picture above.
 
Lucky!! They was right tho bout the jump start when your relay fails or your ignition switch! Hold on to that cause this dude that "Fixed" my car removed it :( Think of it as a mini remote starter switch ;) YEs its very true that you jump the connectors to crank the starter. Man thats so lucky of you to have!! Sorry i keep butting into the thread :/
 
Button
Here is an old video explaining the seat belt interlock system, kinda cool if you have a couple of minutes.

http://www.imperialclub.com/Repair/Lit/Films/314/

This was a one year only deal (1974) and the feds. didn't like it much on their new cars so they changed the mandate for the following year. Then the car makers offered the bypass module like the one in your picture.

Here is one of those interlock bypass things. http://cgi.ebay.ca/Nos-Mopar-1975-s...emQQ_trksidZp1713.m153.l1262#ebayphotohosting

Maybe too much information on this. LOL You and your sons keep up the good work. I'm enjoying this saga.
Bob
 
gerty,
I can't get that video link to open to view the footage once I'm at the site, but thanks anyways. We'll be sure to not remove the piece since it seems rare.
Thanks to all for the information. I think this weekend we'll replace the starter relay just for reliability reasons and because it's inexpensive and will look better being new, under the hood.
Edelbrock Signature series chrome valve covers are not far off.
 
We didn't get to work on the DART this weekend, but I did buy the wife a shiney, silver item for her birthday (18 Dec), a 2007 Ram 1500 "Lone Star" edition pick-up, (no, not jewelry). This is her first MOPAR, and it has the 4.7L V8 (287 cu in). It was a lease previously and only has 14,800 miles. She loves it and so do the boys. A bed cover and Flowmasters will go on but not much else, she likes it as is. It will look good next to my 97 and the boys 74!

Truck front.jpg


Truck side.jpg


97 Ram and bike.jpg
 
Nice addition!! kinda funny cause I just picked this up for my wife last week too! Slightly less powerful than what you got your wife. I'll chalk it up to we're young newlyweds with no kids..... (it'll make ME feel better) but hey at least we got the same color!!

1206081421a[1].jpg
 
I found this book in the Paddock catalog and bought it for my son as a Christmas present. It has 128 pages, 80 color photos, 40 black and white photos, and the cost is $24.95. I wanted him to know the history of the car and manufacter he would be driving.
I also got him a Stanley Mobile Work Center, (an upright tool box on wheels) and some Craftsman, Irwin, and Husky tools for wrenching on his car, dirt bike, ATV and bicycle. I had bought him a 53 piece Ratchet and Socket set about a month ago, so he should be set for tools for a while and can build it up as he needs to. My dad gave me a ratchet set when I was about 14 and it is my primary tool that I use to this day!
Merry Christmas and Happy MOPAR Year to all on this great site.

Book on Darts.jpg


Tools.jpg
 
We were searching through Craigslist the other day and stumbled across an ad for "14inch MOPAR beauty rings and center caps for $30". I shot them an e-mail and arranged for a visit. "Them" ended up being a lady selling her ex-boy friends stuff he left when they parted ways up in Waco. She claimed they were off a 70 Dart. However I think she might be wrong because the center caps matched what we already had, and I don't think they came on 1970 models. But we picked up the rings and left the caps. She actually wanted $30 for the caps and $30 for the rings so we didn't score both. But the rings were pretty much scratch free which was a serious issue with the ones on the car currently. The four new ones are on the towels. The old ones have curb scars all the way around them on all four, which can be seen in the single ring pictures. Since a replacement set runs around $175, I figure we did pretty good getting these.
We've still got to get those Edelbrock signature valve covers and chrome alternator brackets and install them soon.

Trim Rings 4.jpg


Trim Ring scratched.jpg


Trim Ring scratched close up.jpg
 
I know it's been a while since we posted but we're going to be starting up work again soon. But I thought I'd post these to show part of the reason my the boys love of MOPAR. These are from Pomona drag way in summer of 2003 at a GoodGuys sponsored event. Hemi-under Glass was the show stopper/headliner then. We got two posters and a 1/64 scale Johnny Lightning car for my son and Bob Riggle autographed everything for us. A real nice guy. Excuse the picture quality, it was a very cheap digital camera.

Pomona Race Track.jpg


Matching Valients.jpg


J w Hemi Glass.jpg
 
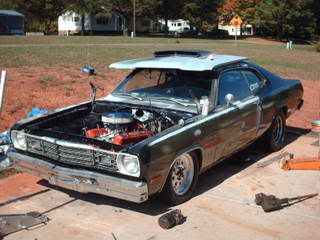
You sure have made a vast improvement in the dart in a short time! Very nice work so far.
About the only thing I wouldn't have done is to use that glass fuel filter. I bought one years ago, thinking the see thru feature was a good idea.
And then somebody told me to open it up and see how restrictive those things are. They have four holes about 1/8" in daimater for all the fuel to pass through, it's actually possible that it might heat the fuel up due to the restriction.
It's not really likely that a stock 318 with a carter BBD is going to need that much fuel flow, but there's another point...it's easier than you think to accidentally break the glass fuel bowl! I wish I could say I don't know that from personal experience! And if someone tries to sell you one of those ProFuel fuel pressure regulators, run away screaming! They are restrictive junk also.
A really cheap upgrade for the carb, is simply to spec one for an earlier (late 60's) 318. it will be jetted just a little richer, and won't have all that EGR crap on it. I usually removed the charcoal canister and plugged the return line off, with no ill effects, but.....
You can get a fuel filter with a 3rd nipple, and plumb this into the return line, giving you a recirculating fuel system, which would help eliminate vapor lock problems. It helps by constantly returning some fuel to the tank, and helps cool the fuel. These filters are found on mid 70's land yachts, like a 74 with a 400 or 440.
I also started adding an electric fuel pump at the rear of my cars, when alcohol gas started being common, and never had any more problems due to heat soak or vapor lock. Need not be some high dollar pump either, a parts store "helper pump" works great on a stock engine. Made starting much easier, as it almost instantly supplied fuel to the front of the car, so you didn't have to crank it forever to build up prime.
If the timing chain ever craps out, and the rest of the engine is in good shape, buy either a double roller chain like the 340's had, or at least an all steel single tooth version. Once grandma's 318 get some miles on it, and then a young driver starts beating on it,8) those plastic teeth on a stock chain will soon shed, and wind up in your oil pump pickup screen, and bad things happen!
I wish I hadn't experienced that one first hand, either!

As far as engine appearance goes, I'd remove the carb, and any of the accessories that are easily removed, mask what can't be, and spray bomb it with some original Chrysler blue. And then add the nice goodies. Just that will make the old 318 look a lot better, than new acessories un an unpainted block. Same thing I did back when I was young and on a real tight budget.
Enough for now, if I can be of any assistance, please let me know!
[email protected]

alan627b
 
-
Back
Top