How bad did I #$&% my piston up?

-

JohnnyRingo

Well-Known Member
Joined
Sep 17, 2011
Messages
119
Reaction score
10
Location
Portland, OR
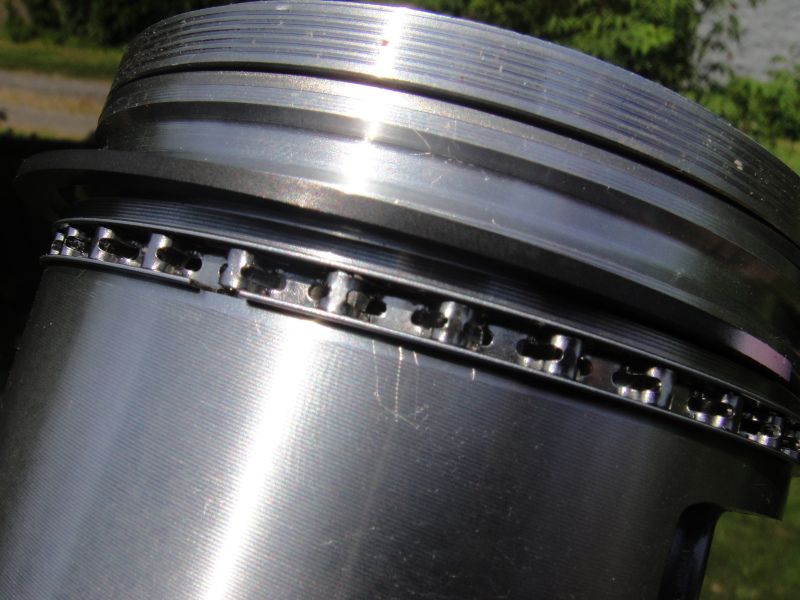
So I'm installing my piston rings with a ring spreader, and the spreader LIGHTLY scratched the surface of the piston. I tried to be as gentle/delicate as possible but the f'ing tool bumped into it as the ring popped out of the spreader. I can BARELY feel it if I run my finger nail along it, but can't feel it when I run the tip of my finger along it. How detrimental is that/how bad did I mess it up?

Kyle
 
Can you post a picture of the damage?
 
I believe, aside from it being a gouge which you imply it isn't, that the concern is the sharp corner edge of the scratch. Sharp edges are more prone to detonate, so eliminating them by light polish/sand should fix that problem. It sounds like you didn't damage the ring lands on the side, so that shouldn't be a concern.

Grant
 
Sorry about that, was scrambling to find a camera with a charged battery.

DSC00158.jpg
 
Even though I bought a ring spreader in 1973 when I built my first engine, I never use it.
I think installing the rings by hand gives me much better control and is less likely to result in damage to the piston or the ring.
The spreader makes a great conversation piece hanging on my wall for people who've never seen one before.
I'm glad that your piston is ok.
 
I've never owned one for the same reason. I just learned by hand and it works for me.
Just a note too - if those are KB hypers make sure the top ring gap is correct for your appliaction.
 
Thanks guys, much appreciated.

moper--they are in fact KB Hypers..I set the rings in the cylinders earlier before I set them on the pistons. They were all gapped at around .20 with my feeler gauge. If I understand correctly, then that gap is an acceptable amount for the cylinder, correct? Cylinders are bored .030 over and it's a .030 ring kit. I was told not to trust the packaging one bit and double check those rings myself. The machinist said anything from .16 to .24 (I believe) was acceptable. All new to me, though.

Kyle
 
just gaped mine and thats what i gaped same pistons n 30 over n whatnot
 
You need to go on the KB web site. They have a chart for ring end gaps. It's VERY important to follow them.
 
Thanks guys, much appreciated.

moper--they are in fact KB Hypers..I set the rings in the cylinders earlier before I set them on the pistons. They were all gapped at around .20 with my feeler gauge. If I understand correctly, then that gap is an acceptable amount for the cylinder, correct? Cylinders are bored .030 over and it's a .030 ring kit. I was told not to trust the packaging one bit and double check those rings myself. The machinist said anything from .16 to .24 (I believe) was acceptable. All new to me, though.

Kyle

http://www.kb-silvolite.com/article.php?action=read&A_id=32

the top ring gap on the kb107 hypers is very important....should be up around .030 gapped...the second ring can gapped normal, with todays thought to be around .022 gap...
the kb107 top ring is higher on the piston and is subject to higher temperature ..and therefor needs to be gapped wider.

I have KB 232's in a .030 over bore. Now I'm starting to get confused, most likely because I'm reading too much into this. So I was told to use the formula of 4x4.000 for a standard four inch bore, or for my situation, 4 x 4.030 to determine the desired ring gap as the top ring sits inside the bore.

When I place that ring inside the bore, it sits at .0020, if I remember correctly. I can certainly go back and check all of those rings, too, though. So if I read this chart on Keith Black's webpage, anything from .0015" - .0020" for a normally asiprated engine with a bore size up to 4.100" is what you're going for, right?

It certainly doesn't seem like I want to file down or grind down the ends of the ring by any means because it'll just increase that size past .0020"?

Woah, woah, woah! You need to step back and VERY CAREFULLY read the web page that was posted.

You are confusing piston to cylinder wall clearance with top ring end gap.

Piston to cylinder wall clearance should be around .0015" to .002" for a normally aspirated street engine.

As far as end gap goes, the top ring needs to have .0065" (that's six and a half thousandths) of end gap PER INCH of cylinder bore. That's 4.030 x .0065 which equals about .026" (twenty-six thousandths).

This is why I admit to being a goon with this stuff and save myself from $3,000 of heart ache. Going back to that page for another read. Thank you, sometimes I just need to be smacked in the head like that.
 
Take your current bore size and multiply that number by the ring end gap factor they specify. In this case, for a NA engine the factor is .0065. If your current bore were 4.030", the top ring gap would need to be .026"

http://www.kb-silvolite.com/kb_car/clearance_pop.php

The ring end gap factor of .004 is typical for cast or forged pistons in a NA engine. If you're going to be using "power adders", the gap increases.
 
4.03x.0065=.026195 ring end gap
.0015-.0020 is the piston to wall gap.
Make sure you gap the top ring only to .026
edit:maybe find a new machinist or atleast one that deals with performance parts.
Your engine could have been destroyed.
 
Take your current bore size and multiply that number by the ring end gap factor they specify. In this case, for a NA engine the factor is .0065. If your current bore were 4.030", the top ring gap would need to be .026"

http://www.kb-silvolite.com/kb_car/clearance_pop.php

Alright...so how exactly does the piston to wall clearance come into effect and what do I need to do regarding that? I apologize if I seem daft on this subject. Or is that something that the machine shop should have taken care of when they had the block/pistons?

So I WILL need to use a file to file down the edges a little bit and just keep doing a trial and error fit until I hit .0026" right?
yes take your time with small bits then recheck.some use a dremel with a disk and lightly squeeze the ring into it.But make sure its .026 not .0026 as you posted.
 
If you can borrow a ring gap filer from someone, do it. File only one end of a ring, not both ends. That will help you keep it square. Stop when you hit .026". It's not the end of the world if you go accidently go beyond that - just be careful. Remove any burrs from the end that you file.

The machinest should have used the pistons and final honed the cylinders to reach the piston to wall clearance that KB recommends. The hypers can run tighter clearances than the forged or other pieces.
 
Also if the shop had the pistons they would have handled the piston to wall issue.
 
This is just a reminder as you may already know this. You need to stagger the gaps also. This diagram may not be exact for your application, just a reference so you know what i'm talking about.
 

Attachments

  • ring align.jpg
    8.4 KB · Views: 537
If you can borrow a ring gap filer from someone, do it. File only one end of a ring, not both ends. That will help you keep it square. Stop when you hit .026". It's not the end of the world if you go accidently go beyond that - just be careful. Remove any burrs from the end that you file.

The machinest should have used the pistons and final honed the cylinders to reach the piston to wall clearance that KB recommends. The hypers can run tighter clearances than the forged or other pieces.

Perfect, thanks a lot!!
 
This is just a reminder as you may already know this. You need to stagger the gaps also. This diagram may not be exact for your application, just a reference so you know what i'm talking about.

Thanks! The paperwork for everything I got really doesn't explain a whole lot at all. The Sealed Power paperwork only touched on the oil ring expander and the retaining rings for top and bottom. All that stuff really said was to place the gap above the pin bore. However, the guy on the tech support line said to stagger every other ring about 90 degrees off each other. Doesn't seem like there's any SPECIFIC order in which those rings go, per se.
 
-
Back
Top