You are using an out of date browser. It may not display this or other websites correctly.
You should upgrade or use an alternative browser.
You should upgrade or use an alternative browser.
Mike's '67 Fastback Featuring Super Slow Progress
- Thread starter ggt1_02
- Start date
-
ggt1_02
Active Member
Until you take it to the sand blaster...I see lots of potential rust problems in the structural areas. Good Luck
I originally wasn't planing on having it blasted, now I am pretty sure I might have to. I know the rear rails need to come off, the passenger side is capped.
ggt1_02
Active Member
Check my build thread and you will see what you are in for with the rear window channel.
That support in the trunk looks like factory crappy welding to me. Have seen that many times. Yours is savable but its gonna take some fab work.
I am following your build, while I don't have much thin metal experience I do have a fair amount of welding background and what I think is the basic amount of metal fab skill not to absolutely destroy the thing.
let me make you feel better about your rust....heres mine.... and theres alot more....so now you should feel alot better!
I am also following your situation. I am afraid that is what mine looks like under the cap, however my perches look semi ok.
I know this isn't going to be done for a while, I have already sat on it for ten years so it is what it is. I have gone back and forth on selling it and buying something built already, but I want this one to be mine not someone else's car. If it take ten more years it takes ten more years.
SNKEBIT
Spending $$ on Mopars
About the thin metal skills. Start in an area that doesn't need to be cosmetically perfect. You will pick up on it fairly fast. There are tricks you learn after years of doing it but if you take your time it will turn out. Remember, it's just sheet metal, if you screw it up, you just get another piece and try again.
As far as the statement of "do it my way",,,,, rock on!!!!!! That's the part of this hobby I really enjoy, making it my own!!!
As far as the statement of "do it my way",,,,, rock on!!!!!! That's the part of this hobby I really enjoy, making it my own!!!
tarvin890
tarvin890
I am following your build, while I don't have much thin metal experience I do have a fair amount of welding background and what I think is the basic amount of metal fab skill not to absolutely destroy the thing.
I am also following your situation. I am afraid that is what mine looks like under the cap, however my perches look semi ok.
I know this isn't going to be done for a while, I have already sat on it for ten years so it is what it is. I have gone back and forth on selling it and buying something built already, but I want this one to be mine not someone else's car. If it take ten more years it takes ten more years.
mine is looking like near frame 2x3 from shock mounts back to bumper....thats a get by for now... waiting on estimate from same chassis man to back half it, ladder bars cross member and rails.... wheel houses already have the stock look tub strip added.... hopefully that price is good and that will be done... the harry area is front frames have steel plate welded over frame...so then those have to be done. your cuda will do fine.. get a nice grinder and wheels and bottle of rust-mort and go to work!!! its actually good busy work and watching progress make the job worth while. you should look into those pre fabbed wheelhouse extentions for tubbing/mini-tubbing it... bigger tire would look nice on that car..:violent2:
tarvin890
tarvin890
" I am afraid that is what mine looks like under the cap,"
cut the cap out....if the idiots that did your were dumb like the people that did mine... they didnt treat the rust and capped it... so it just keeps rusting.... stupid to not treat the rust or grind it out and treat it before capping.
cut the cap out....if the idiots that did your were dumb like the people that did mine... they didnt treat the rust and capped it... so it just keeps rusting.... stupid to not treat the rust or grind it out and treat it before capping.
tarvin890
tarvin890
cuda sitting in the garage isnt hurting anything, just gaining value....better than stocks or bonds....
ggt1_02
Active Member
As far as the statement of "do it my way",,,,, rock on!!!!!! That's the part of this hobby I really enjoy, making it my own!!!
When I grew up my grandpa had loads of antique cars which were perfectly restored, won a bunch of show with some, the best was a Bantam pickup. He had Model A's, Hupmobiles, MG's all kinds of different stuff. I truly appreciate numbers matching complete factory restorations. I had intentions of doing this one that way as well. My biggest personal hurdle for starting this over the years was the cost to fuel the thing once it was completed. Now with modern engines being easier to drop in and getting modernish mpg, I'm in. And as long as I am changing the engine, might as well change some other things to make it more comfortable. To bad this one didn't have A/C though.
cuda sitting in the garage isnt hurting anything, just gaining value....better than stocks or bonds....
Only cost me $1000 ten years ago, then it was drivable too.
Newkytigergirl
Active Member
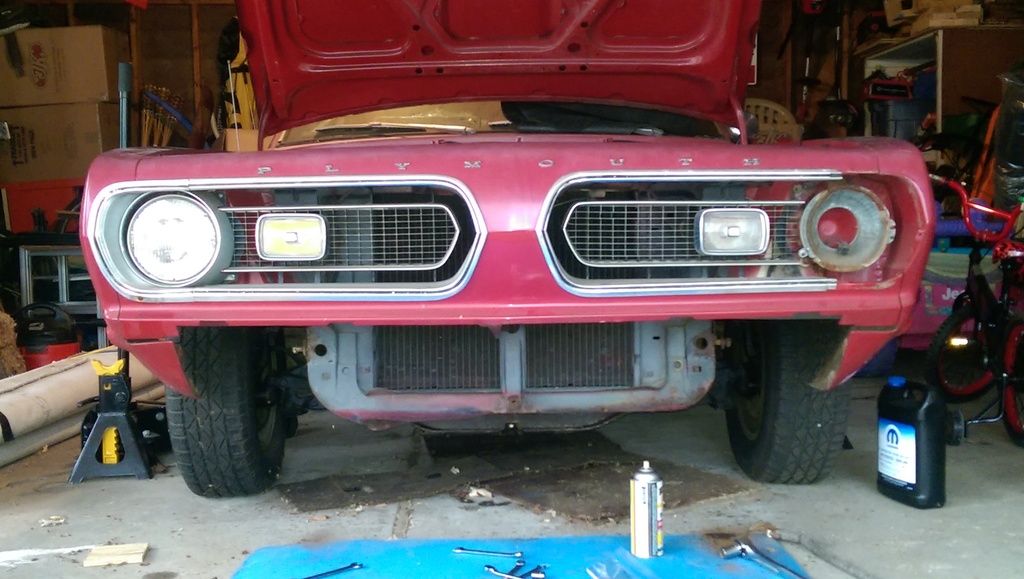
I was just wondering because I purchased a 1968 Barracuda already partially disassembled with nothing labeled. What holds the valance on? I need to locate the fasteners and can't seem to find any reference to how the front clip is attached.
ggt1_02
Active Member
If I recall correctly is attaches with two bolts on the bottom of the fender, the tabs can be seen on the fenders in the picture. Mine was put on with multiple different size bolts though.
salinasjoel
Learning Daily
its two bolts that attach to each fender and then a center bracket that goes to the radiator support. The hole for the bracket can be seen in the picture provided by ggt1_02I was just wondering because I purchased a 1968 Barracuda already partially disassembled with nothing labeled. What holds the valance on? I need to locate the fasteners and can't seem to find any reference to how the front clip is attached.
Newkytigergirl
Active Member
Thank you
Newkytigergirl
Active Member
Any chance you have any pictures?
salinasjoel
Learning Daily
Mine is disassembled at the moment, I can try to get some pictures today that will give you an idea
Newkytigergirl
Active Member
Thank you that would be amazingMine is disassembled at the moment, I can try to get some pictures today that will give you an idea
smlveightis
Confused in Confusion
Following. Where are you in SE Michigan?
moparmat2000
Well-Known Member
Now a frame question for the viewers, I asked in the chassis sub-forum and didn't get a reply. I have attached a picture of where the front of the passenger side rear frame rail attaches to the floor pan. This doesn't look right to me with the gap.
 [/QUOTE]
What it is supposed to be is that the floorpan at the rear footwell area overlaps the rear seat pan area, this creates a boxed frame that ties to the framerails and the rockers The piece that appears missing off your car is the front half of the rear seat pan where it boxes in underneath the rear floorpan behind the footwell.
Heres pix. Disregard the subframe connectors on mine and look at the green circled area. Notice with the body plugs out in this area , you can see another piece of sheetmetal in the body plug holes, this is the overlapped floorpan. This creates the box member that ties the front half of the framerails to the rockers.
Last edited:
-
Similar threads
- Locked
- Replies
- 2
- Views
- 2K
- Locked
- Replies
- 18
- Views
- 1K
- Replies
- 5
- Views
- 370


