Slant 6 Turbo 68Dart Project

-
Well, like stated earlier, the afr gauge and sensor is calibrated, and just now I got her running. You'll never guess what it was ----- basic carburetor stuff. YES. I forgot to adjust the idle circuit at all. It was squeezed all the way in... and the idle set screw was not even touching the arm. Screwed that in a couple times, reattached fuel pump, set float bowl, and she runs. So with the gauge calibrated, on start up and warm up - I get 18.5 then it drops to 17. If you push the gas a little, it jumps down to 13, and then back up to 17. Is it supposed to be this lean at idle? I'm assuming the idea is to have it near 11 or 10 at cruise and boost? I adjusted the set screw on the bOV as well. It doesn't have a high pitched screaming as it did before. It is less audible. I'm thinking the pressure overcame the piston on the bov and was leaving it slightly open. I turned the wastegate preset in a little bit. Can't wait to get the new wastegate setup with the more simple set it and forget it adjustments.

That's great!
Glad it was stuff you could adjust and not have to buy more parts or spend more time diagnosing.
 
Well I managed to get the afr down to about 13.5 at idle, and cruising around town it was 11 to 11.5. Then I pulled into a parking lot and the afr was like 10 and I was saying "sweet perfect" then some Prius driver honked at me and flagged me down. I parked. He said "hey you're leaking stuff all over the road."


Shiiiiiiiiiiiiiiiiiii

Well sorry to the environment - had a nice trail of gas all over the parking lot to a nice pool where I took a couple seconds to shut it off. I looked under the car and sure enough - exact same spot - about 6" ahead of the fuel pump where the rubber meets the hard line to the front, it split again. I'm trying to figure out why this is happening. I'd assume extra pressure is diverted down the return line and shot back to the tank and dumped in. So I'm thinking pressure buildup is not likely - but i don't know. I think the metal line is somehow repeatedly cutting the rubber line... but the split is always perfect, and just in the outer layer of fuel line. The inner layer looks untouched...
 
Well, like stated earlier, the afr gauge and sensor is calibrated, and just now I got her running.

You'll never guess what it was ----- basic carburetor stuff. YES. I forgot to adjust the idle circuit at all. It was squeezed all the way in... and the idle set screw was not even touching the arm. Screwed that in a couple times, reattached fuel pump, set float bowl, and she runs.

So with the gauge calibrated, on start up and warm up - I get 18.5 then it drops to 17. If you push the gas a little, it jumps down to 13, and then back up to 17.

Is it supposed to be this lean at idle? I'm assuming the idea is to have it near 11 or 10 at cruise and boost?

I adjusted the set screw on the bOV as well. It doesn't have a high pitched screaming as it did before. It is less audible. I'm thinking the pressure overcame the piston on the bov and was leaving it slightly open. I turned the wastegate preset in a little bit. Can't wait to get the new wastegate setup with the more simple set it and forget it adjustments.

glad to hear you got that gauge straightened out. they are awesome. afr at idle is going to be what ever the engine wants there is no real set parameters for that. if it runs good doesnt stall and doesnt burn your eyes then its good.
ideal cruise afr is between 13-15. under boost you want to shoot for 11.5. to accomplish a good cruise and boost afr you are gonna have to mess with the power valve channel restricters.
 
Well I managed to get the afr down to about 13.5 at idle, and cruising around town it was 11 to 11.5. Then I pulled into a parking lot and the afr was like 10 and I was saying "sweet perfect" then some Prius driver honked at me and flagged me down. I parked. He said "hey you're leaking stuff all over the road."


Shiiiiiiiiiiiiiiiiiii

Well sorry to the environment - had a nice trail of gas all over the parking lot to a nice pool where I took a couple seconds to shut it off. I looked under the car and sure enough - exact same spot - about 6" ahead of the fuel pump where the rubber meets the hard line to the front, it split again. I'm trying to figure out why this is happening. I'd assume extra pressure is diverted down the return line and shot back to the tank and dumped in. So I'm thinking pressure buildup is not likely - but i don't know. I think the metal line is somehow repeatedly cutting the rubber line... but the split is always perfect, and just in the outer layer of fuel line. The inner layer looks untouched...

did you use something like these to help keep the line from moving?
[ame="http://www.ebay.com/itm/Eastwood-3-8-Fuel-Line-Tubing-Mounting-Hardware-10-Piece-Kit-/361063842969?pt=Motors_Automotive_Tools&hash=item5411150499&vxp=mtr"]Eastwood 3 8 Fuel Line Tubing Mounting Hardware 10 Piece Kit | eBay[/ame]

not sure how smooth your car runs but vibrations can wear hose. are you using fuel injection line? 30r9 is resistant to the alcohol in today's fuels and its pretty strong too.

are you getting boost now after adjusting everything?
 
No boost yet. I suspect a leak somewhere or the wastegate just letting everything through. You can hear the turbo spooling. It sounds like a jet plane, exhaust is dead silent for having none on idle. All you hear is a whine. I decided there was no time for crying or bad fuel lines, so I am getting some new 3/8" hardline to complete the line instead of rubber for the short runs, and some 3/8" braided line for when I must use a flexible line. I want to also move my return somewhere in the fuel neck near the other side of the car if possible. I am just not happy with laying in the parking lot to chop off 2" of line every time it blows out. That's just not "reliable" Once the new piping gets here, I expect to make it up in a day or so, and then bend my new line along with it, and see how it goes. $200 more down... lol

Also yes, those clamps are EXACTLY what I used to keep the line still. I copied a setup someone showed a picture of for a larger engine, my pump is in nearly the same spot but his used press barbs, mine uses barbs and a clamp. The clamp survived where it met the hard line, but the area right behind it blew out.
 
Your fuel pump will make a pressure spike right where it attaches to hard line. You are totally exceeding the capabilities of your hose. Get some push lock. This stuff works on everything and it you use the right fittings. no clamps
http://www.jegs.com/p/JEGS-Performance-Products/JEGS-Push-Loc-Hose/764426/10002/-1

X-2! I did my entire 2-tank/2-pump setup on my V8 car with this stuff and have never had a a leak in it. Here is a pic or two.... and yes, the spare comes out... lol!
 

Attachments

  • 100_2847-1.jpg
    34 KB · Views: 435
  • 100_3265.jpg
    43.4 KB · Views: 443
  • 100_2831.jpg
    57.1 KB · Views: 451
I must admit that hose does look effective. I unfortunately already purchased a brand new hardline, and some shielded stainless hose, with all the correct fittings. I had to draw a picture and do a bunch of math in my head because sizing for npt still escapes me. I.E - 3/8 tube... 3/8 hardware, but thread is... and then the fact that compression fit, is not same as pressure fit...

Anyway - well since I am trying to show how to follow/ not follow in my footsteps, let me admit to what I did.

I cut the fuel line coming from the tank, bulb flared it, put a length of 5/16 fuel line to a filter, then to the pump, then ran a line from the pump then from the pump (pump is barbed fittings) to the rest of the fuel line which I cut near the wheel well, which I also cleaned up and did a bulb flare on (if that's the right term, where it looks like a ball at the end, rather than a horn). The hose that went back to the fuel line is the one that kept rupturing. Right now i have a piece of 5/16 stainless braided fuel line on it that I found in my apartment. I had no idea i had it. So far it is holding.

In review: What I did:
Thought I'd save some time and a lot of money using the stock feed line

What happened:
It is not worth the hassle I just experienced - and creates too many fittings/ adapters.

In conclusion:
I purchased two brand new lengths of 25' 3/8" stainless NEW hardline that I will replace the old feed line with, and do fittings DIRECTLY to the pump. The other 25" length is to redo the return line, since I want to make it return somewhere near the fuel neck instead. The only "soft" hose will be from a the regulator to a bent hardline attached to the carburetor, and that will be 3/8"

Cost of "saving money":

$200 for new fuel line and fittings.

My dad suggested running fire-proof blue line ALL THE WAY. I guess that's ok, but I couldn't imagine having that get cut with a rock, or worse yet - sabotage.

In other news, the AFR gauge works.

IMG_20141005_170752_zpsc04e2612.jpg


And the wastegate conversion kit I ordered came, along with some more boost referencing tube. This blue stuff has thicker walls and looks a lot stronger than the orange stuff.

IMG_20141006_153544_zpscfae114a.jpg


The new wastegate uses a V -band setup, which will be a lot nicer to use.
 
Oh and some more video. I think the boost leak is audible in this video. It's the whining sound not coming from the turbo. I believe it's on the last runner of the intake manifold where it meets the head. More investigation...
[ame="https://www.youtube.com/watch?v=kYcvsj7p5pw"]Slant Six Turbo Idle - YouTube[/ame]​
 
try spraying around the runners and anywhere else you might suspect with some carb cleaner and see if it revves up a little or smoothes out a little.
 
try spraying around the runners and anywhere else you might suspect with some carb cleaner and see if it revves up a little or smoothes out a little.

This is my next step actually, was to do the carb cleaner thing. The only reason I suspect the manifold, is when I push down on it, the noise is quieter, that doesn't necessarily mean anything, but we'll see.
 
you could also try spraying it with soapy water. it will blow bubbles if its leaking under boost. it only works when the engine is kind of cold though. otherwise the water just boils off.
 
when you push down on it what are you pushing on? the manifold or the carb hat?
both, but the one that makes a difference in sound is when i push down on the manifold. I'm probably going to take the intake manifold back off, when I get the new J pipe ready to install, after I get the rest of the pieces.

I sprayed carb cleaner near the back runner where I thought, and no stumble, or better run, etc.. possibly on the bottom or something I'll have to pull the turbo off to find out. I ran out of time to play with it today though... Someone suggested doing the soapy water thing to me, it didn't show me anything.
 
you would need to have it under boost for the soap and water to work. kinda hard if you are under the hood. maybe if you can have someone power brake it to get it to spool a little.
 
I tried with someone acceletaring it a bit, no dice with the soapy water. My exhaust manifold gets pretty hot the instant the car is started, so that may be a factor to it dissolving so fast. Luckily, the header paint has held up through several heat cycles. It did not melt off like the previous attempt I did with the white manifold. That peeled off and melted within one cycle.

At this point I'm under the assumption no matter how much the wastegate is adjusted, it's just full open. Hopefully the new wastegate and J pipe setup will solve that. Right now I'm digging into the carburetor aspect.

There's 70 jets already installed, and a regular powervalve.

The problem I'm seeing, is the idle circuit is good. The car idles well, and the timing is set to about 0-1* advance while idling. Vacuum advance is disconnected for now. Trying to get a read on everything that happens with each system so I know what will effect what, if you know what I mean. It was too bright to test my mechanical advance throw yesterday, so I couldn't really tell what it was. Also the intake piping there now gets in the way. I'll test it out tonight when it gets dark. I'm hoping that I adjusted the throw on the governor low enough. I believe the problem is when I move from idle, to power, the car leans out, and stumbles, unless you mash the gas a bit - then it moves from slow to moving ok, and goes to a 13.5ish afr. If you push the gas GENTLY, the car leans out to a 19-20afr and starts stumbling and hesistating till you let off, then MASH it. Basically, I can't get moving slowly, I have to drag race from a stop sign if that makes sense. I'm thinking the problem lies in the accelerator pump arm, could it not be delivering enough fuel on a push? OR is this something else.

Should it be that the mechanical advance alone stops at 18*? Or should mechanical and vacuum combined stop at 18*?

I know before I could get about 32* almost out of the vacuum, but obviously at a certain point when the carb comes under boost, I'd assume the vacuum advance plate closes again, or slowly returns to center?

The vacuum advance seems just as adjustable as the governor. It looks like I could weld that throw closed a bit too. Or do I let it go or leave it disconnected?

Before turbo, the slant liked idling at about 12* initial, but now that it's 0 the idle circuit feels sloppy. Is there a way to leave it somewhat advanced, then cause it to move only 6* degrees out under the mechanical advance? That would still give me 18.
 
what do you have the wastegate hooked up to?

with the mechanical advance slots closed to around .301 you can run 10* initial. the .301 will give you 8* mechanical advance. the vacuum advance will be over 18* and drop pretty much as soon as the boost comes on. if you are running 0-1* the 10 initial should help quite a bit with drive ability and spool.

sounds like you need more accelerator pump action going on. check the clearance between the arm and the linkage. should be next to no space in there. it should start to piss as soon as you move the throttle. may need to look into a different cam. they are color coded. if you look it up you should be able to find what you need.
 
what do you have the wastegate hooked up to? with the mechanical advance slots closed to around .301 you can run 10* initial. the .301 will give you 8* mechanical advance. the vacuum advance will be over 18* and drop pretty much as soon as the boost comes on. if you are running 0-1* the 10 initial should help quite a bit with drive ability and spool. sounds like you need more accelerator pump action going on. check the clearance between the arm and the linkage. should be next to no space in there. it should start to piss as soon as you move the throttle. may need to look into a different cam. they are color coded. if you look it up you should be able to find what you need.

Wastegate is hooked directly to the snail shell reference outlet after a bleed control, which is all the way closed I'm assuming. It's screwed down all the way, rather than longer.

There also appears to be a leak somewhere below the wastegate in my piping or something because the exhaust wrap is charring only in that one spot. I can just kind of tell the wastegate itself is probably done. It was free, no big loss. New one was only $40 and adapts to the housing itself, and should allow at least 5psi I'm sure. Maybe 8 with the air bleed adjusted.

I'm glad the car can have some initial advance. It definitly needs it. The way I read everything it always sounds like people are running from 0* adv/ret. 10 sounds like it will work just fine.

And the vacuum plate will pull back all the way during boost? Or does it take a few moments? If it's instant, then no reason not to use it for fuel mileage and driveability sake.
 
routing sounds good on the wastegate.

the wastgate with the boost controller will let you get whatever the turbo can make. mine was set at 8psi when i bought it showed 5 on the gauge and i got it up to 14. its just a controlled leak that will open the wastegate at different pressures. looks like you will be running the same wastegate setup i was.

its a toss up between distributors locked at 18* and locked at 12*initial with an msd box controlling the retard. and a few running the setup we are with the mechanical advance locked out and maintaining the vac advance. they all work. vacuum advance plate should pull back as soon as it looses vacuum or sees boost. should be instantaneous.
 
All good info. I'll reattach vacuum advance then and see what happens after I get a good reading for the mechanical advance. Still haven't got time to do it yet. This weekend though I'll have no distractions. I'll be able to construct my new pishta-pipe and it has a much smaller radius, and should shove it back from the radiator a bunch. ALl the parts are here for it. Then I'll install it and go.
 
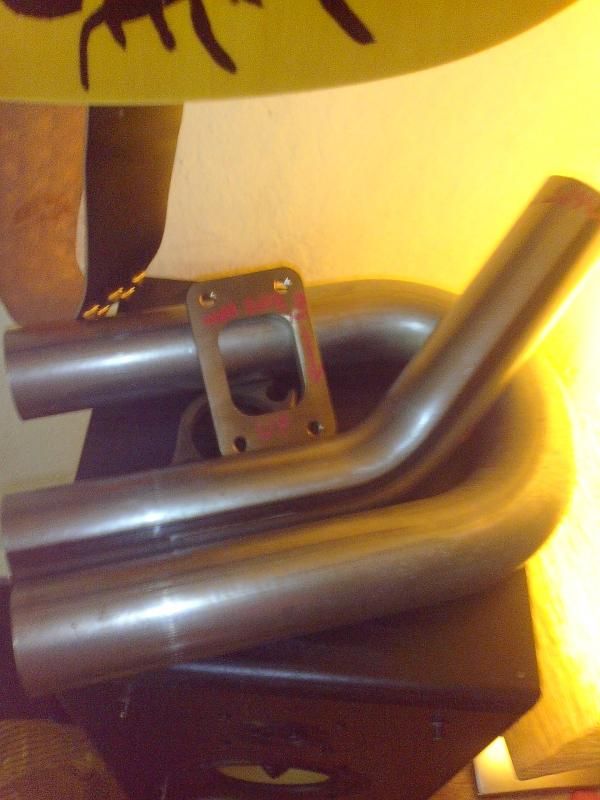
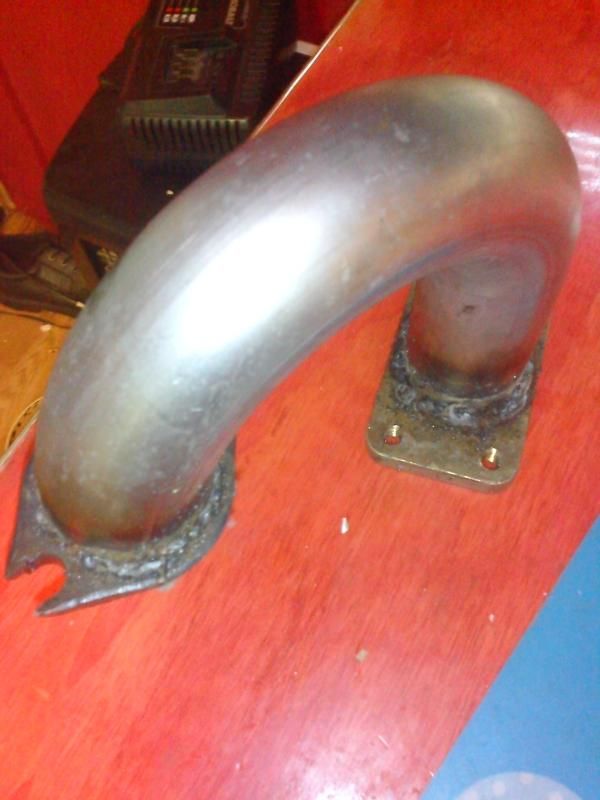
Well, today after work, within the last couple hours, and the last part of last night I've been working on the car. I tacked together my brand new pipe which is WAAAAAY simpler and nicer looking than the last one. I took my time welding this time and I think I may actually be getting better.

I started with a 6" radius this time instead of a 10 or 12" or whatever I had before.

When I received it I thought it was too small and there was no way it was going to work... but I went for it.

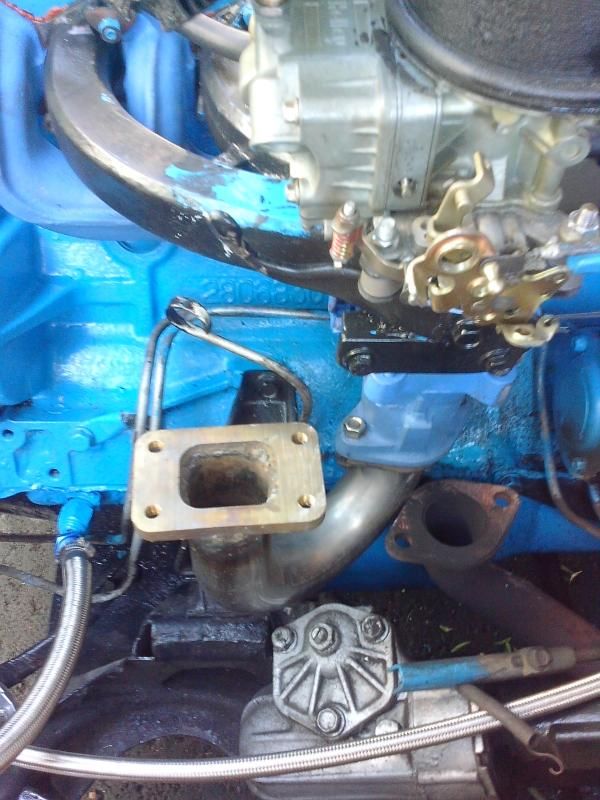
I made the turbo rise 7 1/2" from the bottom of the bend to set it at the same height it was before. For the square flange/ round hole problem, I cut the top of the pipe in four sections, bent the edges down with vicegrips and everything from the pipe to flange had metal to metal contact - no gaps, and had a great load of patience assembling it after.


This time i ensured that I bolted the flange up to the exhaust manifold TIGHT, and then shoved the J pipe into it, that way I could bend it sideways or turn it easily. I tacked it when I leveled out the turbo flange, and all was good. I was kind of scared the turbo would run into the carb this way, but it wound up working out GREAT!


I then spent some time welding that together, then repairing the ends I cut off for fit. I snugged it down and it is WAY sturdier than the old pipe, and lighter too. The turbo sat on top of its flange and made no intentions to bend over or fall. It worked out fantastically.


Everything right now is just lightly bolted into place, except the J pipe - that is bolted onto the exhaust manifold like no one's business. I was also really happy to confirm oil spilling out of the turbo drain outlet, which is great - because that means there's oil going in it.


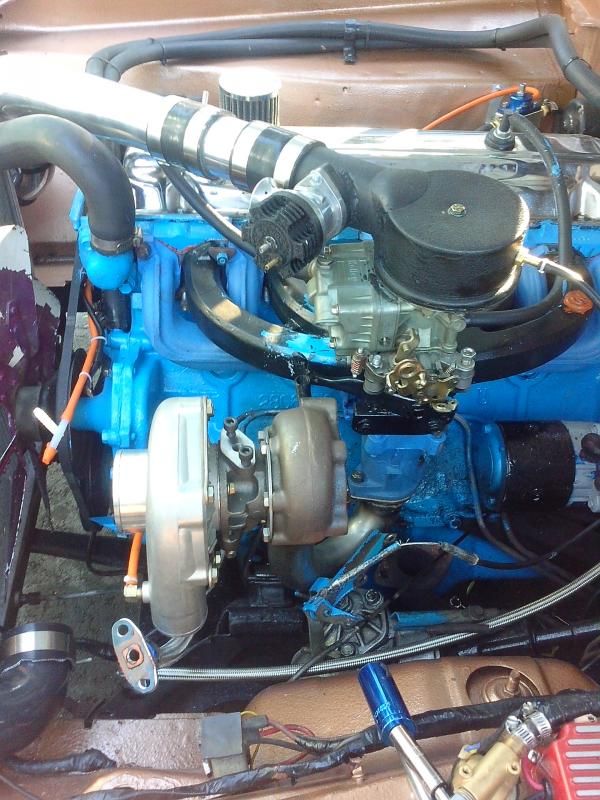
It hugs up to the motor a lot closer than the last setup as you can see.

I figured I made it too close and the wastegate add-on would not have room to swing the arm. Lo - and behold the arm stops at this position back, and only moves forward. The clearance is good. You'd think I planned this stuff... this was just pure luck.


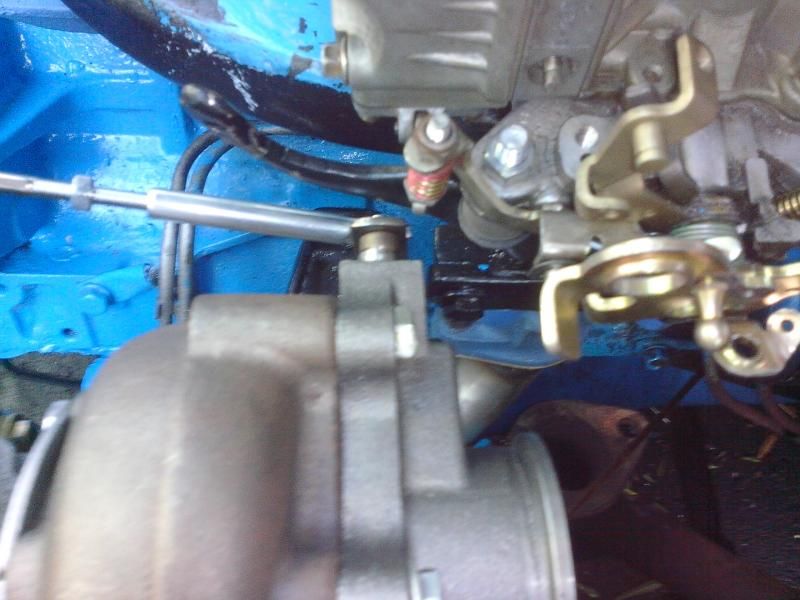
The frontal part of the wastegate attachment got mounted. I noticed the turbo isn't sitting 100% straight on there fore to aft, but at this point, I think if it were, the wastegate arm would not clear, so I am happy with it.

In other news, the filter also now FITS, and clears the fan with tons of room.


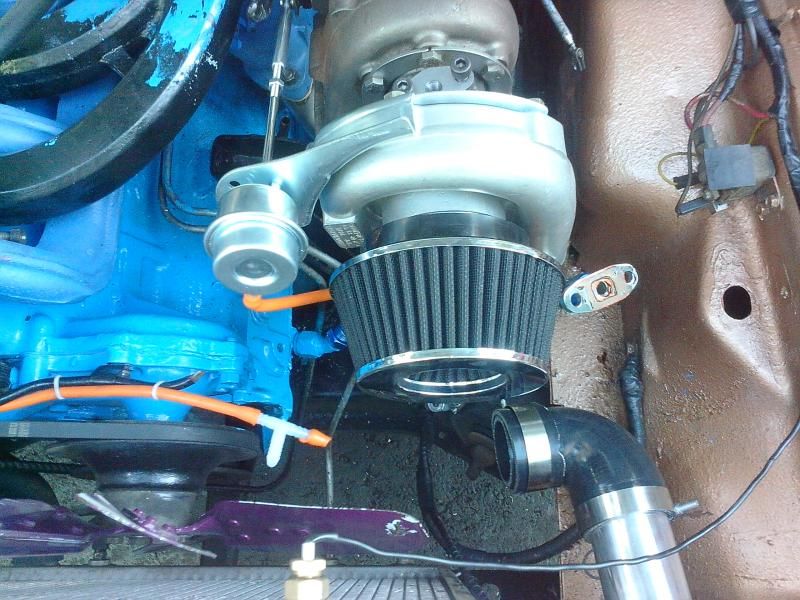
Also the new pipe allows me to reattach the throttle linkage in the stock location and use the original kickdown rod, so fun times ahead.
 
looks good. being that close to the carb you might wanna look into a turbo blanket. also make sure there is some tension on the arm of the wastegate to hold that door shut.
 
You know what they say, "Sometimes its better to be lucky, than good."

The setup looks good, post some vids when you get everything worked out.
 
Wow, looks great!

You are a quick learner with your welder. I have not picked up a welder since I was a senior in high school 28 years ago. I need to set up my welder and do a some practicing, I was not good at it to begin with.

I need to re look at my U/J/Pishta pipe to see the size. I really like how tidy your set up looks.

Mike
 
Thanks guys. This setup is so much cleaner, and all it really took was the addition of the built on wastegate to make it happen. Having that 5 lb rock off the pipe makes it a lot sleeker and hugs it up to the motor better.

I had some time tonight before it got dark and I got hungry. I think it's time for a pizza for me and the girlfriend, but anyway... I had some time to put the gasket down for the turbo flange and bolt the turbo down tight. I am very happy with how secure this setup came out with less leverage. The wastegate flange bolted on easily, and I was able to get a socket onto all 5 bolts even being that close to the intake. I bolted the wastegate actuator onto the turbo intake housing securely, then spun the flange bracket till it was tight and securely closed, then tensioned it two more turns, stretched it, and mounted it. Very secure. (I had to look up a video on how to properly set the tension on it, and yes there is a video on youtube).

I ran a new vac line into the cabin to run the boost/vac gauge just in case the old one was damaged. This one is T-d right off the turbo, instead of on the carb hat.

Tomorrow I'll try and get a simple exhaust fabricated up, and find a plug adapter that will go in the last runner of the intake manifold that i will reference the fuel pump regulator too. I need to actually go buy more line to reattach the vacuum advance, and then I think everything is covered and I'll be back out on the road. Oh, and cut a new length of aluminum 2.5" pipe for the turbo outlet now that it is further back. Luckily I still have a few lengths of pipe.
 
-
Back
Top