You are using an out of date browser. It may not display this or other websites correctly.
You should upgrade or use an alternative browser.
You should upgrade or use an alternative browser.
The Great Pumpkin - '71 Duster
- Thread starter rmchrgr
- Start date
-
rmchrgr
Skate And Destroy
awesome job and great pictures ...where did you get the fire wall block off plates I need some
Wow, first post and responds to my thread! Thanks and welcome. The firewall block off plate is made by Andy F./AR Engineering. I got it from Mancini Racing.
So in other news, the engine is out. Took a little time this AM to finish it up. Came out without issue really. Took my time, probably took about 4 hours total between yesterday and today.
Kind of made me think back a little to when I first started messing with cars about 20 years ago. Engines and drive train parts were intimidating to me and pulling one out seemed like a huge job that was beyond my capabilities. Eventually though, I became a tech. and ended up doing it for a living for a few years. And really, the main reason I became a tech was to be able to work on drive train stuff and dive into engines. I did it and I loved it but I'm not a tech these days so I only get to do it for fun now.
So obviously it's not so intimidating anymore. Engines and drivelines really just became parts of the car that either worked or didn't. Taking them out to replace or rebuild them was an everyday occurrence for me for a while. It's good to have that kind of experience under your belt but I'm sort of glad I'm not doing it anymore. The fun gets taken out of it in a production environment.
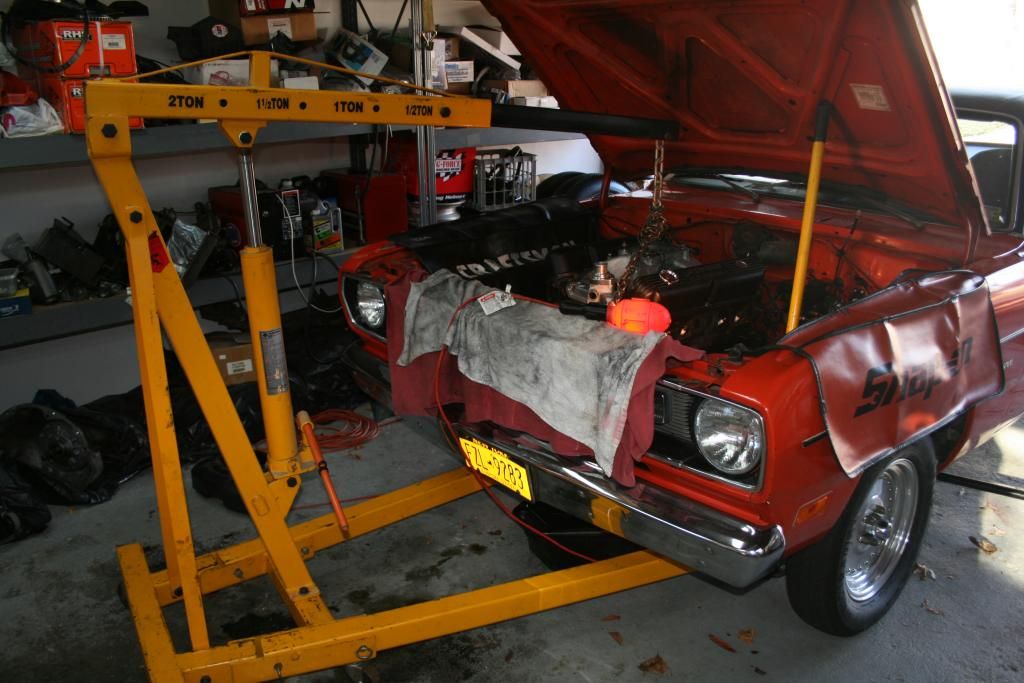
Regardless though, I still feel a sense of accomplishment when an engine comes out. It's really not a small job by any stretch. You also need a lot of tools and equipment to get it done efficiently and safely. Everyone knows that but it's still worth mentioning. I hardly ever use my giant cherry picker or engine stand and they take up a lot of room but I'm glad I have 'em when I need 'em.
Anyway, I took a few pics while hoisting the engine out. Nothing earth shattering, just a guy in a garage pulling a motor.
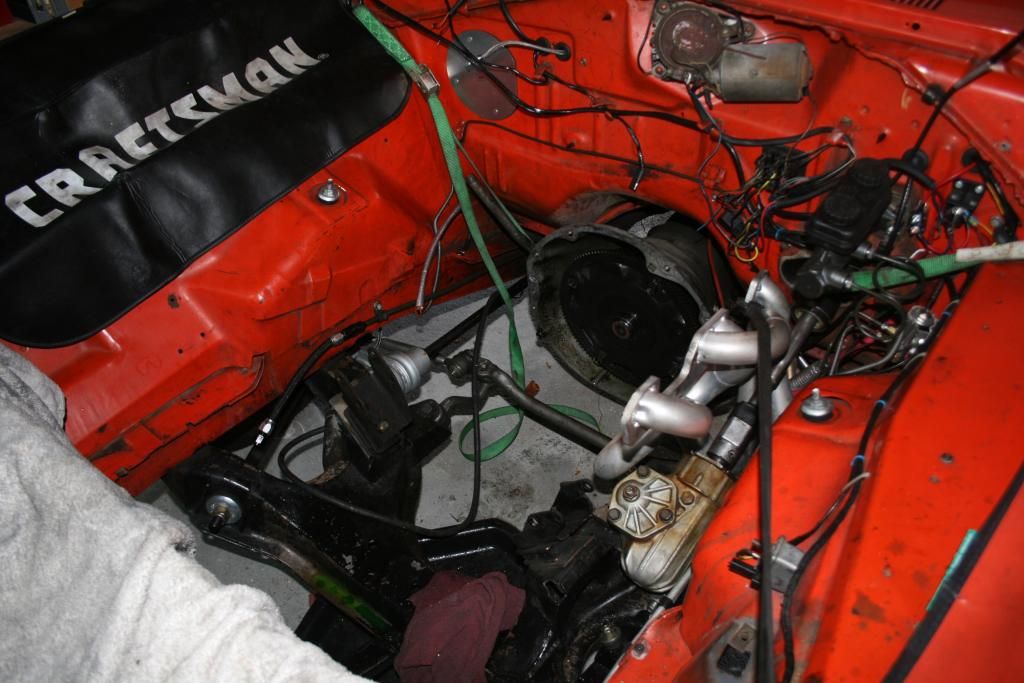
Before I attached the hoist, I cleared a bunch of things out of the way including the radiator, water pump and the right angle oil filter adapter. I did not remove the hood so taking out those things allowed me to slide it forward and then pull it out. I had plenty of clearance. I used a chain attached diagonally to the accessory bolt holes in the heads.
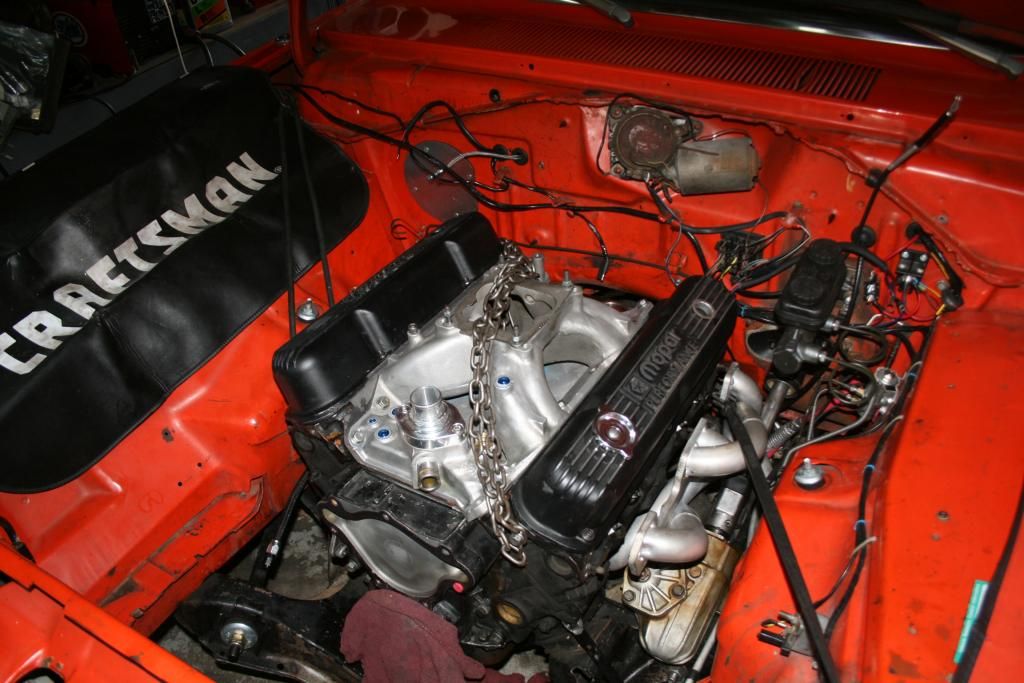
First time loose in a long time. Note headers bungee corded out of the way.
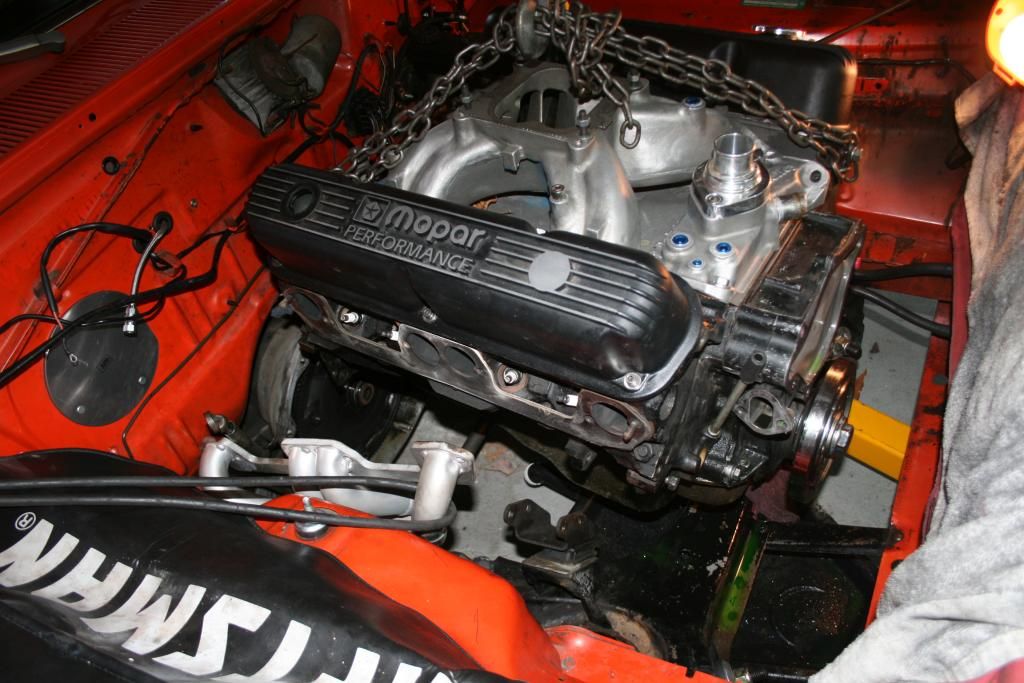
Plenty of clearance, Clarence. My cherry picker seems bigger than I remembered.
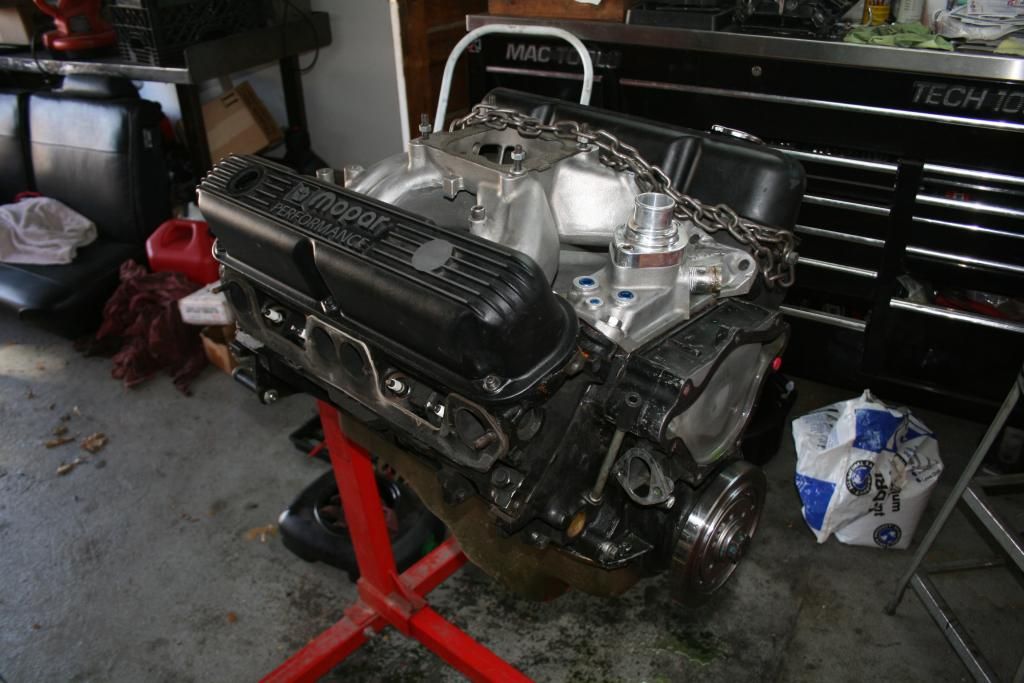
Ye olde 340 out of it's home for a while. I thought I had noticed a coolant leak at the back of the block and sure enough, one of the freeze plugs was weeping. The rear main was typically soaked. The flex plate bolts were in good, I needed an impact to get them out.
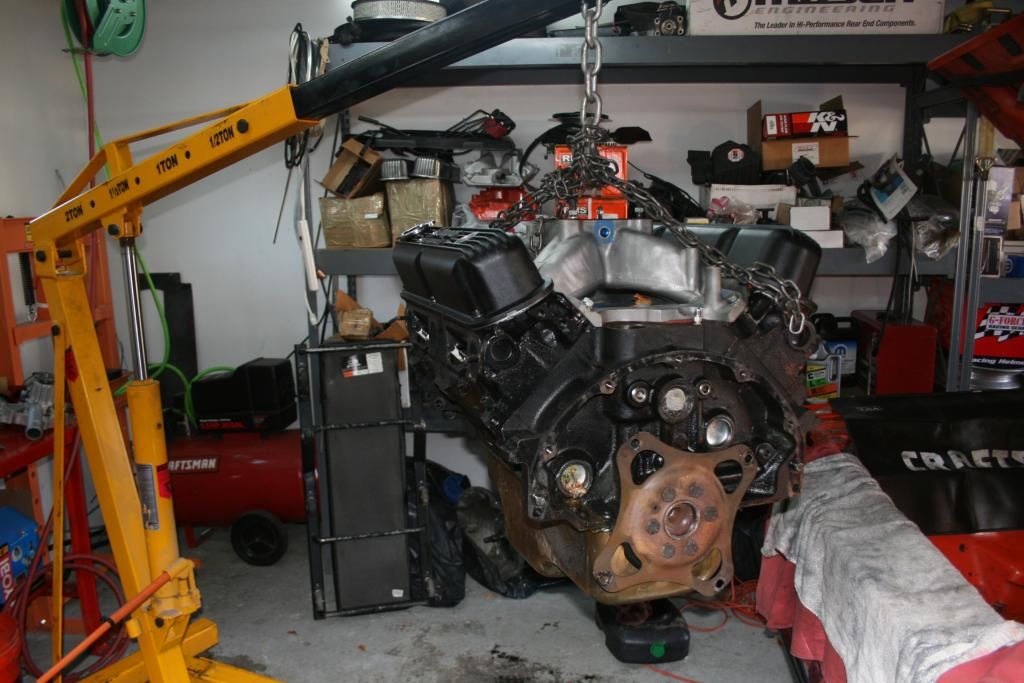
Ever get that empty feeling?
Off the hoist, on the stand, ready for tear down.
More to come!
rmchrgr
Skate And Destroy
So the top end is torn down. Have not had the time to take the oil pan off to look at the bottom end yet but I don't foresee anything surprising. One of the freeze plugs at the back of the block was leaking and there was starting to be a thin film of oil on everything. The clean up begins.
For the most part, things looked OK for an older build. There was no real damage to speak of, just a bunch of carbon on the valves due to the seals being shot. I had thought the cam lobes might be toast but it was just normal wear. Some of the rocker arms had some galling from the tops of the springs but nothing major.
Learned a few things about the internal parts that I was not sure of. The block is .030" over and has Speed Pro 7035p pistons in it. They are .018" out of the hole like stock. Gasket looked like .040" maybe but I'm not exactly sure. Has head studs. The inside edge of the deck was deburred. I was not sure if the lifter galley was tubed but it's not. Might do that for the rebuild. I could probably clean things up with a hone, put new bearings and rings in the short block and it would be good to go again.
So despite the valves being all carboned up, the heads were OK. Again, the main culprit was the old teflon valve seals. The little tension springs that keep them tight against the stems were all gone so they were leaking bad.
Consequently, the valves were a ***** to get out. The valve locks were truly locked. I had to whack the valve tips pretty hard a couple of times to get things loosened up. The springs are stiff, took a lot of muscle to hold them down to get the locks out. I am more used to late model OE valve springs which are pretty wimpy compared to these. These springs are not even that burly though, it's just a Mopar .557" cam.
Intake valves are 2.02" but I had the idea that they were larger. No porting in these heads, just your basic late '70s-early '80s 810 casting W2s.
So the end result of all of this is still up in the air. I spoke with Brian at IMM about how to proceed and he suggested I go with his CNC/RHS heads. He said they could support 550 horsepower with a 4" crank, even with a dual plane intake and a hydraulic flat tappet cam. I was surprised to hear that but it sounds good.
There is a part of me though that wants to rebuild the engine as it is and see what it can do with everything fresh. I have to think some basic head porting, a cam, a better converter and a change back to a 4.30 gear would get me in the mid 11s no problem. I could re use the valve train parts, crank, rods and pistons which is obviously a big cost savings. It's hard to deny the benefits of the 4" crank in a street car though since it's basically a drop in and relatively inexpensive. Decisions, decisions.
Anyway, here are some pics.
Here's the right side head as removed.
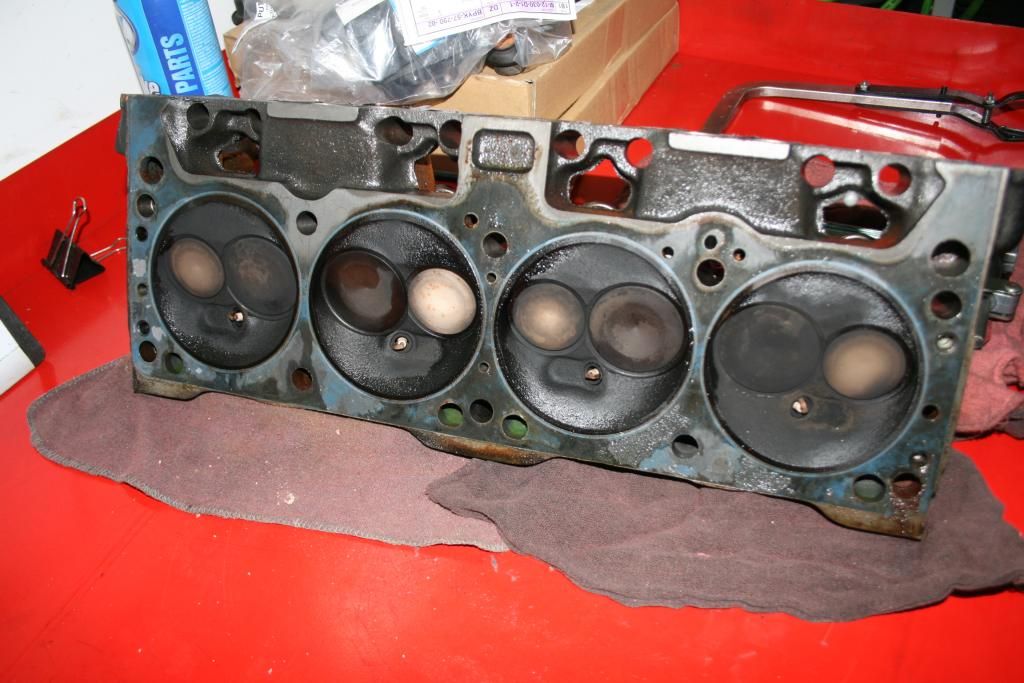
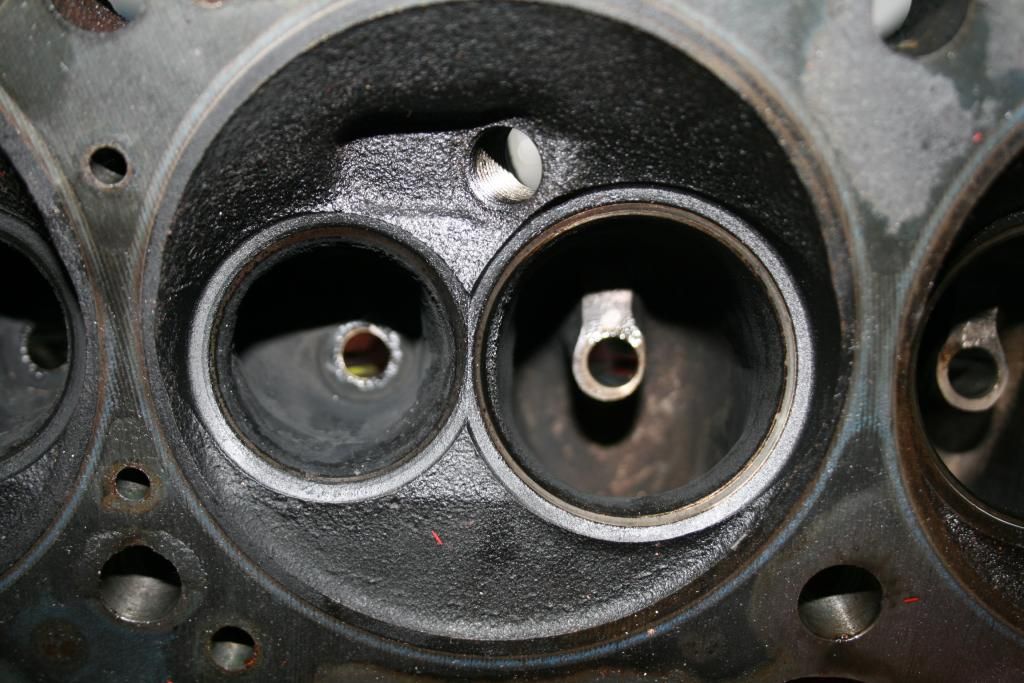
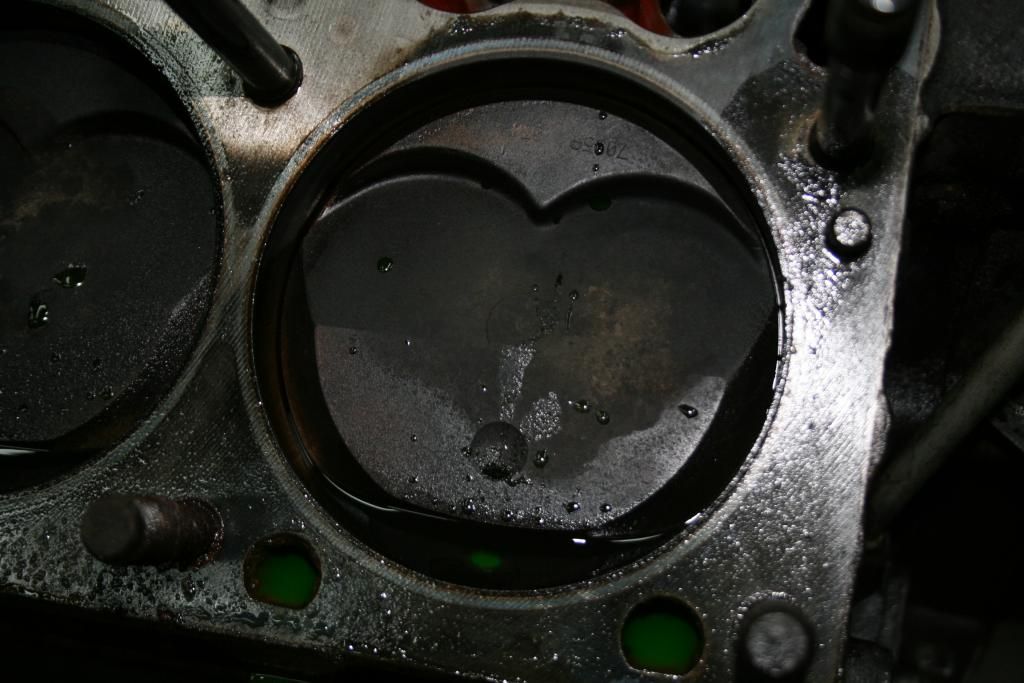
This is chamber #5 with the valves out.
Here are the valves from #7. These valves look like the ones I used to take out of older cars when I was working.

These are the teflon valve seals. The larger spring retainer that keeps the seal on the guide was there but the spring that keeps the seal tight against the stem were all gone.
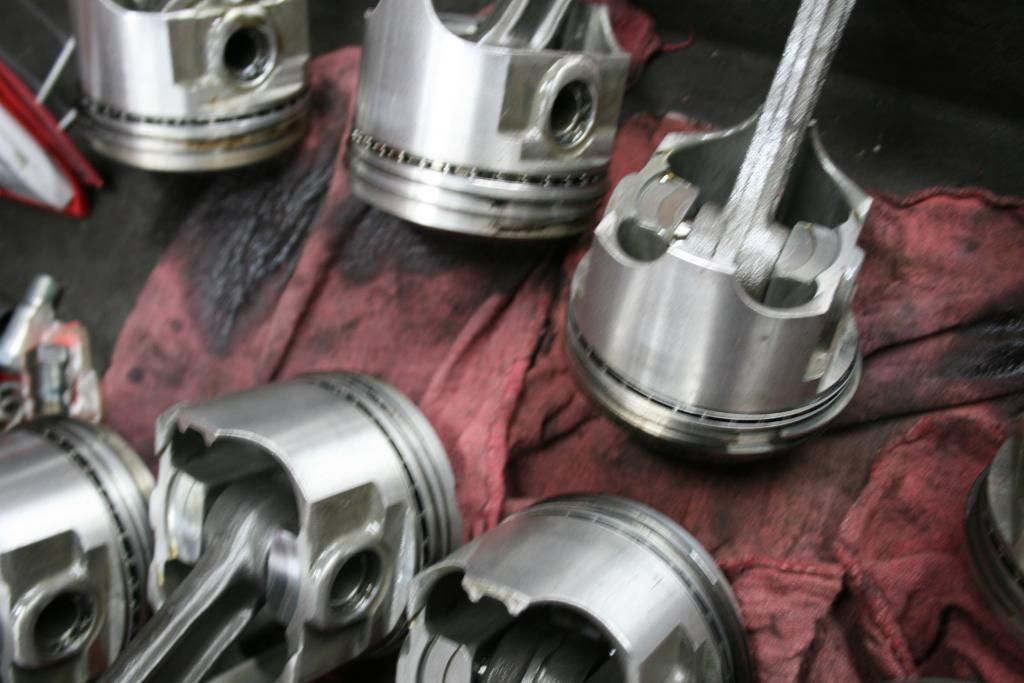
This is cylinder #2. These are Speed Pro 7035p .030" over pistons, .018" out of the hole.
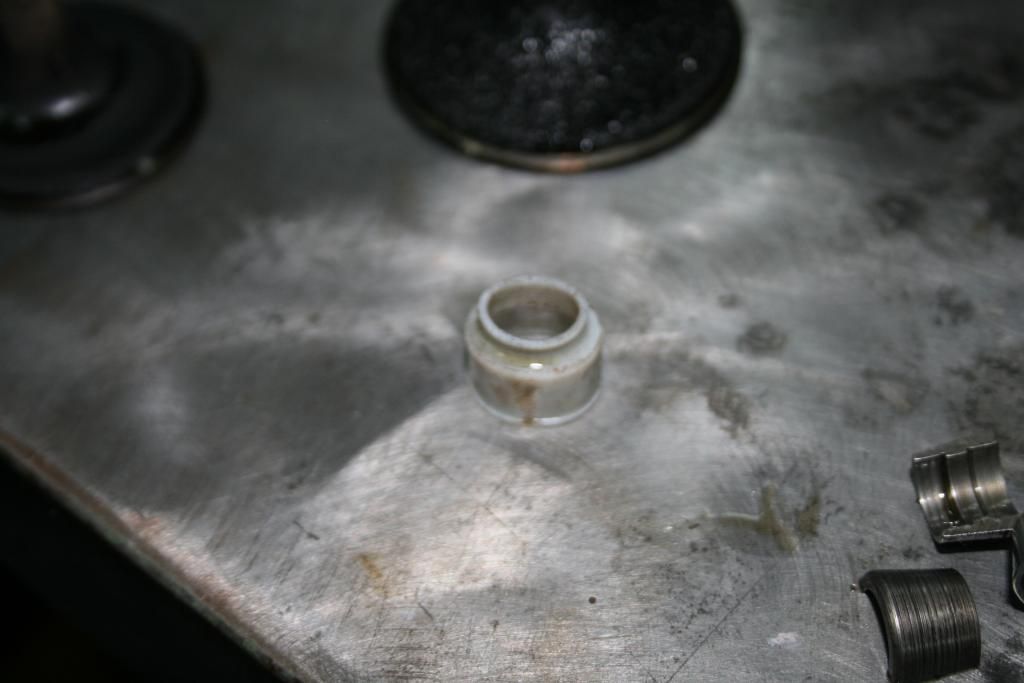
Pic of the witness marks on the underside of the rocker arms on cylinder #8.
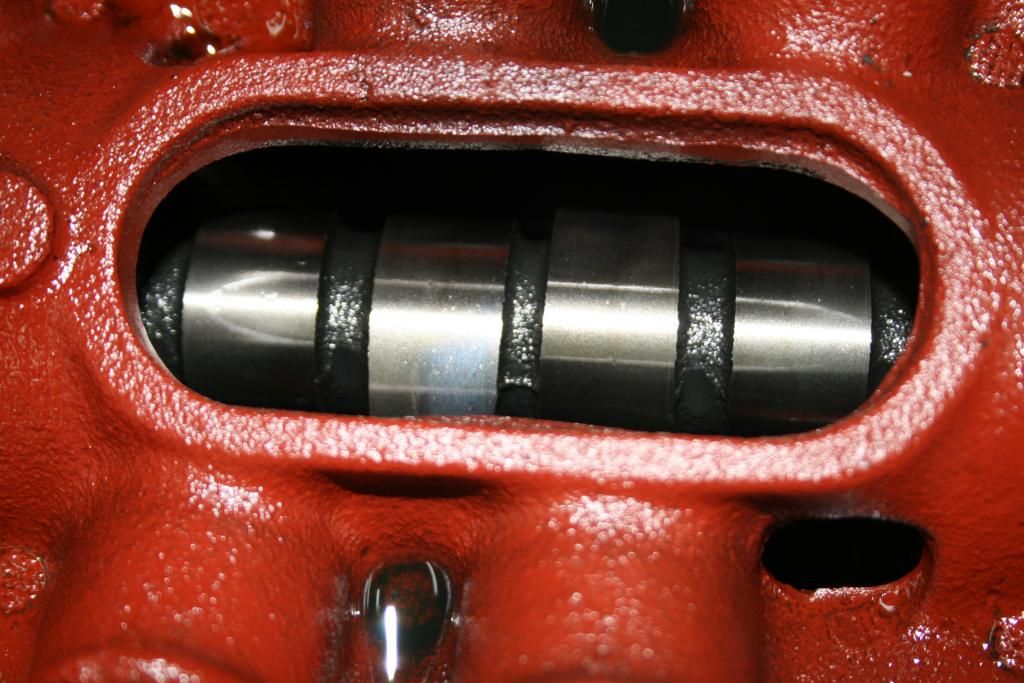
Shot of the cam.
More to come!
For the most part, things looked OK for an older build. There was no real damage to speak of, just a bunch of carbon on the valves due to the seals being shot. I had thought the cam lobes might be toast but it was just normal wear. Some of the rocker arms had some galling from the tops of the springs but nothing major.
Learned a few things about the internal parts that I was not sure of. The block is .030" over and has Speed Pro 7035p pistons in it. They are .018" out of the hole like stock. Gasket looked like .040" maybe but I'm not exactly sure. Has head studs. The inside edge of the deck was deburred. I was not sure if the lifter galley was tubed but it's not. Might do that for the rebuild. I could probably clean things up with a hone, put new bearings and rings in the short block and it would be good to go again.
So despite the valves being all carboned up, the heads were OK. Again, the main culprit was the old teflon valve seals. The little tension springs that keep them tight against the stems were all gone so they were leaking bad.
Consequently, the valves were a ***** to get out. The valve locks were truly locked. I had to whack the valve tips pretty hard a couple of times to get things loosened up. The springs are stiff, took a lot of muscle to hold them down to get the locks out. I am more used to late model OE valve springs which are pretty wimpy compared to these. These springs are not even that burly though, it's just a Mopar .557" cam.
Intake valves are 2.02" but I had the idea that they were larger. No porting in these heads, just your basic late '70s-early '80s 810 casting W2s.
So the end result of all of this is still up in the air. I spoke with Brian at IMM about how to proceed and he suggested I go with his CNC/RHS heads. He said they could support 550 horsepower with a 4" crank, even with a dual plane intake and a hydraulic flat tappet cam. I was surprised to hear that but it sounds good.
There is a part of me though that wants to rebuild the engine as it is and see what it can do with everything fresh. I have to think some basic head porting, a cam, a better converter and a change back to a 4.30 gear would get me in the mid 11s no problem. I could re use the valve train parts, crank, rods and pistons which is obviously a big cost savings. It's hard to deny the benefits of the 4" crank in a street car though since it's basically a drop in and relatively inexpensive. Decisions, decisions.
Anyway, here are some pics.
Here's the right side head as removed.
This is chamber #5 with the valves out.
Here are the valves from #7. These valves look like the ones I used to take out of older cars when I was working.
These are the teflon valve seals. The larger spring retainer that keeps the seal on the guide was there but the spring that keeps the seal tight against the stem were all gone.
This is cylinder #2. These are Speed Pro 7035p .030" over pistons, .018" out of the hole.
Pic of the witness marks on the underside of the rocker arms on cylinder #8.
Shot of the cam.
More to come!
So the top end is torn down. Have not had the time to take the oil pan off to look at the bottom end yet but I don't foresee anything surprising. One of the freeze plugs at the back of the block was leaking and there was starting to be a thin film of oil on everything. The clean up begins.
For the most part, things looked OK for an older build. There was no real damage to speak of, just a bunch of carbon on the valves due to the seals being shot. I had thought the cam lobes might be toast but it was just normal wear. Some of the rocker arms had some galling from the tops of the springs but nothing major.
Learned a few things about the internal parts that I was not sure of. The block is .030" over and has Speed Pro 7035p pistons in it. They are .018" out of the hole like stock. Gasket looked like .040" maybe but I'm not exactly sure. Has head studs. The inside edge of the deck was deburred. I was not sure if the lifter galley was tubed but it's not. Might do that for the rebuild. I could probably clean things up with a hone, put new bearings and rings in the short block and it would be good to go again.
So despite the valves being all carboned up, the heads were OK. Again, the main culprit was the old teflon valve seals. The little tension springs that keep them tight against the stems were all gone so they were leaking bad.
Consequently, the valves were a ***** to get out. The valve locks were truly locked. I had to whack the valve tips pretty hard a couple of times to get things loosened up. The springs are stiff, took a lot of muscle to hold them down to get the locks out. I am more used to late model OE valve springs which are pretty wimpy compared to these. These springs are not even that burly though, it's just a Mopar .557" cam.
Intake valves are 2.02" but I had the idea that they were larger. No porting in these heads, just your basic late '70s-early '80s 810 casting W2s.
So the end result of all of this is still up in the air. I spoke with Brian at IMM about how to proceed and he suggested I go with his CNC/RHS heads. He said they could support 550 horsepower with a 4" crank, even with a dual plane intake and a hydraulic flat tappet cam. I was surprised to hear that but it sounds good.
There is a part of me though that wants to rebuild the engine as it is and see what it can do with everything fresh. I have to think some basic head porting, a cam, a better converter and a change back to a 4.30 gear would get me in the mid 11s no problem. I could re use the valve train parts, crank, rods and pistons which is obviously a big cost savings. It's hard to deny the benefits of the 4" crank in a street car though since it's basically a drop in and relatively inexpensive. Decisions, decisions.
Anyway, here are some pics.
Here's the right side head as removed.
This is chamber #5 with the valves out.
Here are the valves from #7. These valves look like the ones I used to take out of older cars when I was working.
These are the teflon valve seals. The larger spring retainer that keeps the seal on the guide was there but the spring that keeps the seal tight against the stem were all gone.
This is cylinder #2. These are Speed Pro 7035p .030" over pistons, .018" out of the hole.
Pic of the witness marks on the underside of the rocker arms on cylinder #8.
Shot of the cam.
More to come!
I always liked tuning what I have in hard parts. That way you have a known reference, and can reuse the good known parts. ( I would call virgin W2 castings, " good parts"...). A improvement, probably could be done on the M.P cam. If you like the cam, run it,) You have a lot left in that combination, I.M.O.. Maybe others will chime in with W2 combo's , or start a thread in small block tech forum .A good valve guide/ seat centering, would work wonders for starts.
B.T.W., that cam looks like new!
rmchrgr
Skate And Destroy
I always liked tuning what I have in hard parts. That way you have a known reference, and can reuse the good known parts. ( I would call virgin W2 castings, " good parts"...). A improvement, probably could be done on the M.P cam. If you like the cam, run it,) You have a lot left in that combination, I.M.O.. Maybe others will chime in with W2 combo's , or start a thread in small block tech forum .A good valve guide/ seat centering, would work wonders for starts.
Been thinking about re-using all these parts. Yes, the block is a "known good quantity" in that it does not have any extra holes in it. But it might be beyond it's usable life at this point. Next step is to get the bottom end out and measure it with a dial bore gage. If it checks out OK in my garage, then it goes to the machine shop for final verification. Happy to have the other blocks just in case.
IMO, the stock stroke really needs the higher numerical gears though. Based on the ET with this car, that's pretty much a fact. So if I put the 4.30 gear back in, it gets kind of impractical to drive it very far. Around town is fine but I don't have a truck/trailer so it gets driven back and forth to the track which is 80 miles one way. Can it be done? Sure but do I want to? Not really. The 4.10 in it now is the practical limit for me on the highway.
The 4.10 gear would probably work well with the stroker since the longer arm creates more torque. If I had a truck and decided to stay with the stock stroke, the 4.30 gear would be going back in for sure.
As far as the heads, they definitely need some work. Guides, valve job and some basic chamber clean up. It really boils don to a cost vs. benefit choice. The RHS heads are looking pretty good at the moment since they are bolt on deal and I can use my existing headers. `
rmchrgr
Skate And Destroy
OK, more progress on the engine stuff.
Took the bottom end apart, found that it was definitely worn. The bearings were toast. Looking at the stampings on the back of the bearings said that they were from 1997, some even from 1994. Obviously this engine had been together for a long time so none of this is a surprise. All in all though, the engine had no major damage or anything.
It appears there may have been debris in there at some point because the mains were down to the copper. Mostly on the top though which was odd. I bet that those valve stem seal clips were what ended up embedded in the bearings because they weren't in the oil pump pickup. Doh!
The rod bearings also had uneven wear. The top halves were worn to the copper but the bottoms appeared OK. It was suggested to me that the engine was detonating causing the wear on the rod and main bearing upper halves. The detonation would have caused the piston and rod to be forced down on to the rod journal so that partially explains it. I was thinking that something may have been a little bent too because the bearings looked better closer to the front. The crank visually appeared OK though so all this is only a guess.
I also thought that contaminated oil could have done some of the damage. Last spring when I replaced the old MP orange box with an MSD 6, I had some starting issues because of a crossed wire. A lot of unburned fuel wound up going down into the cylinders which would explain that. I never drove it with the oil like that but I figure that all the aborted starting attempts was a contributor.
I will mention also that I sold the entire rotating assembly this week to a guy on Moparts. He was looking for the exact pistons I had. I got in touch with him and offered them and then he asked to buy the entire reciprocating assembly. We came to a deal and off it went. Kind of a weird feeling since just a month ago these parts were running but I was glad I did it, less stuff to sit around and trip over. The crank and rods were .010" under already which he knew. I believe those parts were at the end of their service, any further use on them is gravy.
So the block itself is .030" over and to my untrained eye it looks to have to some uneven wear in the bores. Not sure what this could be due to, maybe piston rock. I doubt it will clean up with a light hone so it would have to be sonic checked before moving forward. I fumbled around with my cheapo dial bore gage trying to get an idea on how it reads but it wasn't working for me too well. In any event, I have two other 340 blocks on hand, one of which is standard bore but will need to be checked to make sure it's usable. Hope that one is good, not real interested in any more boat anchors. Gonna take one of the blocks down to the machine shop soon to get it looked at.
In the meantime, I sent a pair of RHS heads to Brian @ IMM. I spoke with him recently and he suggested having them sent out to be CNC ported with his program along with installing appropriate valves and springs. Gonna discuss the rest of the build with him sometime this week, hope to make decisions on parts soon. Thinking a roll bar might be in my immediate future.
There are a few other things I am going to try and take care of while the engine is out. I need to re-weld the spring perches on the rear end to achieve the proper pinion angle. I had 4 degree shims in there to correct it before but it was never great, had a vibration on decel from higher speeds. I also noticed a leak from the R/R wheel cylinder so that has to be addressed while the rear is apart.
The fuel system also needs some help. I pretty much decided on an electric pump. Found a Mallory 140 on Ebay through JC Whitney for a ridiculously low price. Bought it and they cancelled the auction due to 'no stock'. Not happy. Guess the realized their mistake and didn't feel like giving away a $400 pump for under $90. Still looking around at options for now. I like the idea of an in-tank pump. They are the quietest and keep the pump off the chassis. Thinking about the Aeromotive Stealth system, seems like a good option for a street/strip application.
I will probably be taking the trans out for a freshen up too. It was fine but considering how old everything else is, it's probably time for a rebuild. When I was a tech, the last job I had was doing all powertrain. I'll probably take it back to my old shop and do it there.
Hope to get back to this stuff in the coming weeks. It's been very cold here, have not been out in the garage much. Might have to get a heater of some sort.
On to the pics.
Main bearings.
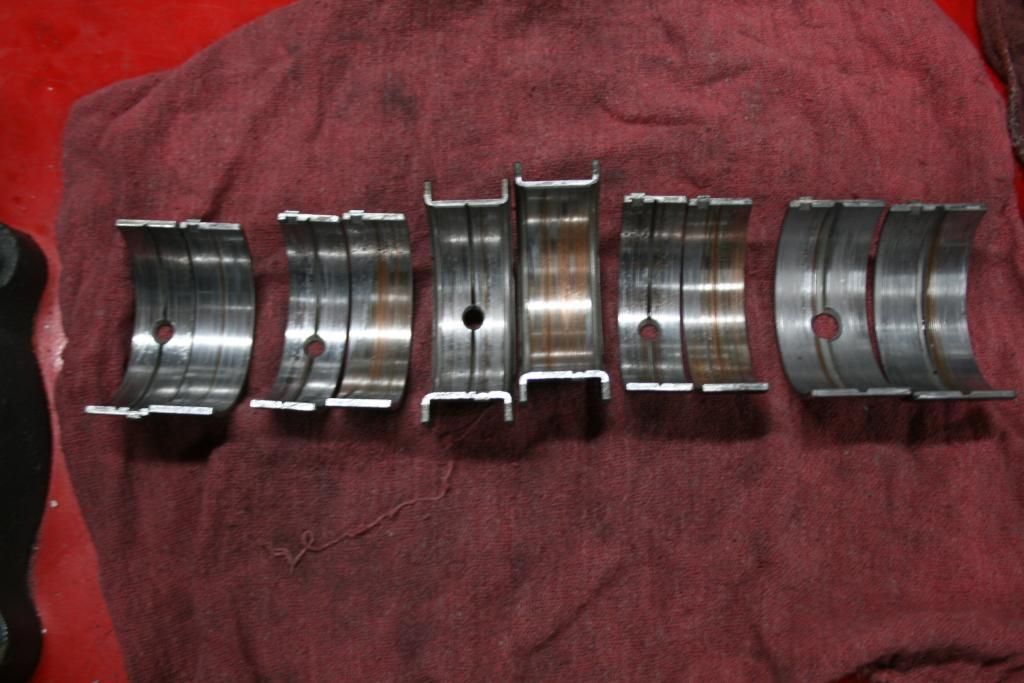
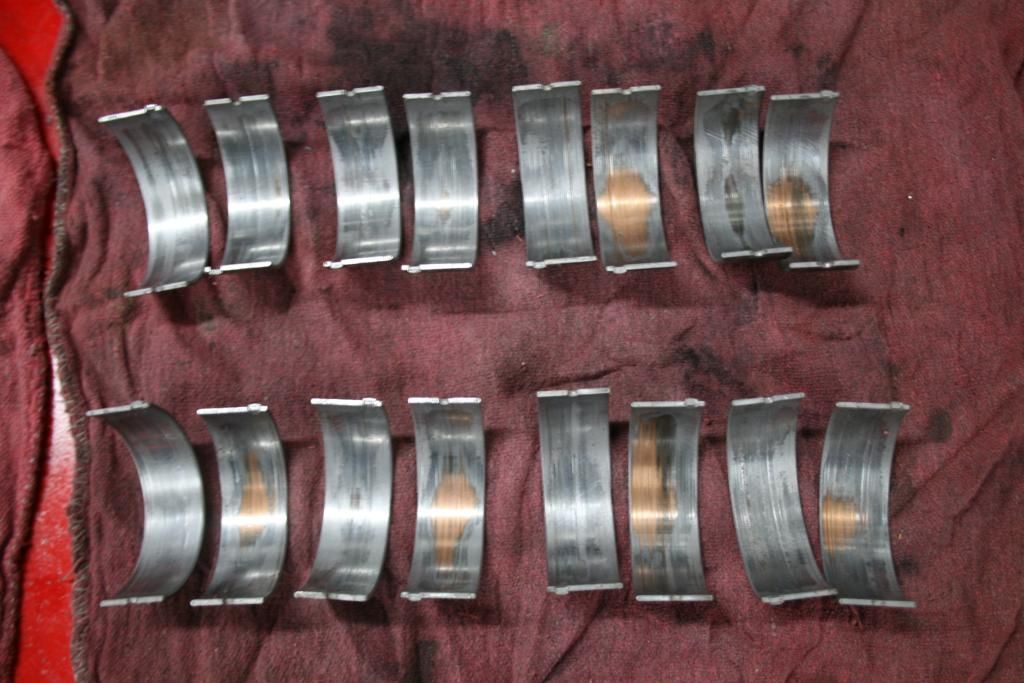
Rod bearings.
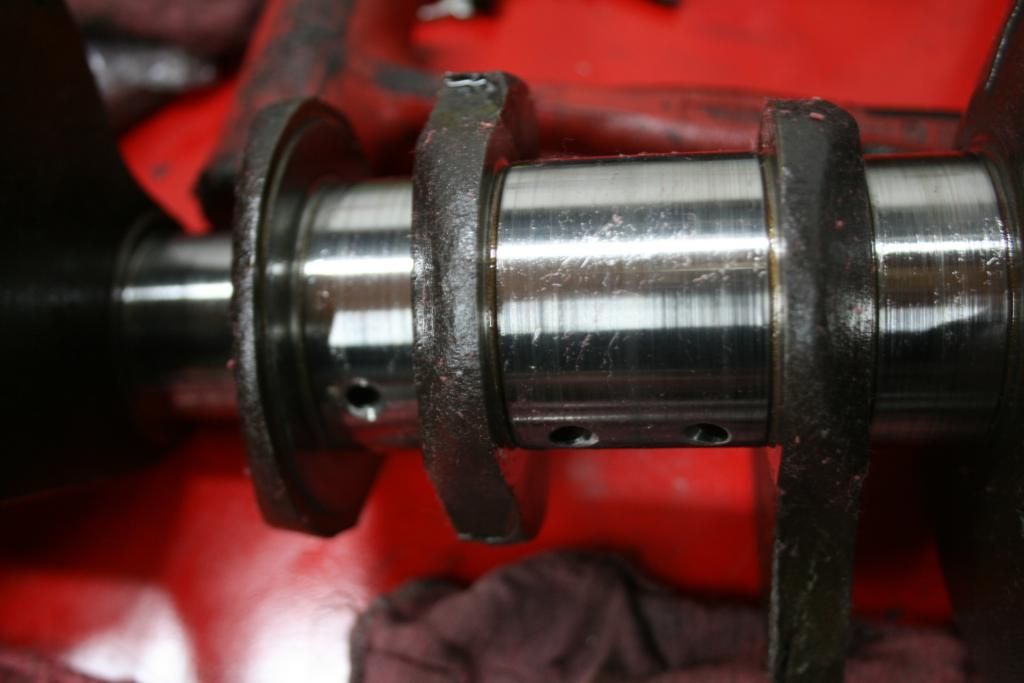
Here's one of the crank journals. Fuzzy stuff is rag material.
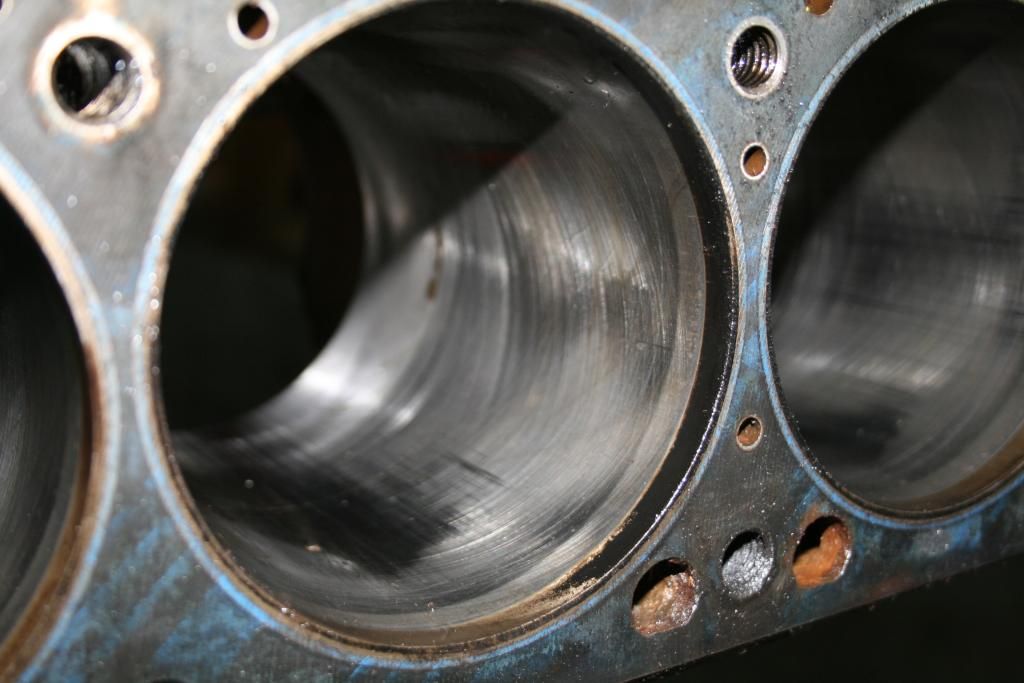
Shot of a cylinder.
Here's pistons and rods. Skirts looked good actually.
Here's the timing chain, which I thought had too much slack. Felt looser than what the pic shows.
That's all for now. More to come.
Took the bottom end apart, found that it was definitely worn. The bearings were toast. Looking at the stampings on the back of the bearings said that they were from 1997, some even from 1994. Obviously this engine had been together for a long time so none of this is a surprise. All in all though, the engine had no major damage or anything.
It appears there may have been debris in there at some point because the mains were down to the copper. Mostly on the top though which was odd. I bet that those valve stem seal clips were what ended up embedded in the bearings because they weren't in the oil pump pickup. Doh!
The rod bearings also had uneven wear. The top halves were worn to the copper but the bottoms appeared OK. It was suggested to me that the engine was detonating causing the wear on the rod and main bearing upper halves. The detonation would have caused the piston and rod to be forced down on to the rod journal so that partially explains it. I was thinking that something may have been a little bent too because the bearings looked better closer to the front. The crank visually appeared OK though so all this is only a guess.
I also thought that contaminated oil could have done some of the damage. Last spring when I replaced the old MP orange box with an MSD 6, I had some starting issues because of a crossed wire. A lot of unburned fuel wound up going down into the cylinders which would explain that. I never drove it with the oil like that but I figure that all the aborted starting attempts was a contributor.
I will mention also that I sold the entire rotating assembly this week to a guy on Moparts. He was looking for the exact pistons I had. I got in touch with him and offered them and then he asked to buy the entire reciprocating assembly. We came to a deal and off it went. Kind of a weird feeling since just a month ago these parts were running but I was glad I did it, less stuff to sit around and trip over. The crank and rods were .010" under already which he knew. I believe those parts were at the end of their service, any further use on them is gravy.
So the block itself is .030" over and to my untrained eye it looks to have to some uneven wear in the bores. Not sure what this could be due to, maybe piston rock. I doubt it will clean up with a light hone so it would have to be sonic checked before moving forward. I fumbled around with my cheapo dial bore gage trying to get an idea on how it reads but it wasn't working for me too well. In any event, I have two other 340 blocks on hand, one of which is standard bore but will need to be checked to make sure it's usable. Hope that one is good, not real interested in any more boat anchors. Gonna take one of the blocks down to the machine shop soon to get it looked at.
In the meantime, I sent a pair of RHS heads to Brian @ IMM. I spoke with him recently and he suggested having them sent out to be CNC ported with his program along with installing appropriate valves and springs. Gonna discuss the rest of the build with him sometime this week, hope to make decisions on parts soon. Thinking a roll bar might be in my immediate future.
There are a few other things I am going to try and take care of while the engine is out. I need to re-weld the spring perches on the rear end to achieve the proper pinion angle. I had 4 degree shims in there to correct it before but it was never great, had a vibration on decel from higher speeds. I also noticed a leak from the R/R wheel cylinder so that has to be addressed while the rear is apart.
The fuel system also needs some help. I pretty much decided on an electric pump. Found a Mallory 140 on Ebay through JC Whitney for a ridiculously low price. Bought it and they cancelled the auction due to 'no stock'. Not happy. Guess the realized their mistake and didn't feel like giving away a $400 pump for under $90. Still looking around at options for now. I like the idea of an in-tank pump. They are the quietest and keep the pump off the chassis. Thinking about the Aeromotive Stealth system, seems like a good option for a street/strip application.
I will probably be taking the trans out for a freshen up too. It was fine but considering how old everything else is, it's probably time for a rebuild. When I was a tech, the last job I had was doing all powertrain. I'll probably take it back to my old shop and do it there.
Hope to get back to this stuff in the coming weeks. It's been very cold here, have not been out in the garage much. Might have to get a heater of some sort.
On to the pics.
Main bearings.
Rod bearings.
Here's one of the crank journals. Fuzzy stuff is rag material.
Shot of a cylinder.
Here's pistons and rods. Skirts looked good actually.
Here's the timing chain, which I thought had too much slack. Felt looser than what the pic shows.
That's all for now. More to come.
greendart
greendart
Where did you get the aluminum bumper brackets?
rmchrgr
Skate And Destroy
Where did you get the aluminum bumper brackets?
From a guy named Jody (jbmopars) out in Michigan. He sold me an extra set.
Just food for thought, the Walbro GSL-392 pumps have been getting a lot of attention lately. They cost around $95.00 and should pump enough for your application. The only reason I bring this one up: low cost and quiet. I run an Aeromotive and it's loud IMO.
rmchrgr
Skate And Destroy
Just food for thought, the Walbro GSL-392 pumps have been getting a lot of attention lately. They cost around $95.00 and should pump enough for your application. The only reason I bring this one up: low cost and quiet. I run an Aeromotive and it's loud IMO.
I looked into the Walbro, it is high on my list of options. That particular pump seems like it would be easier to mount than a standard vertical style pump. Which Aeromotive pump do you use? In tank or otherwise? In tank is usually a different style pump altogether and is generally submerged in liquid which I would think would help to dampen vibrations.
Frankly, the more I think about it, I really don't want to deal with installing an in-tank pump. The main problems I see with an in-tank pump in our cars are with the tank itself. A body gas tanks are a little snug in the front up against the trunk floor, was thinking it might be a PITA to run all the lines from there depending on where you mount the pump. You can cut out a section and make a lower mount for it but that's a lot of extra work. The tank is too shallow towards the back so you couldn't put it there. If it's in front and you had low fuel you risk uncovering the pickup on the hit. You'd need a baffle which I don't have in my factory tank. Guess that's why guys use aftermarket tanks in that situation, takes the headache out of it and they usually have baffles installed.
I need to get under the car and look at it. Maybe if I stare at it long enough I'll come up with a solution.
I'm sure you'll get it figured out! I run their SS pump (vertical canister type). In the future, you may want to have that fuel pump handy outside the tank in case the pump goes out. This will make changing it easier.
rmchrgr
Skate And Destroy
Just a few quick updates.
Dropped a block off at the machine shop for initial inspection. I've had this particular block for several years. I hadn't looked at it too closely since I bought it but outwardly it looked OK so I went with that one. Currently waiting on an order from Hughes Engines to arrive which includes a set of main cap studs. Once I receive those, I'll take 'em over to the shop so they can start the machining process.
I ordered a crank from Bloomer Performance. It's a 4" stroke with 'generic' 2.100 rod journals. This configuration allows me to run a *gasp* Chevy 6.125" rod with a .927" wrist pin. Diamond makes a shelf piston for this exact combo which is what I based ordering the crank and rods on. Not sure what the final bore or deck height will be so I have to wait on the pistons until that is known. If something ends up really wacky, Diamond will alter a set of pistons pretty cheaply so it should all work out pretty well. Aiming for zero deck height and around 10.2:1 compression ratio.
Ordered a bunch of other stuff as well; Kevko oil pan and pickup, fasteners, gaskets, freeze plugs, timing chain and related parts, a set of Hughes 1.5 rocker arms, a flexplate and on and on. I think my credit card is on fire.
I will be ordering some engine tools this week to add to my ever-expanding collecton; cam install/degree tool, deck bridge, pushrod checking tool, ring compressor and filer and a few other things I can't remember at the moment.
I want to mention that buying all these parts in rapid succession definitely makes me thankful to be in a position to do so. I question the nature of these things sometimes but building engines really is a noble exercise that produces tangible, lasting results and experience. No one can argue with that!
More to come.
Just a few quick updates.
Dropped a block off at the machine shop for initial inspection. I've had this particular block for several years. I hadn't looked at it too closely since I bought it but outwardly it looked OK so I went with that one. Currently waiting on an order from Hughes Engines to arrive which includes a set of main cap studs. Once I receive those, I'll take 'em over to the shop so they can start the machining process.
I ordered a crank from Bloomer Performance. It's a 4" stroke with 'generic' 2.100 rod journals. This configuration allows me to run a *gasp* Chevy 6.125" rod with a .927" wrist pin. Diamond makes a shelf piston for this exact combo which is what I based ordering the crank and rods on. Not sure what the final bore or deck height will be so I have to wait on the pistons until that is known. If something ends up really wacky, Diamond will alter a set of pistons pretty cheaply so it should all work out pretty well. Aiming for zero deck height and around 10.2:1 compression ratio.
Ordered a bunch of other stuff as well; Kevko oil pan and pickup, fasteners, gaskets, freeze plugs, timing chain and related parts, a set of Hughes 1.5 rocker arms, a flexplate and on and on. I think my credit card is on fire.
I will be ordering some engine tools this week to add to my ever-expanding collecton; cam install/degree tool, deck bridge, pushrod checking tool, ring compressor and filer and a few other things I can't remember at the moment.
I want to mention that buying all these parts in rapid succession definitely makes me thankful to be in a position to do so. I question the nature of these things sometimes but building engines really is a noble exercise that produces tangible, lasting results and experience. No one can argue with that!
More to come.
NICE!... A good combination. man! I have no tangible concepts with it (J.M.O). Make the crank yank. on those W2 heads. I like, it
rmchrgr
Skate And Destroy
Hey man don't worry about the Chevy rods. I run them too! Lol. Cheaper bearings is how I look at it.
Ha, not worried about 'em at all. Nothing "Chevy" about them really, they are basically 'generic' with a certain size rod journal.
It's good that the crank I ordered comes with the 2.100 rod journal so you don't have to cut down a brand new "Mopar" 2.125" journal crank to get the pistons I wanted. The pistons are light and have the .927 wrist pin. Just seems like there is no reason NOT to use those rods.
There are no cheap bearings BTW. Priced coated ones?
Dropped a set of main studs at the machine shop today. I ordered a set from Hughes that uses a bolt in one side of the rear main cap for oil pump clearance. Hoping not to have to do too much corrective work to get the saddles straight. Crank should be there Monday.
rmchrgr
Skate And Destroy
Couple more updates on the engine build.
Sold the 340 block that was in the Duster to Rob (Rumblefish360) on Saturday. We've been forum friends for a while but never met in person, was great to finally meet him. Glad the block went to a good home. Sounds like he has a pretty cool build up going on, hope he gets it rolling soon.
Anyway, the whole short block has now been sold off. Honestly, I had no use for it and it would have been difficult to store it without being in the way. Plus, a couple extra bucks doesn't hurt when you're building an engine.
I kept some of the pieces to either re-use for the current build up or something else down the road. Still have the timing chain cover, oil pan, windage tray, oil pump and pickup and oil filter adapter.
I was on the fence about whether to toss some of the valvetrain parts but really, what am I going to do with any of it? The valves were caked with carbon. The lifters were over 15 years old and the block they were in is now gone. They'd probably make good paper weights if anything.
Saved the camshaft and the pushrods. The pushrods are nice actually but who knows whether I will need the exact length they are. (8.00") I'm also keeping the W2 heads and rockers. For some reason I kept the springs, retainers, keepers and a shims just in case I ever decide to 'throw something together' but who knows, they'll probably just sit there like everything else. Springs are probably worn out anyway, the retainers are super heavy steel and the keepers are not worth much of anything. Maybe I'll give that stuff away.
The W2 heads need some work. Definitely valve guides. They really should be ported as well. In my mind, the engine never really lived up to its potential when I had it. It was old and tired when it got to me. It was a fun learning experience trying to tune it though.
The person I sold the rotating assembly to said that the #5 piston had a broken ring. I didn't even notice it when I took the thing apart. I had done a compression test on it a while ago and #5 was the lowest. I suspected the rings because it bumped up a few psi when oil was squirted down the hole but it was still 30 psi lower than the rest. Broken ring will do that!
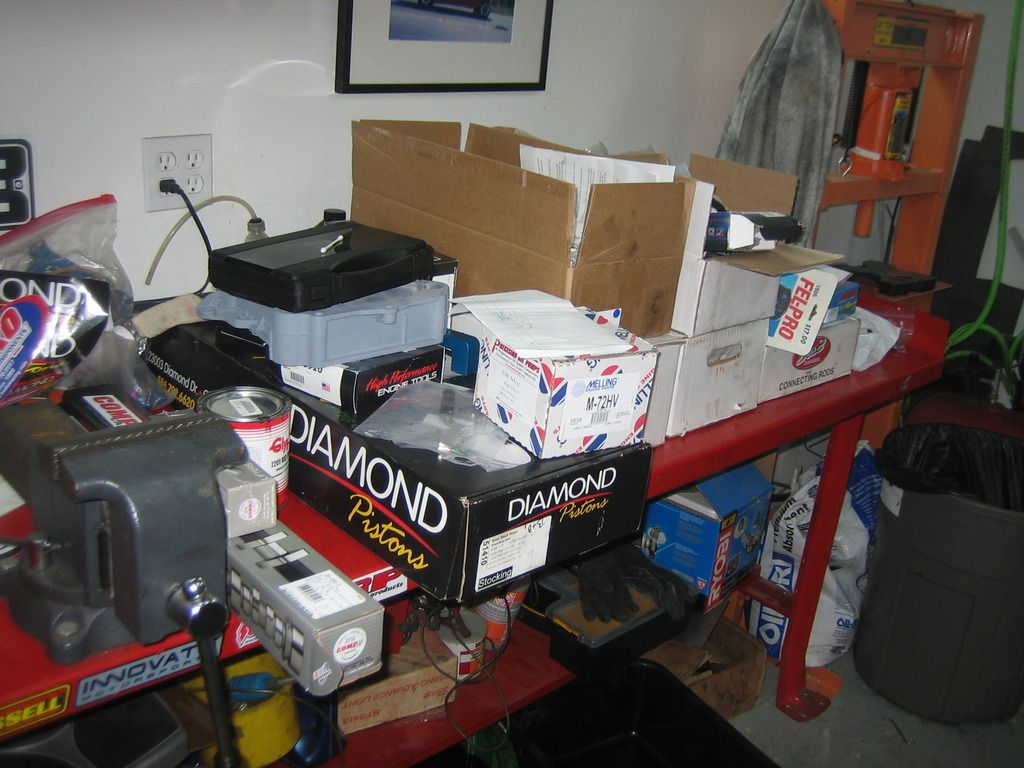
So today I had a little time to go and clean the bench off and try to organize the garage for the next project. I would like to try and get started on some of the other peripheral things while the engine is out.
More to come.
Sold the 340 block that was in the Duster to Rob (Rumblefish360) on Saturday. We've been forum friends for a while but never met in person, was great to finally meet him. Glad the block went to a good home. Sounds like he has a pretty cool build up going on, hope he gets it rolling soon.
Anyway, the whole short block has now been sold off. Honestly, I had no use for it and it would have been difficult to store it without being in the way. Plus, a couple extra bucks doesn't hurt when you're building an engine.
I kept some of the pieces to either re-use for the current build up or something else down the road. Still have the timing chain cover, oil pan, windage tray, oil pump and pickup and oil filter adapter.
I was on the fence about whether to toss some of the valvetrain parts but really, what am I going to do with any of it? The valves were caked with carbon. The lifters were over 15 years old and the block they were in is now gone. They'd probably make good paper weights if anything.
Saved the camshaft and the pushrods. The pushrods are nice actually but who knows whether I will need the exact length they are. (8.00") I'm also keeping the W2 heads and rockers. For some reason I kept the springs, retainers, keepers and a shims just in case I ever decide to 'throw something together' but who knows, they'll probably just sit there like everything else. Springs are probably worn out anyway, the retainers are super heavy steel and the keepers are not worth much of anything. Maybe I'll give that stuff away.
The W2 heads need some work. Definitely valve guides. They really should be ported as well. In my mind, the engine never really lived up to its potential when I had it. It was old and tired when it got to me. It was a fun learning experience trying to tune it though.
The person I sold the rotating assembly to said that the #5 piston had a broken ring. I didn't even notice it when I took the thing apart. I had done a compression test on it a while ago and #5 was the lowest. I suspected the rings because it bumped up a few psi when oil was squirted down the hole but it was still 30 psi lower than the rest. Broken ring will do that!
So today I had a little time to go and clean the bench off and try to organize the garage for the next project. I would like to try and get started on some of the other peripheral things while the engine is out.
More to come.
rmchrgr
Skate And Destroy
Just logging some things here, don't mind me.
Spoke to the machine shop the other day, the Bloomer Performance crank showed up there. I have not seen it yet but the machinist said it appears to be a quality piece, even if it is Chi-neezy. He actually spoke with Rod Bloomer to confirm some questions which was cool.
We discussed a few things on the phone. The mains in the block will need to be honed, they were a little too tight with the studs torqued down. Not sure how much it will take to clean up, hopefully just a wee bit to make 'em true.
He suggested using King bearings for the mains and rods to which I said OK. He found that they were superior to Clevite (more expensive) because they were of more consistent thicknesses. He had several experiences where the other brands were off by .002-.003" measured in various places and had to sort through boxes of bearings to find a good set. Sold me.
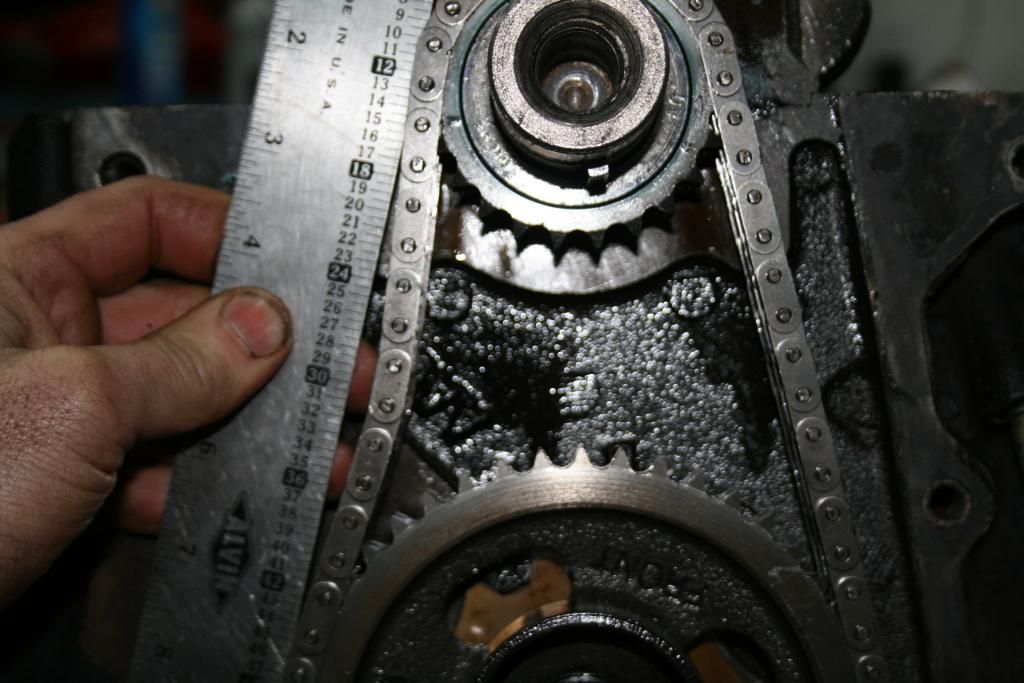
So apparently the block had been honed at one point and the bores were about .005" over stock which means it will need to be bored and finish honed to 4.070". He will be using a torque plate, I gave him the head studs to use with it when I dropped off the block. Obviously the goal is to get things as true as possible and using a torque plate is the way to go. Wish I could have kept it stock bore but oh well. Can't imagine there are many factory 4.040" bore 340 blocks out there in 2015.
Deck height is still up in the air until he has the pistons and rods on hand. Compression ratio with the Diamond pistons is based on the nominal .018" @ 9.6" d.h spec., the hope is to achieve zero deck to get around 10.3:1 C.R. The machinist said he generally measures deck height at the 4 corners unless asked to do all 8. We decided it was probably not necessary unless it was really out of whack at the corners. This is a pump gasser for sure though.
My initial plan was to get the block back home, measure deck height myself and bring it back to be surface cut. I decided it would be better to have him do the measurements and make whatever cuts are necessary. He's got the experience and tools to do the job correctly the first time, I can't really afford to screw that up. I'll tackle that on the next build up. Will also save me some money not having to buy tools and save the hassle of carting the block back and forth. There will be plenty of other measurements to take and verify during assembly.
The pistons and rods are on order. I spoke to Brian at IMM just to confirm the pistons I chose would work with his heads and he said they would be great. I let the machinist order them but I will probably end up paying a little markup. Everyone is entitled to make money I suppose. Things are moving along for sure though and there is plenty of money moving out of my wallet.
The Kevko oil pan and pickup I ordered two weeks ago showed up yesterday as well. I had read a few things about watching for welding slag left over from manufacturing in their parts. So I took the pickup out of the wrapping and casually looked it over. Sure enough, I noticed a piece of welding wire still lightly stuck to the edge of the pickup screen. Guarantee that would have ended up badly. Glad I happened to notice it but I will be going over that stuff with a high-powered microscope before I cinch it down. Nice parts otherwise. The baffles, swinging door and built-in crank scraper in the pan are great. There is also a sight plug to establish correct fill level. Good stuff.
So depending on when the rest of the parts arrive, the block work should be completed within the next two weeks. Brian said the heads were delayed at the CNC shop. He expected to have them back late next week for final assembly. I hope to have all the components done and back in my possession by the end of February.
Sorry for the text-heavy updates gang, not much to document with imagery at the moment. It's all planning/parts ordering right now. Too cold to be out in an un-heated garage anyway.
More to come.
Spoke to the machine shop the other day, the Bloomer Performance crank showed up there. I have not seen it yet but the machinist said it appears to be a quality piece, even if it is Chi-neezy. He actually spoke with Rod Bloomer to confirm some questions which was cool.
We discussed a few things on the phone. The mains in the block will need to be honed, they were a little too tight with the studs torqued down. Not sure how much it will take to clean up, hopefully just a wee bit to make 'em true.
He suggested using King bearings for the mains and rods to which I said OK. He found that they were superior to Clevite (more expensive) because they were of more consistent thicknesses. He had several experiences where the other brands were off by .002-.003" measured in various places and had to sort through boxes of bearings to find a good set. Sold me.
So apparently the block had been honed at one point and the bores were about .005" over stock which means it will need to be bored and finish honed to 4.070". He will be using a torque plate, I gave him the head studs to use with it when I dropped off the block. Obviously the goal is to get things as true as possible and using a torque plate is the way to go. Wish I could have kept it stock bore but oh well. Can't imagine there are many factory 4.040" bore 340 blocks out there in 2015.
Deck height is still up in the air until he has the pistons and rods on hand. Compression ratio with the Diamond pistons is based on the nominal .018" @ 9.6" d.h spec., the hope is to achieve zero deck to get around 10.3:1 C.R. The machinist said he generally measures deck height at the 4 corners unless asked to do all 8. We decided it was probably not necessary unless it was really out of whack at the corners. This is a pump gasser for sure though.
My initial plan was to get the block back home, measure deck height myself and bring it back to be surface cut. I decided it would be better to have him do the measurements and make whatever cuts are necessary. He's got the experience and tools to do the job correctly the first time, I can't really afford to screw that up. I'll tackle that on the next build up. Will also save me some money not having to buy tools and save the hassle of carting the block back and forth. There will be plenty of other measurements to take and verify during assembly.
The pistons and rods are on order. I spoke to Brian at IMM just to confirm the pistons I chose would work with his heads and he said they would be great. I let the machinist order them but I will probably end up paying a little markup. Everyone is entitled to make money I suppose. Things are moving along for sure though and there is plenty of money moving out of my wallet.
The Kevko oil pan and pickup I ordered two weeks ago showed up yesterday as well. I had read a few things about watching for welding slag left over from manufacturing in their parts. So I took the pickup out of the wrapping and casually looked it over. Sure enough, I noticed a piece of welding wire still lightly stuck to the edge of the pickup screen. Guarantee that would have ended up badly. Glad I happened to notice it but I will be going over that stuff with a high-powered microscope before I cinch it down. Nice parts otherwise. The baffles, swinging door and built-in crank scraper in the pan are great. There is also a sight plug to establish correct fill level. Good stuff.
So depending on when the rest of the parts arrive, the block work should be completed within the next two weeks. Brian said the heads were delayed at the CNC shop. He expected to have them back late next week for final assembly. I hope to have all the components done and back in my possession by the end of February.
Sorry for the text-heavy updates gang, not much to document with imagery at the moment. It's all planning/parts ordering right now. Too cold to be out in an un-heated garage anyway.
More to come.
Text heavy, easy to do. Look for at least .060",on every spot on mockup.Just logging some things here, don't mind me.
Spoke to the machine shop the other day, the Bloomer Performance crank showed up there. I have not seen it yet but the machinist said it appears to be a quality piece, even if it is Chi-neezy. He actually spoke with Rod Bloomer to confirm some questions which was cool.
We discussed a few things on the phone. The mains in the block will need to be honed, they were a little too tight with the studs torqued down. Not sure how much it will take to clean up, hopefully just a wee bit to make 'em true.
He suggested using King bearings for the mains and rods to which I said OK. He found that they were superior to Clevite (more expensive) because they were of more consistent thicknesses. He had several experiences where the other brands were off by .002-.003" measured in various places and had to sort through boxes of bearings to find a good set. Sold me.
So apparently the block had been honed at one point and the bores were about .005" over stock which means it will need to be bored and finish honed to 4.070". He will be using a torque plate, I gave him the head studs to use with it when I dropped off the block. Obviously the goal is to get things as true as possible and using a torque plate is the way to go. Wish I could have kept it stock bore but oh well. Can't imagine there are many factory 4.040" bore 340 blocks out there in 2015.
Deck height is still up in the air until he has the pistons and rods on hand. Compression ratio with the Diamond pistons is based on the nominal .018" @ 9.6" d.h spec., the hope is to achieve zero deck to get around 10.3:1 C.R. The machinist said he generally measures deck height at the 4 corners unless asked to do all 8. We decided it was probably not necessary unless it was really out of whack at the corners. This is a pump gasser for sure though.
My initial plan was to get the block back home, measure deck height myself and bring it back to be surface cut. I decided it would be better to have him do the measurements and make whatever cuts are necessary. He's got the experience and tools to do the job correctly the first time, I can't really afford to screw that up. I'll tackle that on the next build up. Will also save me some money not having to buy tools and save the hassle of carting the block back and forth. There will be plenty of other measurements to take and verify during assembly.
The pistons and rods are on order. I spoke to Brian at IMM just to confirm the pistons I chose would work with his heads and he said they would be great. I let the machinist order them but I will probably end up paying a little markup. Everyone is entitled to make money I suppose. Things are moving along for sure though and there is plenty of money moving out of my wallet.
The Kevko oil pan and pickup I ordered two weeks ago showed up yesterday as well. I had read a few things about watching for welding slag left over from manufacturing in their parts. So I took the pickup out of the wrapping and casually looked it over. Sure enough, I noticed a piece of welding wire still lightly stuck to the edge of the pickup screen. Guarantee that would have ended up badly. Glad I happened to notice it but I will be going over that stuff with a high-powered microscope before I cinch it down. Nice parts otherwise. The baffles, swinging door and built-in crank scraper in the pan are great. There is also a sight plug to establish correct fill level. Good stuff.
So depending on when the rest of the parts arrive, the block work should be completed within the next two weeks. Brian said the heads were delayed at the CNC shop. He expected to have them back late next week for final assembly. I hope to have all the components done and back in my possession by the end of February.
Sorry for the text-heavy updates gang, not much to document with imagery at the moment. It's all planning/parts ordering right now. Too cold to be out in an un-heated garage anyway.
More to come.
rmchrgr
Skate And Destroy
Wow, over a month since the last update. Lot going on!
Block is back from the machine shop and everything went pretty well, no surprises. I liked dealing with the shop I chose, the owner was cool. He took the time to talk to me at every step which was really appreciated. I mean, of course that's how it's supposed to work but the other places I went to all seemed to talk at me and had their own
preconceived notions about what I was doing without bothering to ask me one question. Making your customer feel comfortable goes a long way. Thanks Glenn!
So the pistons ended up at zero deck. Apparently the decks were all over the place as suspected but he was able to get everything straight.
The rotating assembly was balanced to within a half a gram. Half a gram! It's pretty light too which I think I mentioned already. This thing is gonna rev pretty quick.
While they had the block, the machine shop also took care of some other jobs - they knocked the cam bearings in, burnished in a new distributor shaft bushing and hot tanked the block.
The day I get the block home in the back of my little Mazda it started snowing. I left it in the car for a bit knowing I would have to go get it out later. So we put the kids to bed and then I go back out to deal with it. I'm out in my driveway in the cold and snow getting a block on an engine stand from out of the back of my little hatchback. The flood light is a motion sensor and keeps going out every 5 minutes so I have to wave my arm to turn it back on. Just thought it was kind of funny. Eventually I got the block out of the car, on to the stand and wheeled it into the garage through 2" of snow.
This was about two weeks ago now and frankly, it's been too cold to do much of anything outside. I can usually stand to be out there for a while but when it's below freezing for weeks on end, it's too much and gets downright demoralizing. So I wrapped the block air tight with plastic and plugged all the holes exposed to air. Then I put blankets and towels over it to insulate it a little from any big temp swings. I left all the other parts in their boxes, no need to start messing with any of this stuff right now. I have a little space heater but it doesn't even make a dent usually. I've learned to respect the cold. It's better to wait and do stuff when it's warmer, you always seem to get better results.
As the boxes pile up on the bench, there's more on the way. Most of what's coming now is tools I needed for assembly. Things like a rod bolt stretch gauge, cam degree kit, ring filer, engine brushes etc. I got some paint too - Glyptal for the lifter valley and Plastikote #232 Chrysler blue for the long block. It's amazing, you think you have every tool known to man but there is always more.
Next steps towards burning rubber are to paint and get the short block done. Hope it starts warming up soon.
Next big step is to decide on a cam but have to wait for the bank account to replenish.
More to come!
dartswinger84
Well-Known Member
- Joined
- Dec 19, 2009
- Messages
- 100
- Reaction score
- 4
You go with diamond 51413 pistons? Callies rods?
rmchrgr
Skate And Destroy
You go with diamond 51413 pistons?
Nope, Diamond #15410. Went with Scat I beam rods, 6.125".
rmchrgr
Skate And Destroy
Wow, another long time between updates. It's been cold up until just recently so I am finally getting out more now that it's tolerable.
So despite being stuck inside for the last 6 months, I have been collecting parts and tools for my 416 build up. Save for a few small odds and ends, I have pretty much everything needed to complete the build, just one or two more parts orders and I'll be set.
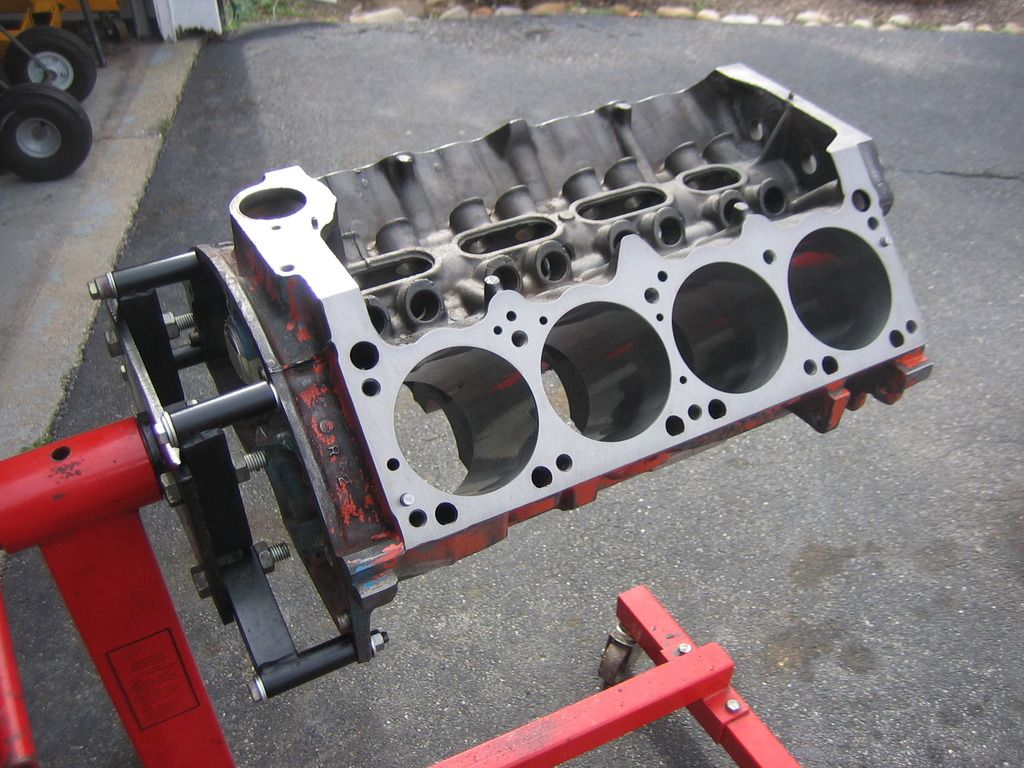
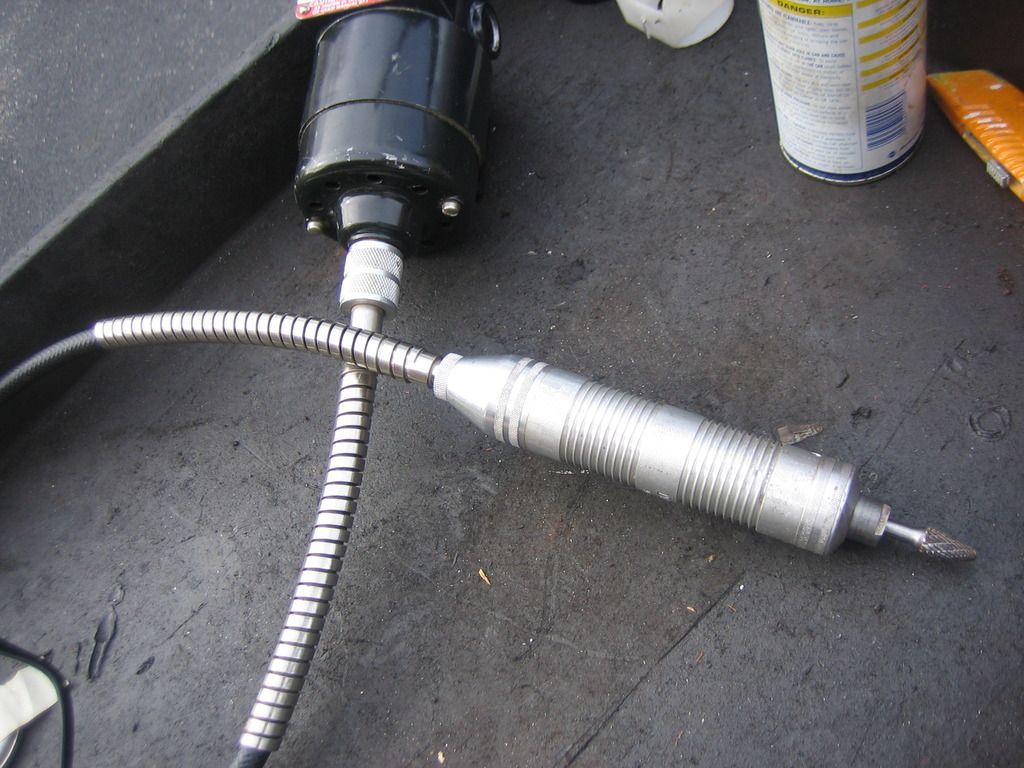
For now, I have taken the block outside to look it over. The first task was to deburr it - this involves breaking all the sharp edges and grinding down some of the casting flash, especially in the oil drain back holes.
I used a flex shaft rotary grinder with a carbide burr and it worked great. It does create a lot of dust and chips though so the block will really need to be cleaned thoroughly before assembly.
Also started to mask off the machined areas for painting which will be the next step after deburring. Don't remember whether I said what I was using for paint but I chose Plastikote based on reading some stuff on the forums. I'm debating whether to prime it before painting, not sure yet.
Also going to do use Glyptal in the valley. I need to clean the valley really well though, there is some flash rust forming. Hope to get this done on Saturday, supposed to be really nice.
Anyway, here's a few pics.
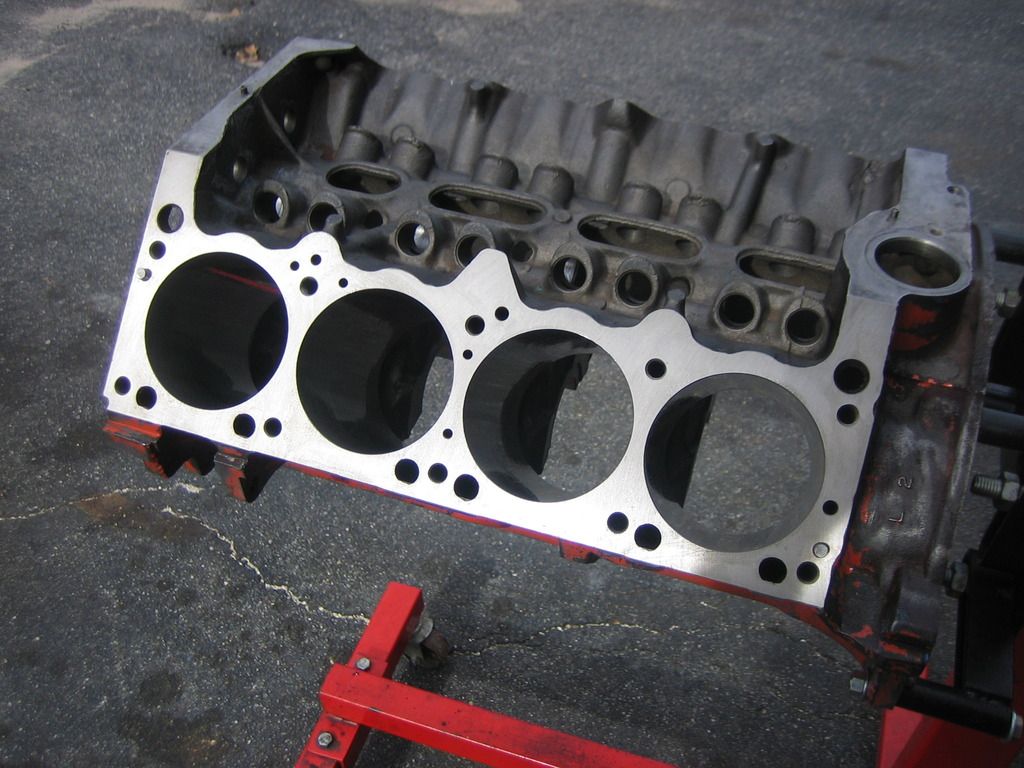
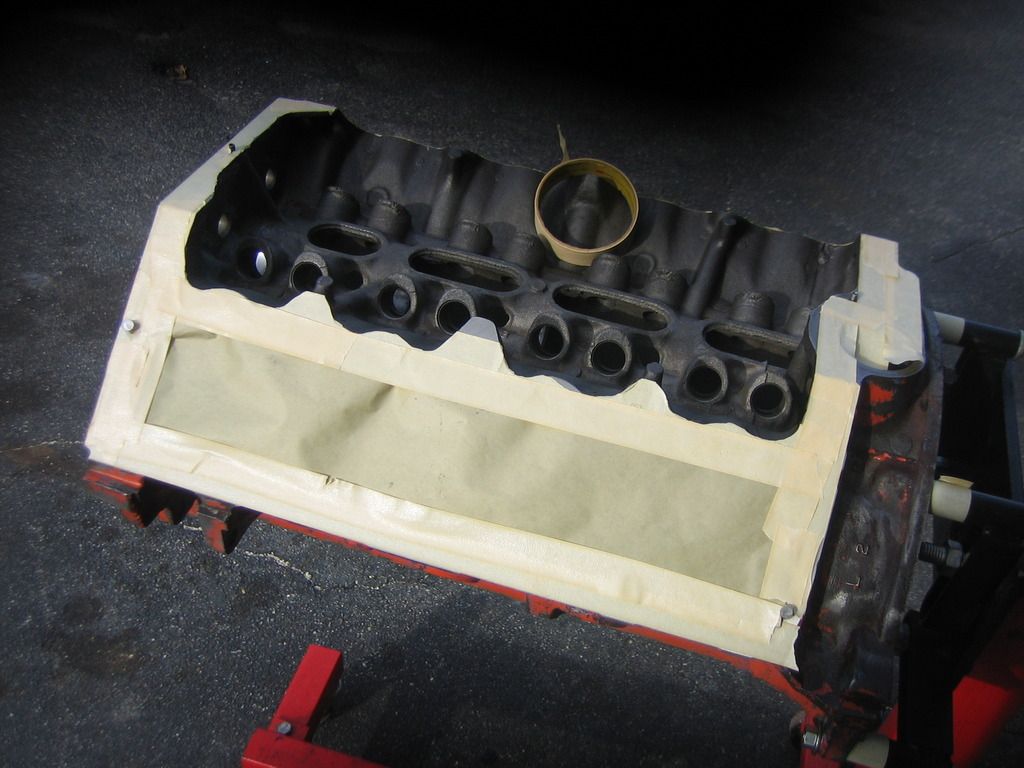
Here is the freshly machined block, ready for battle.
A pile of parts soon to be an engine.
This is the flex shaft tool I used to deburr the block.
Starting to mask off for paint.
More to come!
So despite being stuck inside for the last 6 months, I have been collecting parts and tools for my 416 build up. Save for a few small odds and ends, I have pretty much everything needed to complete the build, just one or two more parts orders and I'll be set.
For now, I have taken the block outside to look it over. The first task was to deburr it - this involves breaking all the sharp edges and grinding down some of the casting flash, especially in the oil drain back holes.
I used a flex shaft rotary grinder with a carbide burr and it worked great. It does create a lot of dust and chips though so the block will really need to be cleaned thoroughly before assembly.
Also started to mask off the machined areas for painting which will be the next step after deburring. Don't remember whether I said what I was using for paint but I chose Plastikote based on reading some stuff on the forums. I'm debating whether to prime it before painting, not sure yet.
Also going to do use Glyptal in the valley. I need to clean the valley really well though, there is some flash rust forming. Hope to get this done on Saturday, supposed to be really nice.
Anyway, here's a few pics.
Here is the freshly machined block, ready for battle.
A pile of parts soon to be an engine.
This is the flex shaft tool I used to deburr the block.
Starting to mask off for paint.
More to come!
Nice looking machine work...
rmchrgr
Skate And Destroy
Nice looking machine work...
Indeed. The work was done by Glenn @ B&B Machine here on Long Island. He is an NHRA Stock Eliminator racer who has won a Wally or two. Very cool guy and great to work with.
This block has had a lot of love - torque plate honed, main bores aligned, zero decked, etc. I think its actually gonna make some power! :burnout:
-


