What Are You Doing To/With Your Car Today?

-
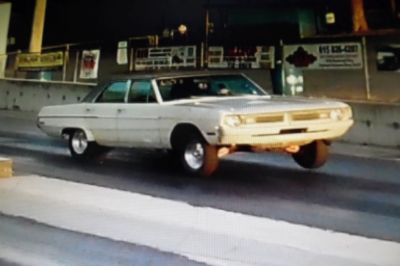
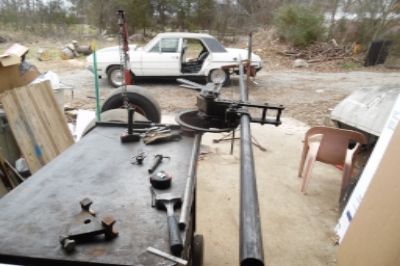
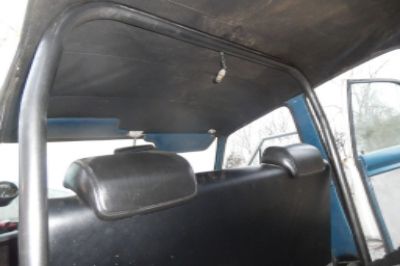
Started installing new headliner in my Dart today....Doing it myself so it's going to take a while.

A piece of advise....Do not... I repeat.... do not attempt this by yourself with the windshield in the car . It can be done but I have spent countless hours trying to get the panel closest to the windshield tight enough and tucked under the seal to the griper teeth and today finally figured out a way to do it although it is killing the arthritis in my hands and elbows. Back window is out or it would be impossible. I didn't want to take a chance breaking the brand new $ 350.00 windshield by taking it back out. Lesson learned ...there is a proper order to working on these things....follow it. The windshield was one of my 1st purchases and should have been one of the last. I had a member offer to come and help but I'm a stubborn old fart and absolutely hate asking for help but at least I got it under control now. :banghead::banghead:
 
Swapped the 3.23 center for the 3.55 and put the 15x7 rally w/drag radials on Jake's 65 tonight. Well...... Jake did 95% of it while I supervised and painted the stripes on his little brother's as sister's pinewood derby cars.

Next up is the front sway bar Saturday evening.
 

Attachments

  • 20160218_215612.jpg
    40.9 KB · Views: 224
Got the painted laid down and she's on the trailer, got a date with the muffler shop in the morning. 2.5" flowmasters with electric cut outs. Then come Saturday morning, trip to alignment shop to get the front end finalized.
 

Attachments

  • IMG_1914.jpg
    37 KB · Views: 214
  • IMG_1907.jpg
    33.2 KB · Views: 220
  • IMG_1920.jpg
    49.6 KB · Views: 233
  • IMG_1916.jpg
    47 KB · Views: 232
Got the painted laid down and she's on the trailer, got a date with the muffler shop in the morning. 2.5" flowmasters with electric cut outs. Then come Saturday morning, trip to alignment shop to get the front end finalized.

That's exactly the shade of Plum Crazy I want for my Dart.What brand of paint and primer etc. did you use.Thanks.
 
dragged the dart out of the barn
for a gear change
4.10 going to 4.56

073_zpsunm9vyws.jpg
 
I bought a vacuum advance pot for my 82 Mazda, big whoop. Also found out I was chasing the wrong part number for 4 days when the one I bought came back "out of production" from seller, then I found the correct year part number and found one on Ebay!
 
Me, well I am going to see if I can break the center link bolts loose on Victoria today
 

Attachments

  • 1a2.jpg
    131.4 KB · Views: 221
Well I got my wiring almost done. What a chore! I am not finished the headlight relays, and the dash and steering column aren't done. I couldn't find the f'ing speedo cable, or that would be done too.

With the headlight relays and the LED lights everywhere else, there should be very little amp load through the bulkhead. The car came with the 60 amp alternator, so the main power wires were routed outside of the bulkhead anyway, but since I am doing away with the amp gauge and rerouting the alternator wire, I upgraded the wire coming into the dash to a #8, and added another #8 all the way back to the trunk since my son thinks we need a big *** amp and sub box back there.

I never got as much done this week as I had hoped, but boy was my stress level dropped way down! Nothing mellows me out more than garage time, even when I can't find that stupid nut, bolt or cable that I am looking for!

Now I'm off to try and find some snow to ride around on with my family on our snowmobiles. Since it's lightly raining now, I'm not sure how that will work out, but they were insistent!
 
Krazy-----just finished what you are starting, I found it most enjoyable and rewarding--good luck!
Last night I got my GV overdrive unit in. Today I will finish up the speedometer cable install and wire the neutral safety on the transmission. Then I think I will set the car down install the console shift mechanisim and verify it in preparation to install the front carpet. I have to install my battery disconnect switch and fab up the new battery negative cables. Plan on 2 full days of work on my Barracuda!
Cheers to all and a good weekend to all FABO-----------DR-----------:burnout:
 
I wish I was doing something with my Dart but instead I am re-building in my cellar after washing machine malfunction! Still I am daydreaming of my a-903 removal and a-833 replacement project. Got most of the parts ready now, just waiting for the weather to cooperate, my garage is too full to fit my stuff and my car!
 
I wish I was doing something with my Dart but instead I am re-building in my cellar after washing machine malfunction! Still I am daydreaming of my a-903 removal and a-833 replacement project. Got most of the parts ready now, just waiting for the weather to cooperate, my garage is too full to fit my stuff and my car!


Hang in there and finish the cellar... :violent1:

Then get to the Dart... :cheers:


The car takes up much less room when you get all of the parts on it... You can use the excuse that you are cleaning up the garage by installing the parts on the car to justify your wrench time...
 
Krazy-----just finished what you are starting, I found it most enjoyable and rewarding--good luck!
Last night I got my GV overdrive unit in. Today I will finish up the speedometer cable install and wire the neutral safety on the transmission. Then I think I will set the car down install the console shift mechanisim and verify it in preparation to install the front carpet. I have to install my battery disconnect switch and fab up the new battery negative cables. Plan on 2 full days of work on my Barracuda!
Cheers to all and a good weekend to all FABO-----------DR-----------:burnout:

Thanks. It is a great feeling when you finish the work on your car and know it's done right... :cheers:

I fabbed up my own positive cable from just the generic store bought battery cable... This is not a resto, but a fun improvement project, function before spending $$$ to keep minor things original... Reliability and durability are the number one priority...
 
got the main hoop bent today
It's still a little tall, better than being to short...
i'll trim 2" off it
start cutting/ notching the other bars tomorrow

001_zpsmqhfxtrt.jpg


f713367d-d2c0-4a4a-bfa5-caabdc3de56a_zpsriwio4wn.jpg
 
Replacing a fuel tank on my 72 valiant . Always easier taking sh** apart then putting it back together . Is there a certain way to put in the filler to tank grommet ? Old one was shot so I bought a new one from classic industries but I'm having trouble sliding the tank in to the filler neck . I put the grommet on the tank and tried sliding it on to the filler neck but that sucker is real tight. I compared the original on and the new one is a bit smaller in diameter which is making it difficult. Was wondering if the original one was bigger due to age and heat? It expanded ?
 
Replacing a fuel tank on my 72 valiant . Always easier taking sh** apart then putting it back together . Is there a certain way to put in the filler to tank grommet ? Old one was shot so I bought a new one from classic industries but I'm having trouble sliding the tank in to the filler neck . I put the grommet on the tank and tried sliding it on to the filler neck but that sucker is real tight. I compared the original on and the new one is a bit smaller in diameter which is making it difficult. Was wondering if the original one was bigger due to age and heat? It expanded ?


Our grommet was also too tight, so I put it in the oven set at 150° for 20-40 minutes on the filler tube to put pressure on it to expand a little. It worked great. Most rubber can withstand 250° before melting, so 150° won't hurt it...
 
-
Back
Top