6.1 Hemi 69 Barracuda Fastback Father Son Project

-
Not a lot to report.
Been getting the final pieces of the wing windows together. Checked fitment of the American Auto Wire Classic upgrade full car wiring kit. Very nice wire harnesses.
Little progress on the "New Challenger" Gas Door mod... making the back side in the trunk sealed from weather and gas...
Added Schumacher's wiper rebuild bits to the wiper pivots.
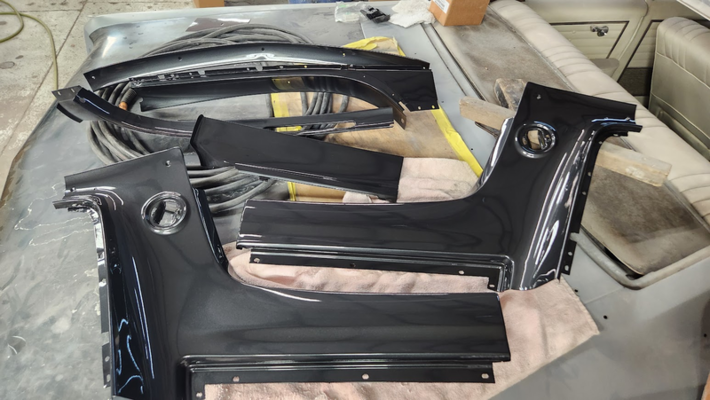
Painted the original Green Sun Visors Black. Soaked the visor arms and bright parts in Evap-o-rust, repainted the silver parts silver...
Before
t9gpcyAWhtd9F7cC9Keb1JA=w1561-h879-s-no?authuser=0.jpg


After a good scrubbing and applying some Sem Landau Black
krvd6rMdrbM903q3W67CBVw=w1561-h879-s-no?authuser=0.jpg


Been spending the last few days getting ready for the Monroe WA Auto Swap Meet.

The "Purge" is happening! Will be in space #55, Area 601 in back. Mostly A and E Body stuff but some B, as well as some Accessories. Also some G3 Hemi leftovers.

Almost done building front, back and sides for the stake pockets on my car trailer. Mostly all leftover lumber from other home projects.

More info Here:

Monroe Auto Swap Meet Post
 
Not a lot to report.
Been getting the final pieces of the wing windows together. Checked fitment of the American Auto Wire Classic upgrade full car wiring kit. Very nice wire harnesses.
Little progress on the "New Challenger" Gas Door mod... making the back side in the trunk sealed from weather and gas...
Added Schumacher's wiper rebuild bits to the wiper pivots.
Painted the original Green Sun Visors Black. Soaked the visor arms and bright parts in Evap-o-rust, repainted the silver parts silver...
Before
View attachment 1716091072

After a good scrubbing and applying some Sem Landau Black
View attachment 1716091073

Been spending the last few days getting ready for the Monroe WA Auto Swap Meet.

The "Purge" is happening! Will be in space #55, Area 601 in back. Mostly A and E Body stuff but some B, as well as some Accessories. Also some G3 Hemi leftovers.

Almost done building front, back and sides for the stake pockets on my car trailer. Mostly all leftover lumber from other home projects.

More info Here:

Monroe Auto Swap Meet Post
A friend and I have talked about going to that swap meet every year for awhile. Unfortunately, it will be another year we miss.
 
Looks like Year One 17x8", 4.25" BS (-6mm offset) wheels with 245/45 up front are a no go. :-(
Going to need to find wheels with at least another inch of backspace... or trim the fenders...


69-G3 6.1 Barracuda Fastback 001.jpg
 
Last edited:
just an option.....switch to the 9" drum spindle w/ Wilwoods and narrow it up about an inch per side.

20230603_112440.jpg
 
just an option.....switch to the 9" drum spindle w/ Wilwoods and narrow it up about an inch per side.

Thanks Denny,
I will look at the available options.

Would the 9" drum spindles require switching to small ball joints?
Is that what you are running on your Duster? What size wheel/tire and Backspace?

Thanks,
Randy
 
Thanks Denny,
I will look at the available options.

Would the 9" drum spindles require switching to small ball joints?
Is that what you are running on your Duster? What size wheel/tire and Backspace?

Thanks,
Randy
Depends on which Duster you are referring to (I have a couple) but every A body I have built with OEM suspension uses the smaller spindle with the small UCA ball joint. Just not a fan of the wider track width. I started the Leal build with the larger spindles /larger ball joints but removed them ASAP because they stuck the tires too far out for the look I wanted.

On the Butch Leal street car (above) the fronts are 15" diameter w/ 5" wide rim and 2-1/2" backspacing

California_Flash_Color_08 (3).jpg


Precisely to allow the wheels to be tucked inward, even the 75 Modified car was built and had them its 47 year race life...with lots of wheel stands.
 
Last edited:
Been slow going this summer but made a little more progress today.

Swapping to a Modern Challenger Fuel door to in place of the stock flip-top fuel cap added the complication of sealing weather or fuel from making it's way into the trunk...

So this is what we cam up with.
We made what is basically a can with a bulb seal that fits against the inside of the quarter panel.
The original fuel fill tube was sectioned to account for the length and angle change needed to accommodate the inset depth of the back of the Challenger fuel door assembly.
The flange of the original fuel filler is sandwiched between the "Can" and the fuel door housing.
Any water from washing or weather that comes in through the door or fuel burps or drips when refueling will drain out the bottom of the can nipple and tubing that will be routed out down between the trunk extension and quarter panel. Most likely will feed a line out through the body plug in the bottom of the trunk extension.

The finished fuel door install looks like this.
1696730674340.png


1696731027637.png

This is what the backside looked like before sealing it off from potential weather or fuel finding it's way into the trunk through all the gaps in the door assembly.
1696730821456.png


The fuel door is not weather tight...
1696732265191.png


The body of the fuel door body is also not weather tight. Spilled fuel or burped will drain out the hole circled in red below. That is a factory drain hole. I did not want it to drain inside the trunk...
1696732463995.png


The solution isolates the trunk from weather, car washing, or fuel burps or overfill that could have found it's way into the trunk.
The fuel door snaps into the body exactly as with a new Challenger.
The "Can" enclosure uses a bulb seal against the inside of the QP.
The way is is assembled uses the Fuel Door and the "Can" to pull against each other to compress the bulb seal against the inside of the QP.
The can has a length of tubing welded into the very bottom in order to plumb a drain out of the car.
The nipple on top of the fill tube is the factory vent opening, it will have the original vent tube attached to it.
1696731065793.png


A small section of filler tube removed to correct the length and angle difference between the back of the Challenger door and the original flip-top cap locations. We will be adding a bracket to the lower section of the fill tube to secure it in place by attaching it to the adjacent wheelhouse bracket.
1696731094692.png


1696731133358.png


1696731153703.png

Really happy with the results. Probably way more work that it was worth but it's done... Almost...
Still have to get the fuel tank installed and it doesn't seem to want to fit without being up against the rear shocks... Ugh!
Will get it up on my lift at home to tackle that...
 
Here is a look at some freshly painted interior pieces for our Fastback.
1696900173092.png

Got 69 Side Marker Bezels!
Had some extra bezels so I just had them all painted. I'll use the best and have some spares.
1696901168369.png


Also dropped off my dash frame to be painted.
Got some "Black Suede" Dash paint from Charles Dallas - Phone: 8774PAINT1 (877)472-4681
Email: [email protected]
Give him a call or drop him an email if you need any Mopar Paints. Link to his web site: MOPAR Automotive Restoration Paint
1696900638753.png
 
Just ordered, on sale at Jegs for $116 was ̶ ̶ ̶$̶1̶7̶5̶.̶9̶9̶ ̶ ̶
I have a number of small parts that will be getting a chance to see the inside of one, up close and personal.

Bench Top Sandblast Cabinet
  • 15-25 cfm @ 40-120 psi
  • 23 in. x 19 in. x 14 in. Work Space
  • 19 in. x 15 in. Viewing Window
  • Overall: 23 in. x 19 in. x 19.4 in.
  • Tight Seal around 19 in. x 15 in. Viewing Glass
  • 16 in. Florescent Light with Switch
  • 1.7-gallon Funnel Capacity
  • Removable Plastic Films Protect Glass from Etching
  • Silicone Sealed Cabinet Creates an Air Tight Seal
  • Removable Air Filter
  • Extra Large Rubber Gloves with Grip to Easily Hold Parts
  • Spray Gun with 4 Ceramic Nozzles


View attachment 1716033431
That is the identical blaster Harbor Freight sells.....
 
Got this last night. $70 off for HF ITC members
1701815541184.png


Used it Today to gain a 1/4" of header to torsion bar clearance on the driver's side.
Using the Small Ram placed between the frame rail and the offending header tube.
Worked like a charm.
A block of steel wrapped in black tape as a spacer against the header tube. No Denting!
Headers are Polished Ceramic coated.
 
Swapped out the stock lower control arms for QA1 LCA's.
Sold the Hotchkis Front Sway Bar (Not Compatible with QA1 K-Member)
Have a QA1 front sway bar still in the box and ready to go on.

But first...
I Tore the Dust Boot on one lower Ball Joint... Ugh...
Anyone know of a good replacement lower ball joint Dust Boot? Source and Part Number?
Thanks!
 
Been slow going this summer but made a little more progress today.

Swapping to a Modern Challenger Fuel door to in place of the stock flip-top fuel cap added the complication of sealing weather or fuel from making it's way into the trunk...

So this is what we cam up with.
We made what is basically a can with a bulb seal that fits against the inside of the quarter panel.
The original fuel fill tube was sectioned to account for the length and angle change needed to accommodate the inset depth of the back of the Challenger fuel door assembly.
The flange of the original fuel filler is sandwiched between the "Can" and the fuel door housing.
Any water from washing or weather that comes in through the door or fuel burps or drips when refueling will drain out the bottom of the can nipple and tubing that will be routed out down between the trunk extension and quarter panel. Most likely will feed a line out through the body plug in the bottom of the trunk extension.

The finished fuel door install looks like this.
View attachment 1716151301

View attachment 1716151303
This is what the backside looked like before sealing it off from potential weather or fuel finding it's way into the trunk through all the gaps in the door assembly.
View attachment 1716151302

The fuel door is not weather tight...
View attachment 1716151313

The body of the fuel door body is also not weather tight. Spilled fuel or burped will drain out the hole circled in red below. That is a factory drain hole. I did not want it to drain inside the trunk...
View attachment 1716151316

The solution isolates the trunk from weather, car washing, or fuel burps or overfill that could have found it's way into the trunk.
The fuel door snaps into the body exactly as with a new Challenger.
The "Can" enclosure uses a bulb seal against the inside of the QP.
The way is is assembled uses the Fuel Door and the "Can" to pull against each other to compress the bulb seal against the inside of the QP.
The can has a length of tubing welded into the very bottom in order to plumb a drain out of the car.
The nipple on top of the fill tube is the factory vent opening, it will have the original vent tube attached to it.
View attachment 1716151304

A small section of filler tube removed to correct the length and angle difference between the back of the Challenger door and the original flip-top cap locations. We will be adding a bracket to the lower section of the fill tube to secure it in place by attaching it to the adjacent wheelhouse bracket.
View attachment 1716151305

View attachment 1716151306

View attachment 1716151307
Really happy with the results. Probably way more work that it was worth but it's done... Almost...
Still have to get the fuel tank installed and it doesn't seem to want to fit without being up against the rear shocks... Ugh!
Will get it up on my lift at home to tackle that...

Nice work!

I have a stock challenger assembly for mine, plus a section of the quarter panel and a filler tube. My plan was to use the top end of the challenger fill tube so it actually fits the modern gas pump nozzles, but I haven’t tried it yet so I guess I’ll see how it goes eventually. Not super high on my priority list.
So, going to try these...

Energy Suspension 5.13102G Ball Joint Dust Boot for Chrysler​

Will let you know if the fit.

They do fit, they don’t have a metal ring or anything in them so the won’t clamp down on the ball joint like the original ones do. They fit most of the ball joints pretty tightly though once everything is assembled and they’re pushed down into place. Better than a torn boot but probably not quite as good as the original style.
 
Got this tool from Speedway. Trying to determine if there is a tire size that would fit with the Year One Mopar Rallye Wheel 17x8" with -6mm offset, 4.25" backspace and not look too small on the front...
this is the 245/45/17 and it does not fit. rubs the bottom front when turned all the way in.
1701825953683.png


1701826074013.png


Going to have to run something smaller temporarily for rollers.
Once the car is fully road ready, I'll get it set to final ride height and a FEA and then probably take a slice out of the lower front fenders... Really don't want to change to different wheels or run small tires...
225/45 looks to small from the side
215/50 looks good from the side but too skinny for my taste... oh well.
Something new added to my to-do list... Will open the door to a lot more wheel and tire size combinations.
 
Last edited:
They do fit, they don’t have a metal ring or anything in them so the won’t clamp down on the ball joint like the original ones do. They fit most of the ball joints pretty tightly though once everything is assembled and they’re pushed down into place. Better than a torn boot but probably not quite as good as the original style.
I might try a little gasket adhesive and glue the boot onto the balljoint before I install it back on the car...
 
Got this tools from Speedway. Trying to determine if there is a tire size that would fit with the Year One Mopar Rallye Wheel 17x8" with -6mm offset, 4.25" backspace and not look too small on the front...
this is the 245/45/17 and it does not fit. rubs the bottom front when turned all the way in.
View attachment 1716174727

View attachment 1716174728

Going to have to run something smaller temporarily for rollers.
Once the car is fully road ready, I'll get it set to final ride height and a FEA and then probably take a slice out of the lower front fenders... Really don't want to change to different wheels or run small tires...
225/45 looks to small from the side
215/50 looks good from the side but too skinny for my taste... oh well.
Something new added to my to-do list... Will open the door to a lot more wheel and tire size combinations.

A 245/45/17 needs a 17x8 with about 5” of backspace to fit up front with 73+ disks. Any less than that puts them further out than the 275/35/18’s I run on my Duster, and there really isn’t much more room up front on a barracuda. It depends on ride height but those YO rallyes aren’t sized for A bodies at all. People have run them but they pretty much all run a narrow short tire with the ride height adjusted to clear.

The corner trim is a good idea on a Barracuda if you want to run wide tires up front, that part is more restrictive than the other body styles
 
The more I look at these the more I like them.
American Racing Magnum 500 style.
Unfortunately the black ones don't come in the size/bolt pattern or backspace we need.
17x9 +0mm offset, 5" BS for the rear.
One piece cast and off the shelf with 5x4.5" 5x114.3mm bolt pattern and pretty affordable. $$
Will have to order the Black/Machined for the rear and have them powder coated matte black.

For the fronts we'll have to order their 2 piece wheels, they are Cast Centers with Forged Barrels.
These can be custom ordered to the offset/backspace and bolt pattern you select. $$$$
Again, not available all black. Will have to order these with Black Center, Polished barrels and send them out to be powder coated all black.

Size for the fronts will be 17x8 with 5x4.5" BP Offset/Backspace TBD, probably ~5"- 5.5"
maybe 5.39" BS, 22.5mm Offset... "¯\_(ツ)_/¯" Ordering custom, might as well get them exactly right...
Using the wheel/tire fitment tool gets me pretty close to a good backspace number but until I get the car at final ride weight, height and a proper front end alignment, I won't know exactly what BS to order.


I do think these will look perfect! Too bad they don't come in 18's...
1702707329863.png
 
Vice work! Thanks for posting.
1. Are you running 73 up disc spindles?
2. 245/45-17x8 What Offset/Backspace up front?

View attachment 1716178961
I believe these were 17x8 with 5.5” backspace. ‘73-‘76 spindle and UCA and Cordoba rotors. These wheels are on Josh Walton’s blue ‘68 Convertible. Guy that owned it at the time had it in the body shop and we used my car to fit test the wheels and tires because we had identical suspension and brakes at the time. You have to make sure to run the shorter style Upper Ball Joint (type without a dome) to clear the wheel.
 
The more I look at these the more I like them.
American Racing Magnum 500 style.
Unfortunately the black ones don't come in the size/bolt pattern or backspace we need.
17x9 +0mm offset, 5" BS for the rear.
One piece cast and off the shelf with 5x4.5" 5x114.3mm bolt pattern and pretty affordable. $$
Will have to order the Black/Machined for the rear and have them powder coated matte black.

For the fronts we'll have to order their 2 piece wheels, they are Cast Centers with Forged Barrels.
These can be custom ordered to the offset/backspace and bolt pattern you select. $$$$
Again, not available all black. Will have to order these with Black Center, Polished barrels and send them out to be powder coated all black.

Size for the fronts will be 17x8 with 5x4.5" BP Offset/Backspace TBD, probably ~5"- 5.5"
maybe 5.39" BS, 22.5mm Offset... "¯\_(ツ)_/¯" Ordering custom, might as well get them exactly right...
Using the wheel/tire fitment tool gets me pretty close to a good backspace number but until I get the car at final ride weight, height and a proper front end alignment, I won't know exactly what BS to order.


I do think these will look perfect! Too bad they don't come in 18's...
View attachment 1716178967

I believe these were 17x8 with 5.5” backspace. ‘73-‘76 spindle and UCA and Cordoba rotors. These wheels are on Josh Walton’s blue ‘68 Convertible. Guy that owned it at the time had it in the body shop and we used my car to fit test the wheels and tires because we had identical suspension and brakes at the time. You have to make sure to run the shorter style Upper Ball Joint (type without a dome) to clear the wheel.

Yup, with 73+ spindles and rotors a 17x8” about 5.5”-5.7” of backspace would be ideal for a 245 or even 255. That’s the maximum backspace, right around 5.7” of backspace is where the outer tie rod end clearance becomes an issue.

With a Barracuda the 255 would require the lower fender corner mod as the profile availble in 255 makes the wheel 26” tall. The 245 is more like 25.6” so that works without the mod with the maximum backspace
 
-
Back
Top