67 Dart 270...Project Old School

-
After I installed shims to get the pinion pointed down 3 degrees, I was still getting drive line vibration when the driveshaft hit 3200-3300 RPM going down the road (60-61 MPH). I ordered up some 6 degree wedges and installed them. This has the pinion pointing down at 5 degrees. Road testing showed some improvement. Low speed vibes are all but gone in the 45-55 range. I am still catching a small about of vibes from 60-65 MPH. I will eventually have to pull the driveshaft and have it checked out. I think it could stand to be an 1/2" shorter as the front yoke pretty much disappears into the back of the transmission. The transmission seal is very close to riding in the radius where the yoke flares out to the U-joint flange.
 
I took the driveshaft to a local shop and had them shorten it 3/4". They also straightened and rebalanced the shaft. I put the shaft in the car last night and there was an improvement in the vibes, but there are still some there starting at exactly 61 MPH and it gets worse the faster you go.
 
On my way home from the Bonne Terre Drag Strip, my brake pedal began to get soft and I was having to pump the pedal a time or two to get a firm pedal. When I got home I made the decision to replace the 47 year old (stock) master cylinder. Since I had upgraded to discs on the front I ordered a master cylinder for a 67 Dart with manual disc/drum brakes.

Here is a picture of the rare option "Invis-O-cast" master cylinder. They use a lot of the same technology today in stealth jets ;-)
MCinvis.jpg


Yes,...it has been a long time since the last time a swapped mater cylinders. My 10 year old son helped me bleed the brakes. He got a work out pumping the brake pedal, while I was under the car taking a brake fluid shower. The results were outstanding! The brake pedal feel was vastly improved over the stock master cylinder. I always love the small projects that have positive results.
 
These cars are notorious for that vibration you are feeling. Ma Mopar hung a 15 lb cast iron weight from the floor on the passenger side of later model Darts and dusters to help dampen the vibration.
 
After watching all the coverage of the 2014 Power Tour, I am beginning to think that might be a fun goal for my 67 Dart. I don't think it would be fun to drive 1500 miles with a 3.91 gear turning 3500-3700 RPM. After looking at the postings on this site about installing a 43RH OD trans in a Duster, I decided to try the same thing with my Dart. Over the weekend I picked up a core:

ODTrans.jpg


The trans looks a mile long and weights a ton even without a converter. I am trying to decide what converter to source to match up with the deeper first gear in the 42RH. The factory high stall is listed at 1600 RPM. The 9.5" converter I have in front of my 904 foot brakes to 3500 RPM. I would like to be around 2800 stall with the new converter, but it seems that anything above about 2600 RPM requires a custom built converter ($$$) versus modified stock units. I was always told the more you hack on the stock converters to raise the stall the less efficient they become. With there being a lockup in this converter, I am not sure if this is a real issue when cruising down the highway.
 
Being a lockup, you're correct, when it's locked at speed the stall doesn't matter. The difference you may notice is the converter lag off the line more with the cheaper converter than a custom one. more constant rev, less flash... I guess the question you have to ask is what is the goal for the car, and what is your current engine/combo set up for... I'm guessing by the fact that you have a 3500 on it now, you might need a bit more than a 2600... It's better to spend the big $ once than to spend $ twice and pull the trans again...

Joe

I guess the big question I have is can I back off on the stall and still get decent 60fts due to the lower first gear?
 
that's me.....G.V. but behind a 833 4-speed.....less cutting.

I guess cost has been my motivation to go the direction I am going. All the other solutions I researched cost over $2500. Mine may require more work to mod the trans tunnel, but my labor is free.

Core Trans $75
Performance Rebuild $1000
Performance converter $500

Hard parts total $1575


This way a get to stay all Mopar, which has been something I have been struggling with.
 
mine fell right behind / after it....in the area of the floor that is pinched down. I cut out an approx 12" long section and replaced it with a piece of curved tunnel that Alston or Morrison sells....easy peasy.

GV says to just tilt the rear down, but that small amount of modification to the tunnel allows the drive line to sit at the factory angle / position.
 
Dropped off the transmission at the shop on Monday. The guy that builds the trans said he could convert it to non-lockup and set it up to use a standard 27 spline, 904 converter. That would save a chunk of change if I can reuse my existing 904 converter.

We shall see...
 
I got the trans back from the shop and it is setup to accept the 904 torque converter. The actual cost to have the trans rebuilt worked out to $850. That included upgrades like additional clutches and a shift kit. Being able to re-use my existing converter saved me $500 -$600. The downside is I do loose lockup, but I can live with a few extra hundred RPMs going down the road. Now comes the hard part of getting the transmission mounted into the car.

I will also have to have the driveshaft shortened and the front yoke changed to one with 727 spline count. My shifter is a Hurst Promatic II which uses a cable, so it should adapt just fine. I am already using a Lokar kickdown cable which should also adapt. I will need to redo the tranny cooler lines to go to the different fittings.
 
Yup, That's right...I signed up my Dart for Power Tour 2015. Now I have to get crackin on getting the Dart ready for the long haul. Weather is looking good for this weekend, so stay tuned for some progress as I get ready to head to Madison Wisconsin for the first start of the tour on June 6th.


I don't know if anyone here has done the Power Tour and has any tips, but here is the list of things that I need to get done:

1) Get the OD trans in and working. This is the make or break item for long haul driving.
2) New coat of yellow paint. Not make or break, but would be nice
3) USB power inside the car for phones/tablets/GoPro
4) Cigarette socket working to power air pump/lights. Would be nice to have one in the trunk as well.
5) Cup holder. Manual steering and a large drink currently spell disaster. I have an idea on how to make one I can clip on the front section of the console.
6) Heater. None of the current heater controls work. Fan doesn't turn If this doesn't get done in time I will need to rethink the heater hose block off plugs as the rubber ones are cracking.
7) Battery tray. need to rethink my custom tray to try to get the battery to sit 1/4" to 1/2" lower.
8) Engine cooling on scorching hot days (100+). I am kind of hoping the OD in the new trans will reduce the RPM on the highway and make this a non-issue.
9) Glove box. I have a new liner/box, but I can't get it into place with the heater box in the car.

I am sure I will find more things to add to the list as I start digging in further.
 
As it turns out the first order of business was cleaning up the garage. I had remnants of multiple projects everywhere. I got the garage cleaned up and the Dart up on jack stands. The first thing I wanted to verify was the driveline angle with the car sitting on the stands. I used an angle finder on the valve covers to get a reading. Here is the reading from the passenger valve cover:
drivelineanglepassside.jpg


Here is the reading from the driver side valve cover:
drivelineangledriverside.jpg


Here is a shot of the A500 back from the transmission shop:
rebuilta500.jpg
 
Finally had a night where the temperature in the garage was above freezing. I got the 904 out from under the Dart and into the shop area. I am jealous of anyone with a lift. It is sad when you can roll the transmission out from under the car on the jack because I can't get the car jacked up high enough. Here is a comparison shot of the 904 with the A500 in the background.
A500vs904.jpg


Here is the input shaft detail of the 904:
904input.jpg


Here is a comparison shot of the A500 that has been converted to non-lockup:
A500input.jpg


My 904 converter slides right onto the A500. Just to be sure, I will verify the spline counts are the same. I am hoping to reuse my 904 dipstick in the A500 as well as all the shift levers and my Lokar kick down cable.

The trade off in going non lockup is I get to reuse my $500+ 904 converter.
 
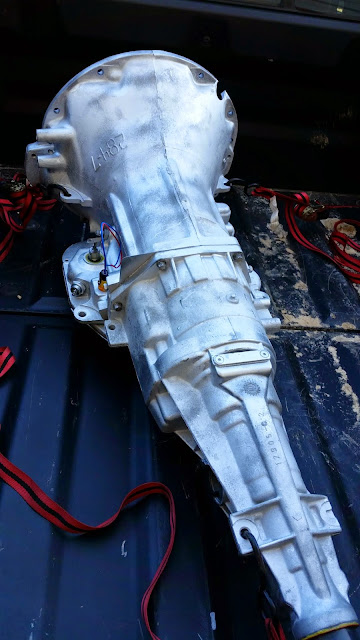
I was off work for the last week and managed to spend part of that time in the garage. The first order of business was to cut the section of the torsion bar cross member that protrudes into the drive line tunnel. I used an air saw to cut the section out. You need to take your time and use a fine tooth blade. The blades I used had 32 teeth per inch. The surprise inside the cross member is the piece of flat steel bent to form a tube on each end. The two tubes pass through the bolts for the lower transmission mount/cross member and keep you from crushing the cross member when you crank down the bolts. The air saw is good at cutting a single sheet of metal, but it can be a handful to cut multiple layers.

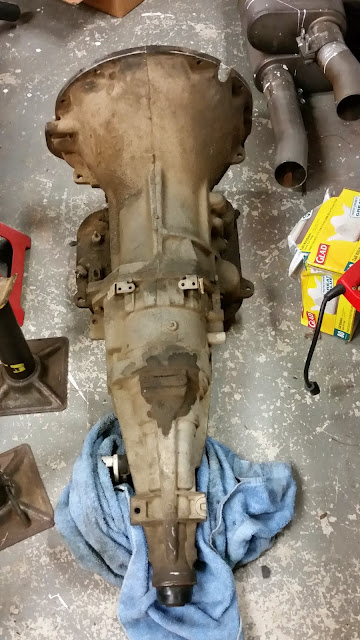
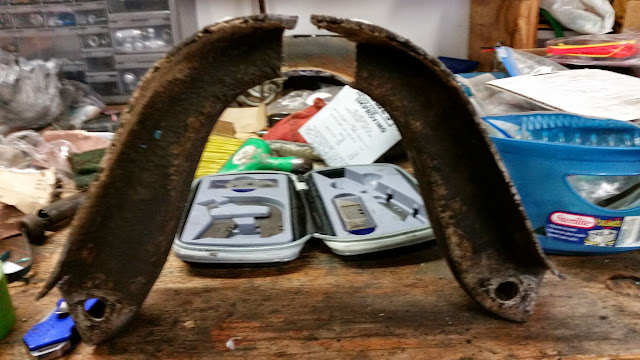
The is the section I removed from the car:
oldxmember.jpg


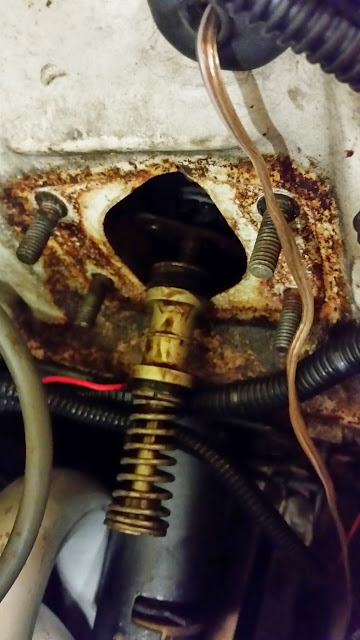
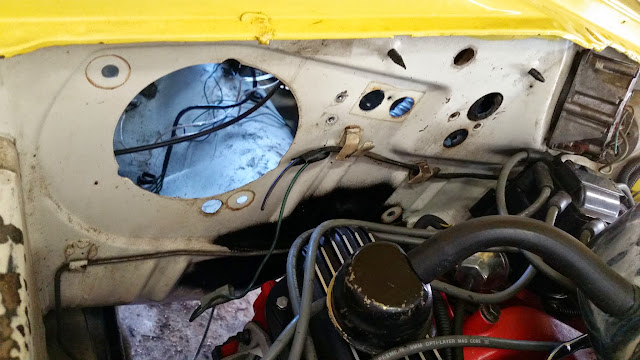
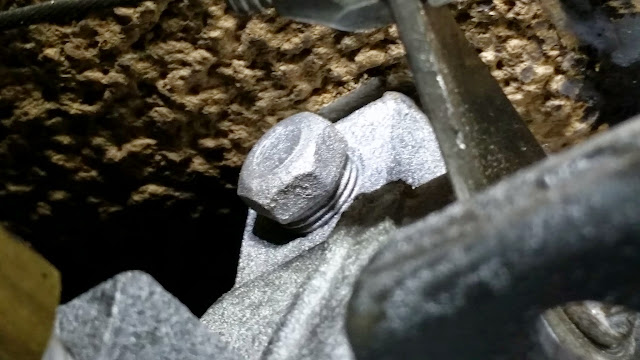
The section is spot welded to the tunnel at the highest point. I drilled out the spot welds and used a chisel to do the final removal. Now for a good visual of why this work is necessary:
oldxmemberonODtrans.jpg


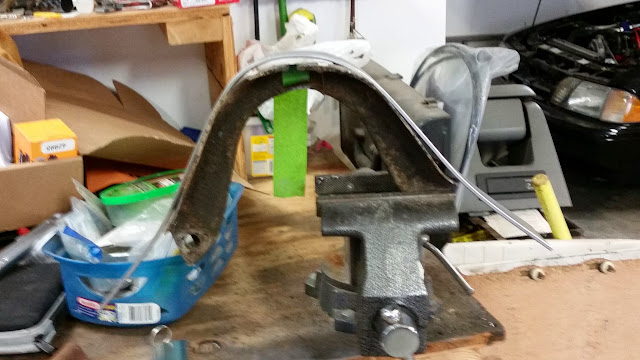
I used a 3/16" piece of flat steel to form the new section. This was the thickest piece of metal I could bend in my vise. Here I am using the old section to create the shape for the new section:
oldandnewxmembers.jpg


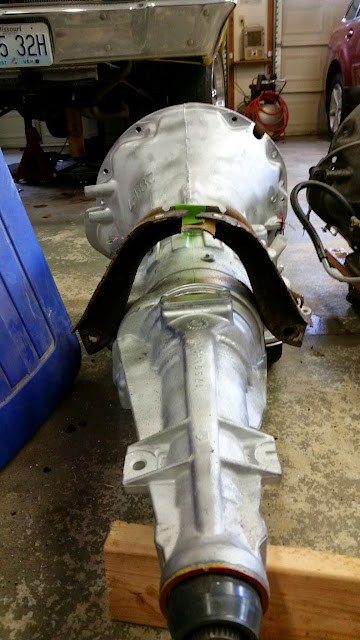
Here I am test fitting the new section in the tunnel:
newxmember.jpg


In order to prepare for welding on the floor boards I needed to remove the interior.
interiorgone.jpg


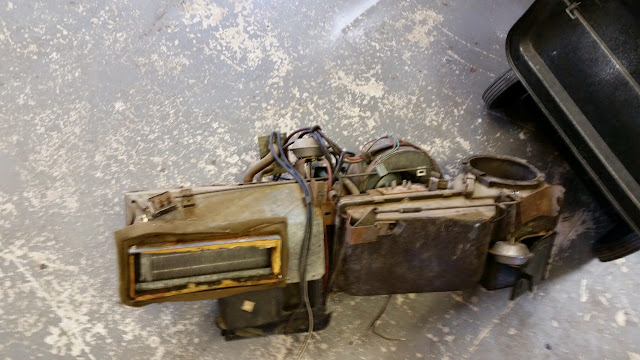
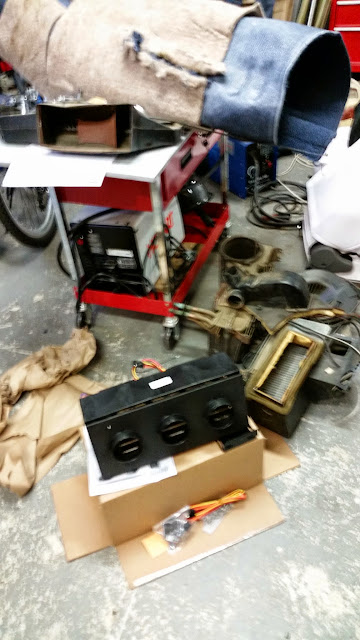
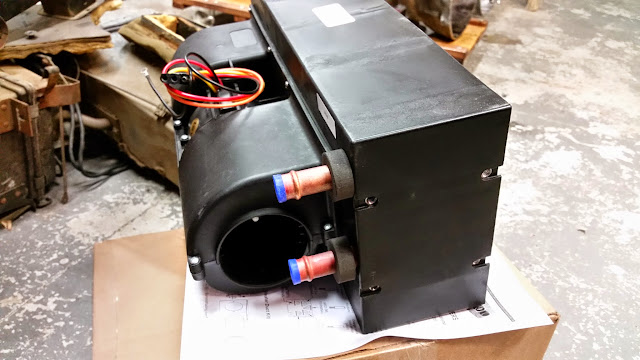
I also realized none of the heater/AC controls worked in the car, so that led me to pull the heater/AC boxes from the car:
firewallnofan.jpg


heatandACboxes.jpg


Which led me to re-route some wiring including the speaker wires and adding line level cables for a "possible" sub-woofer in my future.

Which also led me to remount the shifter with special bolts from the bottom so none of the bolts would hang down in the tunnel. This also allowed me to level out the shifter instead of having it lean backwards. This led me to rethink my console's Velcro to carpet mounting system (yes it wobbles...). While I have the interior out and a welder handy it seems like a good time to fab a mount...which will have to be custom due to the Hurst shifter.

And that led me to run out of time...
 
I believe in the K.I.S.S. principle. With this in mind I decided to replace the entire heat/AC setup with a simple heater box setup. It is much more compact and is dead nuts simple with just a on/off low/med/high control knob. It has three ducts out which two will go to the defroster ducts in the dash and the third will get directed down at the feet.

heaterbox1.jpg


It is compact at only 9" x 9" x 16" and it is a lot lighter then the parts it replaces. I do need to figure out how to handle the fresh air vent on the passenger side as the facory vent ducting is part of the AC/heater box.

heaterbox2.jpg


The second picture shows the fan setup on the back with a center mounted electric motor and blower fans on each end.

In order to get the coolant into this heater box I decided to order a separate heater hose buckhead fitting. This came from a specialty hot rod shop.

bulkhead.jpg


I plan to start mocking everything up this weekend. I can then start planning out how I am going to close up all the left over holes in the firewall. Speaking of the firewall I picked up some sound deadner/heat reducing material that is self adhesive to apply to the firewall.

boom_mat.jpg


I am interested to see how well it works.
 
I spent most of the Easter weekend under the weather. I did manage to get the repo glove box liner installed. I bought the liner at a Mopar event in St Louis four year ago. It may have been the last Monster Mopar weekend in STL. With the heater box out of the way, it was pretty easy to install. I also began the process of determining how to install the new, smaller heater box and coolant feed lines. I modified some exiting holes in the firewall to mount the new bulkhead fitting:
bulkheadfitting.jpg


Now I need to fab up some mounts for the new heater box and finalize the final hose routing and ducting.
 
I did get some mounts fab'ed up for the new heater box. I used adjustable rods with bolts welded on the end for the firewall side and the front of the adjustable rod sits on the lip of the lower dash. This has the new heart box tucked up behind the glove box liner. I need to verify my ducting and hose routes, but so far it looks like a very nice fit.
 
I must have been nuts to think I would get the transmission conversion finished in time to go on Power tour in June. One month to go and the trans is not even been trial fitted in the car. I have to admit I have been struggling to get clean welds on the car. I originally started with flux core, but it was just blowing holes in the thin sheet metal. I finally leased a 80 cubic foot bottle of argon/CO2. It took me a bit to get use to the gas settings and on the bench I was able to produce some nice looking welds. When I tried to weld on the car I was still blowing holes and getting sputtering. I traced part of the problem to a bad regulator.
weldreg.jpg


Things improved, but I was still getting some snap crackle and pop. I increased the tension on the feed roller and that seemed to help some, but the culprit appears to be the grounding. Even though it looked like I had a good connection where I was clamping to the car, it wasn't. I did manage to get the 3/16" steel cross member welded in under the car and an 1/8" steel plate welded inside the car. I also made some plug welds between the two plate to ensure they were bonded through the floor.

Now that the tunnel is ready, I began swapping over all the linkages and fittings from the 904 to the A500. Everything work swimmingly until I hit the fittings for the transmission cooler lines. The port size on the A500 is much larger then the 904. I had to go search down some new fittings. I ended up finding what I needed at O'Reilly's autoparts.
fittings01.jpg

In the picture the A500 fitting is on the left in comparison to the 904 fitting on the right. I am using 3/8" steel line to connect to my transmission cooler.

I hope to get the A500 into the car this week so I can finish fabbing up a cross member and take measurements to modify the driveshaft.
 
I managed to get the A500 under the car and then loaded up on the transmission jack. I jacked the transmission into position and marked several locations that would benefit from some hammer time.
tighttrans01.jpg


tighttrans02.jpg


Tonight I will perform "hammer time" and then load the torque converter on the A500 and get the trans bolted to the engine. Next up is fabbing up the transmission cross member.
 
-
Back
Top