My 360 Magnum build thread

-

octanejunkie

Mopar Padawan
Joined
Dec 23, 2009
Messages
268
Reaction score
1
Location
Los Angeles, CA
Starting this thread to chronicle the build of an engine with text and photos for all to see. When completed, this motor will do into my 71 Scamp. I acquired a complete engine "kit" in the deal with the car this past christmas, the kit as I call it consisted of a '99 .030 over 360 magnum block, stock crank, stock heads, stock rods with pistons pre-mounted, center sump oil pan, windage tray, Air Gap manifold, oil pump, and most all other goodies required to build the long block - now I get to finish someone else's project.

Hopefully this level of documentation will assist others and allow me to go back and reference aspects of my build in the future - plus it is a good release for me to pour it out here rather than drive my family and friends nuts with car talk all day!

Let's begin
So I cleared out room in the garage last weekend, tossed a bunch of junk, and bought a new engine stand at Harbor Freight for $50. Assembled the stand, greased the wheels and the trunnion/sleeve and hung the block last night.

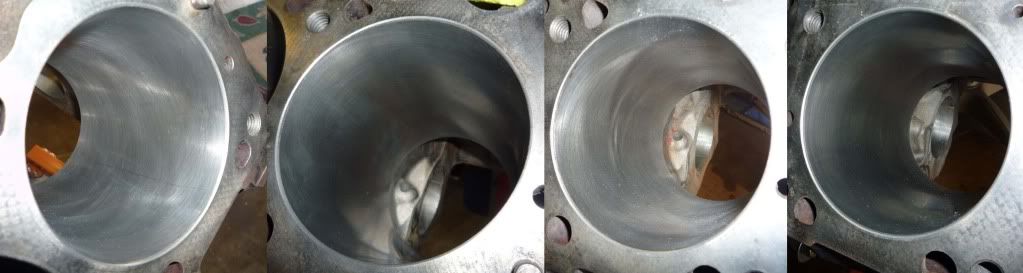
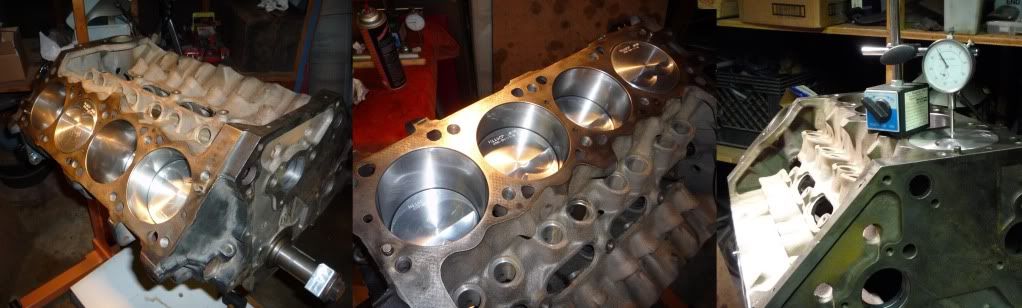
Here are a few pics of the block
360M-block-up-1.jpg

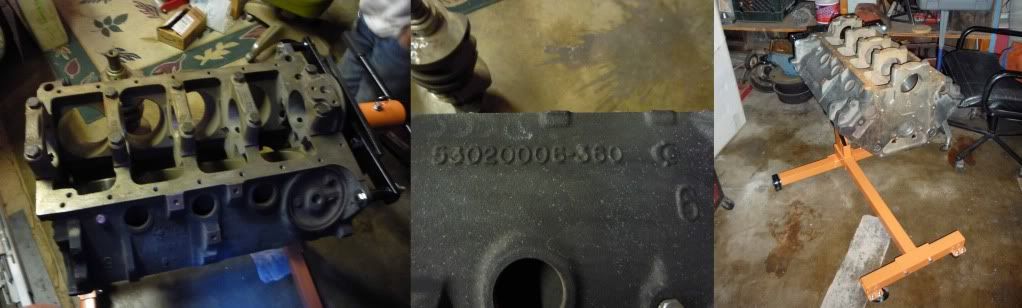
Casting number is apparent, block is .030 over with good cross hatch in the bores, mild surface rust throughout and a virgin deck, or so it seems

Here are a few pics of the crank
360M-crank.jpg

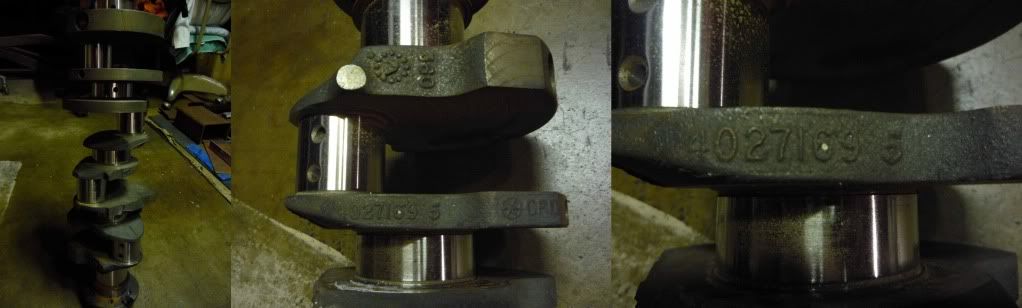
Casting number 40291695, standard crank (not turned,) balanced with journals polished - some mild surface rust up to clean otherwise ready to run

Here are a few pics of pistons and rods
360M-piston-rod.jpg

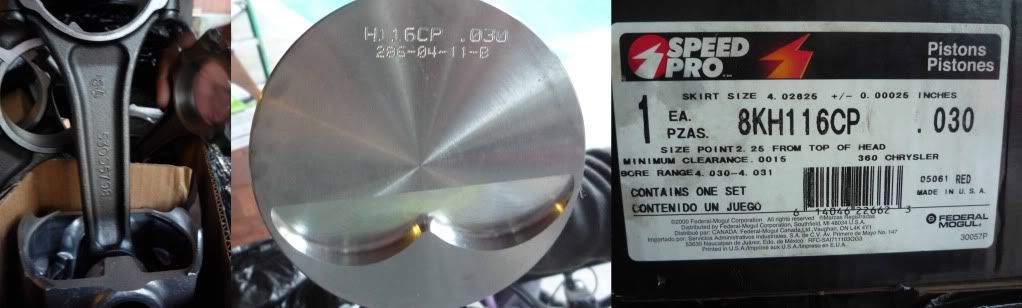
Rods are stock and have not been checked for length/big end diameter, as far as I know. The pistons came mounted to the rods from the previous owner, so I guess I will see some indication of rod length consistency in the deck height mock up; assuming piston compression height is consistent! Part number of piston kit is Z8KH116CP30; .030 over flat top hypereutectic piston with 5cc volume.

The Plan
Mock-up the rotating assembly and measure the piston to deck clearance to determine deck height. Once I have that measurement I will pull it apart and take the block down to Kelly's Block Welding in Culver City, CA for square decking and hot tanking.

I have a list of things to detail on the block at this stage but would like to hear from other folks what they do at this point, what better is the internet and FABO if not for comparing notes.

I will be out of town for about a week so I don't expect to get much done before I get back, but I am dying to get this going! Stay tuned for updates...
 
All right! You beat me to it. I'm about ready to do one myself. I need to balnce the assembley and get cam bearings. On the verge of another engine tear down now.

I guess I'll have to wait.
 
What I inspect when tearing downa block:
Is the cross hatch feelable with a finger tip? Enough to catch a fingernail? Any ridge? Any scratches? how centered are the lifter bores in their castings? Any sharp edges at the casting parting lines in the valley? What's inside the cooling jackets? Sand? Rust? remove all the oil plugs, including the one over the #5 main cap (tap out from the oil pressure sender hole side). Any metal/crud come out of there? The mating surfaces of the deck... any signs of gasket failure or movement? The parting lines of the caps and main saddles... Any metal transfer there? Do the caps fit tightly in their registers in the block or can you drop them in place and slide them for and aft in their places?
 
I will be following your thread. I have a 99 block at the machinist right now getting bored and honed and crank installed. I am going with the same pistons you showed. I will post some picks also once I get rolling on this.
 
All right! You beat me to it. I'm about ready to do one myself. I need to balnce the assembley and get cam bearings. On the verge of another engine tear down now.

I need to mock up the block for potential square decking. Using DGC333's engine as a comparator, one major difference is the piston compression height difference between his KB107s and my Speed Pro's - the KB's have a 1.675 compression height while the SP's have a 1.660 compression height - that is potentially .015 more that has to come off my decks.

What I inspect when tearing downa block:
Is the cross hatch feelable with a finger tip? Barely Enough to catch a fingernail? Barely Any ridge? No Any scratches? No how centered are the lifter bores in their castings? The look pretty centered to me Any sharp edges at the casting parting lines in the valley? Yes, I plan on detailing all casting flash with a die grinder before hot tanking What's inside the cooling jackets? Nothing Sand? Nope Rust? Surface rust only remove all the oil plugs, including the one over the #5 main cap (tap out from the oil pressure sender hole side) All plugs are out already. Any metal/crud come out of there? No, previous owner went through the block already The mating surfaces of the deck... any signs of gasket failure or movement? No, deck surfaces look good, still see the gasket hatching The parting lines of the caps and main saddles... Any metal transfer there? No, caps and saddles look good Do the caps fit tightly in their registers in the block or can you drop them in place and slide them for and aft in their places? Caps need to be tapped in, super nice fit actually

All great suggestions moper :) I will be cleaning up all casting flash and would normally paint the inside of the lifter valley (if not the entire block) with rustoleum, but there is so much drainage in the this lifter valley I don't think speeding oil return matters like it does on SBCs

I was actually surprised at how nice the fit of the mains and caps to the block are, plus the condition of the cyls and deck - this must have been a very low mileage motor - I will try to get some better pics of the cyls once i have them cleaned out - the block has been sitting for quite some time and is very dusty and mildly rusty

I will be following your thread. I have a 99 block at the machinist right now getting bored and honed and crank installed. I am going with the same pistons you showed. I will post some picks also once I get rolling on this.

Cool deal dartman, what compression ratio are you going for; what heads will you use?

I think it will be interesting to see all the pre-spring-builds that start popping up on FABO! I hope to have my 360 done and installed by Spring Fling so I can cruise those 6 long blocks to Woodley Park ;)
 
Yup. Sounds like a good block. However, the proper finish for a moly ring you shouldnt feel with your finger tip and won't really catch a fingernail. So you may want to stick a dial bore down it and see what size i is. It may be in your best interest to have it properly honed. (I havent seen any pics... so if you have a clear one of the bores I'll look and comment later)
 
I would have the machine shop verify piston to cylinder wall clearance is correct.

I would have a machine shop check rod and main bearing clearances. Getting the block lined hone so that main bearing clearances are perfect is a good idea too.

Before you have the heads done you might want to mock it all up and verify intake fits correctly so if you have to have the intake surfaces milled you will know before the heads are finished. Because once those heads are all done you are not going to want to take them all apart and get them milled.
 
I would have the machine shop verify piston to cylinder wall clearance is correct.[/quote[

I will do that

I would have a machine shop check rod and main bearing clearances. Getting the block lined hone so that main bearing clearances are perfect is a good idea too.

I will do this too

Before you have the heads done you might want to mock it all up and verify intake fits correctly so if you have to have the intake surfaces milled you will know before the heads are finished. Because once those heads are all done you are not going to want to take them all apart and get them milled.

Agreed. Heads are already done and ready to bolt on less new springs. I will be doing a complete mock-up build to verify ALL fit and function variables - pending cam purchase and install, then I will verify piston to valve clearance too
 
Here are a few of the corner bores, there is varying degrees of dust, rust and dirt in the bores - I think a final hone is in order before final assembly, and while there are no scratches or other unmentionables, I would feel better knowing those holes are freshly crosshatched prior to break-in though

Cylinders 1, 7, 2, 8
360M-corner_bores.jpg

Notice the line running down cyl 1, it cannot be felt by fingernail but it is there.

You can also see the gasket imprint on the deck surface, the seller did NOT deck the block as he said he did...
 
How can it have fresh cylinders but have gasket marks for the heads? I would think that surfacing the deck as a minimum for block work.

p.s. I have the same engine stand....lol
 
The Plan
Mock-up the rotating assembly and measure the piston to deck clearance to determine deck height. Once I have that measurement I will pull it apart and take the block down to Kelly's Block Welding in Culver City, CA for square decking and hot tanking.

Kelly's did the machine work on my 383 Challenger in 1989. Good straight up people. Drive by there all the time.

I think it will be interesting to see all the pre-spring-builds that start popping up on FABO! I hope to have my 360 done and installed by Spring Fling so I can cruise those 6 long blocks to Woodley Park

I thought you lived in West LA?

I saw someone with a metalic blue 67/68 Barracuda fastback on a trailer parked on the north side of Victory between Lindley and Balboa. Wonder who that was?
 
How can it have fresh cylinders but have gasket marks for the heads? I would think that surfacing the deck as a minimum for block work.

Weird huh... seems they did the bores and skipped the deck - makes me wonder about any previous work done - which is why I am mocking it all up and planning on square-decking - chances are it CANNOT be good enough to run as is, at least not good enough for me and my piece of mind

I thought you lived in West LA?

I do, the car is parked at my friend's house in Van Nuys, until it drives reliably I am not taking it to the west side

I saw someone with a metalic blue 67/68 Barracuda fastback on a trailer parked on the north side of Victory between Lindley and Balboa. Wonder who that was?

Not me...
 
Hey octanejunkie, if you need any help with the build, let me know. I built mine in 08/09 with a lot of the goodies you have. My opinion on a cam: go with Hughes 1418ALN with a 108 LSA.
 
Hey octanejunkie, if you need any help with the build, let me know. I built mine in 08/09 with a lot of the goodies you have. My opinion on a cam: go with Hughes 1418ALN with a 108 LSA.

THanks for the advice, and the offer. Looking up that cam on Hughes site, they list it as a 214/218 hyd roller with .520/.544 lift w 1.6 rockers on a 114 - too much lift for my stock magnum heads unless I go to 1.5 rockers...
 
So I assembled the rotating bits over the last few days, lots of fun to be building another engine, forgot how much I enjoy this stage.

I checked the crank journal/bearing/cap clearances, got .004 crank/thrust clearance, set thrust on the crank forward and torqued it down to 85lbs, turns nicely.

Checked ring gaps, .018 measured at 3 depths and orientation in the bores - looks good there...

Began inspection on the piston/rod combos, pistons were already pressed to rods when I acquired them. Found 3 rods NOT marked with numbers, letters used, suspect replacement rods? I designeated them as follows, for now...
Rod marked [FONT=Verdana, Helvetica, Arial]A, used as #1
[/FONT]Rod marked [FONT=Verdana, Helvetica, Arial]K, used as #2
[/FONT]Rod marked [FONT=Verdana, Helvetica, Arial]T, used as #7[/FONT]

Since I suspect some rod length variation, and cannot accurately measure the RODS with the pistons already mounted, I decided to install ALL piston/rod combos in one cyl, I chose cyl #8 for this task. Here is how they compared off the deck surface:
[FONT=Verdana, Helvetica, Arial]1 .0030 (rod marked A)
3 .0040
5 .0020
7 .0120 (rod marked T)
2 .0095 (rod marked K)
4 .0010
6 .0075
8 .0058[/FONT]

That's quite some variation... While mulling it over and holding back the tears I decided that there are too many unknown variables to make this more than anecdotal info so I moved on and installed the 4 corners and here is what I got
[FONT=Verdana, Helvetica, Arial]1 -.0015 (A marked rod)[/FONT][FONT=Verdana, Helvetica, Arial]7 .0035 (T marked rod)
2 .0030 (K marked rod)[/FONT][FONT=Verdana, Helvetica, Arial]
8 .0100

Ouch! #1 is above the deck and #8 is .010 in the hole... now I wonder how straight the decks are, so I decided to install all 8 and see how they line up, it got more interesting:
[/FONT][FONT=Verdana, Helvetica, Arial]1 -.0015 (A marked rod)
3 .0015
5 .0015
7 .0035 (T marked rod)
2 .0030 (K marked rod)
4 .0030
6 .0060
8 .0100[/FONT]

Since 3 rods seem NOT to be original to this assembly, I decided to play musical pistons and swapped #1 and #8, which seemed initially logical, and ended up with:
[FONT=Verdana, Helvetica, Arial]1 .0015 (8 )
3 .0015
5 .0020
7 .0025 (T)
2 .0030 (K)
4 .0030
6 .0060
8 .0075 (A)[/FONT]

So now I might be ready to discuss cutting decks/squaring with my shop. Obviously I still have a few issues to consider, like how accurate and repeatable are my measurements. Assuming all things being equal, it would seem that the decks are higher in the rear and need to be squared but this may not be so.

Talked to Al at L&B Con Rod Service in Anaheim, he can re-size all or some of my rods for a nominal fee, less than $20 each, which includes sizing the big ends and converting small ends from press-fit to full-floating - he can move the center of the wrist pin bore, oversize it, and bush the pin to get the rod lengths even - I might consider this for #6 and A rods once I see how the deck squares out

Would love to hear everyone's thoughs, in the meantime, here are a few pics.
360M-pistonmock-up.jpg
 
No magnum block comes with a square deck.
So really it's impossible to make measurements with any accuracy until that sucker is square.

Deck it, and then measure those rod/piston assemblies again to determine whether you'll chuck them or not. I personally wouldnt put any money into them. That's just me though, and only because a set of scat I beams are way better, cheap, and strong.

and not to be alarmist or anything because it's not a build-killer...

Someone take the "cylinder 1" first cylinder shown on the left, and zoom the hell out of it. Looks like there MIGHT be a crack from the bolt hole into the water hole next to it. These are common. I have been told they are not a problem as long as there is no leak. Seems to happen a lot with people using head studs. The studs have a sort of shoulder where the threads end and that IMO shouldnt be threaded in flush up against the block. It might act like a wedge and cause these cracks. I really cant say why they happen with any certainty, or if it also happens on la blocks too, but I see it a lot. They could even happen from not having a square deck to begin with!

Anyone have any ideas?
 
I can't see the pictures but a few remarks... What you see for variance is normal for any factory machined parts. This would be why I have it all fixed when i do an engine. I want better than Mopar did it..lol. On the rods... If the order is all mixed up anyway... Have them all re-sized properly and put in some good bolts. But if they are pressed off there is a good chance they will be junk after, and even if they aren't pressed pin don't work as floaters... So be aware that pistons should be in your future. Also, make sure the shop decking the block knows what square decking is and has the equipment to do it. I know some average machinists who say they sqaure deck but can't because they dont have the fixture or equipment for it. They just don't know what the difference is.
 
Also, make sure the shop decking the block knows what square decking is and has the equipment to do it. I know some average machinists who say they sqaure deck but can't because they dont have the fixture or equipment for it. They just don't know what the difference is.

Chrysler obviously doesnt have the correct fixture. lol
 
lol.. They didn't know about it back then, and even the guys doing what they did considered it shift work. It only had to last through the warranty period, or maybe the loan...lol. The funny part is a lot of the shops that say "yeah, we square it up when we deck it" are using millers that are deacades old anyway...lol.
 
I called Kelly's today and spoke with Garrett regarding my measurements and next moves. He suggested swapping the piston/rods between cyl #1 and cyl #7 to get an idea of whether the deck is high in the rear or the rods are off - regardless it will be going in for square-decking.

So in reviewing the numbers with Garrett, I asked how little could he shave off the deck in the event that only .001 or .002 need to come off to reach zero deck height - obviously without having the block to jig up and check, hard to say, but admitedly he felt he may not be able to take less than .005 off.

Now this news leaves me with this dilemma, if he takes .005 off either deck surface it will set some of my pistons ABOVE the deck, which means I have to run a thicker gasket, not the end of the world I imagine - but I may still be looking at resizing rods, some or all. So I am in a bind, emotionally, and need advice beyond "scrap it and buy all new" cause I ain't going that route unless there is no other choice.

My choices at this point:
1. play musical pistons some more and see if I can even things out a bit, I doubt differences of .001 to .003 per piston height is going to affect quench too much...
2. send the block out to be square decked and see what it comes back at and then
a. have all the rods re-sized accordingly in their current locations
b. play musical rods in an attempt optimize deck height post decking
c. run a thicker gasket if they pop out

I guess the best bet is to get the block jigged up at Kelly's and see what the reality of it is...

Any advice is appreciated, and BTW Dakota, that is not a crack

FWIW - I am working with Kelly's because they are the ONLY shop on the west side that has the proper equipment to square deck a block, in fact, they are a motor machine shop only, and all other shops, dealers, etc use them. Seemed an easy choice to make for me...
 
Reason I brought up the cracks (and I didnt mean to spook you) is because they happen like in the attachment. Zoom that sucker in and take a look. they're all over.

You can see from the pitting the one crack was leaking into and around the bolt hole.

I just wanted to show that. Good to hear that's not a crack.

i211.jpg
 
Something is screwy because rod "T" ranges from .012-.0025" and never changed holes. Looking closer it looks like the rod throw 7/8 is off some amount. This is why I say it's better and easier to simply choke it down and have it all done. Square deck the block, re-do the rods, then mock it up and see what gasket will work. Also, even if you need to have the pistons milled a little to get the quench perfect it's not expensive. Still cheaper than new pistons and a balance beyond what you've already got planned.
 
Something is screwy because rod "T" ranges from .012-.0025" and never changed holes. Looking closer it looks like the rod throw 7/8 is off some amount. This is why I say it's better and easier to simply choke it down and have it all done. Square deck the block, re-do the rods, then mock it up and see what gasket will work. Also, even if you need to have the pistons milled a little to get the quench perfect it's not expensive. Still cheaper than new pistons and a balance beyond what you've already got planned.

The reason for the varying measurements was due to the magnetic base for my dial indicator, it has an adjustable beam that was flexing and giving inconsistent measurements. I swapped the adj beam for a solid rod and everything became super consistent - so the last set of measurements posted are the "more" correct. In fact, now my measurements are within .0005-.0010 of each other, which seems accurate enough to me.

Before I disassemble the mocked up block I will take another set of measurements, or two more sets, just to be sure...

If I have the time I may just play musical rods and see what shifting them around gives me - at least a clearer picture of how skewed the decks really are, if not how inconsistent the rod lengths are.

All in all, for less than $300 I can have the block square decked and the rods re-sized - certainly cheaper than buying new pistons and rods, even if I have to have the pistons milled
 
Reason I brought up the cracks (and I didnt mean to spook you) is because they happen like in the attachment. Zoom that sucker in and take a look. they're all over.

You can see from the pitting the one crack was leaking into and around the bolt hole.

I just wanted to show that. Good to hear that's not a crack.

Thanks Dakota, I appreciate the picture
 
Consider having the block magged and sonic checked before anyhting else. Even though it's already bored and honed, I would want that piece of mind for both wall thickness and checked for cracks. Money (and not much) well spent...
 
-
Back
Top