You are using an out of date browser. It may not display this or other websites correctly.
You should upgrade or use an alternative browser.
You should upgrade or use an alternative browser.
Porting a slant six head
- Thread starter 1930
- Start date
-
Have you read Doc Dutra's old article from the Slant Six Racing News?
www.dutra.org/doug/draft-webpages/porting/ssrn-article.doc
There's also an article that talks about the newer vs older heads:
http://www.slantsix.org/articles/combustion-chamber/sl6-combustion-chamber.htm
Fourth post down on this one has some flow numbers with various mods:
http://speedtalk.com/forum/viewtopic.php?f=1&t=22094
The only article I had seen was the middle one mentioned. That first article looks like it has answers to alot of my questions.
Thanks for taking the time to show these to me.
Really stupid question and I am only asking it just so there is no doubt in my mind but you said ..........It does add a small amount of volume to the port itself...........I am assuming at this point that this is exactly what we do not want. We want to reduce the amount of volume to the port itself.Any smoothing you do will give some results. Whther or not it's enough when combined with other mods to make a feelable difference is anyone's guess. But - you won't hurt anything by leaving a larger hole there. It does add a small amount of volume to the port itself, but like Kid mentioned - these heads are so bad that it takes a lot to make them good. It's just reality - not bashing. If you really want to "fix it right" then have the holes welded up and reshape the bowl. This will require the entire head be rebuilt because of the heating required and the distortion - but if that's also part of the plan then welding isn't a big expense. I also don't think it will give you much better performance so the cost vs reward issue comes into play there too.
By reducing the amount of volume we are increasing the ports efficiency. Sound right?
Is that correct?
This is great information and a big help for me, I am a bit confused though. You mention looking at the head in installed position....rectangular hole, top of rectangle is the roof and the bottom of rectangle is the floor.....so that means when flipping the head over and looking at the combustion chamber/port we would be looking at the roof of the head.I have no pics, but here are some simple terms:
Looking directly at the port in normal installed position: the floor is the bottom, the walls are the sides and the roof is the top. Now flip the head on its back, with the chambers up toward you.
With the valve removed, the bowl is what you see if you look down pass the valve seat.
Doc's recommendations are what I have always done as well; I think we may have read the same books when we were kids,
You don't want to lower the floor, or the bottom of the runner. I have found that the most "bang for the buck" ( the most effect with the least effort and time involved) is to "blend the bowls", that is, removing the casting flash just below the valve seat ( careful not to hit your valve seats!) and grinding off the big blockey bosses that often stick down where the valves stems come through the head into the bowls. Then you can "gasket match", which is matching up the openings between your intake manifold and the head so they run directly into each other without a "step" where the two meet.
Another thing I do is to open my headers or exhaust manifold slightly larger ( about 3/32) than the exhaust port opening in order to create an anti-reversing effect, or A.R., and polish the exhaust ports. This is easy to do, since headers are usually larger than stock openings anyway.
")
You then mention ....You don't want to lower the floor........how would I lower the floor? The way I am thinking it sounds like welding/or adding material to the head is only way to lower the floor.
Sorry for my confusion, I am trying to get a grip on the correct terminology.
Thanks for your time and insight!
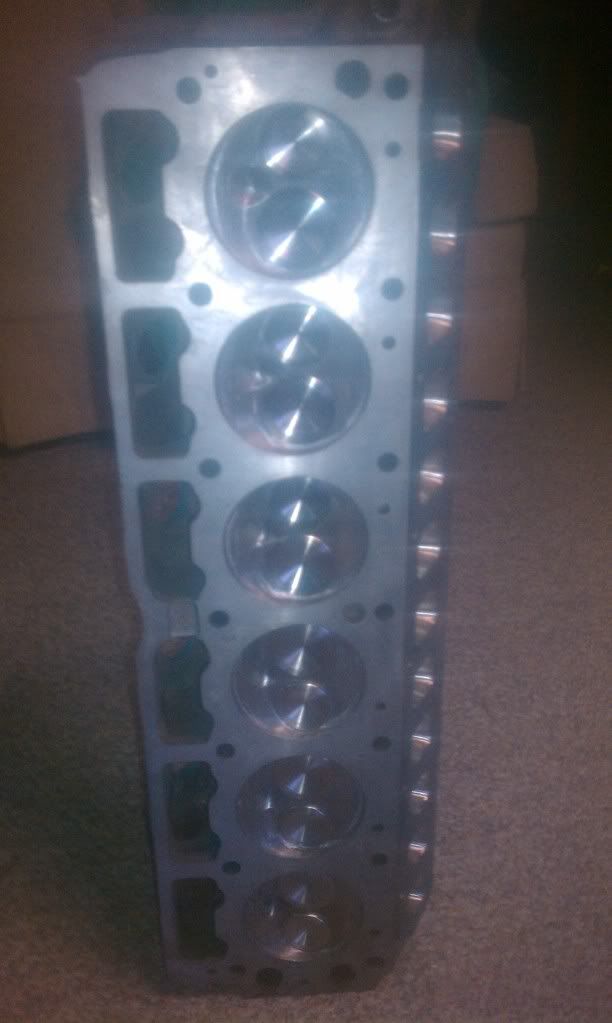
That is a pretty head, can you tell me how you got it so clean? Did you do any combustion chamber work?Here is a close-up of my slant head....it will be getting oversize valves fitted.
Thanks Bill. so it sounds like that little knub will have to go away completely. Is that your take on it too?Here's a little brighter shot of the original picture. Hope it helps...
Here are some images Id like to add for reference. These are I believe belonging to user Fopar on slant.org site.
I thought that it was a no-no to polish the intake port like has been done? What do I know though.
What gains can be experienced by cleaning up the combustion chamber as has been done here? I thought for a street use engine that technically any time spent polishing is sorta wasted time cause the deposits build up pretty quickly.
These are 300 valves, Ill assume the larger version. I am not going to get this stupid with my head, only wanted to show the images for my next question.
Attachments
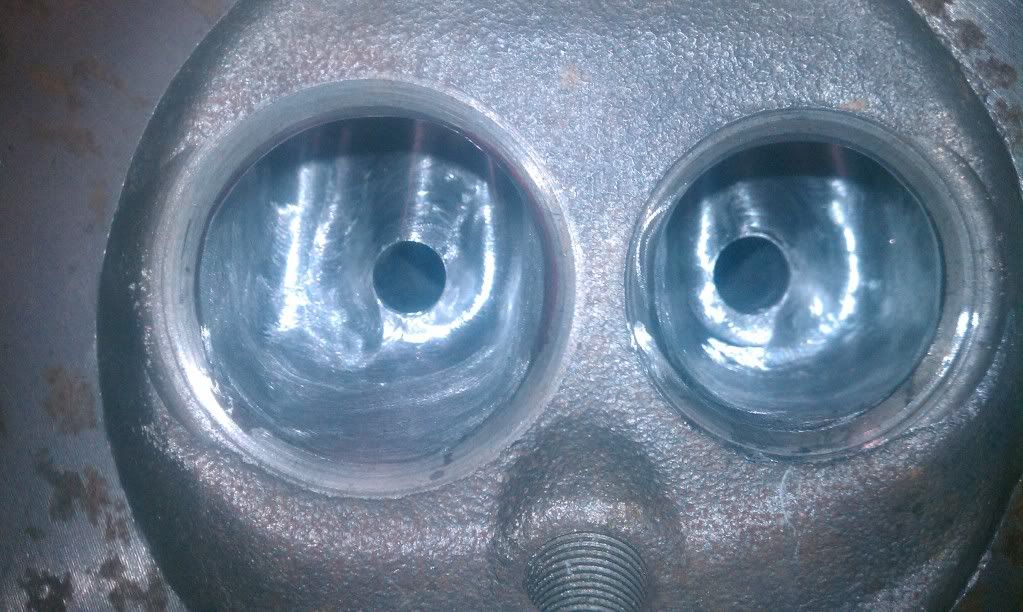
These pictures were so clear I thought I could use them for another question.
Why are these cast this way in that they have this raised area? I am going to assume that I should leave this raised area alone? Dont try and remove it but instead just sorta smooth mine out.
If I did know any better I would try my best to just flatten this area. But at some point there is going to have to be a bump in the head for the valve guide to pop thru and so maybe this runner is sort of a transition so there is no sharp change of angle within the port?
Attachments
srixon4406
TURBO TOAD
Here's a pic of one that's on my fire breathing toad.
Here's a pic of the completed head

Here's a pic of the completed head

srixon4406
TURBO TOAD
Use the pics in this link as a reference
http://www.slantsix.org/forum/viewtopic.php?t=38066
http://www.slantsix.org/forum/viewtopic.php?t=38066
Thanks Bill. so it sounds like that little knub will have to go away completely. Is that your take on it too?
I don't have a dog in this hunt because my engine is slated to be a high boost (over 20psi) turbo engine and I think small flow considerations are not very significant on engines like mine.
Just my opinion...
Great looking head toad, thanks for the link as well. I plan to use some of the pictures for another up-coming question.Use the pics in this link as a reference
http://www.slantsix.org/forum/viewtopic.php?t=38066
Might be that is part of it as well :read2:1930,maybe the excess (hump) is to support the valve guide area for longevity.The slant was engineered as a work horse.Just a thought.
cjh
Well-Known Member
That is a pretty head, can you tell me how you got it so clean? Did you do any combustion chamber work?
I used a normal egg burr, and small sanding pads and flapper wheels to do it.
It's been glassbead blasted, thats why it's not shiny.
Attachments
I have this de-burring set http://s675.photobucket.com/user/jhason2/media/Picture585_zps643b3c34.jpg.html I have been told that I will need a long reach set to get all the way up inside the runner of the head.
Admittedly I have not tried these yet but yes they do look short, where can someone recommend I get the set that I need and which specific cutter do you suggest.
These can get pretty spendy and Id rather not buy an entire other set if I do not have too. Thanks
I have been told that I will need a long reach set to get all the way up inside the runner of the head. Admittedly I have not tried these yet but yes they do look short, where can someone recommend I get the set that I need and which specific cutter do you suggest.
These can get pretty spendy and Id rather not buy an entire other set if I do not have too. Thanks
cjh
Well-Known Member
Snap-On do have long shank ones as well, in alloy or steel.
67 Power Wagon
Hemi Pawr or BUST!
I'm going to be rebuilding a couple heads for a local guy to go to the 2 Mopars hes got with Slant 6's in them so, I'm following along, not the first time I've played, but....it has been awhile so, a refresher won't hurt any!
I'm going to be rebuilding a couple heads for a local guy to go to the 2 Mopars hes got with Slant 6's in them so, I'm following along, not the first time I've played, but....it has been awhile so, a refresher won't hurt any!
Im going to be dropping the head of today to get the valve seats cut in and am going to have hardened exhaust seats installed.
Then ill bring it home to start fooling around with the porting.
I have no intention of getting stupid with it, just a basic clean-up, whatever I can do to help flow without even coming close to hitting water is my goal.
67 Power Wagon
Hemi Pawr or BUST!
I'm not planning on getting stupid with those I have planned to do either, just smooth out the ports and maybe a bit of polishing and all as the guy just what them cleaned up a bit, I'm not even adding in larger valves, just going to re-fit new factory size valve to the head so.....I ought to have the heads, in at some point this week, near the end of it actually so....
-
Similar threads
- Replies
- 78
- Views
- 3K
- Replies
- 4
- Views
- 366
- Replies
- 9
- Views
- 1K
- Replies
- 6
- Views
- 767


