Rallye Dash Resto

-
As requested, here are some close ups of the dash bezel. Let me know if you need any other pics.

Thank you very much for taking those pictures. Detail quality looks really nice. :thumbup::thumbup:


Are the letters susposed to be painted white on the edges though?
 
Thank you very much for taking those pictures. Detail quality looks really nice. :thumbup::thumbup:


Are the letters susposed to be painted white on the edges though?

I thought that too. I see that there was no effort made to fix any imperfections that were in the model/template dash used to make the repros, as the same imperfections occur in the new one. It still looks great though!
 
I.... I see that there was no effort made to fix any imperfections that were in the model/template dash used to make the repros, as the same imperfections occur in the new one. It still looks great though!

What imperfections specifically??

The PG Dashes like $425. There were some people getting $200?? for just the plastic like this with the radio uncut, but STILL needed rechoming and detailing. IIRC, CV Platers gets around $400?? for rechroming and detailing.
 
The imperfections I`m referring to are the little divets that occur along the bottom of the bezel ,I think it`s where each bolt is. It`s on every bezel I`ve ever seen. If you look at Lucky`s 2nd picture you can see one just to the left of the bottom right screw hole. I`m not putting it down in any way, I`d love to have one myself, but you would think that if someone was going through what it takes to repro one of these that they would make it as perfect as they could get it. With most vacuum platers that $400.00 includes doing the lenses and polishing them. If you go with the repro you have to buy the bezel- $425.00 plus the lenses- $195.00 seperately, if you want the complete package redone. I still may do that because I couldn`t stand to have my car out of commission for over a month waiting for a service to refinish them.
 
The imperfections I`m referring to are the little divets that occur along the bottom of the bezel ,I think it`s where each bolt is. It`s on every bezel I`ve ever seen. If you look at Lucky`s 2nd picture you can see one just to the left of the bottom right screw hole. I`m not putting it down in any way, I`d love to have one myself, but you would think that if someone was going through what it takes to repro one of these that they would make it as perfect as they could get it. With most vacuum platers that $400.00 includes doing the lenses and polishing them. If you go with the repro you have to buy the bezel- $425.00 plus the lenses- $195.00 seperately, if you want the complete package redone. I still may do that because I couldn`t stand to have my car out of commission for over a month waiting for a service to refinish them.

Good point. I forgot about the plastic chrome on the centers on the lenses. They need to be still rechromed if you buy the PG dash. I bet to rechrome the lens centers, that $100 alone.

To me the lens polishing isn't a big deal. You can do just as good job of that at home with some plastic polish, toothpaste, or fine rubbing compound. Use some fairly fine abrasive then finish with a really fine polish.
 
So a quick update to my new cluster re-installation. First off, it's pretty difficult to remove the green indicator lenses from the original cluster. I ended up breaking one of them and finally had luck using a small dremel tool to free the other.

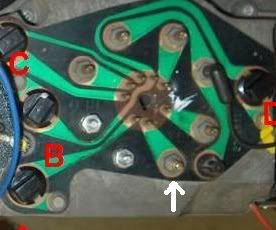
Moving on, I am having difficulty getting all of the bulbs to work on my cluster. I managed to figure out how to bench test the cluster and here is my dilemma (see picture below)

1 - Speedo light
2 - Left turn signal
3 - Right side of speedo/Tach light
4 - Hi-beams
A - Right turn signal
B - Right side of Tach/Left side of dummy gauges
C - Brake warning light
D - Right side light

So on the left side I managed to get all lights working except for 1, if I rotate the number 1 socket, it will light up but it dims #3 to the point where there is no real light. If I rotate #1 back, it turns off and #3 is very bright. I can live with that, if that is my only choice.

On the right side, only B works, however if I apply power to the lower contact of the D socket, both B & D will light (they are on the same circuit trace). But, if I apply power the B & D pin, only B will light. A and C will not light no matter where I apply the power. Also, I know for a fact that my right turn signal indicator worked fine prior to disassembly.

A couple of notes:

1. All sockets and bulbs have been tested and work. This has been verified and re-verified
2. I'm fairly certain that 1, 3 and B worked before. I am certain that 2, 4, A and C worked before.
3. I rubbed the contacts on the board with low grit sand paper to try and remove an oxidation.
4. The boards were never removed from the pot metal structure and all pins seem to be tightly affixed to the board.

Does anyone have any ideas? Am I missing something obvious?

Thanks for any help that you can provide.

cluster.JPG
 
Do you have all the correct and/or same wattage/model bulbs in there? Make certain you have a good ground to the instrument panel cluster.
 
Do you have all the correct and/or same wattage/model bulbs in there? Make certain you have a good ground to the instrument panel cluster.

Thanks for your message. I'm certain that the bulbs are the same. When I bench test, I am grounding from the negative terminal of the battery to a screw on the pot metal cluster. Should I be doing anything different?
 
Make certain you have a good ground to the instrument panel cluster.[/QUOTE]

AMEN!!! MAKE SURE OF THE GROUND, Very important when trying to get parts on your dash to work properly. Good Luck!
 
It wouldn`t hurt to clean up each individual ground screw for terminals 1-4. It sounds like you`ve got the panel grounded well, but do you have the printed circuit grounded well would be the question? If the voltage is constant,bulbs are the same, bulb socket prongs are clean and making good contact, then I would look to the ground screws between #`s 3 and 4 and to the upper left of 2 and 1 as in your picture. If you have to ,jump a ground wire directly to the screw head (once they`re cleaned) and see if that doesn`t solve the problem. Good luck and hth!
 
If I go to the trouble and expense of restoring a panel I will remove the circuit boards and clean EVERYTHING. The ground is chassis and relies on the copper trace under the boards attaching screws contacting the underside of the screw heads.
I appreciate the effort in your numbers but...Its alot easier for me to see the front side of the panel too in determining what is illumiation and what is indicater.
Beware the one you,ve marked 'C' . That end of the board overhangs the potmetal housing and is easily broken
You have the noise suppression capasitor connected to wrong post also.
The plastic post cover at fuel gauge is correct and that wrong connection should be right beside that plastic cap. :)
Thanks for all of your replies.

Redfish, what you say makes sense. This is the first time I have ever taken this apart or have seen this cluster so bear with me if I'm being a little over-cautious or not providing the correct information. I will take the boards apart and give them a proper cleaning. Also, with respect to that noise suppression capicitor, I have never moved that so it was either the previous owner or installed incorrectly at the factory. So based on my picture should the connector go to the top or left of the fuel gauge/plastic cap? Lastly, what do you normally clean the contacts/board with?
 
Thanks again for all of your help and suggestions. We managed to get it working after removing the boards and giving the contacts a thorough cleaning. I should finally have everything reassembled by the weekend!
 
i had mine done by mister G's and i sucks. i paid alot and then the chrome started to wear off in lest then a year. the prep work was poor. sanding scraches all over the place and "paint over peel" was what the chrome looked like. total crap for the money. i know this pic looks good but in the detail and long run not so much.

IM000329.jpg
 
http://cgi.ebay.com/ebaymotors/1967...yZ140720QQssPageNameZWDVWQQrdZ1QQcmdZViewItem
Again they have cut out the radio windows for you .
Their burlwood doesn't look like it will match the door inserts either.
I dont expect my relocation of the heater controls will prompt them to retool their molds simply because it rquires the housing and dash be modified too. I will say I like mine better than anything else I've seen.
I just might have the Alsa chrome "Killer cans" kit here, wrapped and under the Christmas tree, but wont know for sure until next Tuesday.
 
There is another option a few people have tried.

http://www.kustomrides.com/kustom/killer-chromes/

This a simulated chrome process, it give results similar to vaccum chrome plating that you see on plastic model car parts. Its called Mirra-chrome. Its a 3 part process, if the part is in good condition, spray the gloss black base, spray on the chrome, then spray on the clearcoat.


This is the same stuff they use to paint fiberglass bumpers that look like chrome. This is a fiberglass bumper painted with this stuff:

64dodge.jpg
 
Thats the same products at a different webpage. Patented "killer cans" belong to Alsa corp. To go directly to the sourse gets "how to" videos etc..
Cheers :)
 
Thanks for all the help guys, I'm having a problem as my car is not at the house and its diffucult to work on without having all the needed tools and time So I was wondering can this be done .I hooked up an alt. guage and started the car it ran but the starter motor stayed running not engaged but you could hear it spinning
It is possible to drive the car without the instrumnet panel but PLEASE DO NOT RECONNECT THE BATTERY and/or attempt to start the car in its current state. Ask what needs to be done first !
 
continuous running starter motor shouldn't be related to instrument panel service. I think thats a different problem. To bolt those amp gauge wires together and tape them well is a better plan than a dangling gauge.
The steering column needs to be bolted back up in place and the wiper switch needs chassis ground.
 
I know I started this thread 8 or 9 years ago, but I wanted to pst a pic og how my "painted" dash turned out. Ithas been done and in storage for a few years abd I just ran across the photoswhile checking an old digital camera sim card. I think I will buy a repop chromed das face at some pointBecause I am sure that I will get sick of this real quick, but for now? I remember when you could send the dash out and get the whole thing restored for what the repop bezel costs LOL! Dont mind the dog, had to put him down in the summer of 2013. I apparently clicked on the wrong pic! Doh!
 

Attachments

  • S2010052.jpg
    32.4 KB · Views: 242
  • S2010153.jpg
    30.3 KB · Views: 227
  • S2010154.jpg
    41.9 KB · Views: 231
  • S2010155.jpg
    28 KB · Views: 234
I wanted to add a suggestion for restoring the dash. I called Chrome Tech in WI. and talked Chromebob into just chroming the dash and letting me do all the detailing. It worked out great. He even gave me some tips to help with the detailing. I was able to buy an airbrush with the savings and it still didn't cost as much as a re-pop - which by the way you have to buy the glove box trim separately.
 
-
Back
Top