Slant 6 Turbo 68Dart Project

-
Dang man I hope all that is behind you! Good on the manager but holy crap I think I'd have fired that kid before it got so far. Find your happy place, take a few days to relax and not think about the car, and then back to it at your own pace. Excellent work so far.
 
Dang man I hope all that is behind you! Good on the manager but holy crap I think I'd have fired that kid before it got so far. Find your happy place, take a few days to relax and not think about the car, and then back to it at your own pace. Excellent work so far.
Well, I did go to my happy place. The car is my happy place. haha. Intake and carb off, girlfriend took the intake to the backyard and painted it black. Looks good. Now in theory you'd just open the hood and dump all this in and you're done. But there's more to it. 
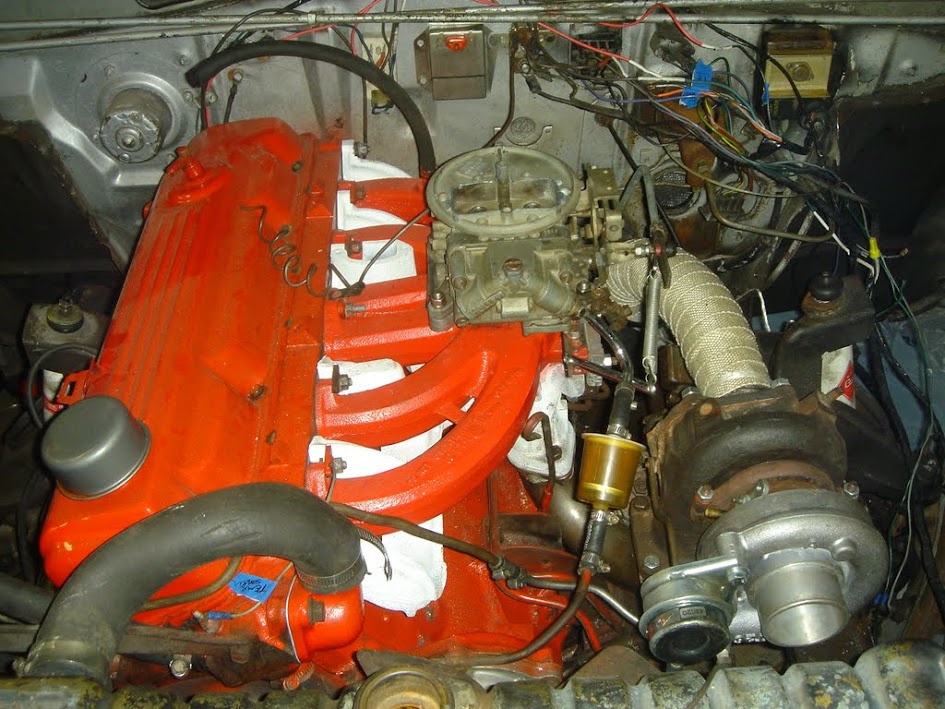
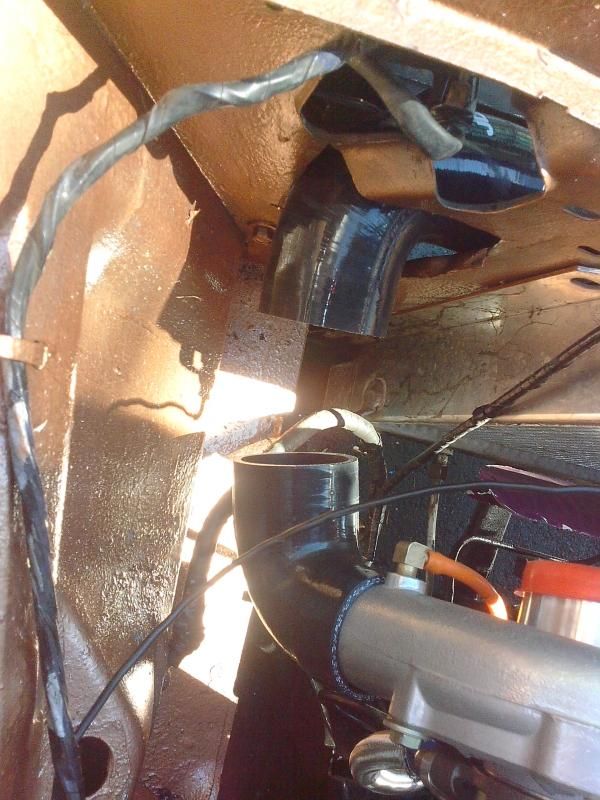
Exhaust manifold that was poorly mated - gone. Look at that exhaust leak stain. Whew. Scraped it off, repainted. 
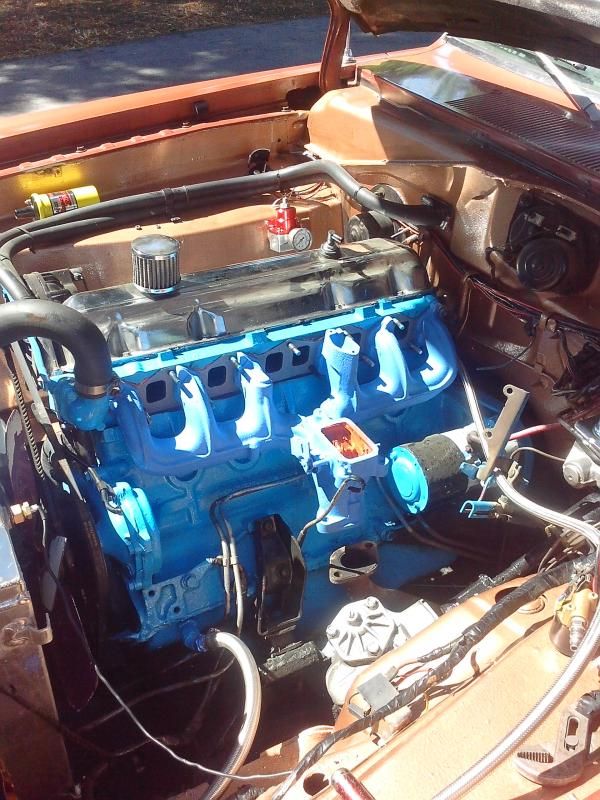
The new gasket, manifold and all is mounted. It looks good. I kicked the old exhaust pipe out of the way and shoved it back, then put the turbo manifold on. I did not like the final fit. I cut the flange off, cranked it about 1/16th of a turn, and rewelded. FIT GREAT after that. 
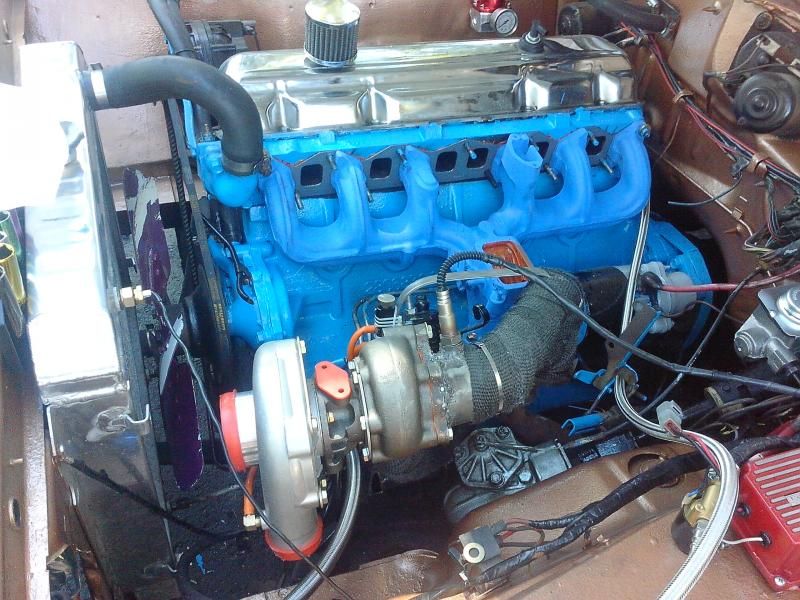
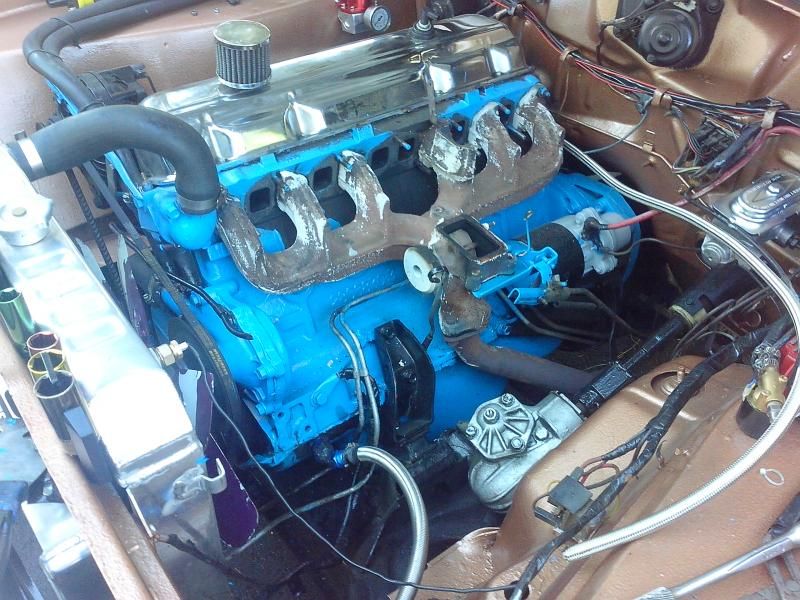
It pointed towards the radiator, so my filter won't fit... guess thats what happens. I'll have to do the window screen filter. I mated the oil lines up. Not done with the filter sandwitch. There were a few complications to the adapter bolt fitting over the stove pipe of the pump. I'm almost there with that side. 
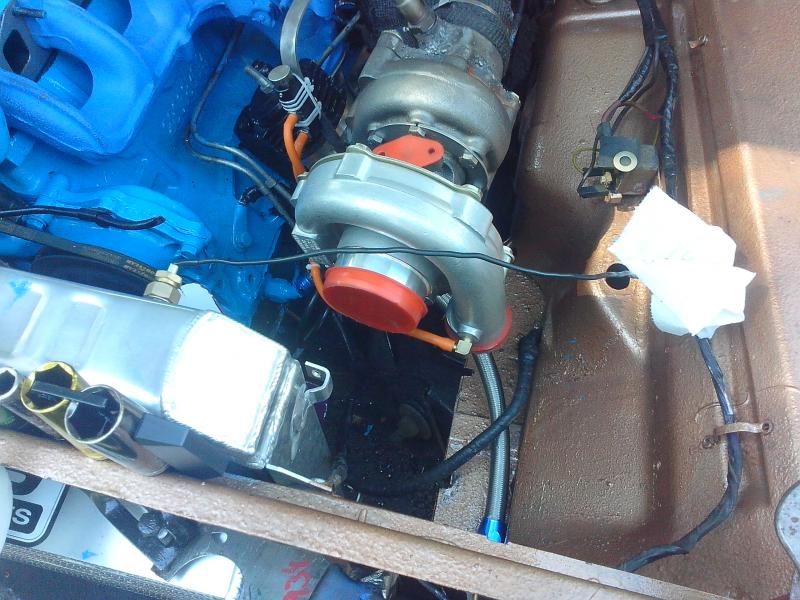
I did not reclock the turbo housing after I dropped it in. I just guessed on where it would go, and I think I was pretty close... I ran into a 5 minute setback mounting the intake manifold. Girlfriend had to hold the turbo manifold while I undid the two bolts on the flange and backed it off a bit to scoot out of the way. After that it went onto the studs, and the turbo got remounted. 
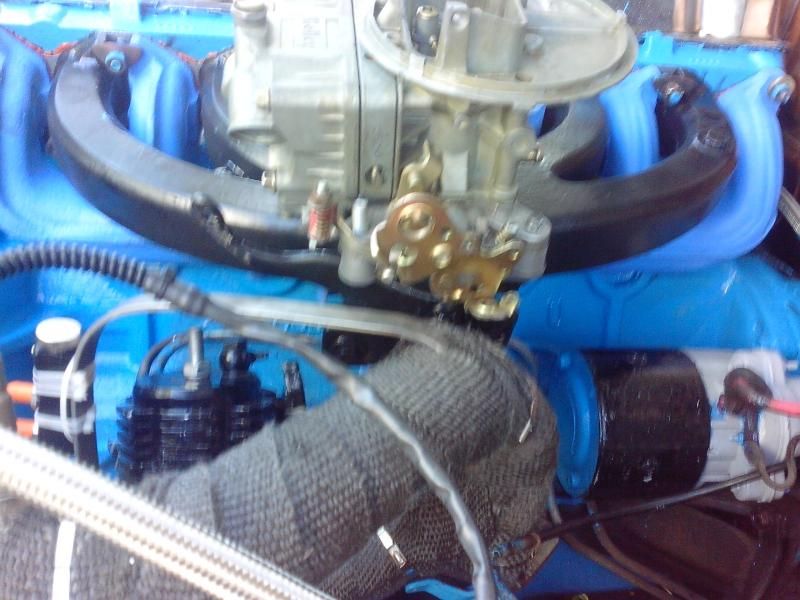
The carburetor bolted on. I had to modify the adapter plate a little bit, but just to mount the interior bolts. 
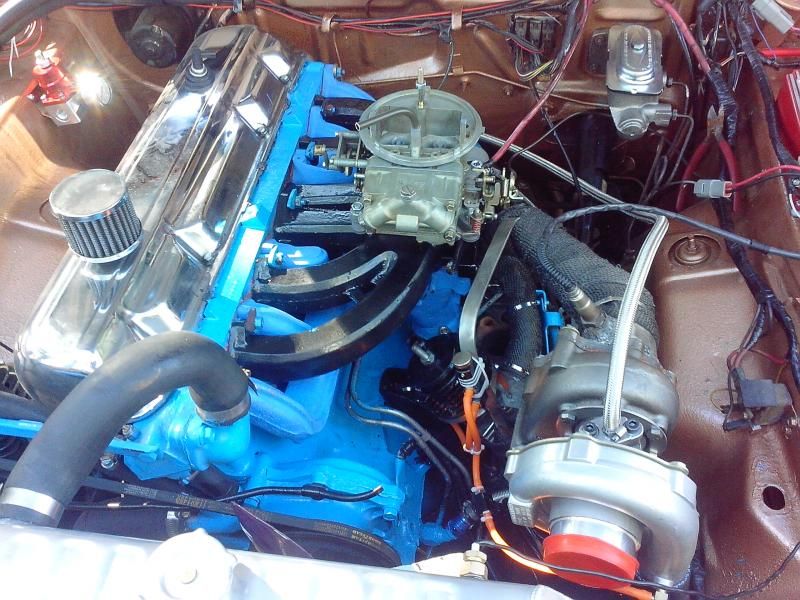
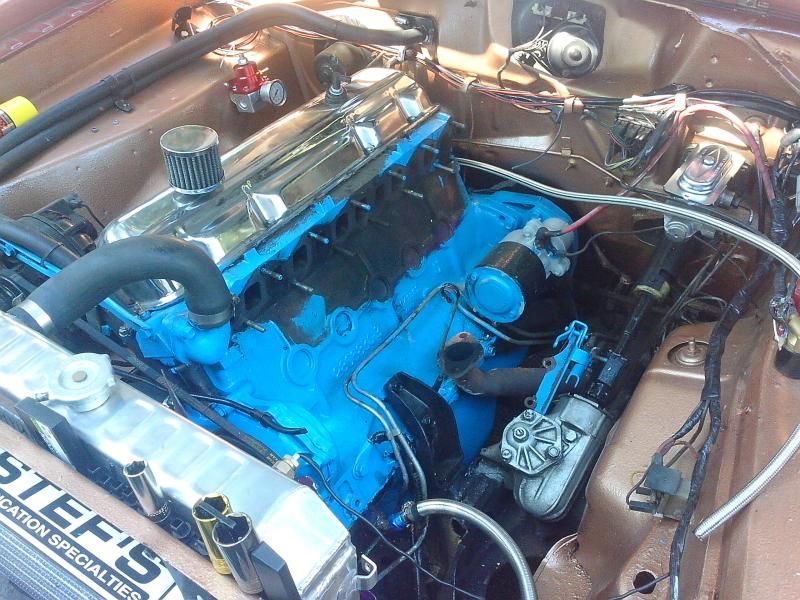
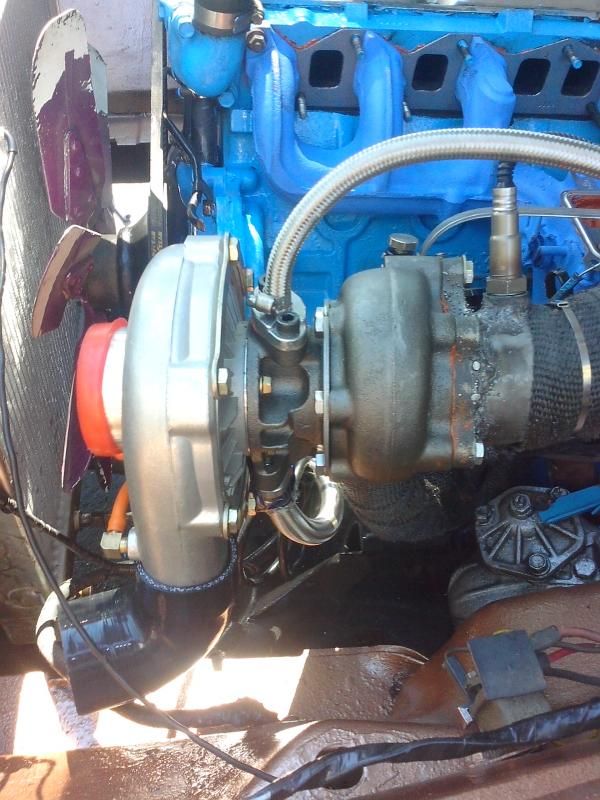
LOOK AT THE CLEARANCE It barely sweeps above the exhaust. It is clear across it's whole spin. The only thing I have to figure out is a bracket to mount the throttle cable to to pull. The stock one will work. It's a tiny bit long so I have to make my angle of attack from the bottom. The spring return is the stock return from the exhaust manifold stock setup bolted to the frame of the manifold I built to hold the pipes together. It also supports the bleed boost control. It's a very functional bar. I'm glad I put it in. 
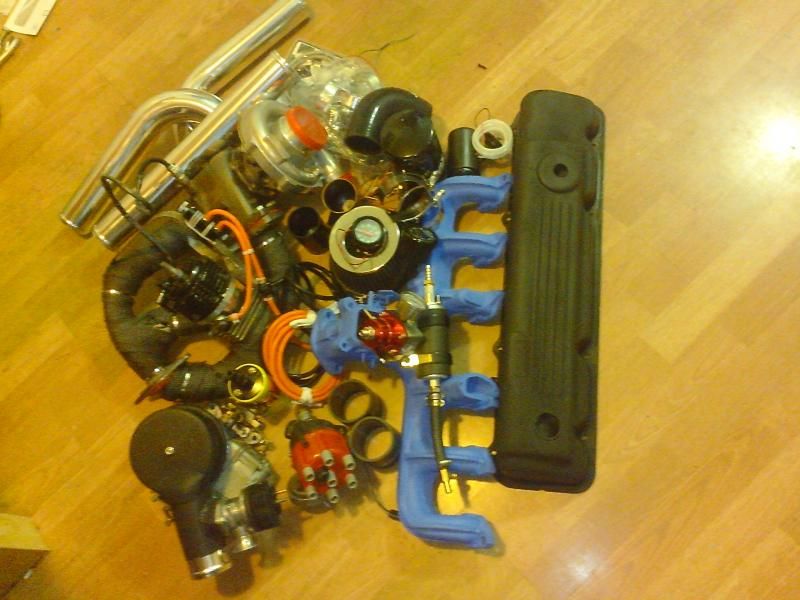
You can see the spring in this picture. I got the cold side completely strapped in and it fit well enough. It's not as few pipes as I was trying to go for, but it wasn't bad.


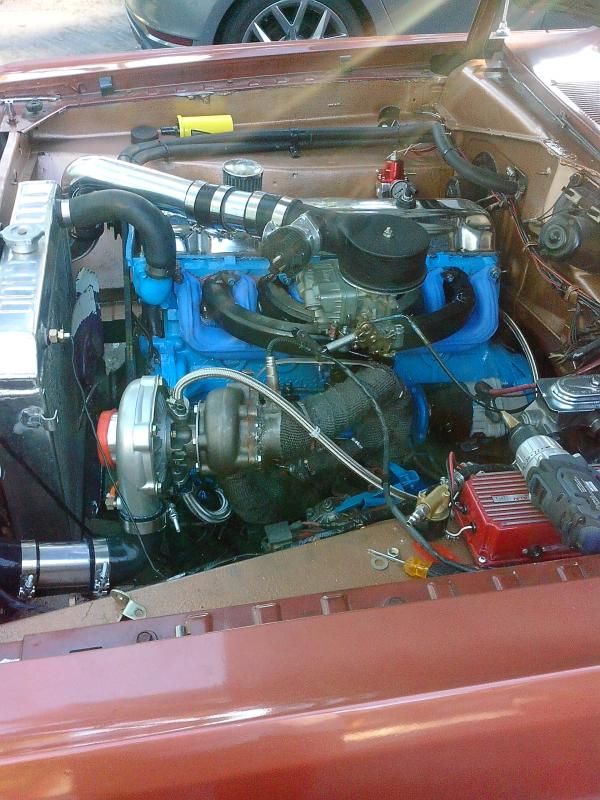
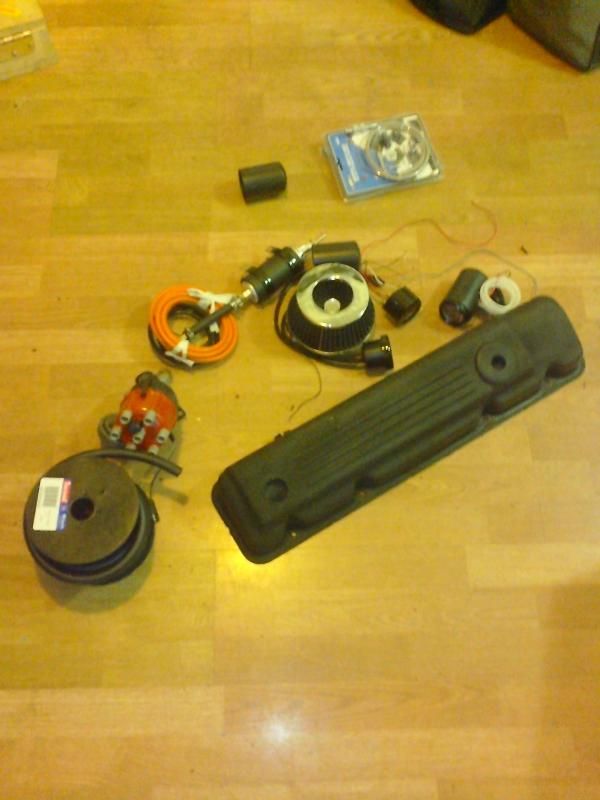
And this is what's left to do either tomorrow or the next day. It may even have to wait till Saturday. The fuel regulator is mounted on the fenderwall above where the stock fuel line was (sort-of) and I will plumb the fuel line back and the return. That will take a while I'm sure, then I have to swap distributors, valve covers, and attach the MSD system. Then figure out all the boost referencing. I think I need to add a couple nipples to the hat. One for fuel regulator, one for the gauge. I'm also trying to figure out what the T is behind the boost control. Maybe that goes to the fuel regulator? It is just off the snail shell.
 
coming along nicely. i had the same problem with the filter, i ran one of these. it clears everything [ame="http://www.ebay.com/itm/Universal-3-76MM-Mushroom-Short-Cold-Air-Turbo-Intake-Filter-Black-Purple-/231342711726?pt=Motors_Car_Truck_Parts_Accessories&hash=item35dd19a3ae&vxp=mtr"]Universal 3" 76mm Mushroom Short Cold Air Turbo Intake Filter Black Purple | eBay[/ame] they make them in different colors so you can find one to suit. what T are you referring to? can you post a picture?
 
WOW! You move fast. Looks great too.
You just gave me some inspiration, I just ordered the flange I need for my turbo. I may order a rebuilt distributor tonight.

What size was your oil filter sandwich? I bought a "T" fitting for all my stuff but I think I like your filter sandwich idea better.
 
Well, let's talk about the sandwich. It does work, it is functional, and was easy to install AFTER I modified it. I recommend you measure the stove pipe on the oil pump first because the adapters they give you fit the filter, and the pump, but DO NOT fit over the oil pump pipe. The inside diameter of the fitting needs to be bored out to the size of the pipe or a tiny bit larger to get it to work. I spent a good hour messing with it because I had to use a smaller drill bit to "machine" it out. The sandwich I bought is the same size as the oil pump ring. It all fits together like it was meant to be.

[ame="http://www.ebay.com/itm/111125155517?_trksid=p2059210.m2749.l2649&ssPageName=STRK%3AMEBIDX%3AIT"]http://www.ebay.com/itm/111125155517?_trksid=p2059210.m2749.l2649&ssPageName=STRK%3AMEBIDX%3AIT[/ame]

That's the one I bought if you are interested in doing the sandwich. Once I bored it out, installation was a BREEZE. SImple attach what you're going to attach to the sandwich, then place it on the pump, then Take your new filter, thread your modified bolt into it as tight as you can by hand, then slip the new assembly over the pipe and thread it onto the original threads and make sure it is seated inside the center hole of the sandwich. Clock the sandwich where you want it, then tighten the filter down by hand as you would notmally. The whole assembly sucks together real nice and tight. It's a pretty clean look once your done too.

I haven't gotten anywhere with the turbo setup today. I went to work all day, walked up the driveway, opened the hood, tried to sort out the ignition, went to start it a couple times, and no go. The battery is possibly dead or dying from all the fuel pump tests I did, because it will crank a couple times then just stop. Then you let it sit a minute - crank a couple times, then stop. I didn't spend more than 10 minutes with it before I realized I'm kinda tired, and even though the sun's still out, I'll have a ride to work tomorrow, and I can chill and I'm probably not in the mindset to work on the car right now.

The other day I did manage to get the new distributor in, and I set it to the same exact position I removed the old one from with the rotor pointed to a mark I measured off the old dizzy. I believe it is timed correctly enough on the dizzy to start, so that's not the issue (I hope) I believe I have created a mess in my mind with wiring. I need to re-look up the slant six stock wiring colors, because lucky me, both wires attached to my coil were dark blue... or I'm color blind. I am also assuming it could be because I left the ballast in line and trying to use msd at the same time. If only this system would fire without msd... would it? Could I just simply fire this setup like my pertronix? Or no? That one the two wires from the dizzy were just attached to the coil, with no ecu.

My stock fuel pump also apparently retained some fuel as it was spraying some when I was cranking. I'll have to drain that. Like I said, not really a good idea to start back up when you're wound down. Also if anyone's in the area and would like to come help me with this if I'm still at it Saturday, I'll like buy lunch or something.
 
coming along nicely. i had the same problem with the filter, i ran one of these. it clears everything http://www.ebay.com/itm/Universal-3...Parts_Accessories&hash=item35dd19a3ae&vxp=mtr they make them in different colors so you can find one to suit. what T are you referring to? can you post a picture?

4 pictures from the bottom of my huge picture post.

Trace the orange air line from the turbo compressor housing, down, you'll see where it attaches to the manual bleed. Before that, is a black T that is pretty invisible, but you'll see where the line splits. It is a one-way check valve, and has a T off the other side.
 
twins! Keep going!
IMG_20140923_155806_zps572edb0a.jpg

DSC00025.JPG
 
Also if anyone's in the area and would like to come help me with this if I'm still at it Saturday, I'll like buy lunch or something.

I'd love to take you up on that; we could go to Pappagattso's in Walnut Creek; I haven't had one of their delicious square pizzas in a while. :(

You see, although I am now located in Conway, (suburb of Little Rock) Arkansas, from 1980 to 1988, I lived in Walnut Creek CA, and from 1988, to 2004, I lived in Hayward so I guess we were all but neighbors back then.

I worked for the San Francisco Chronicle all those years, retiring at age 65, in 2004. I moved back to Arkansas that year, (where I had grown up.) Good move... bought a brand new, 3 bedroom, 2-ba, brick house for $129,000.00, and there is no smog car testing of any kind here, with an "antique" license plate fee for cars 25-years and older that is $17.00 and you never have to pay an annual renewal fee... ever.

The only thing I miss about Kalifornia is the weather, In and Out Burger and the Round Table pizzas.. LOL! Yeah, I like to eat... LOL!

The intensity with which you have tackled this project is admirable, but I am hoping it's not so all-consuming that you experience burn-out; you have accomplished so much...

Wish I lived closer; we could do some serious bench racin;....:burnout: I probably wouldn't be of much help, but we could entertain each other; the first liar wouldn't stand a chance... :D

Keep up the excellent work!

Here's a pic of my house...
 

Attachments

  • 100_2819.jpg
    34 KB · Views: 394
Bill, I know what you mean. I moved to Washington state a few years ago to live in Bremerton because I thought it would be cheaper and I had friends in the Navy there who would be able to help me relocate and such.

It lasted of all of a year and a half. I was making good money for that area (like $18/hr) and was able to rent out a 5 bedroom house with a backyard that touched the water, a 2 car garage, and a private driveway with a wrap-around near the garage. I could fit about 30 cars in the wrap-around and it was in a wooded area with the nearest neighbors about 1,000 feet away. It was a great "party house." As such there were lots of parties there. Eventually my friends moved in to the extra rooms and alleviated me of a lot of the rent, and they were gone for 4 months at a time, so they really just needed a place to put stuff. Then I realized that in Washington, in winter, at this place, you paid an oil guy about $500 to fill the oil heater downstairs. If you did not have a functioning heater, then you were out of luck. $500 of oil lasted about 3 months, and if there was none - it was cold... so cold. Then it rained - every day. You'd get used to the rain. That was not a big deal, you just never washed your car because it was a waste of time. The issue was that water would get inside no matter what. Mold would grow everywhere no matter how hard you tried.

Then after a while my job did this thing where I was working for 2 months, and not getting paid the entire time. I kept writing letters to the CEO and asking for my money and never got it. I hadn't paid rent in 2 months and called the landlord, who was completely understanding. He said - don't worry about it. Give yourself 2 months to hopefully find another job, and if you can't pay me in 2 months, then just use that time to move in with family or something and don't worry about the money - we're square.

So I made a fire sale of all my stuff, called my brother and he came and got me and my girlfriend at the time, and drove whatever stuff I could fit in a pickup back to California.


But back to the car- I decided I'm going to take the new dizzy out, since it is introducing a new system that I am not familliar with, and take the advance/ retard pod off of it, then open up my magnetic conversion dizzy with the control unit already built in, and add the pod to that, and wrap something around the governor throws to close them up a bit. I know someone measured their throw opening with a caliper somewhere so I'm trying to find that to get an idea of what it is. I could also weld it I guess. That way I just plug that distributor back in, use the stock ignition, and we can see if this fires with minimal headache. In theory if the motor ran before, and it is getting fuel, air, and spark, it should run again. I just can't verify the spark till I do this.
 
Well, thinking I have a needle and seat issue and the motor is probably flooded. Upon trying to start the car fuel shot out the vent tube like no one's business. I'll need to dissasemble the carb again and see what the heck.

When the motor cranks, it keeps stalling - like not turning over and over - it will rotate...stop. Rotate. stop. roooooo-ta... stop. IT does this even while being jumped. It's acting like the starter is not getting enough power, but I'd think while being jumped it should.
 
Readjusted the float setting on the holley and still have the vent tube shooting gas as hard as the fuel pump can push it... this is starting to get frustrating.
 
for the flooding. check the regulator. did you run a return line? if so just cap the end of the feed and set the regulator to 3-4lbs. turning the screw in the middle in lessens the pressure. that slow cranking sounds like you have a dead or dying battery or a loose ground or connection somewhere. i had to chase a couple demons when i put my battery in the trunk. just a thought. keep up the good progress man you are so close.


i welded mine and used a dremel to clean it up to fit the posts back in the holes.
 
Well, thinking I have a needle and seat issue and the motor is probably flooded. Upon trying to start the car fuel shot out the vent tube like no one's business. I'll need to dissasemble the carb again and see what the heck.

When the motor cranks, it keeps stalling - like not turning over and over - it will rotate...stop. Rotate. stop. roooooo-ta... stop. IT does this even while being jumped. It's acting like the starter is not getting enough power, but I'd think while being jumped it should.

I think it may have way too much spark advance and is kicking back on the starter at cranking. Try retarding the spark about 7 or 8 degrees and see if anything changes, Let me know.
 
for the flooding. check the regulator. did you run a return line? if so just cap the end of the feed and set the regulator to 3-4lbs. turning the screw in the middle in lessens the pressure. that slow cranking sounds like you have a dead or dying battery or a loose ground or connection somewhere. i had to chase a couple demons when i put my battery in the trunk. just a thought. keep up the good progress man you are so close. i welded mine and used a dremel to clean it up to fit the posts back in the holes.

I finally founnd this photo on sl6.org a couple hours ago and welded the governer like you did in the pic, then cleaned it up. Mine's pretty close to .32

The battery functioned with the starter perfectly before. I was unaware that the screw in the center adjusted the fuel down as it screwed in. I turned mine all the way out... silly...

I assumed for some reason less pressure on the spring meant less fuel pressure. Also yes there is a return line. I'm going to try and lower the pressure and see if that helps. I swear the needle and seat are clean. I've taken the bowl off several times to check.

Also Bill, you wouldn't happen to know which way the dizzy is turned to retard timing? with it running I just check with a light, but I don't want to risk trying to get it to run too advanced. It seems odd because this is the original distributor marked and put in the same spot.
 
Well, I adjusted the screw down as far as I felt comfortable, and it seems like the pressure coming out of the carb vent is still the same. I have the vent tube extension in and it can drain about a quart of gas in a couple seconds into a bowl.

I don't want to attemp another startup till this is resolved... and without a car to get around and collect parts it seems I have made this rather difficult on myself. But then again, car stores around here tell you to go to a speed shop if you need a carb part, of which there are none nearby. I tried the needle and seat off a holley marine carb I had, which was in worse shape. It didn't work either... guess I should've expected that, but it was worth a try.
 
.32 is good. im actually thinking about opening mine up. pretty sure my setup can handle more timing. that and im looking for some more power.

crank that screw in. the difference between holding pressure and flooding is only 1-2psi. carbs are picky like that.

clockwise retards timing.


i just made one of the brpv's you were thinking about. the one with the nickle. still gotta put some threads on the shaft but it seems like it will work. gonna try an alternative to the jb weld and nickle for the block off. the hardest thing was getting the seat just right for the valve to seal. took two power valves to figure it out.
 
I cranked the screw all the way in. I looked up the aeromotive copy I purchased, and check this page out. I think I found my problem. Check the baseline psi... http://aeromotiveinc.com/products-p...gulator-adjustable-efi-2-6-inlets-1-6-return/ Also the gauge I finally looked closely measures in BAR, what a stupid mistake...

The version I actually bought lists it as being adjustable from 0. Would there be a difference in switching my in/out ports? The bottom is very obviously the return. I Allready found that one out. I want to know how well that nickle valve works. But essentially I got a non-functioning car at the moment to even start testing boost parts on... this sucks.
 
block off the line going to the carb and let the pump run then adjust the pressure. throw a pair of vise grips on the rubber hose. you could do it with the line hooked up to the carb but you wont know if you are close unless you can stop the flow.
 
thats not gonna work. see if you can return it and get one for a carb instead of fuel injection.

Yup, stupid mistake...

Well, I ordered a QFT regulator, spent the extra $25, but now I got to adapt from -6 to -8 at the regulator. At least $30 more right there... the cost of budgeting.

The qft is stock adjustable from 3-9psi, and then has a boost referencing port of 1:1.
 
all part of the experience. live and learn. if you do a search on www.theturboforums.com for regulators there are a couple options to make a boost referenced regulator. its pretty straight forward and cheap. there are regulators in the for sale section there from time to time as well. i got mine by starting a thread there asking about regulators in general. it was used but its like new and it was cheap.
 
-
Back
Top