Expire
Well-Known Member
Well, I figured that I mooched this forum long enough and now it's time to start some contributing...
A little background on this car before I begin.. I bought this car for $400 without ever seeing it in person, on a friend recommendation. I was also in the middle of moving when I got the call about it. Only got 3 pictures at the time, a front, back and an engine shot. Couple weeks go by and the P/O is pretty dodgy, didn't want me to pick it up yet, and some shady things like that. Eventually get the title and have it repo'd. The car had 3 flat tires, and my friend claimed "he couldn't see under it because it's wheels were flat." Before you ask, yes, I am dumb.
The overall goal:
I've always wanted a muscle car, but growing up in a family that never really was into cars, I was under the impression to own a car like this, you had to know a ton about them and practically be a mechanic. I figured I'm 21, single, have a good job and a disposable income, so there isn't really a better time to start learning. I really just want to learn a ton from this build so if something ever goes wrong with it, I built it from the ground up and will know exactly how to fix it. BUT if I can end up stuffing a 440 in this with some nice meaty tires, a good paint job, interior, wheels, with it all being structurally sound and safe to make a fun little weekender car I wouldn't be opposed to that either.. A lot of this build is going to be a ton of "Firsts" for me, like first motor swap, first paint job, etc etc.
So anyways, here we are.

Some nice info to add, the car hasn't moved since '92, it's a 74 gold duster with a /6. The previous owner parked the car with a full gas tank, and it now had a full tank of varnish.
First order of business was to fix the fact it couldn't roll, did some searching and picked up some nice wheels w/ tires from mrdodge on here. Was a great road trip out to Lancaster.
Next thing is to tackle some rust. I knew the car has some body rust, and a rot hole in the trunk. But I had no idea of the frame or floor boards. I was reluctant to tear the old musty carpet out because I didn't want to see what's under it. But like an STD test, you just got to suck it up and find out. To my surprise, it wasn't really all that bad. Couple holes here and there, but the car held both me and a friend while we were vacuuming it out. Banged around on it a bit, seems pretty solid. But that's the next step is patching.
Here's some interior shots...
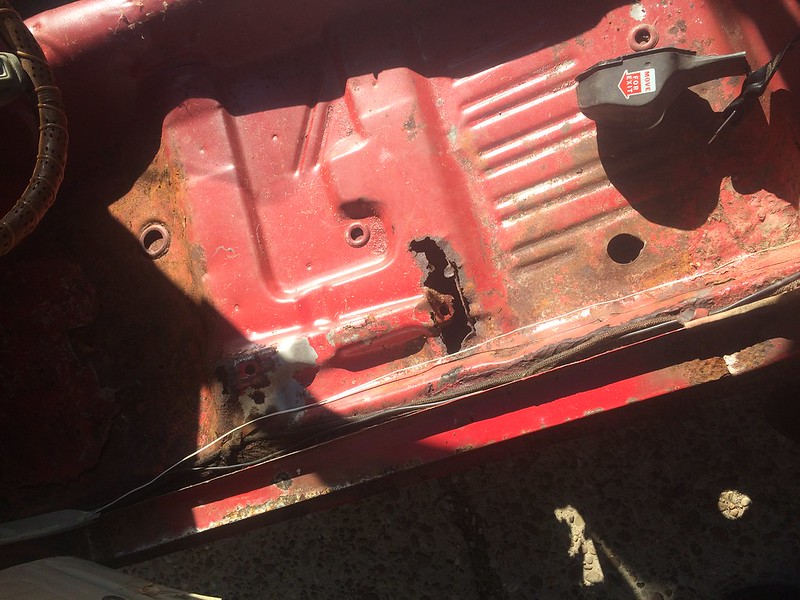
Driver floor pan, rusted seat bracket.
Under driver's dash, looks to be mostly chipping paint

Passenger's Rusted seat bracket.

Under passenger's dash, rust, couple holes here and there

Crack free dash though, which is nice

Yup, that's the end of this first update, I should have a gas tank coming in the mail pretty soon, so that will be next, along with fixing these rust holes.
A little background on this car before I begin.. I bought this car for $400 without ever seeing it in person, on a friend recommendation. I was also in the middle of moving when I got the call about it. Only got 3 pictures at the time, a front, back and an engine shot. Couple weeks go by and the P/O is pretty dodgy, didn't want me to pick it up yet, and some shady things like that. Eventually get the title and have it repo'd. The car had 3 flat tires, and my friend claimed "he couldn't see under it because it's wheels were flat." Before you ask, yes, I am dumb.
The overall goal:
I've always wanted a muscle car, but growing up in a family that never really was into cars, I was under the impression to own a car like this, you had to know a ton about them and practically be a mechanic. I figured I'm 21, single, have a good job and a disposable income, so there isn't really a better time to start learning. I really just want to learn a ton from this build so if something ever goes wrong with it, I built it from the ground up and will know exactly how to fix it. BUT if I can end up stuffing a 440 in this with some nice meaty tires, a good paint job, interior, wheels, with it all being structurally sound and safe to make a fun little weekender car I wouldn't be opposed to that either.. A lot of this build is going to be a ton of "Firsts" for me, like first motor swap, first paint job, etc etc.
So anyways, here we are.
Some nice info to add, the car hasn't moved since '92, it's a 74 gold duster with a /6. The previous owner parked the car with a full gas tank, and it now had a full tank of varnish.
First order of business was to fix the fact it couldn't roll, did some searching and picked up some nice wheels w/ tires from mrdodge on here. Was a great road trip out to Lancaster.
Next thing is to tackle some rust. I knew the car has some body rust, and a rot hole in the trunk. But I had no idea of the frame or floor boards. I was reluctant to tear the old musty carpet out because I didn't want to see what's under it. But like an STD test, you just got to suck it up and find out. To my surprise, it wasn't really all that bad. Couple holes here and there, but the car held both me and a friend while we were vacuuming it out. Banged around on it a bit, seems pretty solid. But that's the next step is patching.
Here's some interior shots...
Driver floor pan, rusted seat bracket.
Under driver's dash, looks to be mostly chipping paint
Passenger's Rusted seat bracket.
Under passenger's dash, rust, couple holes here and there
Crack free dash though, which is nice
Yup, that's the end of this first update, I should have a gas tank coming in the mail pretty soon, so that will be next, along with fixing these rust holes.


