So, I decided to replace the quarter panel on the 66' and when cutting off the outer skin I found the inner wheel well lip gone. Some of the lip actually needed to go into the wheel well area.
Now this repair is the same way I've been doing this for over 35 years. Some have an issue with it, but it works and is do-able by almost anyone with some mechanical skills and a small welder.
If you don't agree with my methods- then use what you can and add your own. I like to spot weld in the replacement bendable metal but some people like to weld solid. Using this method allows for more movement (adjustment to match quarter) with less warping when welding to the wheel well lip on the new quarter repair panel. Again, the quarter is already off and the rot was removed to solid metal and all under coating is cleaned on the inside for proper connection with the spot welder tongs. Tacking with a mig welder is fine also. I just own a welding shop for the last 23 years so I have some really good tools that most home shops don't have a need for. Use what you got and good luck! Sorry for no before shots exactly of the quarter. I decided part way thru to start this "How Too." Some of these shots will give you a good idea what I started with. A really good New England car.


Metal is clean and prepped for work
This is available at most body shop supply shops and even panel suppliers. I call it wheel lip material but it goes by other names. It's bendable but strong. Cut to fit and have at it. This strip cost me like $8.00 for 36" strip.

This is the product cut to fit, a slight 3/8" bend in the fingers to mimic the factory wheel bend. Make sure you clean both sides of the metal in case of surface corrosion or rust before welding.

This is my Miller 220v spot welder. It's a heavy duty spot welder made for thicker sheet metal and duplicates many of the factory spot welds. It also works well because it allows more movement of the metal. If welded solid - it's okay but the welded shape kinda rules the job then. Also, when you try to "tweek" the metals to fit the new outer lip for tight contact.... it's tough.

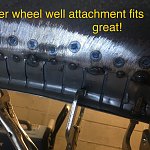
Once the tabs are welded and solid to the car inner fender, using a block on the backside tap the tabs as tight to the inner fender as possible- the curve of the inner wheel well and the flat tabs sometimes separate or lift up. Welding more of a metal tab when The tab won't stay to the wheel well. Get it as Tight as possible, then grind the surface and the welds down a bit also. Too much weld height will not allow the outer quarter replacement panel to fit tight.

Now the controversial part: I prefer to "seal" the inside parts to each other with USC all-metal. Do not use on any metal that still requires welding. This stuff does not like welding and fires can happen. This stuff to me Mixes like plastic filler but it has metal in it and seals solid. If you want to use anything else it's okay- this has worked for me for over 35 years and no issues unless the metal under it as long as the metal was roughed up and clean. Once dry, sand down smooth to eliminate any rough areas so the outer skin fits tight if it needs too. Every car inner wheel well and outer quarter skin fit differently so double check all parts. You can leave the repair bare metal or just paint but anywhere moisture can get in... it will. I even use the all metal to seal between the tabs (its only like 1/16" of an inch)

Remember, the new inner wheel well repair strip is like 36" long new. You may need more or less to do your job. You may also need to do it in sections to accommodate the angles or contours.
Here are a few pics from the inside out after the replacement quarter panel patch is vice griped up.


Here is where the fun begins. Line up the panel and weld in spots about every inch with a "tack" I use 75/25 argon/ C02 mixture and a good brand name .023" E70s welding wire. Flux core wire is not good to use for body work- too much possibility of flux left behind on the weld. My personal welding wire choice is made by Harris or Esab welding wire for my machine for this type of work. It is an easy grind, which means less heat while grinding. I also like the fact it takes less heat while welding as well. Again, less heat less warpage.


Bottoms up.

Welding the panels together using the spot welder.

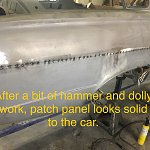
Tight fit is needed. Hammer and dolley gently to bring the two lips together.
At this point you want to grind offf any surface oxidation, clean the metal and then rough it up a bit for more All-metal. Once the all-metal seals up the area, sand down the surface for a cleaner look. Make sure there are no holes or gaps because they will appear the first time you light up the tires and the car fills full of tire smoke.

This is the finished product of the lower leg of the inner qrt and the outer quarter. They end up at diffrent lengths. Where the two "roll" together that is where you weld and then cut off the extra with a whizzer cut off wheel.
TO BE CONTINUED: Ran out of room. I will finish article in next instalment.
Now this repair is the same way I've been doing this for over 35 years. Some have an issue with it, but it works and is do-able by almost anyone with some mechanical skills and a small welder.
If you don't agree with my methods- then use what you can and add your own. I like to spot weld in the replacement bendable metal but some people like to weld solid. Using this method allows for more movement (adjustment to match quarter) with less warping when welding to the wheel well lip on the new quarter repair panel. Again, the quarter is already off and the rot was removed to solid metal and all under coating is cleaned on the inside for proper connection with the spot welder tongs. Tacking with a mig welder is fine also. I just own a welding shop for the last 23 years so I have some really good tools that most home shops don't have a need for. Use what you got and good luck! Sorry for no before shots exactly of the quarter. I decided part way thru to start this "How Too." Some of these shots will give you a good idea what I started with. A really good New England car.
Metal is clean and prepped for work
This is available at most body shop supply shops and even panel suppliers. I call it wheel lip material but it goes by other names. It's bendable but strong. Cut to fit and have at it. This strip cost me like $8.00 for 36" strip.
This is the product cut to fit, a slight 3/8" bend in the fingers to mimic the factory wheel bend. Make sure you clean both sides of the metal in case of surface corrosion or rust before welding.
This is my Miller 220v spot welder. It's a heavy duty spot welder made for thicker sheet metal and duplicates many of the factory spot welds. It also works well because it allows more movement of the metal. If welded solid - it's okay but the welded shape kinda rules the job then. Also, when you try to "tweek" the metals to fit the new outer lip for tight contact.... it's tough.
Once the tabs are welded and solid to the car inner fender, using a block on the backside tap the tabs as tight to the inner fender as possible- the curve of the inner wheel well and the flat tabs sometimes separate or lift up. Welding more of a metal tab when The tab won't stay to the wheel well. Get it as Tight as possible, then grind the surface and the welds down a bit also. Too much weld height will not allow the outer quarter replacement panel to fit tight.
Now the controversial part: I prefer to "seal" the inside parts to each other with USC all-metal. Do not use on any metal that still requires welding. This stuff does not like welding and fires can happen. This stuff to me Mixes like plastic filler but it has metal in it and seals solid. If you want to use anything else it's okay- this has worked for me for over 35 years and no issues unless the metal under it as long as the metal was roughed up and clean. Once dry, sand down smooth to eliminate any rough areas so the outer skin fits tight if it needs too. Every car inner wheel well and outer quarter skin fit differently so double check all parts. You can leave the repair bare metal or just paint but anywhere moisture can get in... it will. I even use the all metal to seal between the tabs (its only like 1/16" of an inch)
Remember, the new inner wheel well repair strip is like 36" long new. You may need more or less to do your job. You may also need to do it in sections to accommodate the angles or contours.
Here are a few pics from the inside out after the replacement quarter panel patch is vice griped up.
Here is where the fun begins. Line up the panel and weld in spots about every inch with a "tack" I use 75/25 argon/ C02 mixture and a good brand name .023" E70s welding wire. Flux core wire is not good to use for body work- too much possibility of flux left behind on the weld. My personal welding wire choice is made by Harris or Esab welding wire for my machine for this type of work. It is an easy grind, which means less heat while grinding. I also like the fact it takes less heat while welding as well. Again, less heat less warpage.
Bottoms up.
Welding the panels together using the spot welder.
Tight fit is needed. Hammer and dolley gently to bring the two lips together.
At this point you want to grind offf any surface oxidation, clean the metal and then rough it up a bit for more All-metal. Once the all-metal seals up the area, sand down the surface for a cleaner look. Make sure there are no holes or gaps because they will appear the first time you light up the tires and the car fills full of tire smoke.
This is the finished product of the lower leg of the inner qrt and the outer quarter. They end up at diffrent lengths. Where the two "roll" together that is where you weld and then cut off the extra with a whizzer cut off wheel.
TO BE CONTINUED: Ran out of room. I will finish article in next instalment.