1965 Dodge Dart Charger

-
Last Friday I was able to get some isolation material. I have searched all over, talked with saddle makers, horse carrige guys and guys restoring old coaches, sofas and chairs. Nobody has ever seen this isolation repopped. However all of them had seen the old isolation!!:banghead:

So if this will be as close as I can get I started out by cutting the left front side and making two so there will be the same thickness. After getting them done and laying them out on the floor I can understand why there is such a difference between the isolation on a repopped carpet versus the factory style.

I was also able to solve the electrical problen. It was a hair thin crack on one of the connections on the backside of the instrument cluster. But I had an NOS one that I bought from Don (65 dartman). Now I just need to solder the other one for the wagon.

Now everything lights up as it should. Dan! I can see the importance of getting the right bulbs. All lights have the same luster, both on the dash and on the instrument panel.
 

Attachments

  • 002.jpg
    31.1 KB · Views: 751
  • 003.jpg
    40.5 KB · Views: 743
  • 004.jpg
    44.4 KB · Views: 741
  • 005.jpg
    7.2 KB · Views: 701
Let there be light!

You are so right Dan.

Last weekend I got a package with the outer rear window trim. At least I thought so. The seller shipped the inner window trim!!!:banghead::banghead:

Today my buddy helped me out in an unexpected way. My friend Johan has super nice super clean mouldings on his sweet 65 Dart 270. He offered them to me and I can get his replaced later! I was blown away of his kindness. Thanks Johan! This will really help me reaching the finishing line.

So I started to peel off the black cement that keeps the sealing tight. The smell of gasoline was crazy! I need to find a better way of doing this.
 

Attachments

  • 001.jpg
    30.9 KB · Views: 706
A small package arrived today at my doorstep from Don (65 dartman). Inside was some rechromed quarter panel letters saying "DART"!

From the beginning I thought that this will do it before I found NOS letters. After comparing these to all NOS letters I have I must admit that they are dead on compareble to NOS ones. Thanks Don for super letters of the year!
 

Attachments

  • 001.jpg
    30.2 KB · Views: 701
A small package arrived today at my doorstep from Don (65 dartman). Inside was some rechromed quarter panel letters saying "DART"!

From the beginning I thought that this will do it before I found NOS letters. After comparing these to all NOS letters I have I must admit that they are dead on compareble to NOS ones. Thanks Don for super letters of the year!

You're welcome my friend! One less thing to find and a step closer to the end. Save your NOS letters for another project!
 
Today was the assembly of the antenna. I was able to get the right model incl the right "thing" that goes just under the fender.

After that it was time to mount the rear inner splash shield. Now is everything in order.

Question! Was the tab in the wheel house opening painted black or just covered with undercoating?

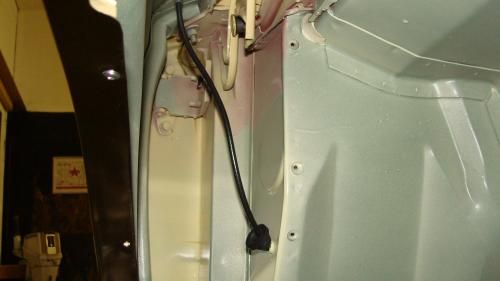
Hi Ulf, I'm looking for that rubber grommet for the radio cable pictured here. Do you know where to get one? Thanks, Robert

radio_grommet_zps2227e223.jpg
 
The NOS letters on the side was excellent but now I did add the rechromed ones from Don. It looks awesome.

However while getting the nuts I comparedthem with theones offered at Ebay as NOS nuts for emblems. First of all these nuts has a stamping PAL. Not sure what it stands for but someone might have answer for me?
Compared to a new one they factory ones has a larger "washer".

So now it looks like it did on the inside of the trunk as well!

The rear window mouldings has been going through a sanding and polishing process so they looks like new. Adding them was easy. But, the clips that goes on the inside has a wrong angle with the result that it can't lock the inside chrome moulding!

Next job will be to get the angle right.
 

Attachments

  • 012.jpg
    15.7 KB · Views: 649
  • 015.jpg
    26.9 KB · Views: 636
  • 014.jpg
    19.4 KB · Views: 616
  • 011.jpg
    15.5 KB · Views: 636
  • 009.jpg
    31 KB · Views: 624
  • 008.jpg
    16.4 KB · Views: 597
  • 007.jpg
    20 KB · Views: 618
  • 006.jpg
    30.4 KB · Views: 631
  • 005.jpg
    29.8 KB · Views: 639
  • 003.jpg
    19.4 KB · Views: 625
This morning I had a goal to get the next rear window moulding done. It needed to get some dings corrected and then alot of sanding. 5 hours later and it was done.

I bought the clips from a vendor that sells lots of NOS and repopped items. The only issue is that the anle is different then factory units. I adjusted it with a plier. Now you can see the difference! Now it will hold the inner moulding.

Now the rear window trim is done and tomorrow will the last clips go there and add the rear window weatherstrip.

Re the DART GT door emblems that goes on the inside I must admit that I haven't been over welmed impressed by the result. On the website Tradera here in Sweden I was able to locate a set that was in mint condition. My plan is to stick with them instead. I can keep the rechromed Dart emblems or sell them.
 

Attachments

  • 003.jpg
    33.8 KB · Views: 625
  • 002.jpg
    35.3 KB · Views: 603
  • 008.jpg
    17.2 KB · Views: 611
  • 005.jpg
    16.2 KB · Views: 606
  • 004.jpg
    20.8 KB · Views: 615
  • 001.jpg
    34.3 KB · Views: 602
When I was to find a NOS rear window gasket I failed. I haven't found one so I asked around and the best recommendations were the Steele gasket.

Today I opened the bag with the weatherstrip gasket and mounted it towards the opening for the window so it can start taking shape before final assembly. It seems to be a Little small but I guess that's better so it seals better around the glass.

I also I found out that 3 clips were missing. I found 3 that was almostmint so I will have to glass bead them later on.
 

Attachments

  • 001.jpg
    29.4 KB · Views: 596
Have you tried clips and trims out of the car?

Yes, but not the rear ones. Reason is that they mounts to the body. However I have compared and adjusted the trim on the working bench so I know all of it have a good fit.

Tonight glass beading was on the agenda. 10 minutes of glass beading and then some primer and finally black paint. They will be mounted tomorrow night.

I talked with a friend of mine and he suggested me to mount the rear weatherstrip on the window instead of the body. Is there any advantages of doing that?
 

Attachments

  • 005.jpg
    31.5 KB · Views: 539
  • 004.jpg
    34.2 KB · Views: 548
  • 002.jpg
    33.9 KB · Views: 536
Ok! The last clips in place with correct screws.

I took the advice to put the weatherstrip on the rear glass and that was quite a challenge but now it's there.

I did cut the last isolation for the front passenger floor. Next would be to cut up all the sewings on the carpet so I can peel off the heel pad.

The armrest pad was next. I took an NOS(NOT) green metallic old armrest pad w/ash tray and cut it apart. Now I could get an idea how the steel plate inside was done. It seems that there will be some drilling and then a small saw to open up the hole for the ash tray. Then just a small bend and we are ready to go!

So it was time to open up the white arm rest pad. I must admit that this product is great and I can highly recommend Laysons Restoration for these pads.
 

Attachments

  • 012.jpg
    30.4 KB · Views: 518
  • 006.jpg
    25.5 KB · Views: 508
  • 011.jpg
    34.7 KB · Views: 518
  • 010.jpg
    30.9 KB · Views: 534
  • 009.jpg
    32 KB · Views: 527
  • 008.jpg
    32.6 KB · Views: 508
  • 005.jpg
    35.9 KB · Views: 526
  • 004.jpg
    30.7 KB · Views: 527
  • 001.jpg
    37.7 KB · Views: 548
Today was the "take-off-the-heel-pad" day!

The heel-pad is glued to the carpet and then sewed into place. My plan is to take off the heel-pad and cut the carpet as it should be and then when I get the right heel-pad sew it in the correct place.

With a thin knife I was able to cut all the sewings around the heel-pad. Compare the sewn on hgeel-pad and the corrrect assembly line heel-pad! Quite a differenceI would say!
 

Attachments

  • 004.jpg
    20.1 KB · Views: 466
  • 003.jpg
    21.9 KB · Views: 481
  • 002.jpg
    24.8 KB · Views: 469
  • 001.jpg
    25 KB · Views: 464
On October 9 last year I was able to find a restoration shop that had factory correct undercoating. That took 5 years to find out!

Anyway, today it finally showed up. The reason for taking so long is that hazardous material must be shipped by sea. No air shipments.

So now I have a gallon of undercoating and a instruction sheet. I have read it and have an idea how to applay it. Is there anyone on FABO that has used this product before?

I would be very interested in techniques, air pressure, etc.

Thanks FABO:glasses7:
 

Attachments

  • 004.jpg
    37.2 KB · Views: 447
  • 003.jpg
    34.8 KB · Views: 454
  • 002.jpg
    25.7 KB · Views: 439
  • 001.jpg
    23.7 KB · Views: 449
Finally the front and rear carpet is in place and almost ready. Ijust need to add the black plastic bezel around the foot swith for headlights.

It takes quite sometime to cut the carpet the get the right propotions. But finally done! If I just had the heel pad and the rest could be done!:banghead:
 

Attachments

  • 006.jpg
    41.1 KB · Views: 412
  • 005.jpg
    35.2 KB · Views: 416
  • 004.jpg
    39.1 KB · Views: 434
  • 002.jpg
    41.4 KB · Views: 401
  • 001.jpg
    38.6 KB · Views: 426
The area on the A-piller post is the place where the factory placed the VIN tag on these cars. The two holes must have been pre-drilled before the sheet metal was welded together. Then a screw was added with a flat washer to keep away the rust,primer and the finally paint. The reason for that is that the VIN tag was spot welded with one dot on each end and that needed to be against the bare steel area on te A-pillar post.

Of cause I did NOT do it that way so now I need to take of that paint so a spot welding process can take place.

But my thoughts are about the spot welding. Is it possible to spot weld a stainless steel plate against a steel plate with the spot welder going from just one side?
 

Attachments

  • 003.jpg
    17.8 KB · Views: 323
The area on the A-piller post is the place where the factory placed the VIN tag on these cars. The two holes must have been pre-drilled before the sheet metal was welded together. Then a screw was added with a flat washer to keep away the rust,primer and the finally paint. The reason for that is that the VIN tag was spot welded with one dot on each end and that needed to be against the bare steel area on te A-pillar post.

Of cause I did NOT do it that way so now I need to take of that paint so a spot welding process can take place.

But my thoughts are about the spot welding. Is it possible to spot weld a stainless steel plate against a steel plate with the spot welder going from just one side?

I have one like this and it is possible with it.

http://www.ebay.com/itm/LENCO-LENCO...063?pt=LH_DefaultDomain_0&hash=item3f45e84ad7
 
I just pulled the VIN tag off the 65 Dart I'm parting out. No spot weld - just some kind of glue/epoxy. Just 2 little dabs and has stayed there since Apr 3, 1965. I can take a picture of the back side of the VIN tag if needed.
 
I just pulled the VIN tag off the 65 Dart I'm parting out. No spot weld - just some kind of glue/epoxy. Just 2 little dabs and has stayed there since Apr 3, 1965. I can take a picture of the back side of the VIN tag if needed.

Yes, please!
 
Over the past couple of weeks I have read this thread right through. What a fantastic job you are doing of this restoration. The knowledge on this board is quite amazing. I have found myself reading a post on here and then going out to the garage to check different items on my '66 Dart GT.

Looking forward to seeing the finished car.

Thanks Alf! Glad you enjoy it!

grimreaper! Thanks for sharing the information.

I took some pictures of my 65 Dartcharger convertible. It seems like this one is spot welded too.

By looking atthe A-pillar post I see marks of the spot welds. Looking at the VIN tag there is a spot weld on each side.

It might be that the Los Angeles plant spot welded the VIN tags on all cars. Is there anyone out there who can shoot a picture of a VIN tag on a Los Angeles built car? Also St Louis and Detroit built car. Then it might be possible to compare the way of attaching the tag.

Don (65 dartman) sent me a picture of a VIN tag from his Detroit built Dart. It looked like it was glued in place!
 

Attachments

  • 001.jpg
    17.2 KB · Views: 284
  • 004.jpg
    11.4 KB · Views: 280
  • 005.jpg
    37.3 KB · Views: 276
Dan! Don't you think the refelctive stripe was only on the doors? Not on the rear panels!

I was able to add the armrest on the drivers door and even picked up the NOS handle for the door. All of a sudden I forgot to take away the chrome moulding that is pressed into the panels. It even looked better!

The right side rear quarter is done too so now all there is to it is the passenger door.


I'm playing catch-up in reading this thread. Is the "reflective" strip actually the mylar strip through the center of the panel? I'm thinking it's only on the quarter panels to continue on from the piece in the door trim panels.
 
-
Back
Top