315x60x15's on my 64 Dart GT

-
Sweet!!! I d like to put a 10point cage , relocated leaf springs,frames connected,the whole deal. Right now its all modified, you can see a picture of mine on the about me page.
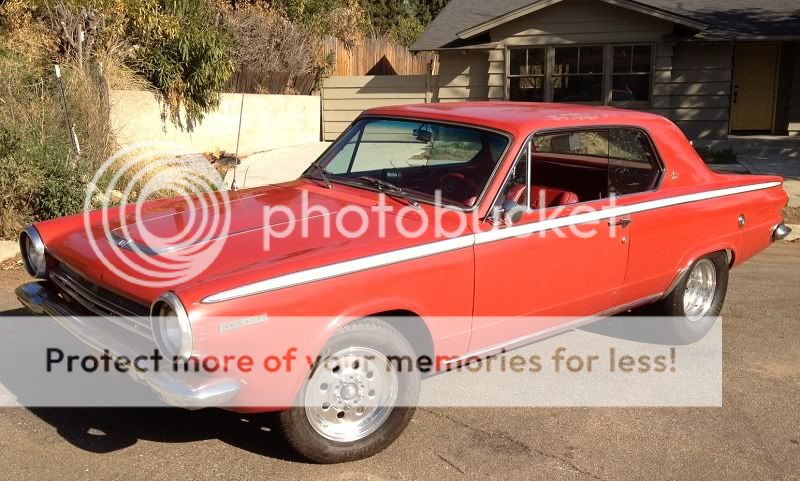
 
It has been a while, but I have finished this phase of the project. The car is now running and driving. Here are some current photos:

Dart2_med.jpg


Dart3_med.jpg


Dart4_med.jpg


Dart5_med.jpg


Dart7_sm.jpg


Dartfront3_4_med.jpg


There you have it, 315x60x15's on a running and driving 64 Dart.

Thanks,
OldMoparsRule!
 
How much higher do you think the car sits in the back with the SS springs, i need to update my springs but i do not want it to look like a 4x4 in the back.


looks nice i just got my Valiant running did the same thing in the back buy i run a 275/60
 
Sweet!!! I can't wait to get started on my 64 post Dart.

Mike


This tire requires a lot "fine tuning" in an Early A. With the width of my axle, I could have gone with .25 to .5 more backspacing...it is really close. I probably have .75 of clearance on the frame side, and .50 on the fender side.

A lot of people go with the 325x50x15 which is approx 2 inches shorter and .4 inches narrower.

I do not have a problem with the height, but the .4 inches may make things easier in some scenarios.

At this point, I have very little rubbing when driving. Every once in a while, in very specific situations (uphill, turning, and hitting a bump at the same time) I will hear minor rubbing. I think it is the axle moving sideways...but it is minor.

I am happy to answer any questions to help you with yours.

Thanks,
OldMoparsRule!
 
How much higher do you think the car sits in the back with the SS springs, i need to update my springs but i do not want it to look like a 4x4 in the back.
looks nice i just got my Valiant running did the same thing in the back buy i run a 275/60

Thanks! I am not sure how much over stock, as the leaf springs I took out were 48 years old and sagging. You should be able to adjust the leaf springs by flipping the spring hangers, which should get you close.

I hope this helps.

OldMoparsRule!
 
I love this car. One of my favorite on FABO. Nice job!

Thank you Very Much! I really appreciate the compliment!

This phase of the project took way too long...

I am looking forward to actually driving the thing, I started getting tired of looking at it in pieces.

Thanks again!

OldMoparsRule!
 
Looks great, nice job.
I would not even paint it, just drive and enjoy.
Throw a little horsepower in it when you get the time.
 
The size of tire looks good, mine tires are two wide for the rims. You done a really nice job!
 

Attachments

  • IMG_0263.jpg
    63.5 KB · Views: 512
Sweet ..... I'd love to alter the wheel base like the old kid goat and the chicago dealer with the checkered roof . Both cars had the staight axel ,HEMI , Dana . I like the color on your car . What color is it ?
 
Sweet ..... I'd love to alter the wheel base like the old kid goat and the chicago dealer with the checkered roof . Both cars had the staight axel ,HEMI , Dana . I like the color on your car . What color is it ?

Thanks for the feedback, it would be cool to do a straight axle awb car someday.

I am almost positive the paint is PP-1 Red (DT-3180/71203).

Thanks,
OldMoparsRule!
 
Also, what is the largest tire any of you know of under a stock early A body? I know you cant get much under there without the dreaded scrubbing.
 
I like the stance on this 64. It is just the way I would have done it. Nice car. It deserves a 800+ SB motor to go with that ground shaking look. LOL. I don't know where I got the picture of it on the street. But when I saw it I liked it and saved the picture to show my son.

hrdp-1205-brake-system-fixes-18.jpg
 
So, I spent the better part of the past 2 days working on the mini-tubs on the 64 Dart.

Here is a shot of the drivers side. You can see that I had to move the trunk support higher up on the wheel well. You can also see the original holes where we drilled out the spot welds. I have one more small patch of rust that I need to cut out, and then weld in the final filler panel. This was the first side I did, and I definitely learned from this side...the other side turned out better.

P1010099.jpg


Here is a shot of the passenger side. I had to make a large filler panel, and then weld in the patch panel. You can see that I needed to weld in piece of metal that runs the full length of the area that supports the upper shock mount. Once the last spot on the driver side is taken care of, all of the rust issues that were in the trunk will be taken care of. Besides this area, the car is rust free.

P1010101.jpg


Here is another closer shot:

P1010098.jpg


Finally, here is the shot of both wheel wells:

P1010100.jpg


I put on a quick coat of paint to see what it looked like...I need to clean up some of the seam sealer, but it is real close.

The nest step will be welding in the spring relocation kit. I think I will go with the $129 kit from Mancini's unless any of you know of a better kit.

Thank you!

OldMoparsRule!

I just stumbled onto this thread , looks pretty dam good to me !!
I want to do my 68 fastback, but too stiff to crawl up in there to weld it anymore ---------------
 
-
Back
Top