66 dart electrical problems

-
Done! Bad ground on the socket got a sharp pointed punch and dimpled it up between the socket and the housing! Thanks again to all that chimed in! Jim

Great!!!

You'd be far better off, however, on all 4 sockets...........to solder a pigtail to the socket shell and run it over to a bolted ground.
 
Great!!!

You'd be far better off, however, on all 4 sockets...........to solder a pigtail to the socket shell and run it over to a bolted ground.

I tried that on the 71 and couldn't seem to get it to solder? Actually, I tried to put a Bead of solder from the socket to the case.
 
Post what you have for an iron / gun. You need plenty of heat and or a large tip. I've bought COUNTLESS "old school" irons at swap meets and garage sales, some for under a buck. 80-100W and it needs to look "old," LOL

You don't want a "pencil" (radio / electronics) iron, you want something with at least a 1/4" or larger tip.

Stop by your local welding store and see if they can drum up some ELECTRIC SAFE "Nocorrode" (spelling?) brand name flux

You HAVE to scrape it clean, get it where you can work with it, and be able to get enough heat on it. You can's just stab the thing in there and pour solder at it, LOL

In the types of lamps where you can separate the socket from the housing (less heat is needed) you might get by with the "big" old Weller guns. These were model 3? something 330 350? and 5 something, 500? 550? You can sometimes find them used.

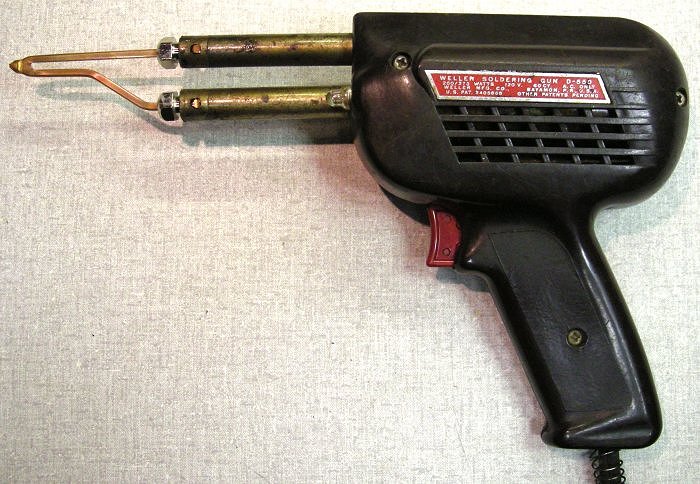
Here we go. 550 was the "king" of the Weller line. They were 275 watt, needed more than an iron because of the smaller tip

http://www.stevenjohnson.com/soldering/weller.htm

weller-d550.jpg


The smaller 18XX something series is the "radio" gun, and is not big enough for this work
 
Does not need to be quite this big, LOL. I once bought an old one LARGER THAN THIS as a joke gift for a friend. We used to have an entire library of "way too much power" jokes

(If you push the talk button on your handheld, and the antenna gets red, you might be running way too much power.

If the DRIVER amplifier is exceeding the legal amateur limit, you could be running too much power

If you have to get 480 3 phase installed to your station, you could be running way too much power)

304983d1344958643-recommend-soldering-iron-value-versatility-american-beauty-3198.jpg


Solderingiron.jpg
 
Thanks. That's great information. I will look around and see if I can get that done. I would like better grounds, now I have a better idea how to do it. I appreciate your help!
 
So I took another look at the 10 pin connector and sure enough, It matches the old harness, but not the new one. So, I pulled all the pins, matched by color according to the "real" manual and what do you know. Everything is working now except the flashers and one park light? Traced the flasher and definitely has power? So, all that being said, what the hell does this green light mean??

it (usually) means that one of your lights on the left side of the car is either bad or not getting a good ground. check the socket and ,,,ummm using a test light sort of poke it into the edge of the front parking light or socket flange to ground it to the housing. if it works then , it is a ground problem, you can solder it but you need a heavy duty soldering iron(like 67dart273 has in post 30 is best! (mines from the early 70's so I have no idea where you would actually get one like that now OR how much it'll cost!) to actually get it to solder to the housing. sand a spot off in the housing and socket for good joining. oh and see if you can find the pre-tinned paste to help adhere it to the steel. you have got to really heat it correctly and then tin it to get it to stick. remove or insulate the contacts for the bulbs so you don't cook the epoxy insulator for the contacts. dimpling the front sockets work for a bit bu usually will lose connection once weather/ corrosion get's back in there again.

Damn 67daart273 I LIKE that last one you posted a picture of. I used one a little bit smaller that that to spot repair tiny diesel radiators leaks when I was a kid. those suckers put out a ton of heat!
 
Getting ready to put the carpet in. Can someone tell me the correct routing for the console harness? Seems like I have way too much!
Thanks
 

Attachments

  • image.jpg
    38.7 KB · Views: 100
My guess would be you need to rotate so it follows the tunnel forward, and under dash at fire wall. That places it protected from feet traffic. It seems the length would be good for that.
 
Remember on the early cars the front parking lights do not come on with the headlights only with the headlight switch half pulled out> I think this changed in 68 to front parking lights on with the headlights.

Brian
 
Next question please. Hooking up my gauges, says to tie into the existing light circuit. Frm the map light, should I tie into the yellow or the pink for the feed? I'm in the pink right now, gauge lights only come on when the ignition is on, they don't come on with the dash lights when the ignition is off?
Any help is appreciated!
Jim
 

Attachments

  • image.jpg
    38.5 KB · Views: 71
Orange is the dash light feed coming from the light switch dimmer. Look at the radio connector. It goes to one of them. The oranges all come off one side of the 'inst' fuse which is at one end of the fuse panel

That is a trick circuit

The headlight switch has TWO separate power feeds TO it. One is headlights only

The second comes FROM the tail fuse, and powers tail, park, and dash lamps. That power goes through the switch, through the dash dimmer, and THEN goes to the inst. fuse on tan. Through the fuse, then out on orange wiring to all dimmer controlled lamps
 
-
Back
Top