You are using an out of date browser. It may not display this or other websites correctly.
You should upgrade or use an alternative browser.
You should upgrade or use an alternative browser.
68 4-door "Sleeper"
- Thread starter 4door68
- Start date
-
DARTGAME
SuPeRcHaRgEd
I would try stephen's performance on the e-brake piece
Ian
Ian
PanGasket
has cork sides
Try rock-auto yet??Thanks! I just bought a pair. Now, for the "brake-shoe-separator-lever" :sad:
Love the 4dr hemi dart. Very nice build. Going to keep an eye ob this thread.
I just purchased a 66 dart 4dr, factory 273 2 barrel car and will be building nice 360 to replace it. No pics as of yet, will post when I get it home.
I just purchased a 66 dart 4dr, factory 273 2 barrel car and will be building nice 360 to replace it. No pics as of yet, will post when I get it home.
Tawny Demon
Well-Known Member
What did you use to make the insert for the vent it is a really great idea?
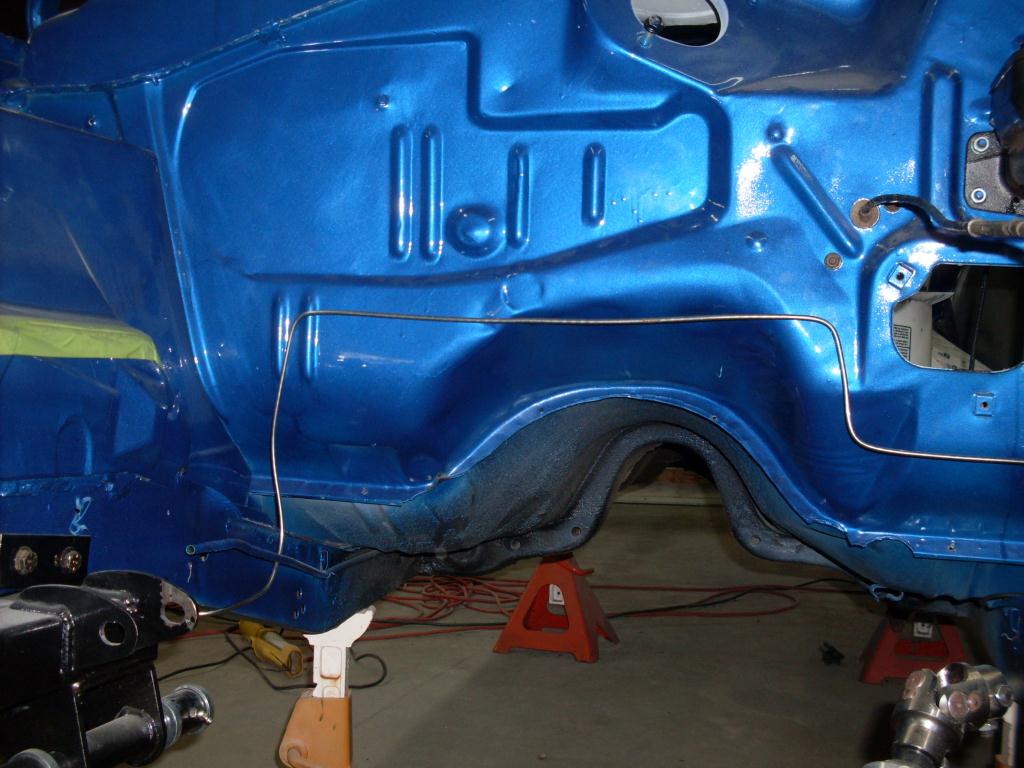
"The other thing that I have been working on is the driver's side vent. I showed before, the rust damage. (Picture below).
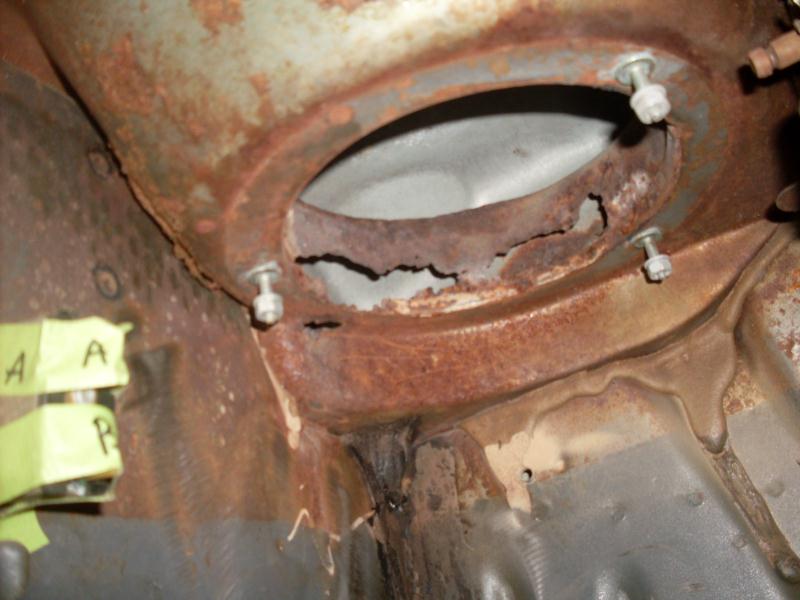
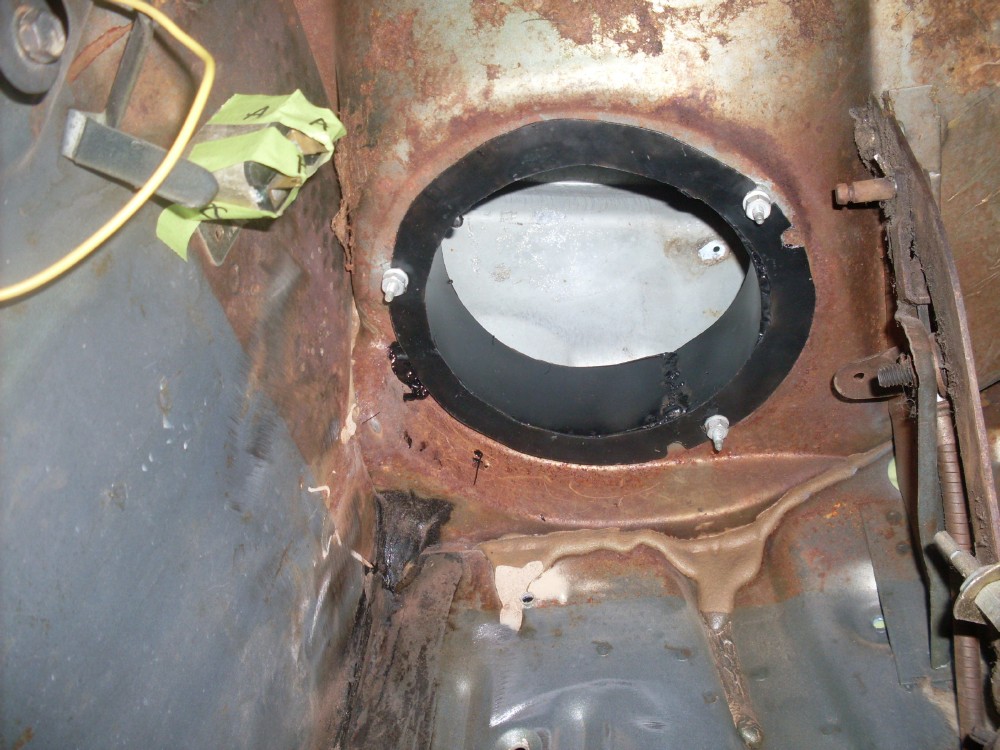
Instead of trying to create a new sheet metal vent and trying to make it look perfect, my goal is to make it last until I am dead. So, I fabricated a new vent, and then, I put a bunch of epoxy on the "lip" to seal it in there. It can't be seen and I will be dead before it rusts through. So, I am OK with my "fix". Anyway, here is the "fix".
"The other thing that I have been working on is the driver's side vent. I showed before, the rust damage. (Picture below).
Instead of trying to create a new sheet metal vent and trying to make it look perfect, my goal is to make it last until I am dead. So, I fabricated a new vent, and then, I put a bunch of epoxy on the "lip" to seal it in there. It can't be seen and I will be dead before it rusts through. So, I am OK with my "fix". Anyway, here is the "fix".
What did you use to make the insert for the vent it is a really great idea?
It was pretty simple, actually. I cut a sheet metal "ring" and used a die grinder with a carbide bit to put in the 3 notches where it bolts up. I measured the ID (inside diameter) of the "ring" (I think it was 6.25 inches) and multiplied it by "pi" (3.141592654) to get the inside circumference of the "ring" (19.635 inches). I then cut a 2 inch by 19.6 inch piece of sheet metal and rolled it into a circle to fit inside the "ring" and then welded it all up.
The only problem was the 3 notches. I had the "ring" upside down when I welded in the vertical piece and it didn't line up. That's why you see some extra notches in there.
I put a lot of epoxy around the "ring" and jammed it up in there and put the nuts on until it cured.
I haven't poured any water in the vents yet to see if it leaks, though. But, with as much epoxy as I put on there, I doubt it will leak.
It's been a while since I updated, so here it goes.
I bought some shock plates from Mancini Racing (thanks "DARTGAME"). They fit great.
I finished the steering column and brakes. I decided to remove the line-lock. I can see myself getting into trouble with that. Also, I ordered from Mancini Racing a new master cylinder, a power brake booster, and a master cylinder offset plate. (it should be here soon). I thought I could live with manual brakes, but I am getting old, so I want power everything.
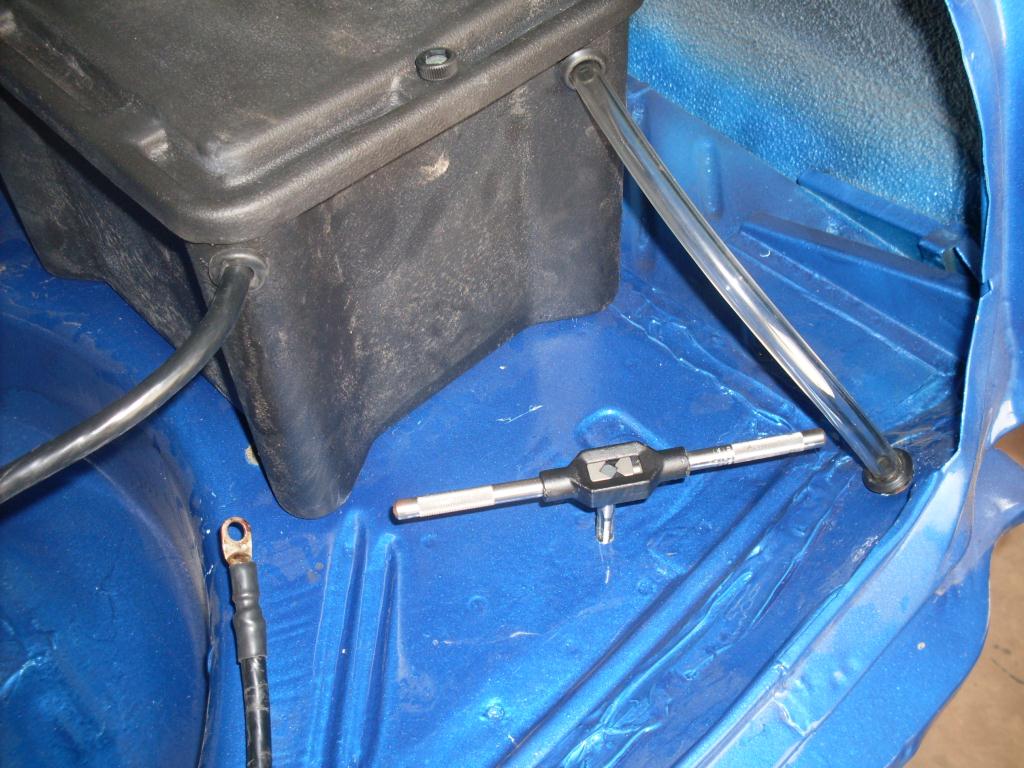
I also started on the wiring. I put the Summit rear mounted battery kit in the trunk and bolted it down.

I tapped the frame to mount the negative cable. I didn't want to have to use a nut. Plus, I feel like it gets better metal-to-metal contact being threaded like that.
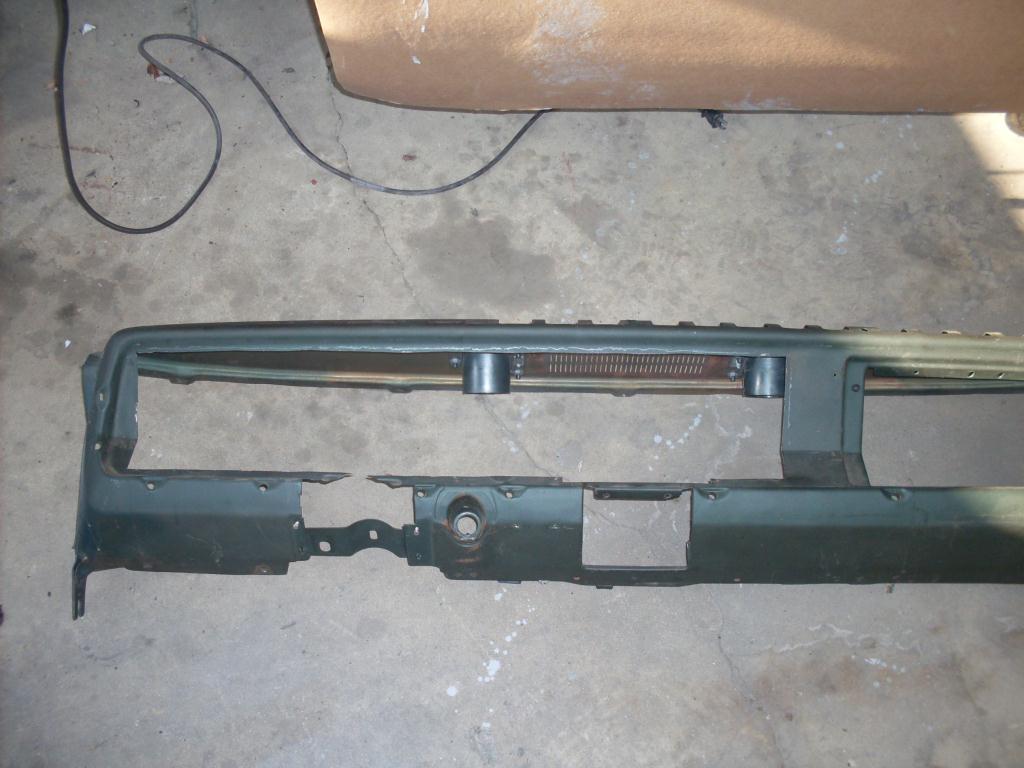
I began working on the dash, too. I cut some sheet metal out of the dash to put in my new dash.
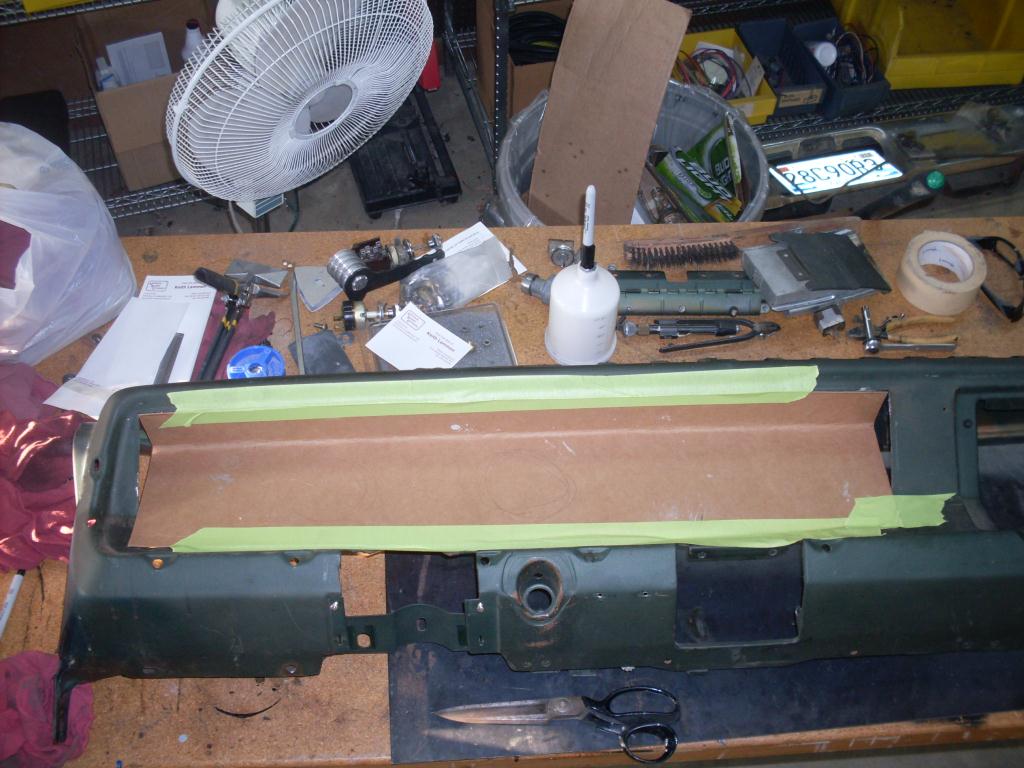
Then, I cut out a cardboard template that I will transfer to sheet metal.
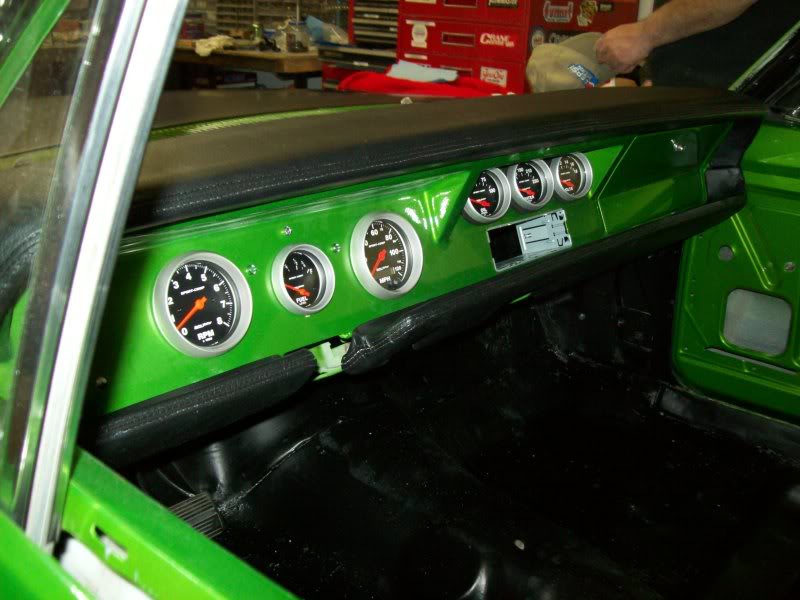
I ordered some guages from http://www.speedhut.com. I like the GPS based speedometer that they have. Plus, the guages look cool, too.
My inspiration for my dash is another one that I found here on FABO. (I can't remember who had this dash. I wanted to give you credit.)
As a reminder, I bought the Ron Francis wiring harness. I really like this wiring harness, too. Good instructions and every wire labeled every couple of inches.
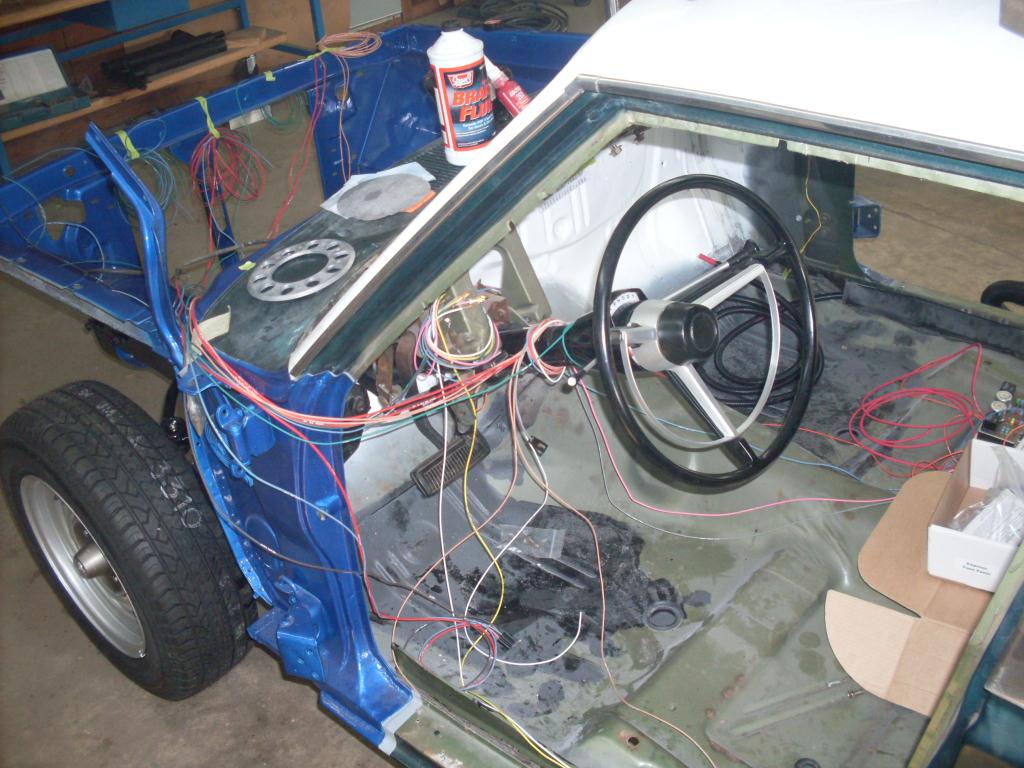
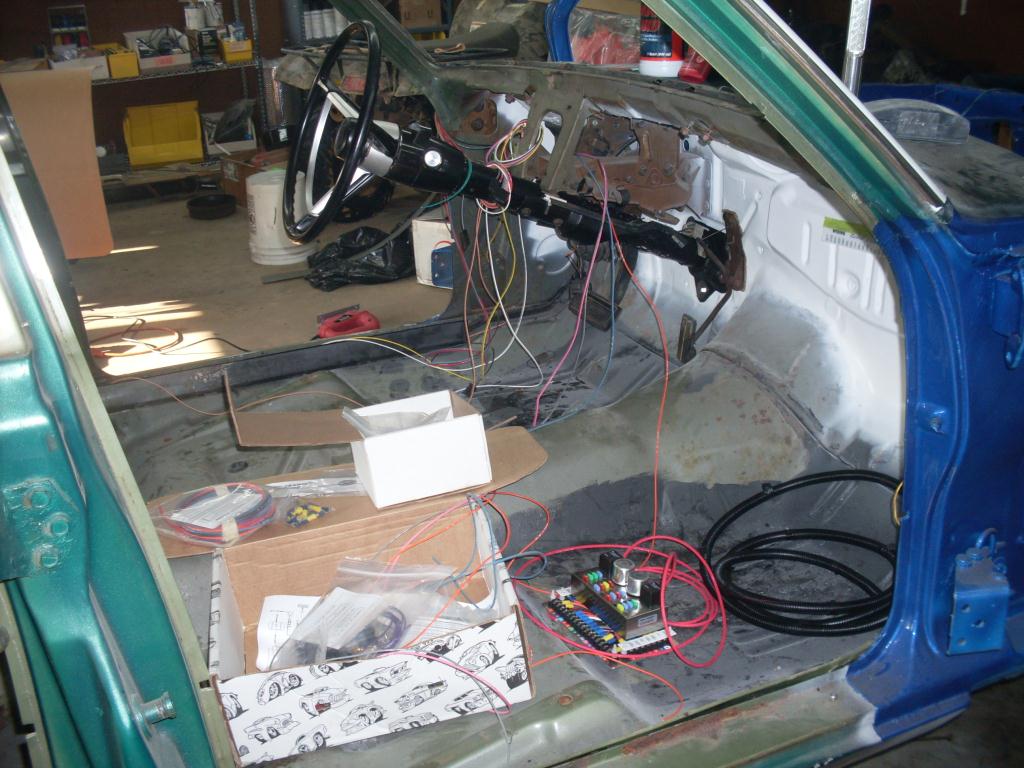
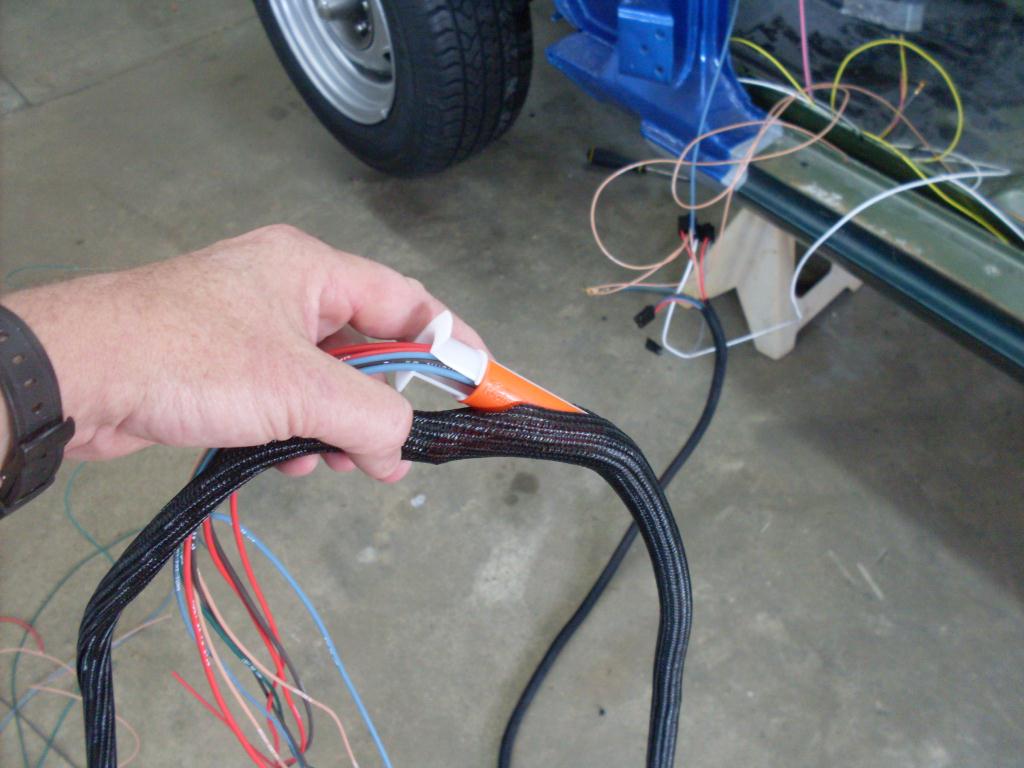
In addition to the wires, I bought some of the split braided wire loom and this kick-*** tool for getting the wires into the loom.
That's all for now. I will post more progress pics soon.
I bought some shock plates from Mancini Racing (thanks "DARTGAME"). They fit great.
I finished the steering column and brakes. I decided to remove the line-lock. I can see myself getting into trouble with that. Also, I ordered from Mancini Racing a new master cylinder, a power brake booster, and a master cylinder offset plate. (it should be here soon). I thought I could live with manual brakes, but I am getting old, so I want power everything.
I also started on the wiring. I put the Summit rear mounted battery kit in the trunk and bolted it down.
I tapped the frame to mount the negative cable. I didn't want to have to use a nut. Plus, I feel like it gets better metal-to-metal contact being threaded like that.
I began working on the dash, too. I cut some sheet metal out of the dash to put in my new dash.
Then, I cut out a cardboard template that I will transfer to sheet metal.
I ordered some guages from http://www.speedhut.com. I like the GPS based speedometer that they have. Plus, the guages look cool, too.
My inspiration for my dash is another one that I found here on FABO. (I can't remember who had this dash. I wanted to give you credit.)
As a reminder, I bought the Ron Francis wiring harness. I really like this wiring harness, too. Good instructions and every wire labeled every couple of inches.
In addition to the wires, I bought some of the split braided wire loom and this kick-*** tool for getting the wires into the loom.
That's all for now. I will post more progress pics soon.
dusterbd13
Well-Known Member
whered you get the tool? i do a lot of wiring, and that would make life much easier.
and the ron francis is a good kit. i dont like the terminals they send (the colored insulated jobbies), and throw them out and use fastenall brass.
also, a good tip is to use the fastenall adhesive lined heat shrink over all your crimps. makes them waterproof, and all but elimitanes the chance of them working loose.
Michael
Here is another update.
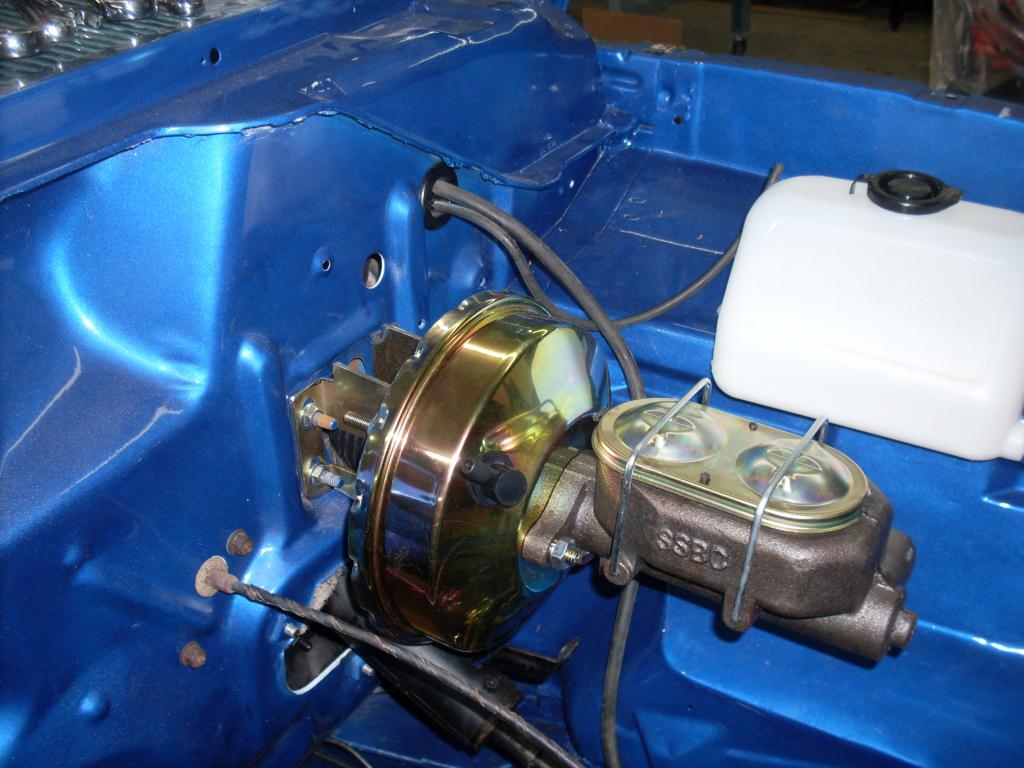
I bought an SSBC power brake booster and master cylinder from Mancini Racing. I had to do some modifications to the bracket that mounts to the firewall to make it fit flush.
I bolted it all up and checked for leaks. I wanted to test for leaks BEFORE I put the engine in. That way, it would be much easier to fix. I didn't have any leaks.
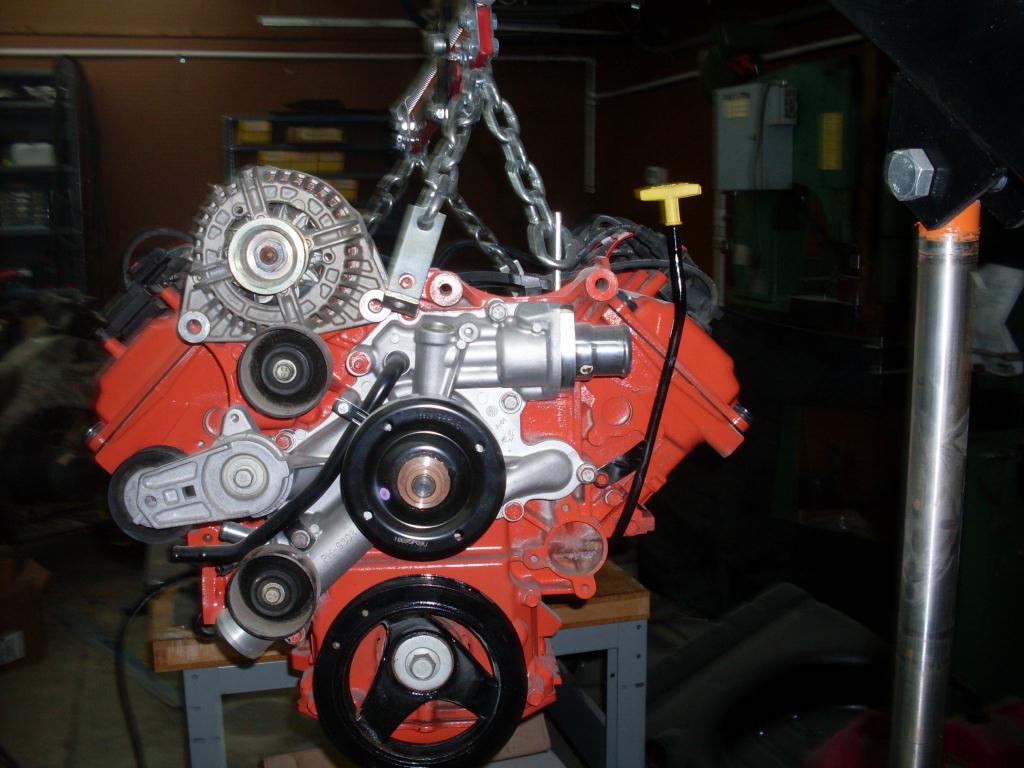
I decided it was finally time to put the engine in and see what kind of problems I will have to deal with... and I found a few of them.
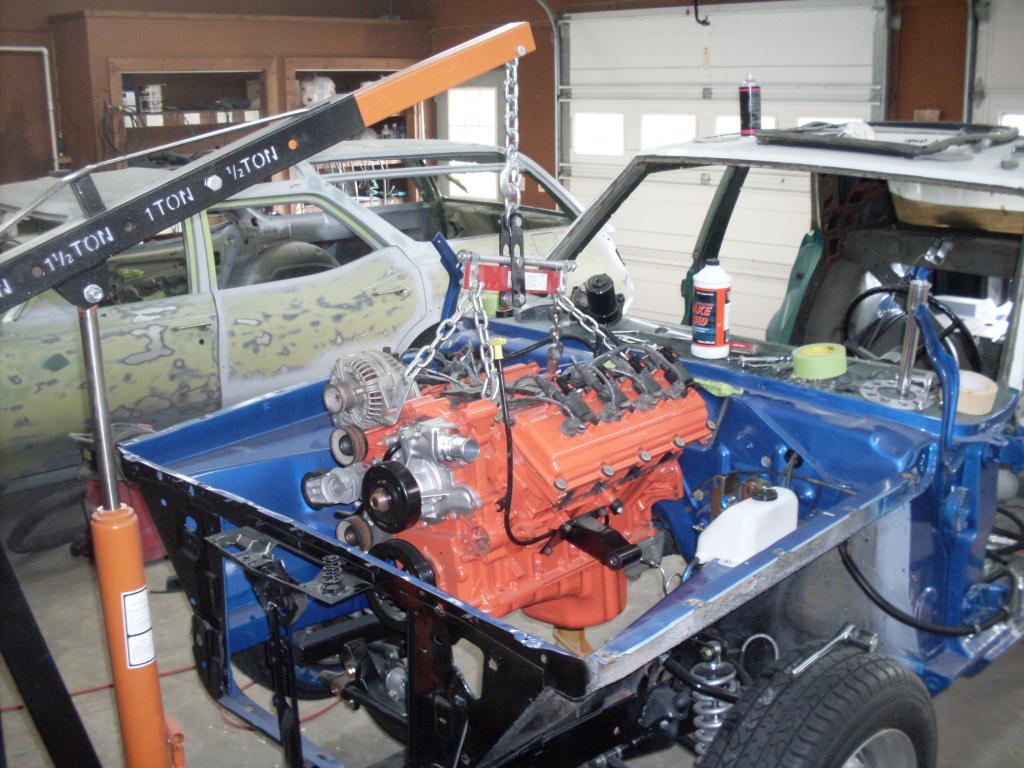
The first problem I discovered is that the head hits the steering column. I did some research at Reilly Motorsports webstie and it sounds like the have a steering column "shift plate" that moves the steering column over a little bit. I couldn't find it on their website, so I will call them tomorrow to see about getting one.
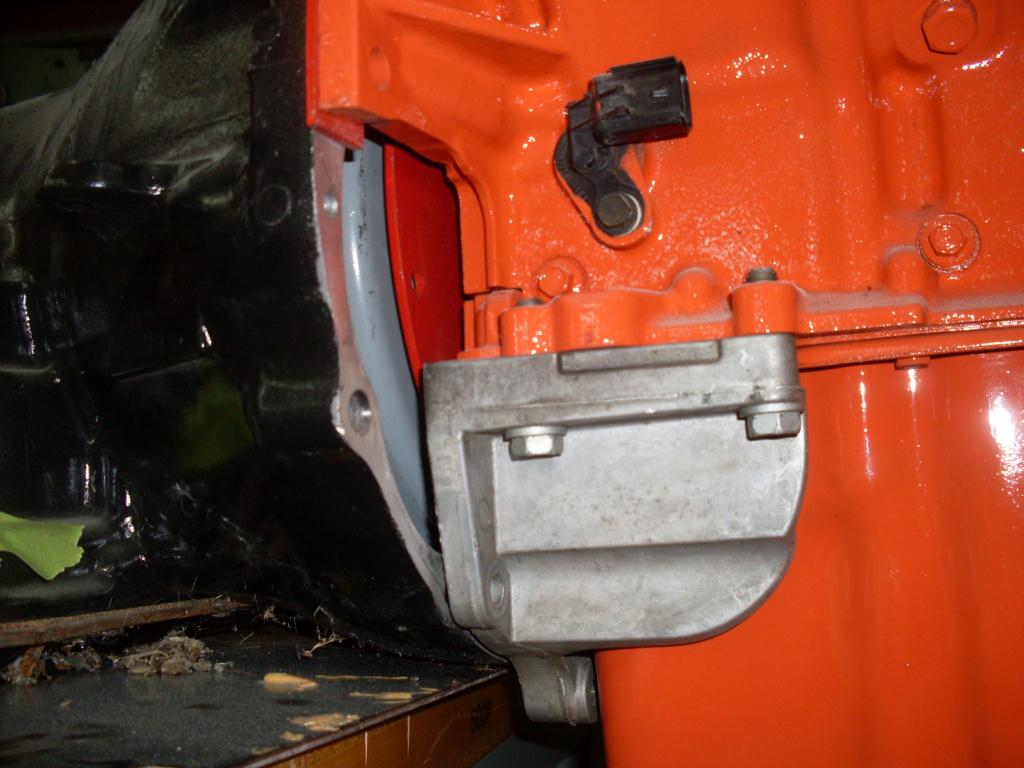
One good thing that I discovered is that the oil pan clears the power steering rack. I have a truck engine with the sump in the back so this worked out well.

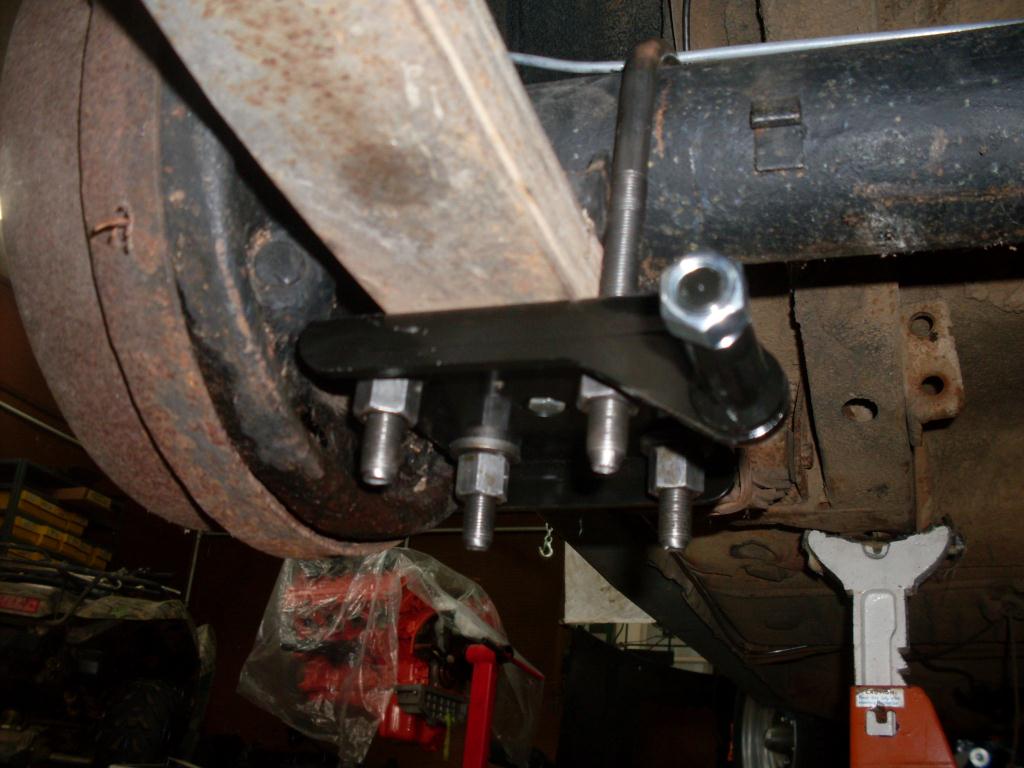
Another problem I discovered is that the motor mount is off by just a fraction of a cunt hair. I got the bolt into the motor mount on the passenger side and, as you can see in the pic below, the bolt won't go into the driver side motor mount. Also, you can see in the pic below that the head hits the steering column.
I bought an SSBC power brake booster and master cylinder from Mancini Racing. I had to do some modifications to the bracket that mounts to the firewall to make it fit flush.
I bolted it all up and checked for leaks. I wanted to test for leaks BEFORE I put the engine in. That way, it would be much easier to fix. I didn't have any leaks.
I decided it was finally time to put the engine in and see what kind of problems I will have to deal with... and I found a few of them.
The first problem I discovered is that the head hits the steering column. I did some research at Reilly Motorsports webstie and it sounds like the have a steering column "shift plate" that moves the steering column over a little bit. I couldn't find it on their website, so I will call them tomorrow to see about getting one.
One good thing that I discovered is that the oil pan clears the power steering rack. I have a truck engine with the sump in the back so this worked out well.
Another problem I discovered is that the motor mount is off by just a fraction of a cunt hair. I got the bolt into the motor mount on the passenger side and, as you can see in the pic below, the bolt won't go into the driver side motor mount. Also, you can see in the pic below that the head hits the steering column.
70DartMike
Too many projects
Great progress so far! Looks like its going to be fun squeezing the headers in there ;)
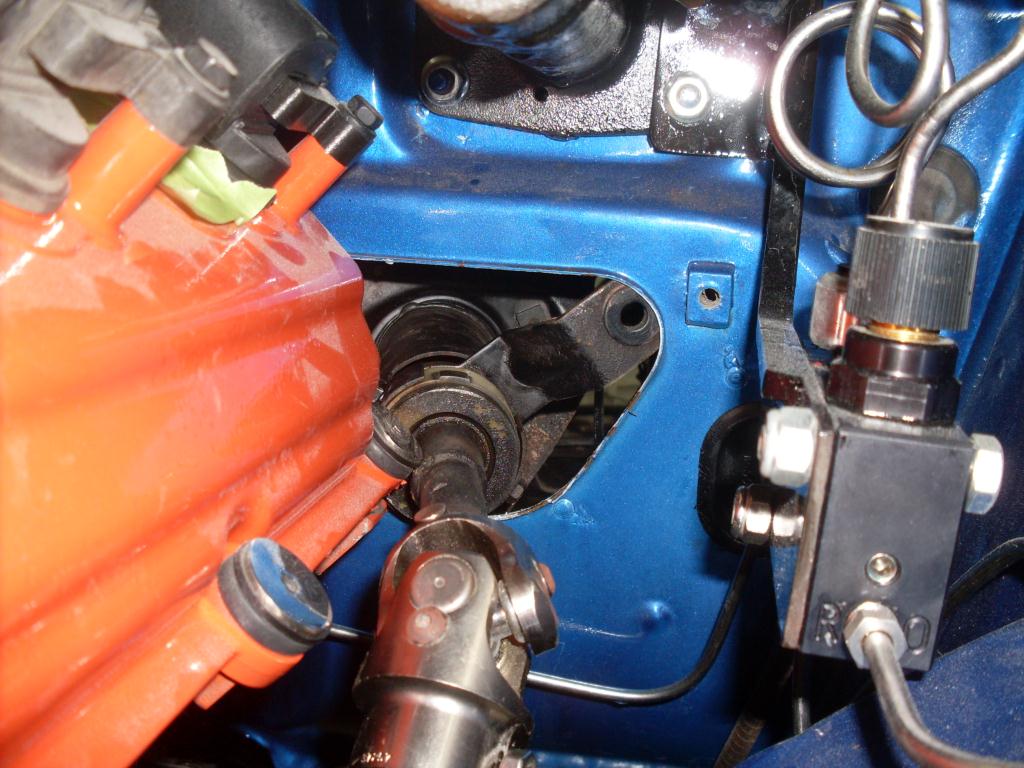
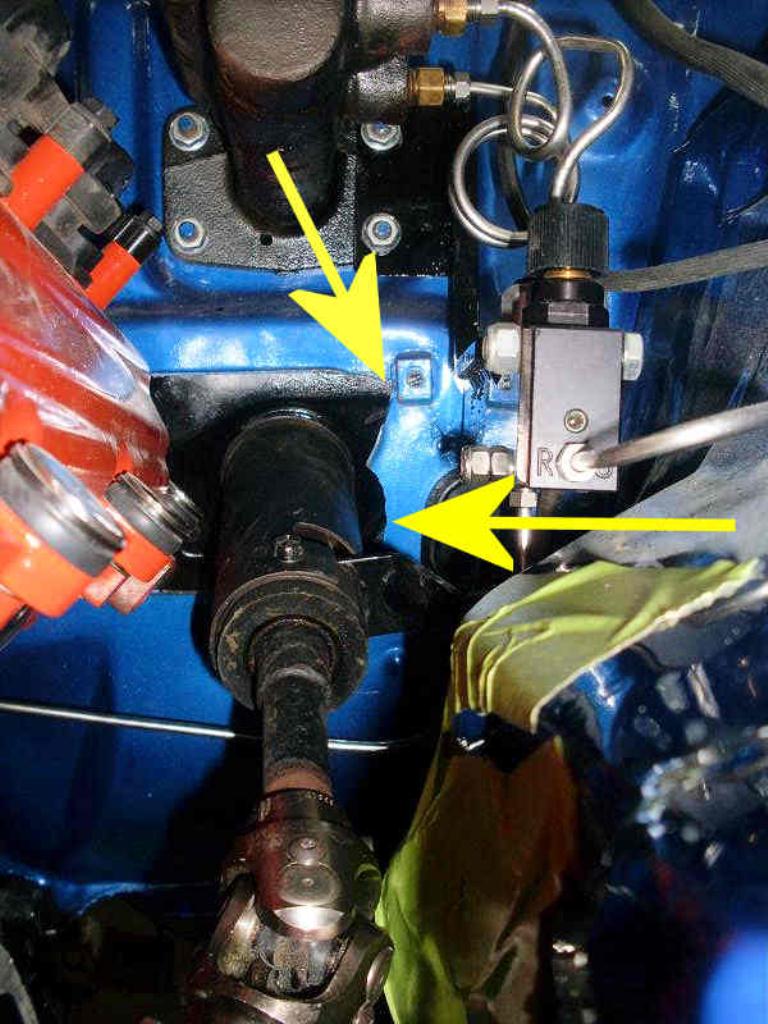
I had to move the proportioning valve. Where I had it before was right next to the header. I could just imagine the header cooking and boiling the brake fluid. So, I fabricated a backet to put the proportioning valve further away from the header. At first,I sprayed it with a cheapo can of restoleum, but as soon as the brake fluid touched it, it wrinkled. So, I sandblasted it an sprayed it with a black single-stage urethane paint. It holds up much better to the brake fluid.
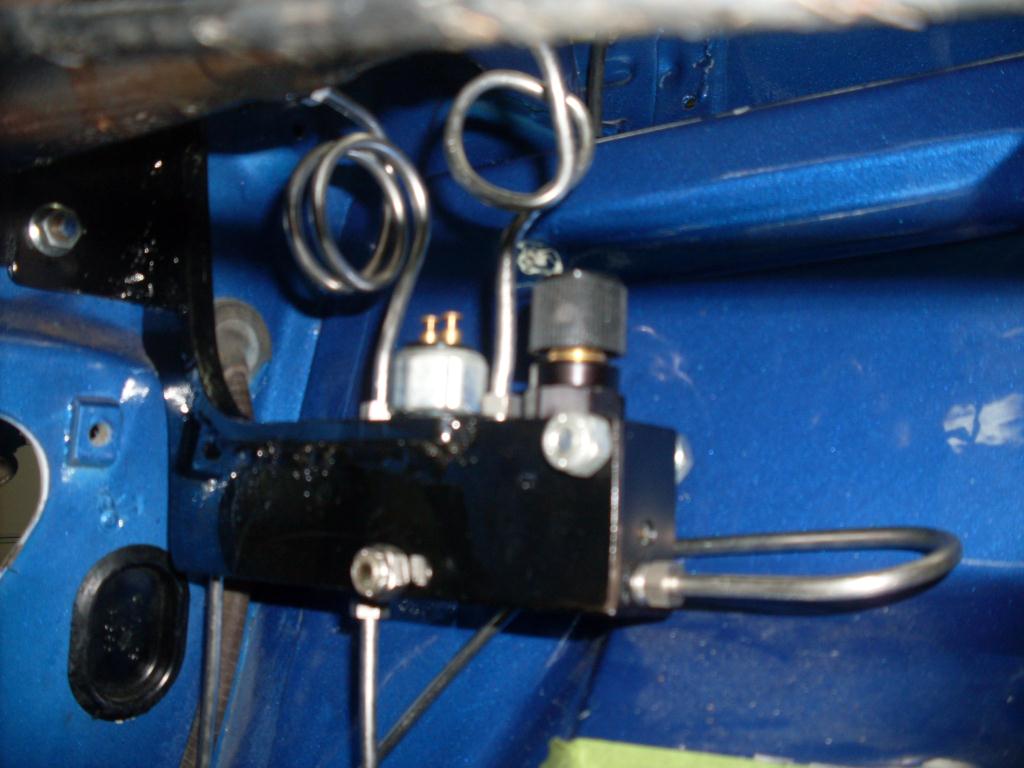
Also, I had to re-route ALL of the brake lines that I worked on previously. Someone mentioned before that it was unsafe to route the brake lines behind the transmission. Some kind of NHRA rule, or something. Not that I am EVER going to race this thing in a NHRA race or anything, but since I had to redo ALL of the brake lines, I rerouted the lines closer to the factory setup.
I have much more to report, but I will post more tomorrow. It's past my bedtime.
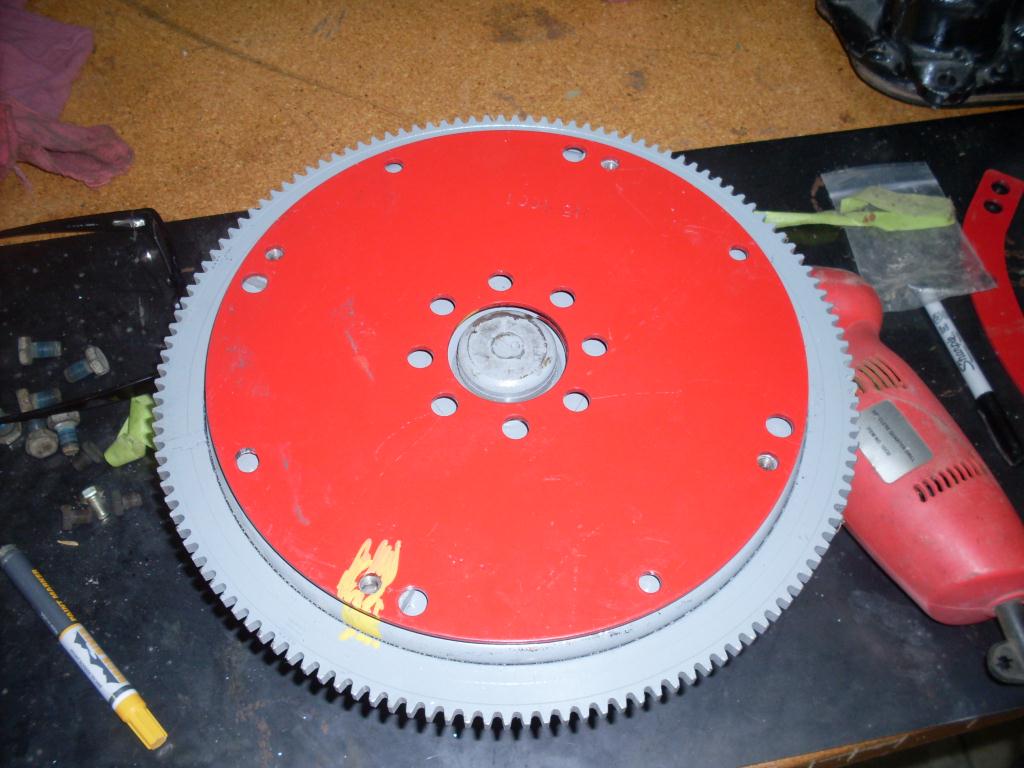
I bought the XV Motorsports transmission plate. Until I got this plate, I always thought the threaded pieces on the torque converter were evenly spaced around the circumference. I marked the plate and torque converter so that, in the future, I don't spend so much time finding the correct position.
There is one hole in the bellhousing that doesn't bolt up to anything. Should I make a cover plate to keep water from getting splashed up in there?
The dipstick on the truck hemi is too tall. I decided to reduce the height by 2 inches. So, I used a tubing cutter to get a nice clean cut on the tube and welded it up, smoothed the weld and painted it black. Then, I used some snips to cut 2 inches out of the dipstick and welded it back together.
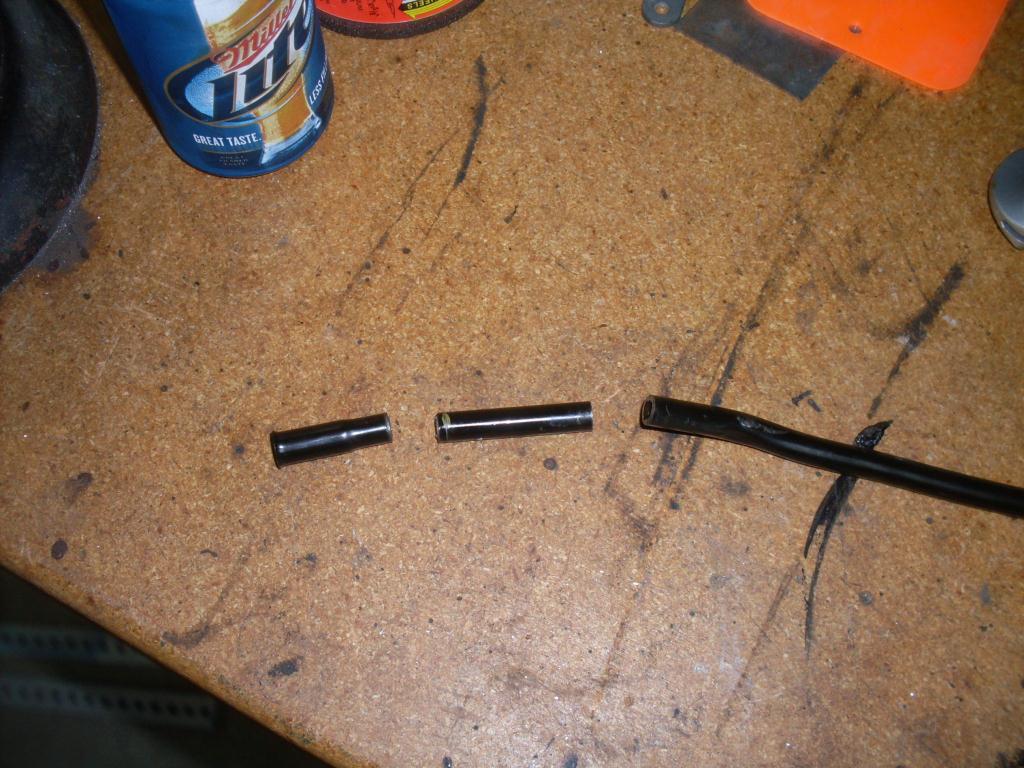
Now the dipstick isn't any higher than the alternator, now.
I finally put the engine and transmission in.
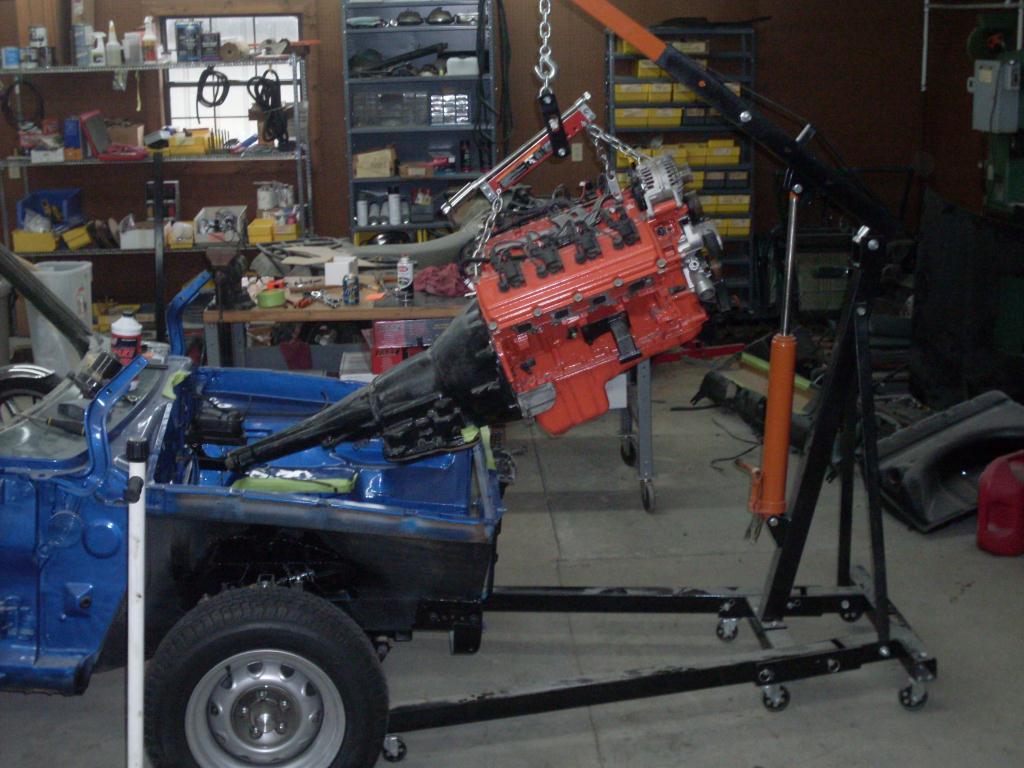
Here's a pic of it in there with the intake manifold on.
Of course the problem I am having now is with the steering column. I have to do some modifications to it. Does anyone know if a column shifter has ever been used with the alterktion hemi setup?
There is one hole in the bellhousing that doesn't bolt up to anything. Should I make a cover plate to keep water from getting splashed up in there?
The dipstick on the truck hemi is too tall. I decided to reduce the height by 2 inches. So, I used a tubing cutter to get a nice clean cut on the tube and welded it up, smoothed the weld and painted it black. Then, I used some snips to cut 2 inches out of the dipstick and welded it back together.
Now the dipstick isn't any higher than the alternator, now.
I finally put the engine and transmission in.
Here's a pic of it in there with the intake manifold on.
Of course the problem I am having now is with the steering column. I have to do some modifications to it. Does anyone know if a column shifter has ever been used with the alterktion hemi setup?
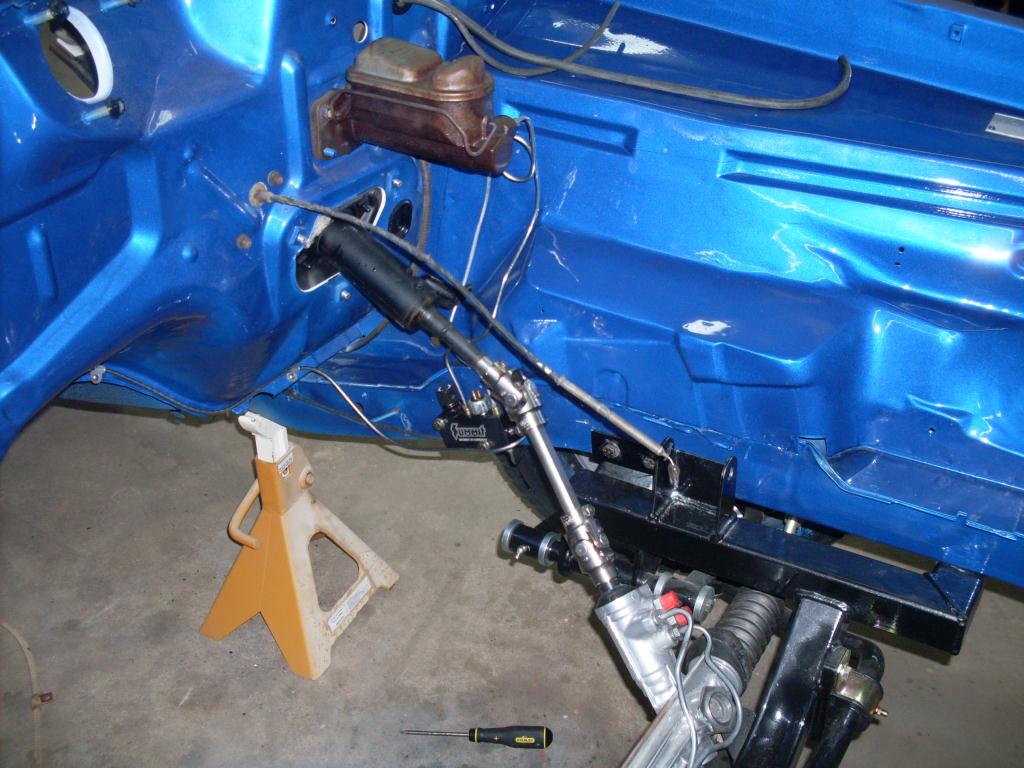
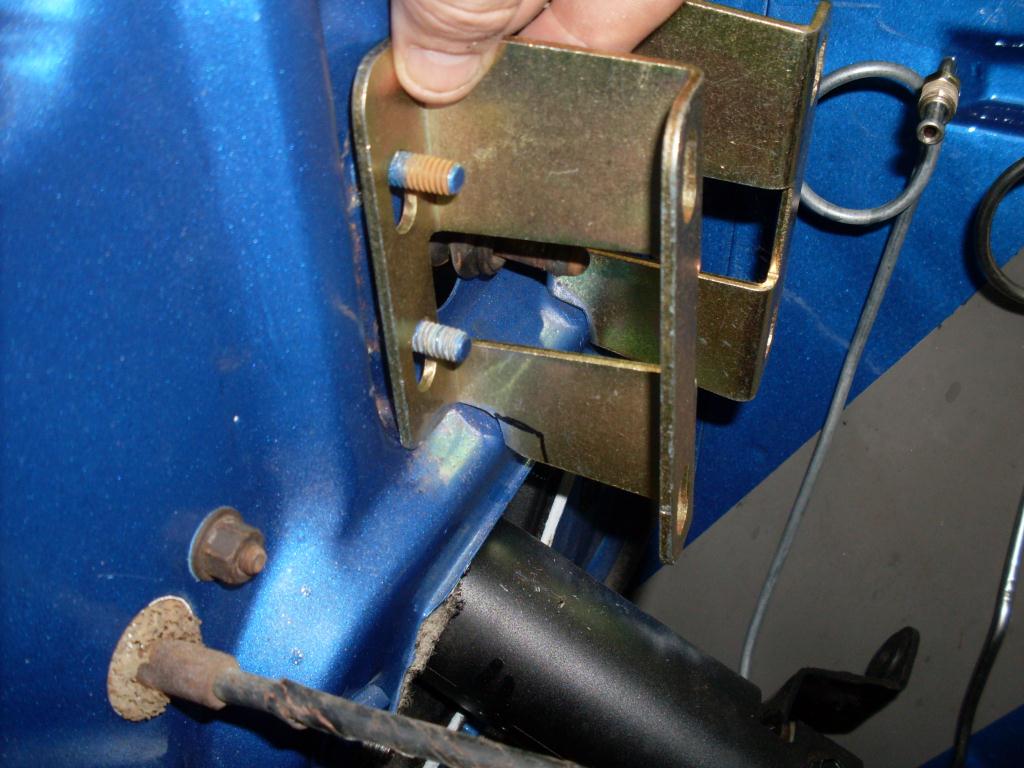
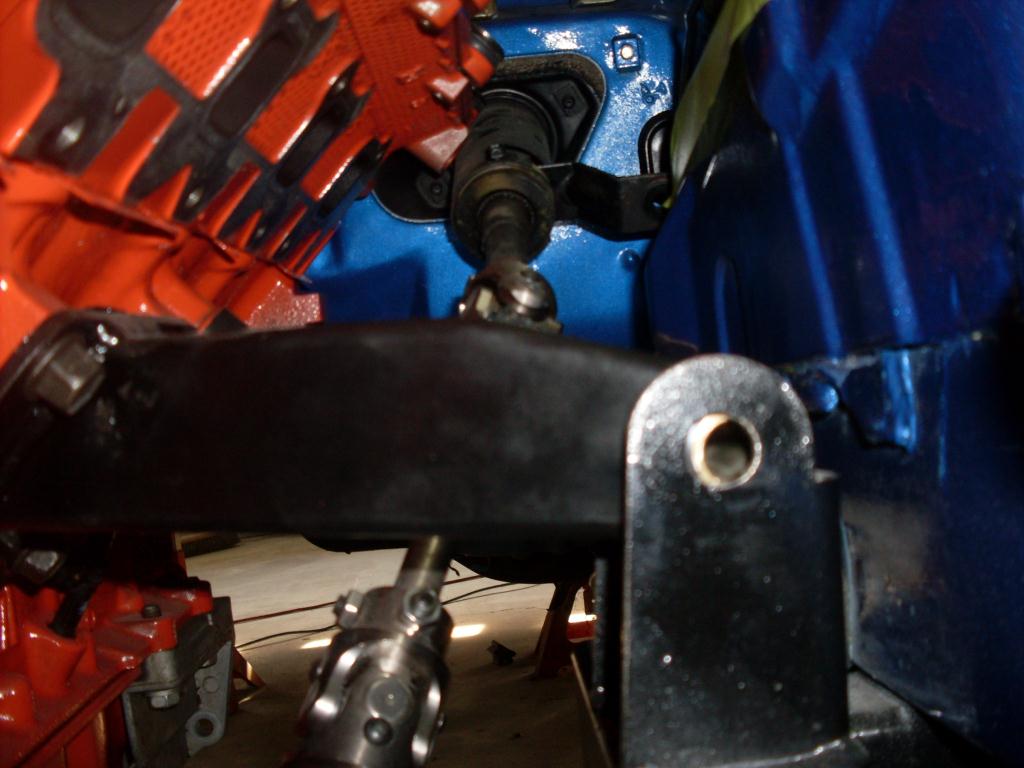
I had some clearance problems with the steering column and the hemi. Here is how I solved the problem. I disassembled the steering colum to isolate the firewall-mounting-plate. Here is the plate before modification... you can see the hemi head through the hole.

I am going to modify the plate and move it over about 3/4 of an inch... like this. Now, you can't see the hemi head.

I welded some sheet metal to extend to bolt hole on the upper right. (below)

Here it is bolted in and moved to the left. One problem I had, though, is that 2 of the captive nuts on the firewall have been replaced by non-captive nuts. I had to have my brother help me bolt it in.

I almost moved it over too much. It clears the fender well by just a fraction of a cunt hair.

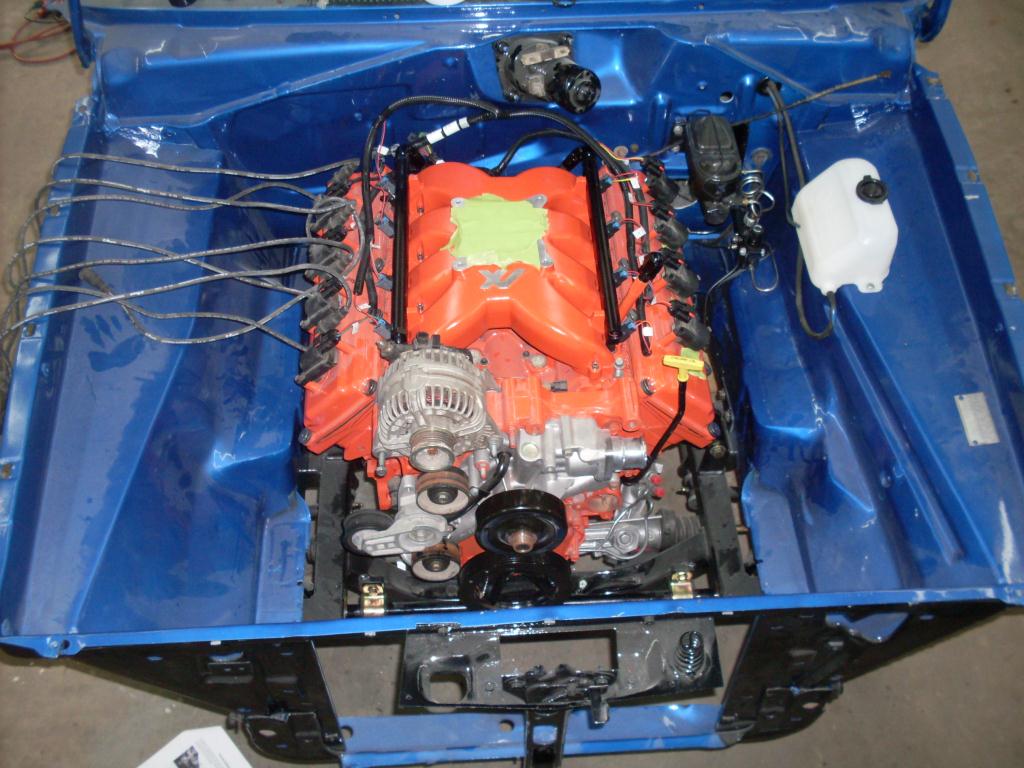
Here is a preview of what it may look like when it is done. I put the throttle body and air cleaner just to see how it might look.

That's all for now.
I am going to modify the plate and move it over about 3/4 of an inch... like this. Now, you can't see the hemi head.
I welded some sheet metal to extend to bolt hole on the upper right. (below)
Here it is bolted in and moved to the left. One problem I had, though, is that 2 of the captive nuts on the firewall have been replaced by non-captive nuts. I had to have my brother help me bolt it in.
I almost moved it over too much. It clears the fender well by just a fraction of a cunt hair.
Here is a preview of what it may look like when it is done. I put the throttle body and air cleaner just to see how it might look.
That's all for now.
Well... I guess no one gives a **** about this thread. I posted 10 days ago and no one commented. Oh well. I don't really care. Really, what I am trying to do is help others who might want to put a modern hemi into a 4-door, column shift, 68 Dart "sleeper". Considering the small pool of people who might want to do such a stupid thing, the lack of comments is to be expected.
That being said, here is my progress...
I searched for "convert 904 transmission linkage to 727 transmission linkage"
I searched for "column shift 904 transmission to column shift 727 transmission"
I searched for "torqueflite 904 transmission linkage to 727 linkage"
No matter what I searched for, I could not find an answer to my dilemma. So, I am going into unchartered territory.
That is what I am posting today. With the keywords that I posted today, maybe someone else who is looking to put a modern hemi into a 4-door, column shift, 68 Dart "sleeper" will run across this thread and comment. (I don't expect it, though.)
Anyway, here is my update for those looking to put a modern hemi into a four door, 68, A-body Dodge Dart with the column shift, here you go.
From everything I read, no one had any problem converting the shift linkage from a 904 transmission to a 727 transmission. Yeah, right!!!
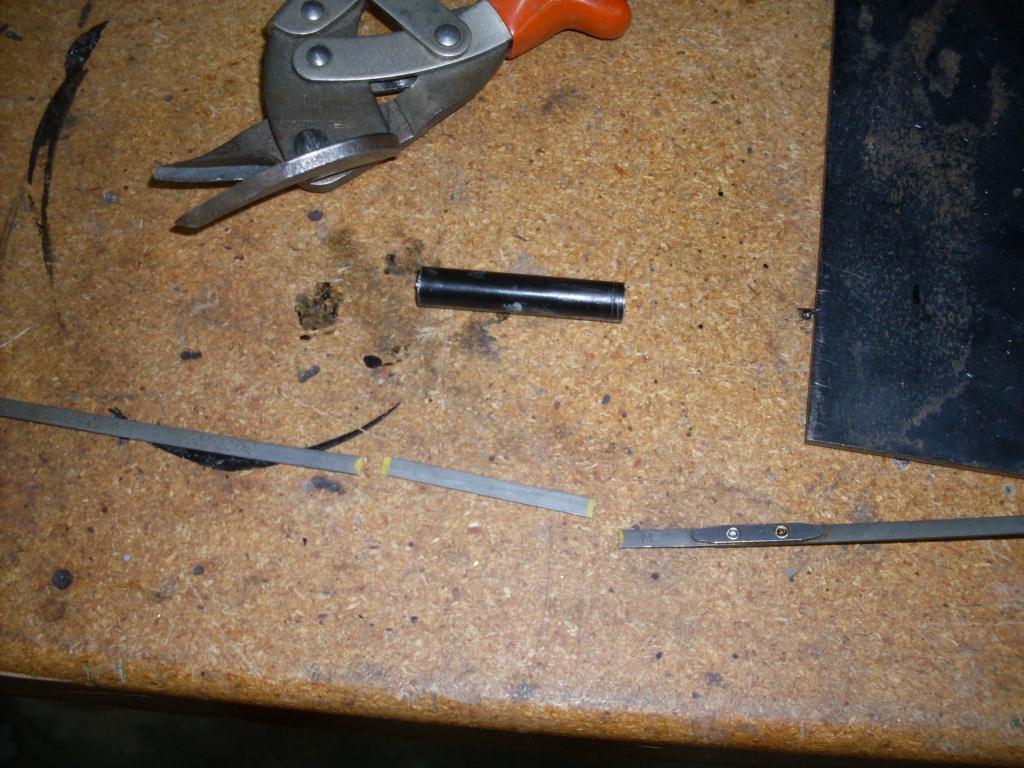
First of all, the horizontal "bar" is too wide to fit. So, I decided to narrow the horizontal "bar". (I don't know the real name, or I have had too many beers to think of the correct name of the horizontal "bar") I am getting off on a tangent. Back to the subject...
I decided that the horizontal "bar" needed to be shortened.
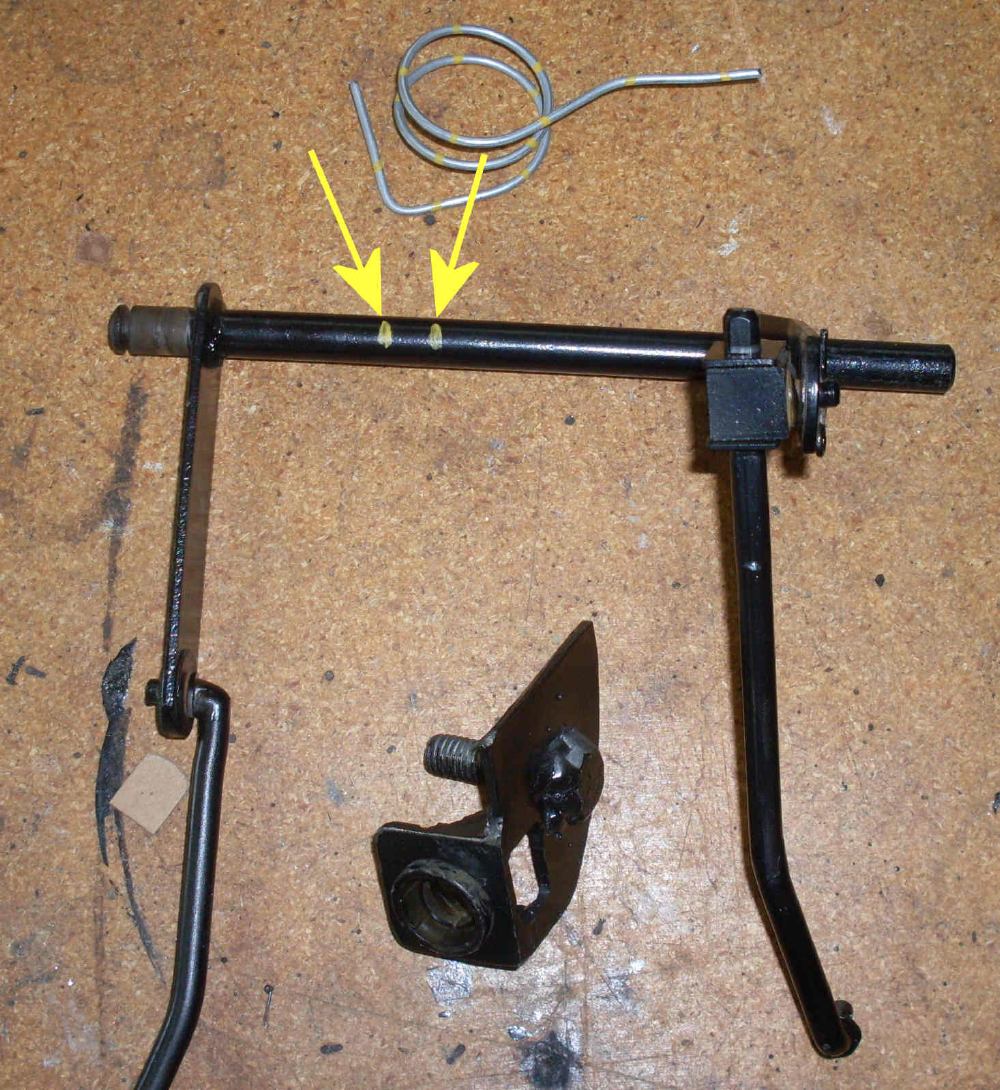
I cut out this section and rewelded the horizontal "bar". This gave me the correct width.
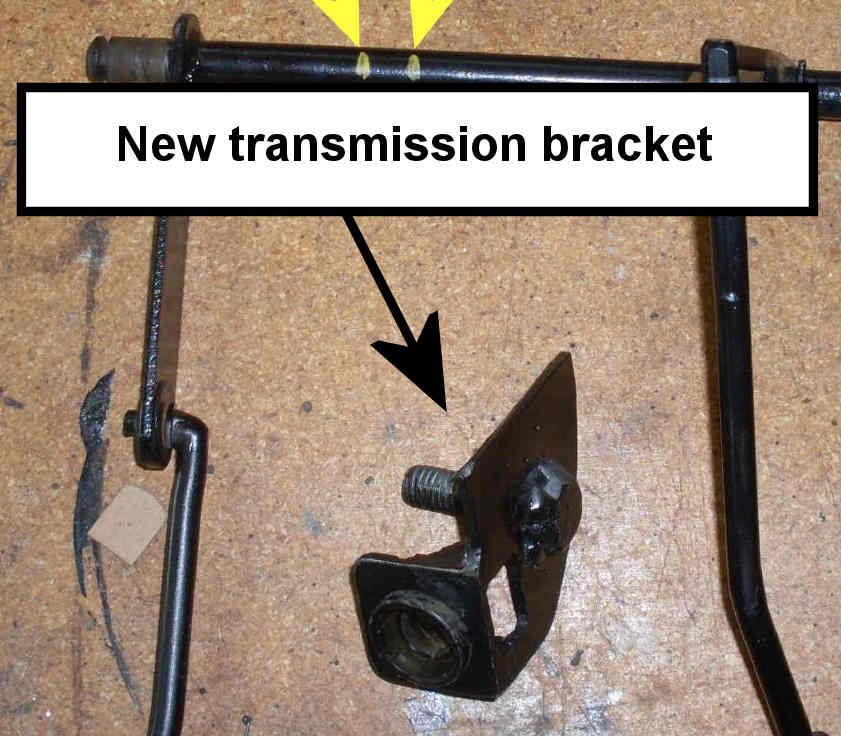
The bracket that bolts to the transmission was too high vertically, so I created a new one. Now, I created this thing with the captive bolt that you see in the picture. However, I later grinded it off and put on a captive nut, instead. You see, the only way to put in the bracket with the captive bolt was to lower the transmission, put the bracket in, and then raise the transmission. Screw that. Sorry that I didn't take a picture of the bracket with the captive nut but, trust me... that is what I evetually did.
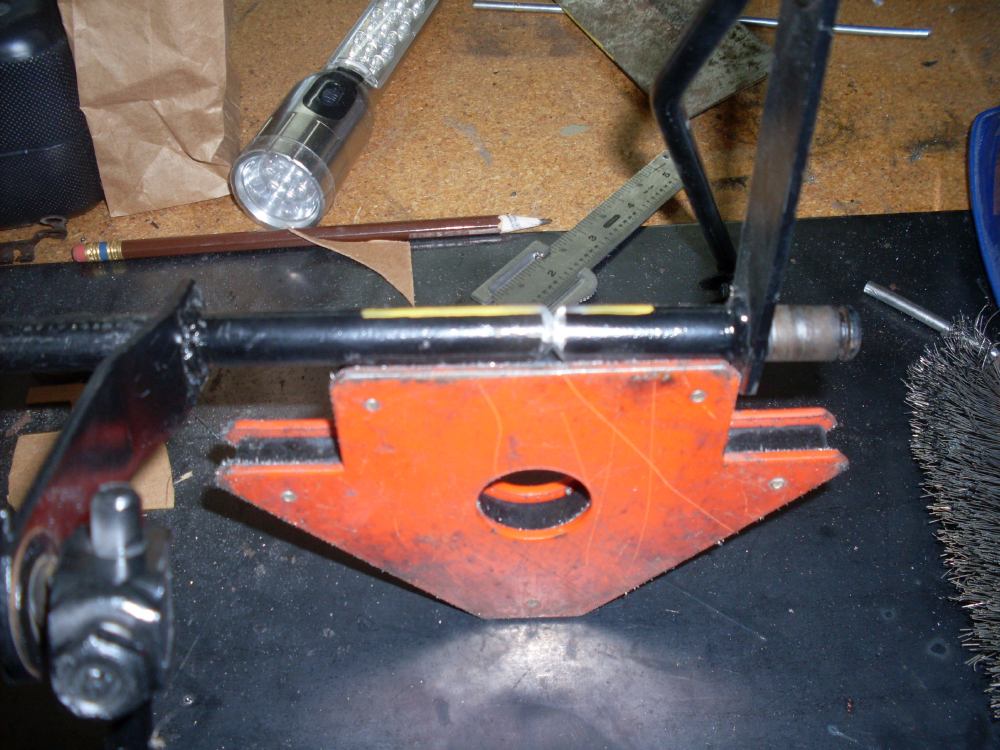
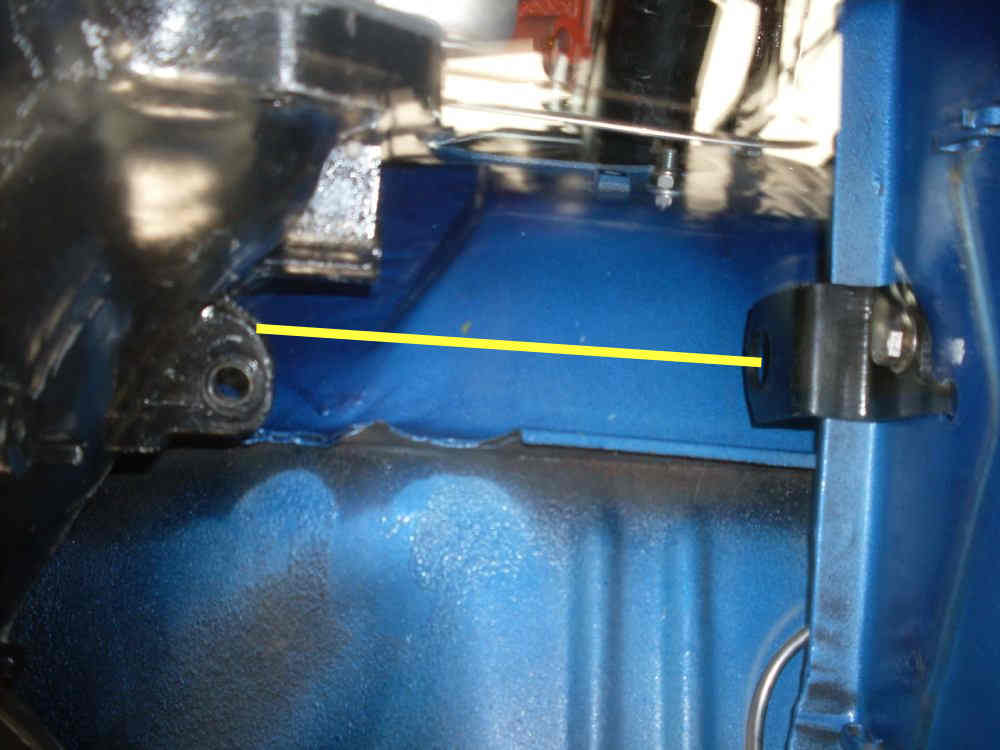
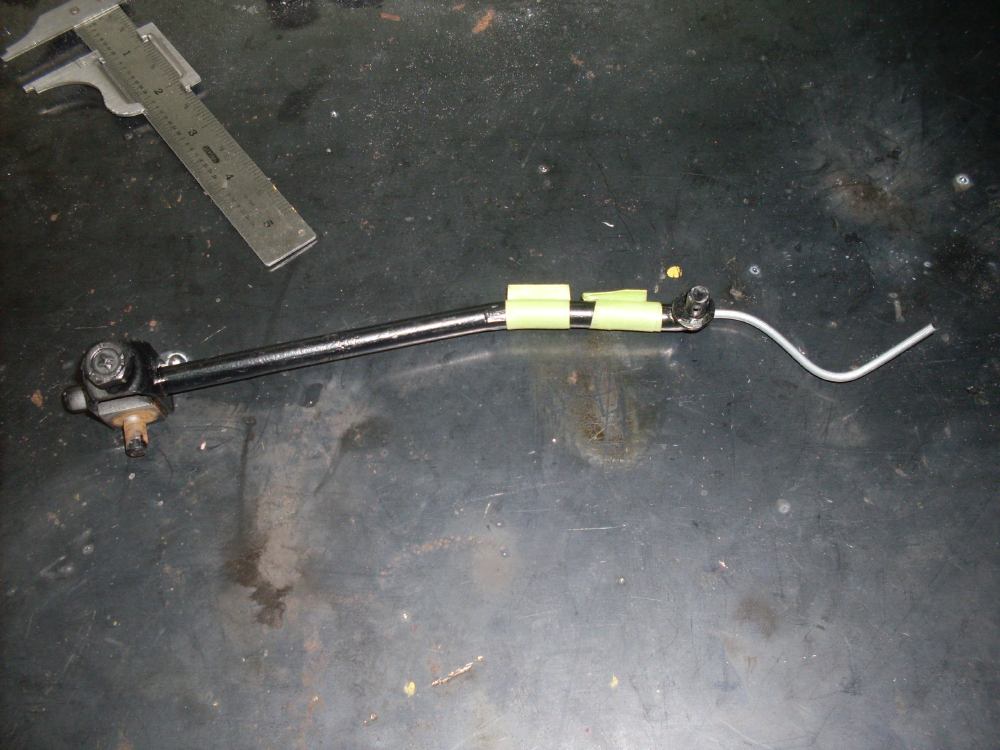
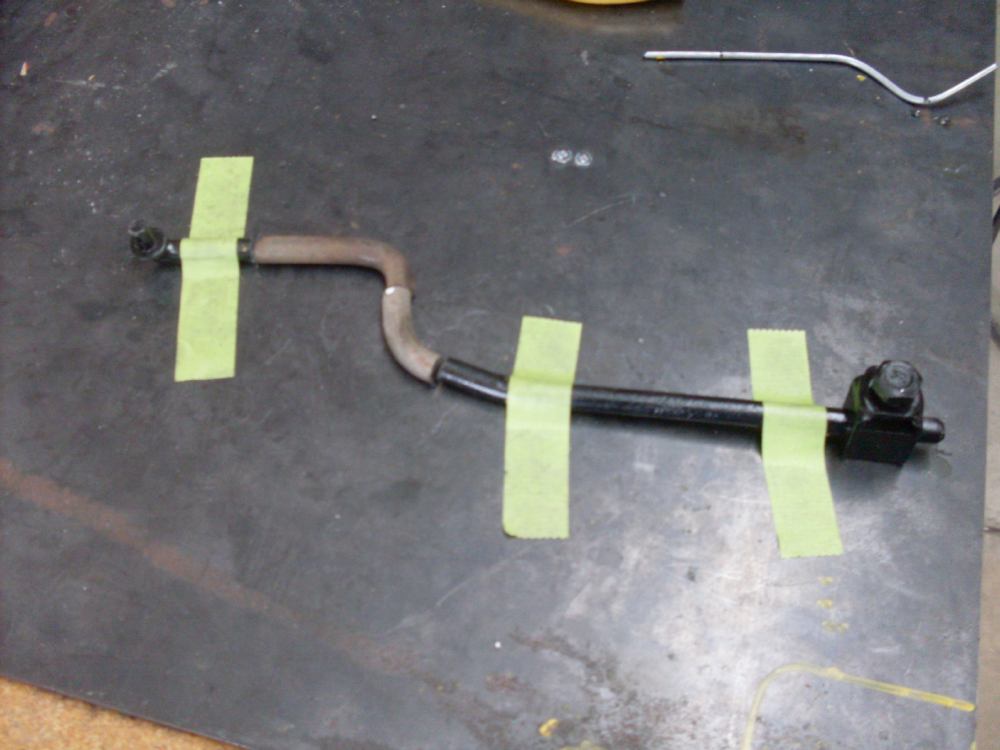
The next picture shows how the alignment of the horizontal "bar" needed to be adjusted. The yellow line is where the horizontal "bar" needs to be fore and aft.
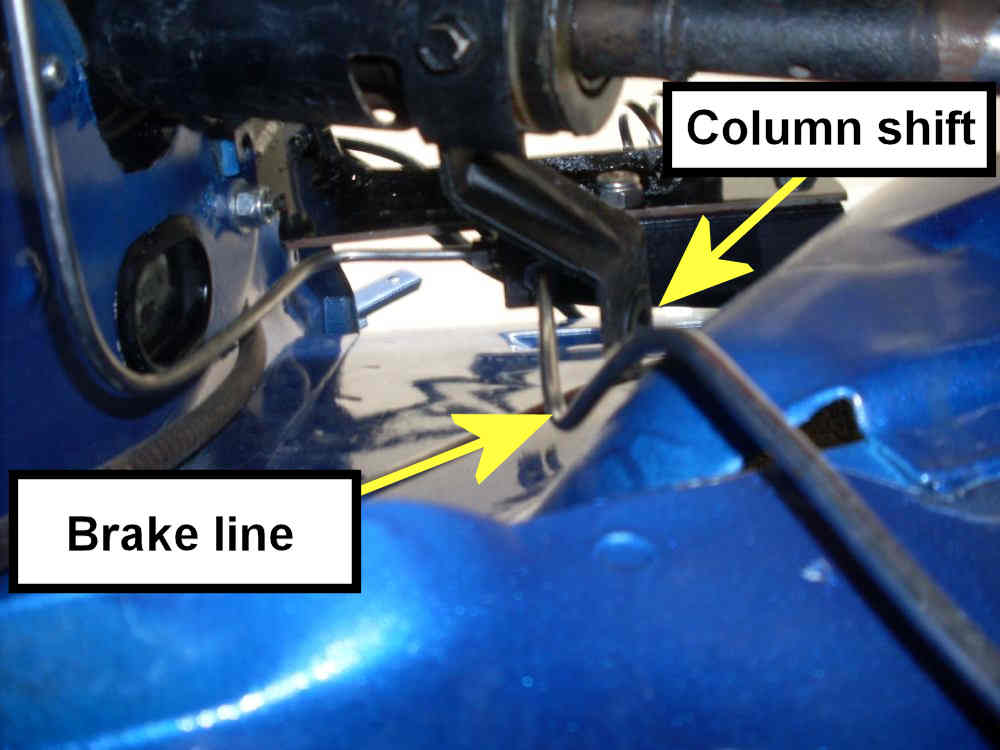
I almost forgot. I am going to have to re-do one of the brake lines for the 3rd time. The brake line will interfere with the column shift. It's a good thing I haven't bled the brake lines, yet.
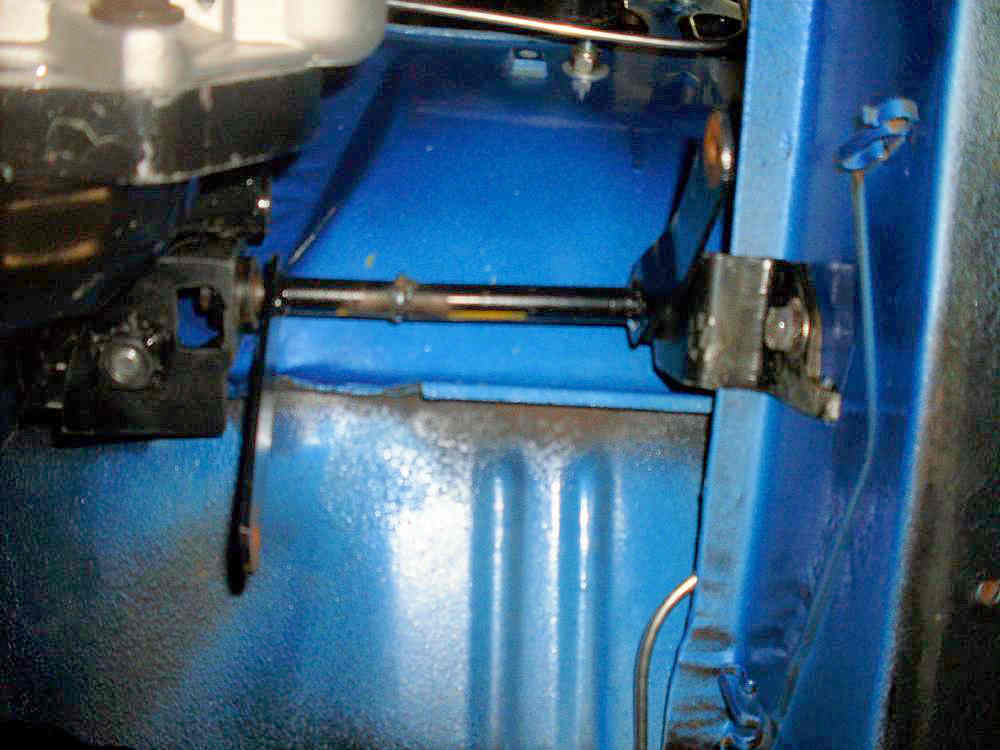
I finally got the horizontal "bar" in level with no binding.
Now, the problem is with the length of the shift rods. You see, I moved the steering column towards the driver side about an inch. This allowed it to clear the hemi head. Of course, it created a new problem. The shift "rod" (Huh, huh huh... I said "rod") needs to be moved, also.
To make the move, I taped a piece of bailing wire to the shift rod and bent it to the length and angle that I needed.
Then, I found some rod from the kickdown lever rod from the original slant 6 and cut it to get the new rod angle and length that I needed. I will weld it all up tomorrow.
That's all for now. I will repost soon for all of the other people looking to put in a column-shift, modern-hemi, 4-door, 68 Dart sleeper.
That being said, here is my progress...
I searched for "convert 904 transmission linkage to 727 transmission linkage"
I searched for "column shift 904 transmission to column shift 727 transmission"
I searched for "torqueflite 904 transmission linkage to 727 linkage"
No matter what I searched for, I could not find an answer to my dilemma. So, I am going into unchartered territory.
That is what I am posting today. With the keywords that I posted today, maybe someone else who is looking to put a modern hemi into a 4-door, column shift, 68 Dart "sleeper" will run across this thread and comment. (I don't expect it, though.)
Anyway, here is my update for those looking to put a modern hemi into a four door, 68, A-body Dodge Dart with the column shift, here you go.
From everything I read, no one had any problem converting the shift linkage from a 904 transmission to a 727 transmission. Yeah, right!!!
First of all, the horizontal "bar" is too wide to fit. So, I decided to narrow the horizontal "bar". (I don't know the real name, or I have had too many beers to think of the correct name of the horizontal "bar") I am getting off on a tangent. Back to the subject...
I decided that the horizontal "bar" needed to be shortened.
I cut out this section and rewelded the horizontal "bar". This gave me the correct width.
The bracket that bolts to the transmission was too high vertically, so I created a new one. Now, I created this thing with the captive bolt that you see in the picture. However, I later grinded it off and put on a captive nut, instead. You see, the only way to put in the bracket with the captive bolt was to lower the transmission, put the bracket in, and then raise the transmission. Screw that. Sorry that I didn't take a picture of the bracket with the captive nut but, trust me... that is what I evetually did.
The next picture shows how the alignment of the horizontal "bar" needed to be adjusted. The yellow line is where the horizontal "bar" needs to be fore and aft.
I almost forgot. I am going to have to re-do one of the brake lines for the 3rd time. The brake line will interfere with the column shift. It's a good thing I haven't bled the brake lines, yet.
I finally got the horizontal "bar" in level with no binding.
Now, the problem is with the length of the shift rods. You see, I moved the steering column towards the driver side about an inch. This allowed it to clear the hemi head. Of course, it created a new problem. The shift "rod" (Huh, huh huh... I said "rod") needs to be moved, also.
To make the move, I taped a piece of bailing wire to the shift rod and bent it to the length and angle that I needed.
Then, I found some rod from the kickdown lever rod from the original slant 6 and cut it to get the new rod angle and length that I needed. I will weld it all up tomorrow.
That's all for now. I will repost soon for all of the other people looking to put in a column-shift, modern-hemi, 4-door, 68 Dart sleeper.
sorry ....sometimes we're speechless......
and a lot of us were busy getting ready...goin' to.... and returning from the Mopar Nats this past Friday thru Sunday
I for one enjoy the build...you have modified a lot of and in the same manner pieces that I have had to modify to install the 426 in a A-body
Mopar to ya'
Denny
and a lot of us were busy getting ready...goin' to.... and returning from the Mopar Nats this past Friday thru Sunday
I for one enjoy the build...you have modified a lot of and in the same manner pieces that I have had to modify to install the 426 in a A-body
Mopar to ya'
Denny
Thanks, Hemi. I am glad someone is reading it. I forgot about the Nats. Maybe that explains it.
sorry ....sometimes we're speechless......
and a lot of us were busy getting ready...goin' to.... and returning from the Mopar Nats this past Friday thru Sunday
I for one enjoy the build...you have modified a lot of and in the same manner pieces that I have had to modify to install the 426 in a A-body
Mopar to ya'
Denny
a68postcar
Well-Known Member
x2rock on,brother!
dusterbd13
Well-Known Member
and there are also others of us who tend to just lurk. i love reading other peoples builds, especially the outside of the box stuff, like the 73 pro-touring duster, the hemi duster, etc.
with that being said, i rarely have anything to comment on that doesnt sound like me being critical. usually just things id do a little differently.
so its not that were not watching, just some of us are the quiet types.
i guess im also in your shoes at times as well, as i rarely get comments on my thread either. but i post up for others to learn from, as well as the fact that i enjoy writing and sharing what im doing. people digging it is a bonus.
on your linkage, have you thought about adding some tubing over the splices, also welded in to provide a little more structural integrity? those things take a hell of a beating.
michael
dusterbd13
Well-Known Member
oh, how well i know that........
but im blessed to have my wife. even if she does tell me how, when, where, and wwhy to do anything.
but im blessed to have my wife. even if she does tell me how, when, where, and wwhy to do anything.
66plyValiant
Well-Known Member
I'm loving the build, have been following it all the way. I really like that you are giving a 4 door the chance insted of the usual 2 door, I tend to lurk more then comment.
-
Similar threads
- Replies
- 11
- Views
- 396
- Locked
- Replies
- 1
- Views
- 182
- Replies
- 0
- Views
- 207
- Replies
- 3
- Views
- 199


