Biohazard

-
speaking of grilles:

Today the surround got the 400grit followed by the color. I am using Duplicolor Stainless Steel. I love the color of this paint as I wanted something a tad darker than straight silver but, in rattle-can world, you go from silver direct to very dark charcoal. I was happy to find this in-between sort of silver. It also lacks any obnoxious, heavy metal flake. My end result was something that looks real damn close to a factory finish albeit a shade darker.

So my first blast with the Stainless Steel paint made me very unhappy. The paint seemed to collect on the surface like beach sand. Coarse beach sand. I was like WTF and stopped spraying. I went to the internet to see if I was doing something wrong. Nope. Perfect conditions, in fact, with a temp of 80 degrees and 32% humidity. When I went back out to my work I rubbed my finger over the paint and the extra mass just came right off leaving a very normal steel grey finish underneath. So, if anyone should decide to use this stuff, ad this step to the directions on the can: After coat dries, rub gently with dry cotton cloth.

Okay so here's what the coarse grit looked like:
[URL="http://img.photobucket.com/albums/v467/vr6pilot/Red%20Fish/graineypaintstraight_zpsbd162403.jpg"][/URL]

It was especially bad in the bends:
[URL="http://img.photobucket.com/albums/v467/vr6pilot/Red%20Fish/graineypaintbend1_zpscb381043.jpg"][/URL]

Here's is what the paint looks like after a quick wipe with an old t-shirt:
[URL="http://img.photobucket.com/albums/v467/vr6pilot/Red%20Fish/surroundoutside_zps5aacb992.jpg"][/URL]

Even looks good in the bends:
[URL="http://img.photobucket.com/albums/v467/vr6pilot/Red%20Fish/paintwipeddown_zps0dded9f4.jpg"][/URL]

Brought it inside for proper lighting:
[URL="http://img.photobucket.com/albums/v467/vr6pilot/Red%20Fish/innersurround_zps5664ece2.jpg"][/URL]

[URL="http://img.photobucket.com/albums/v467/vr6pilot/Red%20Fish/outersurround_zpsc0bea67a.jpg"][/URL]

I also shot the stamped steel parts with the gloss black epoxy paint.

My other grille doesn't have giant cracks in the surround and should finish up faster than this one did. If I can assemble the entire grille this week, I'll do it and get some pics up but I know I have a lot on my proverbial plate the next several days.
 
So my company sends me down to Roswell for the week. I didn't find any crashed UFOs but I did stumble upon someone's red 68 fastback parked in their yard. It's got custom wheels and is missing the trunk panel. Anyone on here own this car? Sure looks good!
 
None. I was already looking like a creeper lingering in front of this guy's house.
 
Grille with the honeycomb installed. This looks so nice in person, you have no idea.

 
I'll send you mine! lol Wonder why they crack in that area, maybe stress from the fill? Your work looks awesome. Thanks for the how 2.
 
I think it's just the plastic aging and becoming more brittle. Then there's handling care. The dupli-color stainless steel provides a great finish in terms of color and an aesthetically pleasing amount of metal flake.

I used Mother's mag polish on the aluminum strip but those strips were pretty badly pitted from years of highway driving. They aren't perfect, but they do look..... authentic. You can definitely tell these aren't repro's.
 
Thanks, Jim!

This past week, my work sent me off to a remote site and I wasn't able to bring any parts for my off-time. I'm anxious to get the dash frame prepped and painted so I can put it in and start sorting all the wiring. Then I can get that motor turned over.
 
Very nice, you're doing a great job. I just had my dash for my 66 dart painted. It is a suede or flat black. Keeps the sun from reflecting in the eyes!!
Keep up the good work. Not only is the work excellent, 
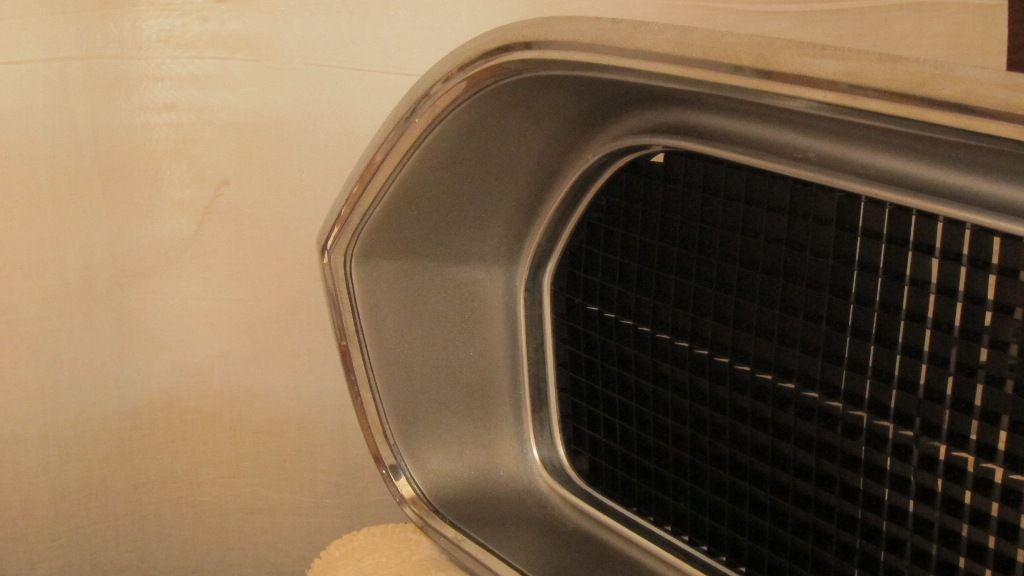
you're a hell if a writer!
Again, thanks for sharing!
 
Alright, kids...time to get some work done.

Got bizzy this afternoon rubbin' down the entire dash frame (already primed) with 400 grit. After rinsing and a thorough dry-out (doesn't take long out here in wonderful western New Mexico) I sprayed it from the bottom up with the custom mixed R6. This is the same paint I shot the engine bay with.


After allowing the initial shot of color to dry, I set the frame on it's back, sprayed the topside (paying particular attention to the speaker grille area) and went back for a second coat on the 'face' areas.


Also got the passenger side grille out. Gotta bring it up to the standard set with the driver's side unit.

This one had one complete break in it at the thinnest part and a significant crack at one of the bends. The plastic surround was given a bath a couple days ago and today's work was limited to the application of some JB weld (yes, the original steel stuff). I decided to try using the metal-set JB rather than the 'plastic welder' product thinking that the 'steel' would produce a stronger, more realiable bond. It does, however, take an awful long time to set.

So there I was, slowly reaching a zen-like trance state while staring into oblivion, holding the joint together while the JB weld took it's sweet-*** time setting up. Sigh.

Finally, there was enough of a bond that I was able to "splint" the fracture with masking tape, even using the roll as a weight, and let it finish setting.

Here is the complete break, with a thin layer of JB across the backside. I did coarse-sand the plastic prior to bonding.


Here is my semi-set grille, cheaply splinted.


For the large break, a small patch of JB Weld to hold it together. Later, it will be filled with the JB plastic putty.

 
Late night update: the bond failed on that narrow joint. Have to get creative tomorrow.
 
Since your into plastic repair;I thought I woukld share my recent experience repairing the plastic bumper cover on my Dodge Caravan. It was literally in about 5-6 pieces,and multiple cracks everywhere. A new one wasnt available,so I bought a Dominion sure seal bumper repair kit,and stripped the bumper off. After taping all the peices together,I v grooved each crack using a low speed on my die grinder,with an aggresive double cut bit. Then sanded with 80 grit out from each crack about 2 inches either side. Smeared with the repair compound and reinforced with fibreglass window screen. Bumper is back on,1 month later still can't tell it was done. Well...at least it's a 20 footer lol...the paint was just spray bomb!
 
Thanks for that, resto. I'm doing just great with the JB plastic on the cracks finding it effective and easy to work. The hard part is the complete break at the narrowest part of the surround. Making it strong without building it up too thick is a chore...but I think I got it covered. Stay tuned.
 
The issue:
...complete break at the narrow part of the plastic surround. This is the one you don't want but it is still fixable.


My half-*** attempt to put it together with JB Weld failed. I was having such a difficult time splinting the pieces and keeping them in position long enough for the JB to set up properly. My fault, not the epoxy's fault. Need a better plan.
 
First order of business is removing the old JB weld. I also dug-out the channels running lengthwise so that I could fill them with epoxy 'beams' to better reinforce the joint.


After working the grooves out with the cutting wheel, I ran over the front and back side with a sanding drum. Truth is, you can't just pile up layers of epoxy as there is a limit on how thick you can build up this flange as it sits neatly between the header panel and the chrome outer.

 
The general scheme for this repair is drilling some very small holes on either side of the break and "lacing" the two ends together using fine stainless steel wire. This will hold the parts steady so that, when I reapply the epoxy, it will be able to set up properly.

The JB Weld will not only bond to the plastic, but to the wire as well creating a sure, reinforced bond.
 
-
Back
Top