Body Work Tutorial

-
Next step is to get rid of any dust from the panel. Here we have a brand new tack rag. A lot of people open the package up and rub it across the panel... I do it a bit different. I like to take the rag, and unfold it's many layers.... make it look like that pink thingy your wife washes herself with in the tub.:D

This fluffy rag will grab a lot more dust if you just lightly brush it across a panel. Do not rub it hard<<<< The tack rag that is, it will leave a sticky residue on the panel.:wack:
 

Attachments

  • 000_0117.JPG
    48.9 KB · Views: 1,356
  • 000_0118.JPG
    53.6 KB · Views: 1,393
  • 000_0119.JPG
    59.5 KB · Views: 1,348
Now lets get that gun set up to spray. For a newbie I would suggest sticking some paper up on the wall and testing the pattern. You want a good even fan with the proper amount of fluid. Here are some examples.

The dial my finger on is your pattern adjustment. Close it down and you get a shotgun pattern, open it up and you get a nice fan. My suggestion to a newbie is to open the fan up quite a ways. If you close it too far you will get what I was trying to show on the side... too much material. The fan next to it looks good.

Next the fluid adjustment... Not much to say here. I prefer the painter to just open the fluid adjustment all the way and modulate it with your trigger. This is a good technique to learn as you can modulate your finger to lightly dust something, or to lay it on heavy. Do some practice and you will get the hang of it.

Air pressure, I would suggest checking the product info for air pressure settings but as an experienced painted I don't even look at the dial, I just listen to the way the gun sounds and know its right.

If you use too much air pressure you will be wasting product and $.
 

Attachments

  • 000_0120.JPG
    37.5 KB · Views: 1,347
  • 000_0121.JPG
    58.2 KB · Views: 1,386
  • 000_0123.JPG
    46.8 KB · Views: 1,363
Is it finally time to spray something? Yea! Lets go for it. :D


Here are a few spraying tips.

How close should I put the gun to the panel? In general spread your thumb and pinky finger out... that is about the correct distance.

Overlap your fan pattern, I suggest about a 50% overlap from each pass.

Don't flick the gun at the end of a stroke. You will be laying far less material on the end of the stroke this way. I pull the trigger full on, and release half way (to air pressure) at the end of the stroke. This lets the air atomize the last bit of fluid and push it towards the panel.

Always spray in the direction that the panel is facing. Panels are not all flat, they have curves and angles... always adjust your wrist to keep the material flowing directly at the face of each bend and curve.

Practice and have some fun:burnout:
 

Attachments

  • 000_0124.JPG
    63.6 KB · Views: 1,395
  • 000_0125.JPG
    64.8 KB · Views: 1,358
good stuff.

I hope to paint my car this summer.

Do you have to spray differently or do wet sanding between coats when laying on a metallic paint? Do you overlap the same way when spraying? Can you just add flake to the can? I was thinking of adding some metal flake to F3 metallic because my wife likes things that sparkle. :) It's gonna be her car.


Spraying Metallic colors sometimes can be a bit tricky, but usually not bad. You can do the same overlap also, but want to be a bit more accurate with a metallic, lots of things can change the way they sit in the paint. You do not need to wet sand the paint as you go, in fact doing so will disturb the metallics and change the way the paint looks. I found that after coverage is achieved you can just give the car a light dust to lay the metallics down evenly. There are some paints that you can add flake to when you mix the color, or you can look for a heavier metallic paint. This is with a base coat system mind you.
 
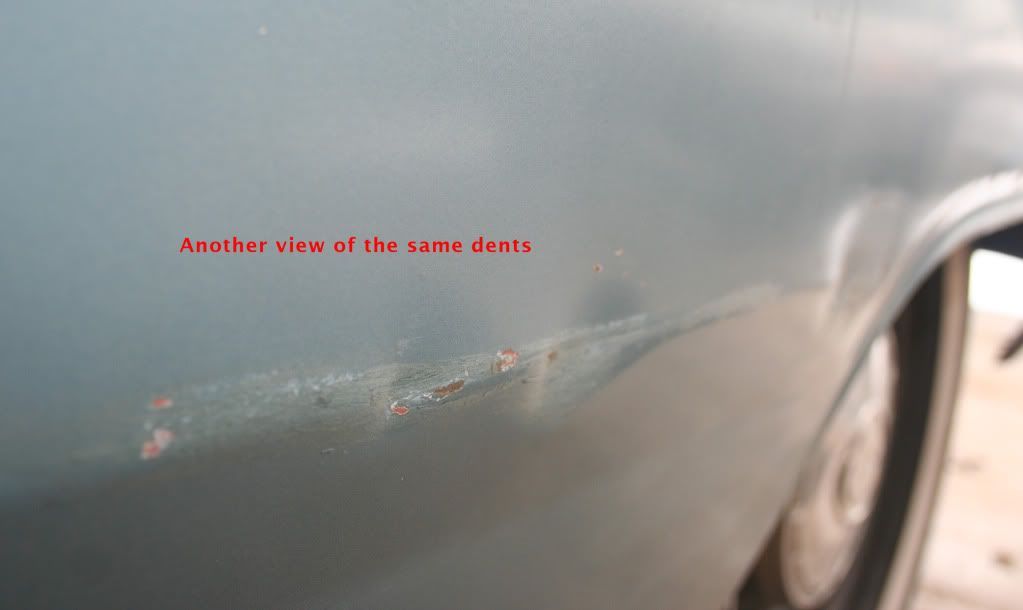
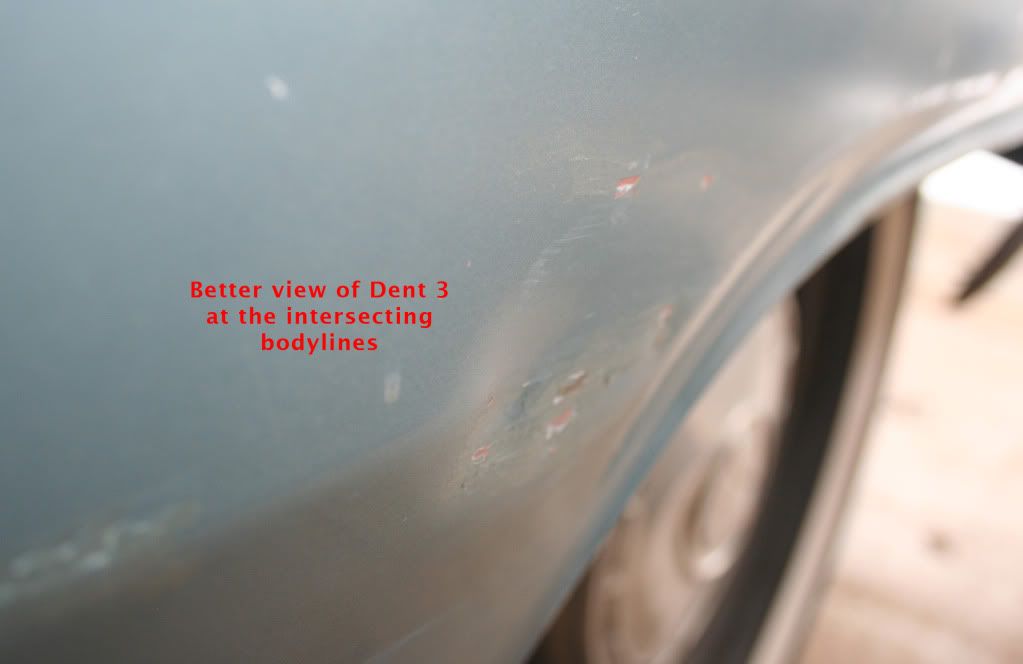
Hey all. I asked 67Dart if I could post up a couple dent examples here for advice on how to approach from himself or anyone else with experience. Every dent is different, right?! So I figured we could all learn. My Dart only has a few dents, fortunately, but unfortunately, they're all in bodylines! My luck!

I've read The Key to Metal Bumping and watched numerous videos, but the best approach to these still eludes me. Better to ask than to muck up my 1/4!

After I work on these dents with advice, I'll post up the results as before/after. Hope to get to as soon as it warms up just a little more.

I have at my disposal:
- basic body hammers/dollys.
- H&S Autoshot stud welder/puller
- H&S Autoshot Dent Killer (picked it up new, cheap, thought it might come in handy at some point.)
dentkiller.jpg


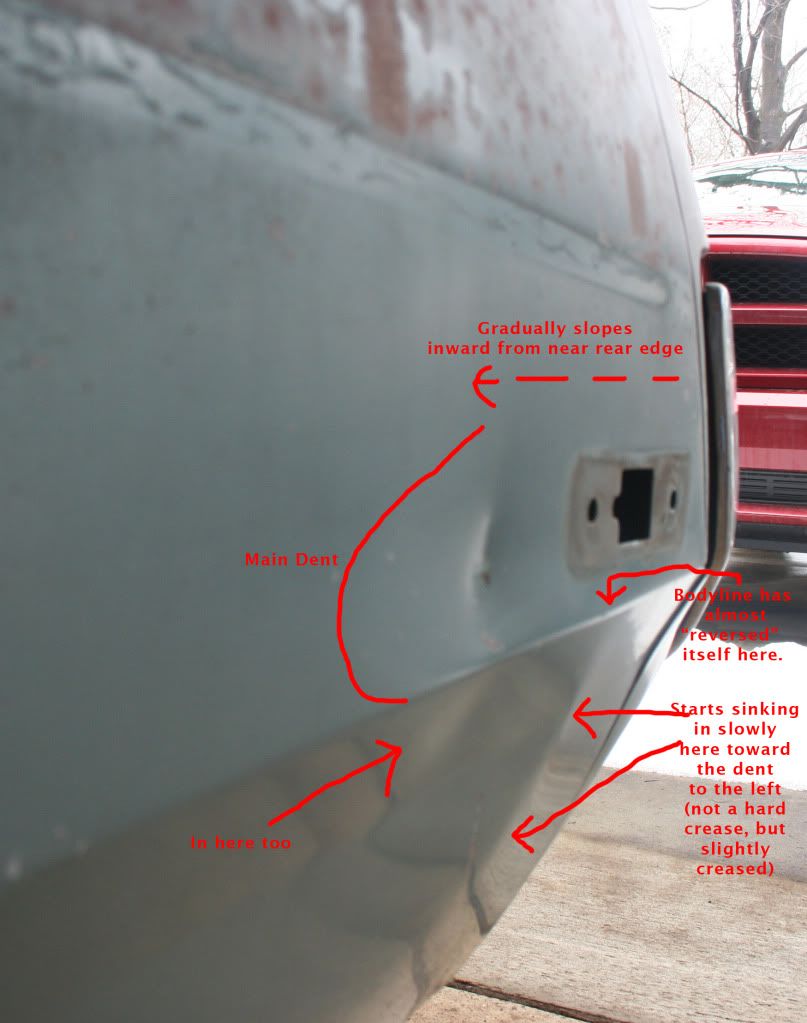
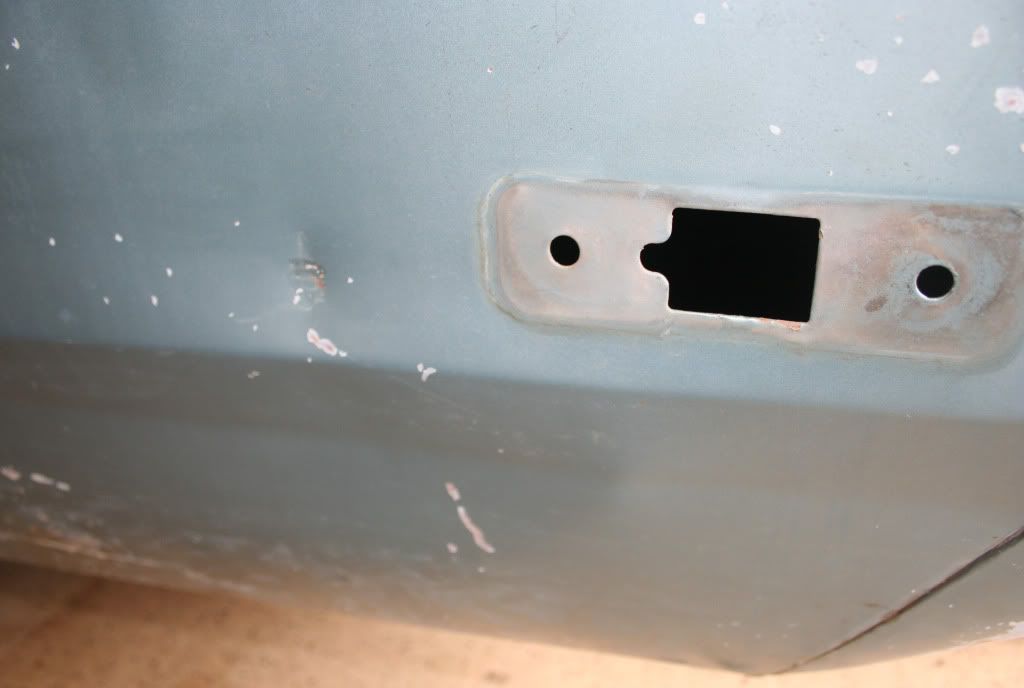
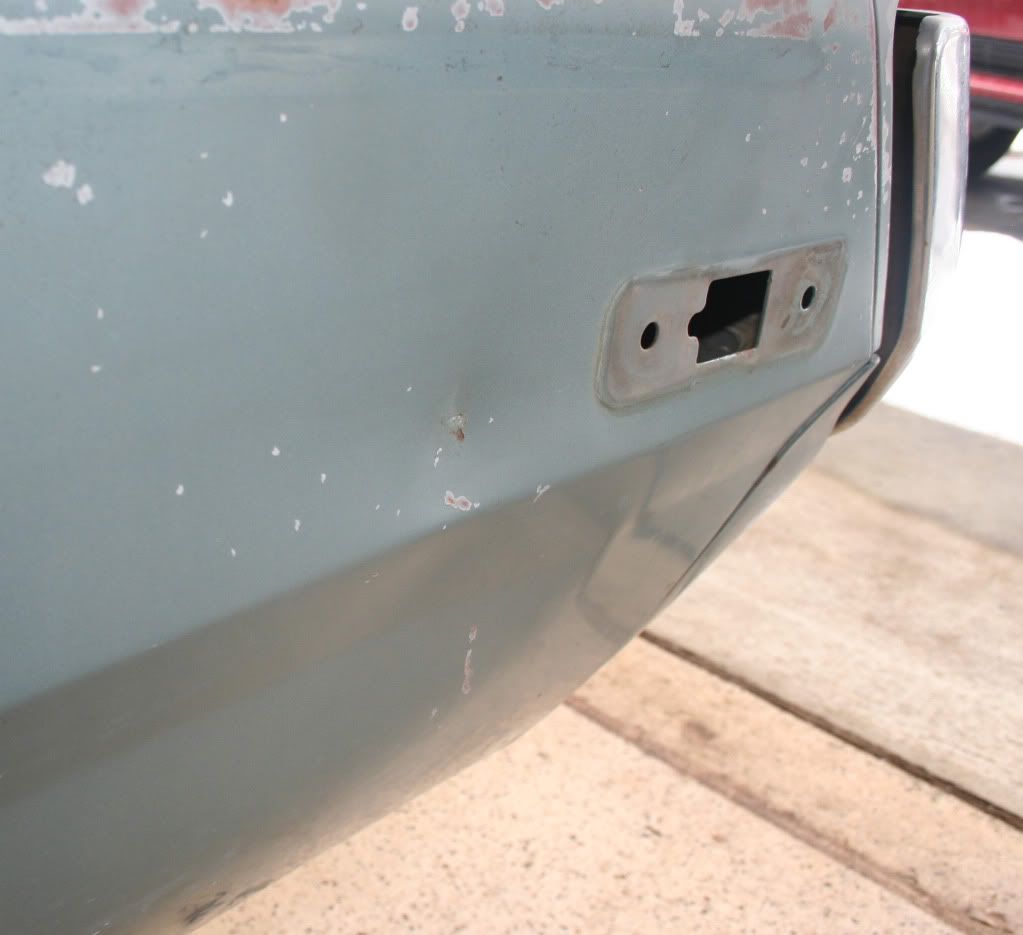
DENT AT REAR OF DRIVER'S QUARTER:
I'll let my notes on the pics do most of the talking. To me, on this one it seems like if I pull out the deep main dent, and same with the smaller dent under the bodyline, a lot of the shallow stuff would straighten out. While slightly hammering on that crease at the bottom back that sticks out. But, that seems to go against the advice, so I'm not sure.
IMG_7012-dent1edit.jpg

Another view:
IMG_7011-dent1edit.jpg

Yet another view:
IMG_7010-dent1edit.jpg


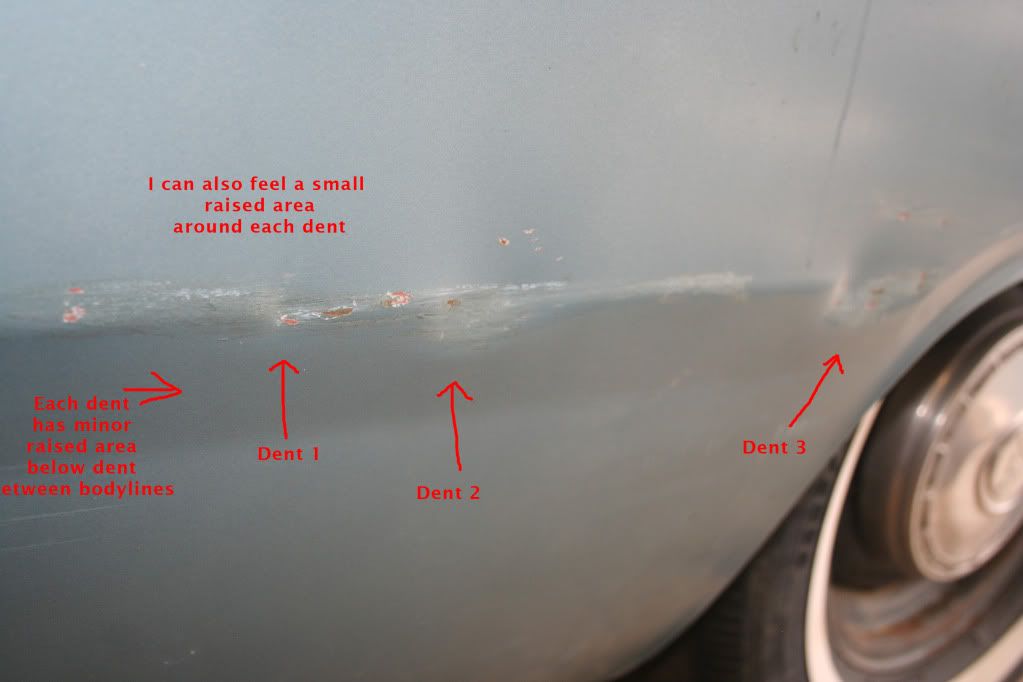
DENT(S) IN FRONT OF REAR WHEEL ON BODYLINE ON DRIVER'S QUARTER:
This will not be a show car, so I don't expect perfection here, but would like to get it looking like not-crap. After this is straightened to best of my ability, I'm sure it's going to take some filler (hopefully a small amount) to get those lines back pointed again. Would I just get it close then use regular filler, or something different? (I have Rage Gold now, and I also have some long-strand glass filler as well as some All-Metal, which I've never used).

IMG_7014dents2-edit.jpg

IMG_7015dents2-edit.jpg

IMG_7016dents2-edit.jpg


THANK YOU!
 
Question i have replaced the metal [hand formed pieces] in the cars shell in the areas that required it after i ground/smoothed the welds i filled the area with duraglass just to rough shape. Should i have sealed the entire car prior to applying the filler or am i ok with what i have done? I went to the body supply store today and the guy did not seem to think i had screwed up by doing that he said that old school guys may think its wrong but fillers have improved over the years and not to worry. Should i continue to skim coat and smooth the body prior to sealing or etch primer or what? kinda lost here i don't want to waste time and money doing this, hopefully i have not done something that i have to redo.
 
I always thought you wanted to apply fillers to bare metal for maximun adhesion so I think you are ok Lou, but I am also no expert. That's how I did it on my car anyway.
 
Thank's i'm not a body man and i was thinking the same way due to adheasion to metal with nothing in between plus i don't want to waste primer as i sand and smooth [my son and i ain't got a large budget] we're just trying to do a budget build for him so he can take something of his with me and my cuda to the local cruise in.
 
don't lose this thread i can't read it now it's great post it some place i can find it later thank's
 
I always thought you wanted to apply fillers to bare metal for maximun adhesion so I think you are ok Lou, but I am also no expert. That's how I did it on my car anyway.

Todays fillers/glazes can adhere to most all sanded substraights meaning paints, primers, sealers and bare metal. I among many would advise NOT to go to bare metal unless it is absolute! When grinding to bare metal you expose the steel to moisture.

Most folks use parts store special "Bondo". The absolute worst thing you can waste money on. Most products of this nature need Physical adhesion i.e. grind/sand scratches. Crap shrinks and cracks and eventually pops off after rust has covered the bare steel that was exposed before the filler was applied. By the way, fiberglass needs the same "Physical" adhesion on steel. Don't use it either imo..

S.E.M. and Evercoat have the leading fillers/glazes available in my professional opinion. Kent also has some good products.
 
Question i have replaced the metal [hand formed pieces] in the cars shell in the areas that required it after i ground/smoothed the welds i filled the area with duraglass just to rough shape. Should i have sealed the entire car prior to applying the filler or am i ok with what i have done? I went to the body supply store today and the guy did not seem to think i had screwed up by doing that he said that old school guys may think its wrong but fillers have improved over the years and not to worry. Should i continue to skim coat and smooth the body prior to sealing or etch primer or what? kinda lost here i don't want to waste time and money doing this, hopefully i have not done something that i have to redo.

Duraglass is a more modern product with the correct adhesives to apply to bare metal. I choose to get the panel as close to original as possible and use Evercoat glaze. You really don't want more than 8-10 mils of filler imo. After the "Hard" bodywork is done (I finish rough with 180grt) then i use a quality epoxy sealer. Let that kick a day and then continue with the "Finess" bodywork and finish it with 320grt. 2 coats of 2K filler primer then a good wetsand with 800. Seal again and shoot color-sometimes a midcoat-clearcoat. Done! Unless you run/slide the clear LoL!

Kudos on your thread 67Dart440GT!!! Good advise!
 
Cuudak are you saying not to go to bare metal when refinishing? But isn't it bad to put new base coat and other non laqure finishes over old laqure
 
Cuudak are youyou sayingwith not to go to bare metal whentrimmed refinishing? But isn't it bad to put new base coat and other non laqure finishes over old laqure

Not when you use 2K epoxy sealer. This "Completely" seals the substraight. Done it many times.
The condition/thickness of the finish determines whether or not I choose to reach metal when I am sanding. Chips and scratches also come into play.

If you have to take a car/panel to bare metal you MUST condition the metal. Acid etch/wash is vital to prepare the bare metal surface before anything can be sprayed on it. That is unless the sealer you choose has etching chemicals within. I use PPG Dp90LF on most projects. Even with the Dp90LF I still apply GEM with a squirt bottle and a lint free cloth and dry scuff it with 180 once cured.
 
Cuudak are you saying not to go to bare metal when refinishing? But isn't it bad to put new base coat and other non laqure finishes over old laqure

Laquer finishes are really old school. Unless the vehicle had a second paint job or custom paint in its life most 60-70's vehicle manufacturers and some 90's Japanese used Enamel products.
 
Have any of you used a DTM (direct to metal) 2K instead of an epoxy or etch as a base primer ?

Maybe someone can run through the different types of primers and were and when you use them ?

Epoxy primer
Polyester primer
urethane primer
high build 2K primer
Lacquer primer

Theres so many choices that it can get real confusing especially forr someone like myself who spent about 2 years in a body shop knows enough to get myself in trouble lol
 
Is it ok for some Q&A here? I would also like to do my own work well most of it to save money. From start to finish.
 
This is a good idea as well, a lot of people forget about corrosion protection AFTER the repair is done. I made a wand that attaches to a binks #7 that I can spray epoxy into all the nooks... I just let it run out... plastic under the car.

I'd really like to see your wand and how you made it. I've been thinking about how to treat the insides of panels after I sandblast what I can get at. Eastwood has an aerosol with hose and nozzle that sprays in a circle, but I'm not sure its the product I want to use.
http://www.eastwood.com/internal-frame-coating-w-spray-nozzle.html

Your advice for sanding filler is really great. I've done just enough of it to understand very well why the methods you describe will make a big difference. Shaping the filler can be very frustrating and you've explained it well.

I've read a great deal on the various rust treatments. Lets just say there is a lot of opinion out there and sparse hard data.

I've also been researching the new rust removal products that work by chelation. These are highly impressive. It's worth looking at the web sites to see how they are being used even on complete bodies with a spray and collect/recirculate method.

I bought this one. They ship a concentrate that saves a lot of shipping cost.
http://www.rustremoval.biz/rotisserie-car.htm

Another (there are several).
http://www.evaporust.com/evaporust.html

I'll post some info after I've put the product to use.
 
Have any of you used a DTM (direct to metal) 2K instead of an epoxy or etch as a base primer ?

Maybe someone can run through the different types of primers and were and when you use them ?

Epoxy primer
Polyester primer
urethane primer
high build 2K primer
Lacquer primer

Theres so many choices that it can get real confusing especially forr someone like myself who spent about 2 years in a body shop knows enough to get myself in trouble lol


Sorry guys, been really busy at work on this Rustang. :banghead:

I will try to help answer some of the questions listed above by everyone.

As far as direct to metal primer... YES I have used them and I do like them... it eliminates a step right? The one I used with good success is PPG's NCP 270.

Maybe I can explain to others what it really is.

What really is primer? Why do we use it?

A few reasons, protecting bare metal, helping other materials stick, and helping fill sand scratches and low spots in body work.

A "direct to metal" primer, or corrosion resistant primer can be directly applied over bare steel.

What kind of primers are direct to metal? Lots, and you just have to read their product info first.

Most, Epoxy primers, Etch Primers, and SOME filler primers.

It can be an advantage to get a Filler Primer that is direct to metal, although like mentioned above, I believe NCP 270 Primer is about $180 a gallon WITHOUT catalyst. It's a good primer though. Getting a direct to metal filler primer can save you a step and time.

Here is a run down of when and where you can and should use different types of primers.

1. Etch Primer, is basically a primer that has an acidic content that "etches" or eats it's way into the metal. This primer is the BEST for adhesion. Most primers rely on "mechanical" adhesion to stick to the car... this is sand scratches. Etch primer will basically create it's own adhesion. This primer should be sprayed very lightly and just one coat basically still being able to "see through" the coat. It is also a very TOXIC product that I really don't see much of a use for anymore.

2. Epoxy primer, great adhesion properties (sticks to anything) durable, awesome for corrosion resistance. I use epoxy over bare steel, and also over the top of my primer surfacer for sealer before base coat. Epoxy is a great product. Epoxy generally does not sand well, and dries very slowly.

3. Lacquer primer, shrinks, cracks, and basically is an old technology. It dries very quickly and can be dusted over bodywork or primer as a guide coat but I don't recommend using it.

4. Poly primer, is a VERY high build primer, most body fillers are polyester based as is this primer. This type of primer is basically sprayable body filler. This is a good primer for leveling an entire car. This primer has the possibility of cracking and chipping because it is so THICK. It does have it's purposes.

5. 2k primer and Urethane primer are usually associated with the same product. A 2k primer is a "two part" primer, basically the primer, and a catalyst. 2k Primers are usually associated with a sandable surface primer or filler primer. The primer is used to fill sand scratches and also help you level bodywork. Dries fairly fast, and usually has a good build of product.
 
I'd really like to see your wand and how you made it. I've been thinking about how to treat the insides of panels after I sandblast what I can get at. Eastwood has an aerosol with hose and nozzle that sprays in a circle, but I'm not sure its the product I want to use.
http://www.eastwood.com/internal-frame-coating-w-spray-nozzle.html

Your advice for sanding filler is really great. I've done just enough of it to understand very well why the methods you describe will make a big difference. Shaping the filler can be very frustrating and you've explained it well.

I've read a great deal on the various rust treatments. Lets just say there is a lot of opinion out there and sparse hard data.

I've also been researching the new rust removal products that work by chelation. These are highly impressive. It's worth looking at the web sites to see how they are being used even on complete bodies with a spray and collect/recirculate method.

I bought this one. They ship a concentrate that saves a lot of shipping cost.
http://www.rustremoval.biz/rotisserie-car.htm

Another (there are several).
http://www.evaporust.com/evaporust.html

I'll post some info after I've put the product to use.


Thanks for the reply, good info and glad some will help you too. The wand I made is very simple, I just took some copper tube, small diameter and made a fitting for the fluid tip side, and soldered a cap on the end, then I just drilled some small holes in the end, it does not spray 360 like the eastwood type shows, it more or less just lets me dump a bunch of product in hard to reach area's.

I forgot the name of another product I used to use in a body shop a long time ago, it was a yellow snot looking material that you could spray with a hose end inside doors or quarters, a great product. This product would also "creep" around the hem flange of a door skin, I will get the name of the product asap.
 
So say you have an older finish. Thats chipped. I plan to sand down with 80 grit the entire car. But most likely not to bare metal. What primer would be best to lay down?
 
-
Back
Top