Lower Ball Joint/Steering Arm Removal Advice Needed

-

ADHD426

FABO Gold Member
FABO Gold Member
Joined
Mar 20, 2012
Messages
236
Reaction score
14
Location
CA
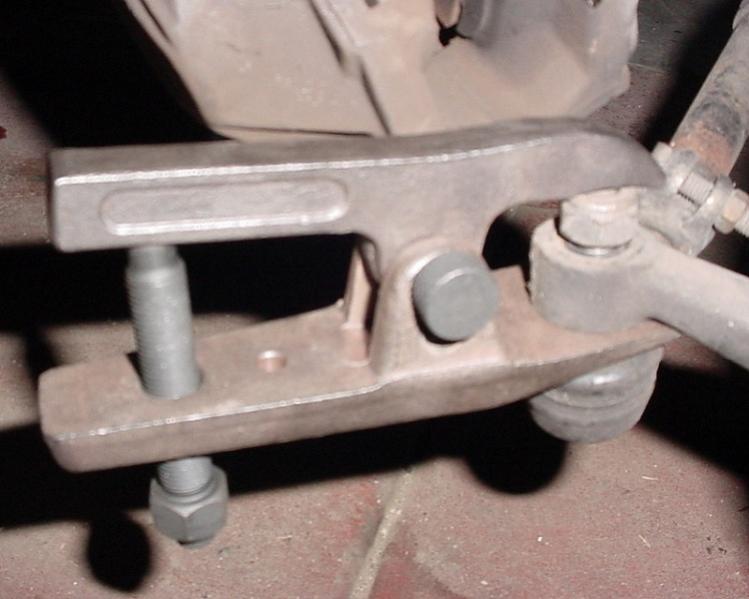
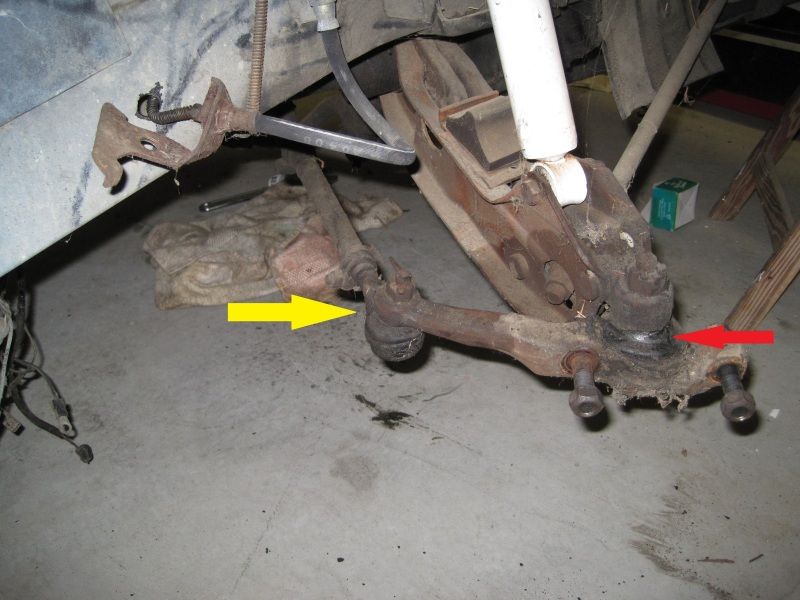
As you know I am in the process of removing my K-Member. Also while doing so I am upgrading my 71 Duster Drum brakes to Disc brakes off of a 75 Valiant. I have all the parts, but I need to swap out the Steering Arm/Lower Ball Joint. I have already taken off the UCA, so I don't think that specialty tool will work, not sure it would work on a 71 Duster anyway. I figure I can use the pickle fork on the ball joint that connects to the LCA since I will not be reusing it. I am not sure about the joint between the lower ball and the tie rod (Yellow arrow) will a tie rod remover work there?

Questions:
1. If I use the pickle fork at the red arrow will I damage anything?
2. Would it be easier to put the UCA back on and use that specialty tool to get the steering arm/lower ball joint off?
3. When I hit the joint with the pickle do I drive it straight in just like the arrow, or do I put it in and hit it up and down?
4. If I use the pickle at the tie rod do I risk messing up the entire steering system?

Any other help/hints/wisdom you can provide would be appreciated, I have never taken apart one of these joint things.

IMG_5049.jpg
 
Use the pickle fork. you will not damage anything. You will need to replace the inner and outer tie rods anyway. same for the lower ball joint. it looks shot as well. use the pickle there too. go straight in, the wedge part of the pickle fork will separate the two pieces...

make sure you take off the castle nut off both pieces...sometimes you can loosen the nut all the way to the top of the threads, and hit the nut with a hammer to separate the ties rods and lower ball joint...
 
Take out the cotter pins, loosen the nuts, then start smacking the ball joint at the tapered connections; the spnidle and tie rod will fall out. Easiest way; That's how the dealer techs do it.
 
Yep. Pickle fork at red arrow, tie rod remover at yellow arrow. The 72 UCA can't be used with the 75 spindle. Save yourself a lot of frustration if you're going to put a new UBJ in the new UCA and need to get the old one out first. Mount the UCA on the car then remove the UBJ. I have usually needed to use my 6' cheater bar on my breaker bar.

Be careful when installing a new UBJ to make sure it is not cross-threaded. You can start the install with the UCA off the car, but will need to install to torque to spec.

Besides cutting cotter pins off (don't even think about reusing them), it may go better to use KROIL or another effective rust penetrant. Good luck, be safe, and have fun.
 
The tie rods ends normally come apart fairly easy with a pickle fork and a 4 lbs. hammer. Not so easy at that lower ball joint. With the lower arm floating in rubber mounts as it is, you might beat on a pickle fork forever trying the split that join.
Knowing the best order of steps is not going to help now but next time...
Keeping all the weight of parts on your team can make it a lot easier.
 
The lower ball joint to LCA is tough. What has worked for me is remove castle nut (if not re-using ball joint), spray WD-40 on the stud, pickle fork in joint sideways so it doesn't bottom out on LCA. Hit it in and hit down to pry it, hit top of stud, repeat 20+ times. I vaguely recall getting a Pitman arm puller on there once, which works better. Search for the "two hammer method" I saw on a Mustang site. Supposedly all the shop guys knew that and could get the joints apart with a couple wacks from both sides on the part surrounding a ball joint stud. I tried that last time and didn't work for me, but sounds intriguing. Things pop apart easy on the TV shows, but I am guessing they stage those.

BTW, you are in CA so you have no problems. From your photos, you don't even know what rust is. They guys in the frozen, salty north must be drooling. Paint all the parts so it stays that way. I even paint my ball joints and tie rod ends, cause I like "purty". I second installing a dual master cylinder and prop valve. I bought the later a few weeks ago for $28 from Jegs on ebay.
 
Loosen the castle nuts almost all the way off, turn the steering so you can hit the end of the steering arm, by yellow arrow,.. smoke it 2 or 3 tmes with a 40 oz. hammer, it will fall out,, the ball joint, same thing, loosen nut to end,, smoke the end of the control arm 3 or 4 times, (just above red arrow), it'll fall out.. works for me, and saves the rubber boots..
 
Check out the grease boots carefully before reassembling. You might consider replacing them if they are 40 years or so old.
 
Loosen the castle nuts almost all the way off, turn the steering so you can hit the end of the steering arm, by yellow arrow,.. smoke it 2 or 3 tmes with a 40 oz. hammer, it will fall out,, the ball joint, same thing, loosen nut to end,, smoke the end of the control arm 3 or 4 times, (just above red arrow), it'll fall out.. works for me, and saves the rubber boots..
thats right you never have to use a pickle fork,just a pony sledge
 
I have found cutting out the rubber grease boot before having at it with the pickle fork works a lot easier. When the fork is in contact with rubber boot, a lot of the energy delivered by a BFH is absorbed, and when it is steel on steel that ball joint gives up fast.
 
I have found cutting out the rubber grease boot before having at it with the pickle fork works a lot easier. When the fork is in contact with rubber boot, a lot of the energy delivered by a BFH is absorbed, and when it is steel on steel that ball joint gives up fast.
Agree. I always discard the rubber boot anyway. Indeed, I don't even use the cheap rubber boots that come with new ball joints. I only use polyurethane since inexpensive, and I go get red so everybody knows I splurged. You can get on ebay or speed shops. The 9.### numbers are Mopar, but dust boots are pretty generic.
 
Cutting the boot on the lower ball joint worked with the pickle fork.
Used Dorman tie rod dust boots #13567 <$6, seem to fit large ball joint.
 
If your going to toss them give them some good shots with a 3lb hammer, worked for me. I needed a pickle fork for my upper ball joint though
 
Once you learn where to hit them with the big hammer they will drop right
out with one or two swings.
I haven't used the pickle fork in decades. Good aim with a hammer makes
this job very easy.
The idea is to smack/shock the female taper into distorting a bit. The male
tapered pins fall loose.
 
I quit using pickle forks a long time ago. I use a ball joint separator tool. It pops them right off with no damage to the parts or rubber boots. Clean and quick too.
 
HF has a tool that looks like a clothespin. You hook the thing on and turn the jack screw until the thing pops, sounds like a firecracker. No hammer needed but its slower but if your stuff is coated or painted, it wont even chip the paint.
IMAG1464.jpg

105319d1346818331-lower-ball-joint-separator-w123-suspension-tool-1sep.jpg
Where did you get that tool? I have yet to get it to pop loose...thanks
 
-
Back
Top