My 1974 Plymouth Duster 360

-
Happy Birthday, Prine! You Old B@$+@*d!:clock::bootysha::argue::thumblef: :notworth: :wave:\\:D/:supz::cya::hello2::burnout:
 
He got it running yesterday! It cranked right up. Sounded as good as it could over the phone... No issues. As soon as that pesky 'console pivot bracket' arrives, by Friday he thinks, it will be moving under its own power. He was super stoked...

Maybe he will come back and post some pics for those that are interrrested. I dont know.
 
It runs. Sounds damn good :-D , 65 psi cold oil pressure, no leaks...sound quality on the vid is full of open manifold single car garage resonance....but enjoy.

[ame="http://www.youtube.com/watch?v=0x0Fc_R5us0"]YouTube - kpgsx 1974 Plymouth Duster 360 roller cam LA360 crankup[/ame]


:clock:
 
sounds good, I really like those fender support my 73 did not have those.
By the way looks like you better put some gas in the tank. LOL
 
No...there are no definite plans for the green 73' Duster. It is going to sit right there...until I or my cousin MARTIN need a tidbit...then we have Absolute Permission to go and retrieve anything we want.

Come to find out....the Woman that owns the car...owns over 1000 acres of West Texas Brushland in the surrounding area and my Great Grandmother and Grandfather used to help their family out before,during and after the Great Depression up until her father passed away...(my grandfathers friend).

Turns out my grandfather had turned a wrench or two on the ole Green Duster more than once. The old man got alzheimers and went off the rocker a little bit...noticed the driver side tail light didnt work. Thought there was a short in a wire somewhere and went to pulling wires and cutting into harnesses, and THEN called my grandpa. My grandpa went over and looked at the mess of wires the Green Duster had become and couldnt believe it....He pulled the driver side tail light bulb out and it was clearly blown with black all over the bulb.

The old man was then left without a vehicle, and went even further off the rocker...and later got put into a nursing home for permanent care.

The car sat there from 1983 until I saw it riding my ATV on some back roads around my hometown. I mentioned it to my dad and he filled me in on the story. I asked if he thought it could be bought and he gave me the womans number. When she found out I was interested and had another Duster that I was working on, She GAVE me rights to any part, piece, or anything I wanted as long as I respected her land/property entering or exitting.

I really look forward to bringing my completed Duster to a Homecoming for her to see......
:clock:
 
Well I figured I would document my 9 day vacation/birthday/weekend I took to focus on getting my Duster started and closer to going to my friends' shop for body work.

I got off Saturday 10-30-10 at 1pm and dont have to be back to work until Nov. 9th.

Saturday afternoon I sent payment for the console pivot bracket I found on Moparts..and went over my crankup checklist.

I needed to make a jumper for the SeatBelt Interlock.
I needed to mock up some manifold head pipes.
Weld them up.
Hook up the coil.
Hook up the Ballast.
Hook up the Solenoid.
Fill the engine with oil.
Fill the radiator and block with coolant.
Test the Ignition Start Circuit.

No problem. Sunday I felt like crap. Just kinda walked around in a daze but at least I had a list.

Got out my wiring kit and made a jumper. Ran a Coil + wire, and the - wire from the box. Hooked up the ballast, made all the solenoid connections. Stood there and just gazed at it, imagining the sound.
Went to bed early.

Got up Monday took the kids to school. Drank 1/2 pot of coffee. Dreaded mocking up the Head pipes. Dragged my feet. Read all of Louis' (Madart) twin turbo 67 dart thread and got my butt out in the garage and pulled out my stash of mild steel aluminized bends and got about 6- 2.5" mandrel 90*'s out and got to it.
I used my die grinder and cutoff wheel and cut, fit, and shaped the passenger side. Then got under there and worked all the pieces on the driver side to fit through and inbetween the starter and torsion bar.
Once I got a piece to fit I would simulate a weld with a wrap of 1" masking tape.

I finally got the Head Pipes where I liked them at about 10pm that night.:sign10:
 
Tuesday morning was my 32nd birthday. I got up, made coffee, got the kids ready for school. Dropped them off, and went to the shop.

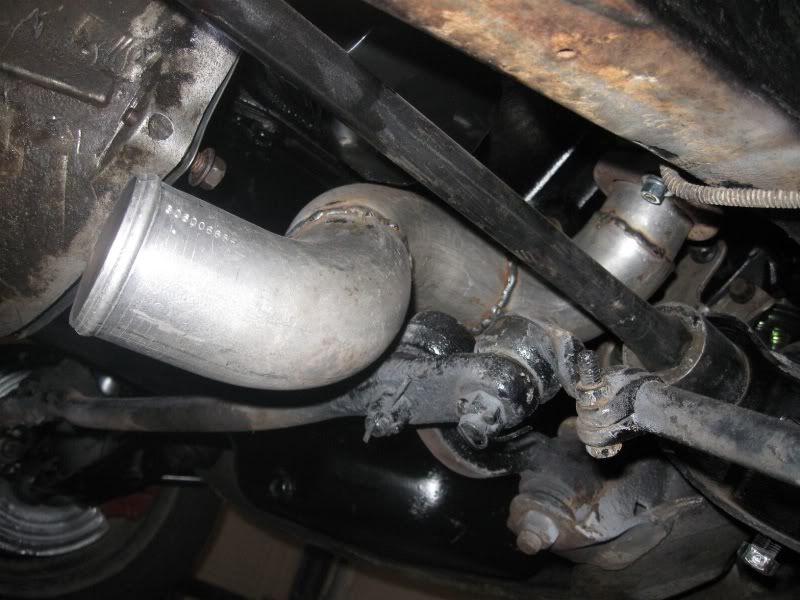
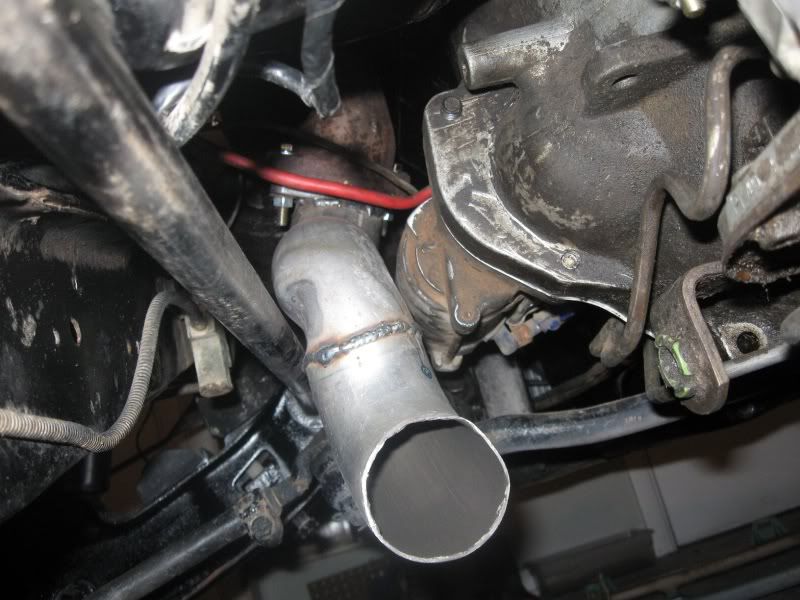
Welded up my mocked up 2.5" Manifold Head Pipes.

Grabbed a New collector gasket at Advanced Auto Parts on the way home.

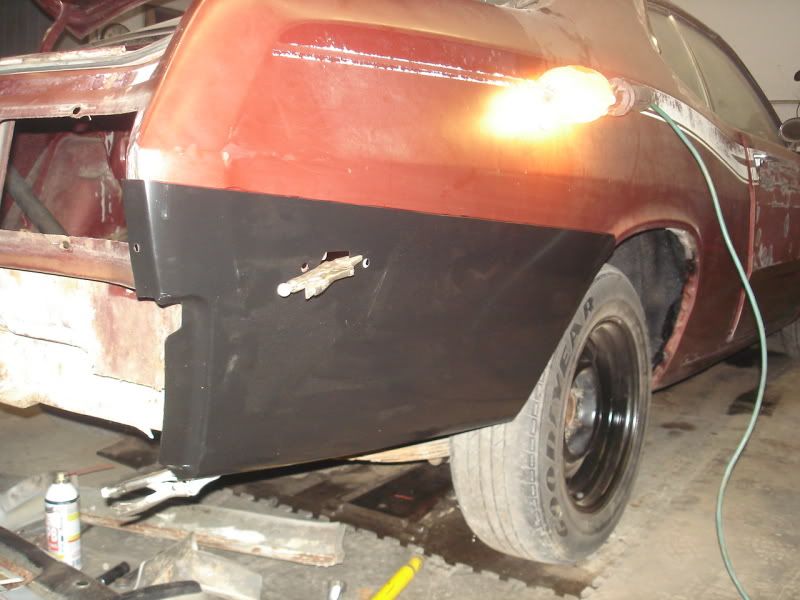
I installed the passenger side first cause I knew it was a no brainer and the easiest of the two. It lined up perfectly and fit down and around the oil filter and down through the torsion bar no sweat.
005-2.jpg


Damn, I am good.

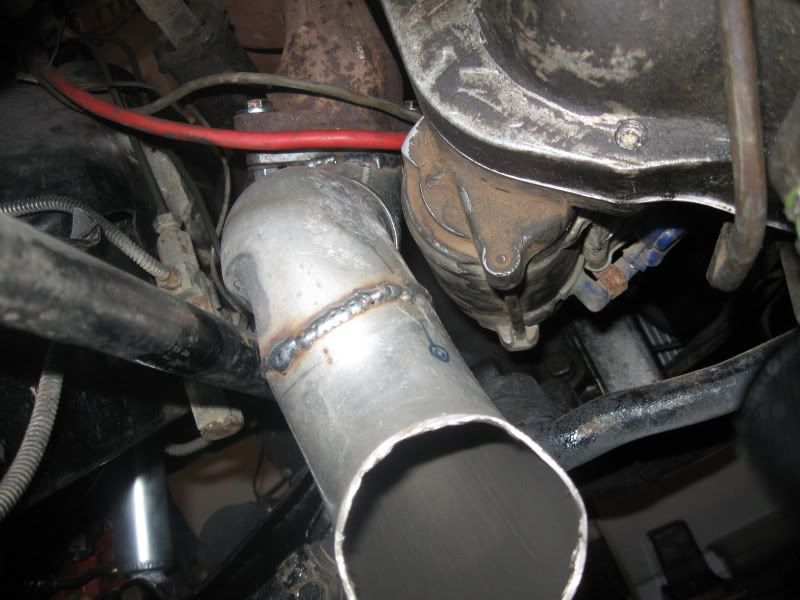
I slipped under the driver side, put the flange up to the manifold and couldnt get the bolts in.....I had missed the angle by .18"...or 1/8 of an inch....my head pipe was up against the torsion bar and I needed .5 to .75" of clearance.

I hunted around for a BFH and all I could come up with was a claw hammer.

After a couple of retarded plinks on the mandrel pipe....I was loaded up and haulin *** to the shop to use the torch. I heated up the contacted area and found a piece of 1.5" pipe and a 8 lb sledge hammer and made the pipe conform to my desires....after a quick quenching I was headed back to the garage.

With the clearance dimple :-D in the pipe, I installed it, the bolts dropped right in I installed the new gasket and I tightened up the bolts.
003-1.jpg

004-2.jpg


After that I moved onto the next thing on the list.

Set the engine on #1 TDC.

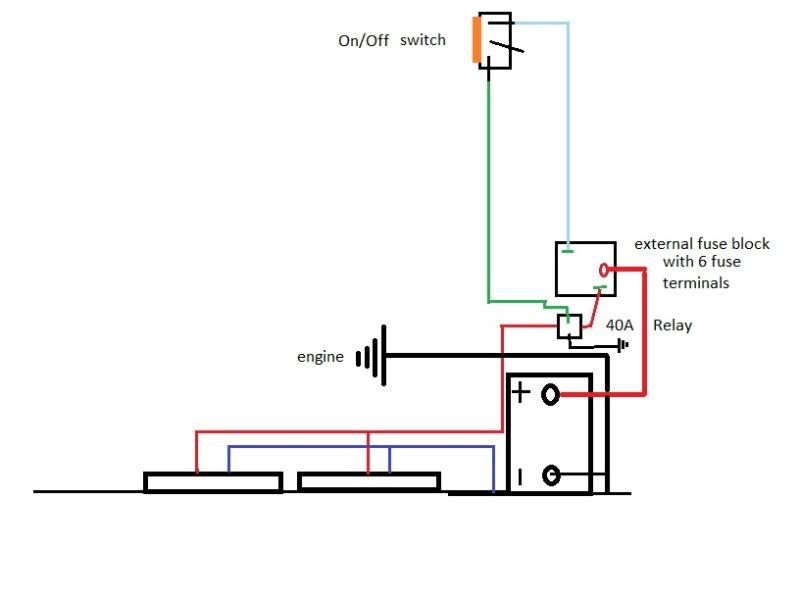
I filled the engine with 4 qts of Castrol GTX 10w-30 and 1qt of Lucas Oil Stabilizer. I filled the champion radiator and block with 4 gallons of PEAK all season coolant. I tested the Ignition Start circuit and the solenoid was getting a signal from the key.

All Systems go.

Grabbed the gas can and headed off to the Chevron for 5 gal. of 90.

Poured in the 5 gal. into the brand new tank, with new sending unit....new filler neck grommet.

Filled a 20oz. root beer bottle with a modified cap with a hose barb and hose for carb priming, half full. Popped the feedline off the carb and filled the float bowl on my FREE (ok....$13.99 accelerator pump) edlebrock 600.

Sprinkled a dabble over the venturi's for the homies.

Hooked up the battery and starter solenoid wire.
Turned the key:-D.....nothing.

huh?

slipped under the car and pulled on the shifter lever on the trans...Damn it....REVERSE.

Hit the key, and V-VVROOOOOOM.....:-D:-D:-D:-D:-D:-D:cheers::cheers:
Happy Birthday Me!!!!

I let it run about 1 minute the first crank.
Shut it off and just looked it over. No smoke, no leaks. :toothy10:

Yay!

Cranked it up again. The lifters quieted down.
Set the ignition timing at 10* ATDC and locked down the distributor.
Noticed the oil pressure light would just come on intermittently so I shut it down once I noticed it on steady.

That worried me. Stupid Oil light.

So I went to the junkyard Wed., found a crappy gauge set in a ford pickup.
Stopped by Advanced Auto Parts and got a copper oil line install kit.

I hooked up the gauge, cranked the car and it shot up to 65 psi. :cheers:

I let it warm up this time, the (instrument cluster that I rebuilt) temp gauge works. I let it get up to 180* and let the thermostat open....no leaks. No Oil on the ground, no coolant either. :-D

Manifolds started smoking a little as the gaskets burned in.

Shut it off and put a box fan in front of it to let it cool down.
 
Thursday was just pure bliss.
I was uphoric all day. I couldnt believe my accomplishment.
I uploaded my crankup vid to youtube and had to share:
[ame="http://www.youtube.com/watch?v=0x0Fc_R5us0"]YouTube - kpgsx 1974 Plymouth Duster 360 roller cam LA360 crankup[/ame]
Above.

I prepped the brake system for bleeding. Topped off the reserviour. Loosened all the bleeders.

Tightened up the Driveshaft Strap Bolts.

Swept the garage floor.

Friday the wife and my middle child felt like crap. No fine tuning.
Complained of gasoline vapors all day. So I made up a vent hose for the fuel tank, and covered the carb.

Console Pivot shaft bracket showed up Friday afternoon.
I installed that this morning.
002-3.jpg


Adjusted the Shift Linkage for 1st thru Park.

Cranked it up and let it warm up.
Put it in Nuetral and started throwing the Mercron to it till it showed up on the stick.
Shut it off and let it cool.

Attempted to bleed the brakes but the rear brake cylinders are not passing fluid thru them.

Front Circuit bled with no issue.

Ahh Hot Rodding....:bootysha:

Its 2:00am and I am tired....going to bed now.
 
Hey, what are the wheels behind the car on the floor in the first video on this page (post #124)? Something you plan to run on the Duster?
 
What? In the video? Rims? The 5 spoke 17's? Those are 2007 Dodge Charger 17"x7" take-offs from the dealership I work at. Been doing some measuring, fitting, and trying to figure out everything to be able to use them.

0083.jpg

0032.jpg

0042.jpg


I am reluctant about them because I dont want to deal with the front hub/dust cap issue.

I dislike the thought of using a 1" spacer on the front because I dont want the sidewall of the tire to rub the inner lip....otherwise I really like the rims, and the price I paid for the set.

Going to try to fit 225/50/17s on the front and 245 or 255/50/17's on the rear.

We'll see.

I am also considering just spending the $$$$ and going with my all time favorite rim...15" Keystone Classics....my first Duster had Keystones' on it and I just love the way they look.
KeystoneRims.jpg


:clock:
 
Your projects lookin great, and I know how you feel on the rims. I like the SRT-4 rims, but they require a 2" spacer... Gonna find some way for them to work without the use of a spacer.
 
Your right cousin...its due time again for an update.

Well....I ended up wiring up the fans on a relayed circuit like this:
FanCircuit-1.jpg


I used a cheap double toggle switch and a 40A relay and some 10ga wire so as to make the least resistance and most durability on such a necessary circuit.

I borrowed my friends tandem axle trailer I went to DFW to get the car with and loaded it up and took it to my Friends' shop for the body work.
Here it is on Jan. 27th 2011...the morning I dropped it off.
dusterbodyshop01.jpg

057.jpg

059.jpg


With income tax....the wife approved the purchase of my Lengendary Auto Interior seat covers, carpet and dash cap....took 3 weeks to get all that in my possession.

I talked to AMD and purchased a passenger lower quarter patch to repair the gouge down the lower quarter..It came in pretty fast...so I took it to my bodyguy, not remembering to take my camera, and missed getting the picture of the lower quarter removed....

I went back a week later and he had the patch mocked up and sitting in there.....
dusterquarterrepair.jpg

dusterquarterrepair1.jpg


As it sits right now.....the quarter patch is welded in, skim coated and rough sanded.

He (body guy) removed the windshield, and rear window, cleaned the window channels, and fixed some small rust issues...one on the passenger A-Pillar, the other on the top roof by the back window..... and he pulled a baseball dent from the passenger side top roof by where the A-pillar is.

He is getting ready to cut out my Dusters' broken out Driver Door Striker Post....and replace it with one we plasma cut from a wrecked donor car....he said that he will weld it in and smooth it in so good it'll never be obvious it was repaired.

I am going up there this weekend, and will remember to take my camera for more update pics.

I realize its been nearly 7 full months since I dropped the car off for bodywork and paint.....but my friend has 40 years experience and he is a retired Master Sgt. from the USAF and he works a part time job and works on my Duster and his toys on Thursdays, Fridays', and Saturdays...I told him not to rush on it, but to do a good job. I handed him $1000.00 for his labor, I bought all the sanding materials and told him to let me know when he needed more $. He has been working on it as deligently as he can, and using his tricks to keep further costs down. He told me not to pay him anymore...that he would fix the rest and get it in a few coats of paint and clear coat it.....and doesnt know I am gonna drop another $1000 to him when he gets it in color.

Coming right along.......
stay tuned.
 
ya ya ya....time for a update.

It was a long moisture free winter...lots of nasty cold wind and frigid temps....but pulling through...my buddy has diligently been sanding and prepping along.

I have moved a bunch of paper myself on the weekends and I am proud to say we are making some real progress.
006-4.jpg

008-1.jpg

009-1.jpg

010-2.jpg

011-1.jpg

012.jpg


and a crankup
(double click this picture)


more work
001-6.jpg

003-5.jpg

005-5.jpg

006-5.jpg


in the booth for solid primer and guide coat!!!!!
033.jpg

034.jpg

035.jpg

036.jpg

032.jpg

037.jpg


Whew!

Still some more work to go....but man it feels good to make visible progress.

Been trying to source the WeatherStripping....a new windshield, and gasket, and where in the world do you guys find REAR window gaskets?

Anywho...pressin on.

Enjoy.
 
-
Back
Top