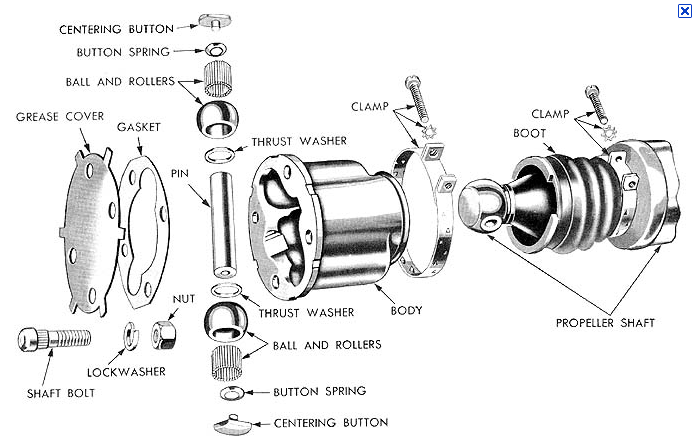
Original Balland trunnion u -joint

-

alcronk

Valiant64
Joined
Aug 1, 2009
Messages
51
Reaction score
17
Location
Coquitlam B.C. Canada
Can anyone help a first timer take apart a ball and trunnion u-joint and the push button cables on a 1964 valiant. These are the last things we need to do, then we can pull the 273 v/8 and push button transmission, to start the rebuild.:newb: Any help would be welcome. THANKS in advance. valiant64
 
It's been a long time since I messed with a ball and trunnion setup. My recollection is....


Pry the cover off the end after prying up the tabs holding it on

You may have to remove the boot clamps to get enough room

Push the outer body down against the driveshaft

Now you should be able to remove any hardware and the balls

Then you'll have to "rig" necessary hardware to press the center pin out of the main part of the shaft

When installing a new pin it is IMPERITIVE that it be a tight press fit, and centered in the shaft with no more than .006" off center (from Motor's Manual.)

Modern wisdom is to take it to a driveshaft shop, and get the damn thing replaced with a modern U joint/ slip yoke setup

with a matching drive flange.

My God, I knew there was something seriously wrong, turns out that Rolls/ Bentley even used the damn things:

http://www.demascotte2.nl/werkplaatshandboeken/TSD2476-F-Drive Shafts and Universal Joints.pdf

Screenshot2011-02-11at92236AM.png
 
Pishta is right: you don't need to take apart the ball & trunnion U-joint to pull the engine and trans. Just remove the four nuts holding the front U-joint housing to the transmission output flange and lower the driveshaft. Depending on the condition of the B&T front joint -- most are quite worn at this late date -- you may want to consider, now or later, converting to a conventional front U-joint.
 
That was my first thought....why pull it apart? There aren't any repair parts out there for it anyway unless you're lucky and find some NOS stuff stashed away somewhere. As for the shift/park cables....If you've never removed one before, start with the park cable. First, grab a drain pan and put it under the tail housing. Loosen the clamp holding the cable housing. It's a 7/16 nut on a stud. Back off the nut until it's flush with the end of the stud. Tap the end of the nut so the stud moves and releases the cable housing. Remove the Allen head plug in the small cover. ATF will start draining out so don't be alarmed. The trick to releasing the cable end is to trigger a hairpin like clip that fits in a slot in the cable end. A small screwdriver can be used to press it aside. If you can't figure it out, just pull the cover off with the cable still attached so you can see how it's fastened. Carefull you don't bend any of the parts inside as you pull the cover off. Once you see how the cable end is fastened, you should be able to do the shift cable. On it, just pull the bolt holding the adjustement wheel and pull the cable out as far as it will easily go. Then the fishing around with the small screwdriver begins. Sometimes it will release on the first try, sometimes it takes 15 minutes to get the right angle. Have fun!
 
Cant you just unbolt it from the trans flange?

Oh hell I misread what he posted. Some reason' t other I thought he said "how do you take it apart" as in "for rebuild?"
 
That was my first thought....why pull it apart? There aren't any repair parts out there for it anyway unless you're lucky and find some NOS stuff stashed away somewhere

Sure there are -- you can get replacement boots and repair kits from Andy Bernbaum. But really, money's better spent on a cross and roller conversion.
 
Like I said, if you find someone with a stash of those parts you can rebuild it but my point was, you're not going to just go down to your local auto parts store and expect to find replacement parts. If the joint is bad, do the conversion unless it has to stay stock for show reasons.
 
Un bolt it then take your drive shaft to a shop and have the nice driveshaft guy convert it to a ujoint, Rebalance it and enjoy life. I went through this with my 65 cuda and finally realized why mess with the old B/T crap! It is too hard to find parts, less reliable and just plain hard to work on. It cost me a couple hundred bucks to get it converted rebalanced and it runs smooth, safe and if something happens its easy to replace the ujoint....In my case we could not find the boot that covers the B/T joint seems a simple thing but became a chase not worth the time or effort!
 
Pishta is right: you don't need to take apart the ball & trunnion U-joint to pull the engine and trans. Just remove the four nuts holding the front U-joint housing to the transmission output flange and lower the driveshaft. Depending on the condition of the B&T front joint -- most are quite worn at this late date -- you may want to consider, now or later, converting to a conventional front U-joint.

I used this conversion and it is slick.....ONE NOTE THOUGH: THE FLANGE YOKE PART NUMBER 2-2-329 LISTED IS INCORRECT .....THE CORRECT PART NUMBER IS: 2-2-349

In my opinion this is the only route to go.....get rid of the ball & trunion setup......the parts list was aprox $130.00 :glasses7:

Rickster
 
Back here for more help . :banghead: I have removed the drive shaft with help from members here ,but have tried for about two hours to remove the park lock cable from the tranny with no luck . We did every think by the shop manual but we could not get the cable to release. So now my next question is how hard is it to release the cable from the under the dash ANY help would be welcome . THANKS IN ADVANCE valiant64
 
Don't remove it from the dash, you'll make a much bigger hassle for yourself. Keep at it under the car until you get it. It's tricky but not impossible.
 
Back here for more help . :banghead: I have removed the drive shaft with help from members here ,but have tried for about two hours to remove the park lock cable from the tranny with no luck . We did every think by the shop manual but we could not get the cable to release. So now my next question is how hard is it to release the cable from the under the dash ANY help would be welcome . THANKS IN ADVANCE valiant64
Pull the cable and cover together so you can see how it's attached on the inside. Just do it carefully so you don't damage the adapter sping inside.
 
-
Back
Top