Show us your home made tools

-
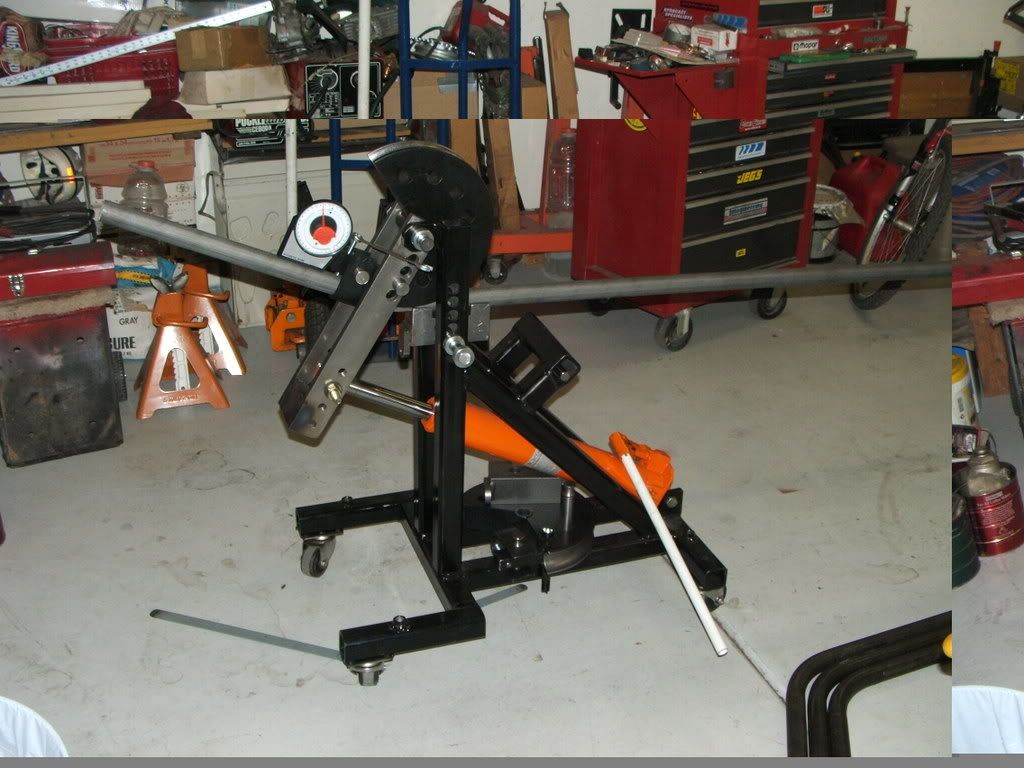
picture is of the bead roller i made.

I cant find the pics for the sheet metal brake, slip rolls, english wheel, ring roller, tracer for the oxy/propane torch,

Also in the works of building a cutter to cut splines for an 8 3/4 axle shafts on the bridgeport.

Would love to see some pics of these other metal working tools :D
:read2: This thread is a WINNER LOL wished I was at home I could scrounge up a couple of homemade junk
 
i miss this thread.. a lot of good info on here so i figured i d bring it back to life. anybody else got homemade stuff they d like to share??
 
Initially built to install/remove, a large welding machine on my rig/truck. It has proven to be very usefull for solo engine pulls/installs, and such:thumblef:
 

Attachments

  • 69 straight axle 011 (Small).jpg
    79.7 KB · Views: 12,527
Here are a few. The first is a Allen head bolt welded on another. The allen head is the perfect size for most trident gear clamps. Makes it very simple to tighten or change clamp.
A water filter for my grit blaster,works great.
Two 6 inch wrenches,cut and welded together. Stick it in your back pocket on Saturday morning when you are out doing little chores in the yard, comes in handy.
When I take the sand out of the blaster I screen it to take the crap out and reuse the sand,simple but it works.

[ame="http://www.youtube.com/watch?v=x22yNaLdiGA"]YouTube - Scrubs - Knife Wrench![/ame]
 
i was gonna post this a long time ago and forgot.
homemade contour guage for doin bodywork and making hood scoops and stuff. works good.
 

Attachments

  • 100_2091.jpg
    74.5 KB · Views: 11,497
some very good stuff on this topic!
will try to take a few pics someday to add to this thread, have a fairly big socket/wrenchthingy at work that is used almost everyday that i made from scrap basicly just until i would get a real tool but after using it for a long time i have kind of stoped careing about getting the right tool
 
Don't throw those old bodies away!

Some handy mock-ups (cut from doner Dusters).

These are excellent when building headers, mounts, custom K-members
and front subframes, pedals and clutch linkage, hanging and working on
fenders; you name it.

They are on dolly wheels and can even be stood on end when not in use.


mock-up1.jpg

mock-up3.jpg

P1010004.jpg
 
Thirty bucks, Harbor Freight and a few beers, netted me a set of homemade front end casters.

011902-Swivel-Caster-2.jpg


Notice that the slip tube is rather long just in case I needed to raise the car up. I didn't need to, but it didn't hurt anything either.

011902-Swivel-Caster-4.jpg

show_image.html
 
purplehaze- i wanna know more about that tubing bender. can you build exhaust with that? what s the largest diameter you can bend with that? any pics of the bends? looks cool.
 
Just had to add this tool I made today -a homemade control arm bushing puller .Total cost in materials $10.59 . I used a 2"W X 3"L threaded pipe with cap.Drilled hole off center ran allthread down the middle . Tighten the nuts and the bushing slides right out! Didn't take too much effort either. I did soak the a-arms in evaporust overnight.Should work just as well to install the new bushings .


That is one of the neatest homemade tools. Very well done Jomoper!
 
purplehaze- i wanna know more about that tubing bender. can you build exhaust with that? what s the largest diameter you can bend with that? any pics of the bends? looks cool.

i doubt it would be very usefull for exhaust work, that type of bender works great for thickwall tubing compared to its diameter and using big radiuses compared to tubing diameter,there is a limit to what the tubing will be able to withstand without a wiperdie and a mandrel controling the tubeflow onto the radius :thumblef:

here is a handy chart http://www.omni-x.cz/en/c/mandrel-a...mandrel-and-wiper-die-selection-chart-for.htm
 
Jomoper - why was the hole in the cap drilled off center?
Thanks,
C
 
Here is the bushing removal/install tool a friend made for me.
I showed him a picture of the tool in the 1967 Plymouth service manual.
It cost me a bottle of Scotch wiskey!
 

Attachments

  • tools 005a.jpg
    99.7 KB · Views: 11,204
  • tools 004a.jpg
    126.2 KB · Views: 11,085
  • tools 002a.jpg
    106.8 KB · Views: 11,285
Jomoper - why was the hole in the cap drilled off center?
Thanks,
C

So it would fit onto the control arm, otherwise it would hit that lip and not sit flush.

Thats what I gather from the pic where the pipe is right against the control arm lip.
 
Just had to add this tool I made today -a homemade control arm bushing puller .Total cost in materials $10.59 . I used a 2"W X 3"L threaded pipe with cap.Drilled hole off center ran allthread down the middle . Tighten the nuts and the bushing slides right out! Didn't take too much effort either. I did soak the a-arms in evaporust overnight.Should work just as well to install the new bushings .

I made one of these today and man does it work well.

I used a long bolt instead of all thread.
 
Don't have pictures, but I convertered a 1 gallon insect sprayer in to a power bleeder for brakes. You fill it with brake fluid, make a adapter that fits the master cylinder, pump the handle to about 10 psi. I mount a pressure gauge on mine and found that 10 psi seems to work the best. The fluid in the tank is drawn into the master cylinder then through the lines and viola pressure bleeding the brakes. I use this system when I replaced all the lines, wheel cyl and master cyl on my Valiant. I also have used it on other cars and it always works flawlessly....
 
-
Back
Top