1964 1/2 valiant build thread.

-
well got started on the floor pan replacement. Got the driver side pan out and got started on installing the new pan. the fitment of these pans is ****! i had to make all kinds of cuts to get them to go around contours in the factory floor that were not stamped into the repop pans. I managed to get them into a shape that layed flat with minimal hammering. I got about 3/4 of the welding done then the rain hit and started dumping. here are some pics.


Looks to me like you did pretty well on the fitment considering a less than ideal repop-good job, I look forward to seeing more on this one:happy1:

Damn nice looking beads btw
 
Oh-forgot to ask-did you have a chance to lay down some rust converter or POR on the subframe?
 
Looks to me like you did pretty well on the fitment considering a less than ideal repop-good job, I look forward to seeing more on this one:happy1:

Damn nice looking beads btw


in hind sight i should have held out and found a donar car with clean front floor pans. it now has a patched hump and patched both front floor pans. lol its getting to be a jig saw puzzle. this is low buget though. I will be going under the car and trimming/welding the other end of the lap weld.
 
well got started on the floor pan replacement. Got the driver side pan out and got started on installing the new pan. the fitment of these pans is ****!


Great work.

Just curious, in the second photo what are the 7 holes in the center of the pan with one off to the right?

Are you going to be reinstalling the original bench or going with buckets?

I am currently working on my floor trying to plug up the original plug holes plus a bunch more. It looks like the original owner must have installed 10 different kinds of seats in it and drilled each time.

image_zps53a28247.jpg
 
the holes in the floor pan are there so i can plug weld the pan to the frame rail. i just hadn't welded em shut yet in that photo.


I will be staying with the bench seat. the seats are already redone a while back by the previous owner. they look pretty good still. will be installing a b & m floor shifter that i will take apart and make my own shift arm for. i want the shift arm to come back and over the seat cushion.
 
got some updates guys! got sick and tired of my old tired, worn out welder and got me a millermatic 211.


this posed another problem. I didn't have 250v volt service set up in the garage. so i went ahead and installed a 50amp 250v receptacle. I had plenty of room for a duplex 50amp breaker so i just installed the new outlet right below the breaker box. i used 6-3 wiring and it is working great!


the next little hiccup was how i was going to ground my welding ground lead to flat sheet metal?......... well i built a magnetic stud to clamp onto. i had a cheap harbor freight magnetic square that i took apart and reused the magnet. works like a champ!


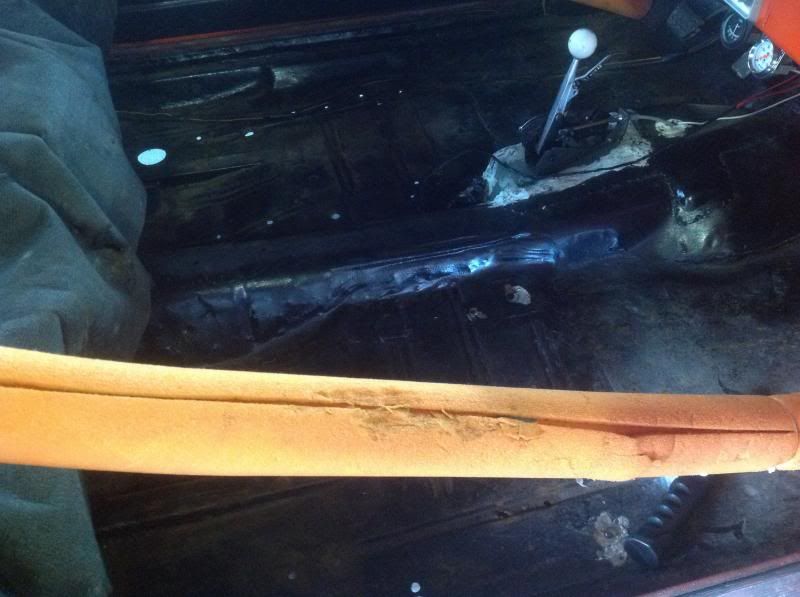
then i actually got some work done on the car. lol. got the driver side floor pan all finished up. then got to working on the passenger side. the repop floor pans suck for fitment so i ended up cutting them into jig saw puzzle pieces but they eventually laid flat and gave me enough coverage to get rid of the rust.


i just took my time with the welder running a bit hotter then i normally would and just skipped around doing single tacks all in a row.


i took a few min with the wire wheel and knocked the rust off the rear pans and they are actually still really solid. take the whole floor to bare metal then paint it all with rustoleum oil based paint.


next weekend im going to be installing the frame connectors then she is getting a mini tub and my own home brewed inboard spring kit.
 
well got started on the sub frame connectors. got the passenger side nearly ready to weld in. here are some pics.


man those door panels really came up good.. what did ya use on them?

i agree that sure looks like a 65. cool little car. should be a fun toy.
 
man those door panels really came up good.. what did ya use on them?

i agree that sure looks like a 65. cool little car. should be a fun toy.

magic eraser! those things are awesome. I got this car just in time to save it. it was sitting for a long time and is starting to rust all over. its all surface rust but i dont think it would have made it another winter here in washington state. hope to have her on the road by the new year. this is going to be my new daily driver.
 
magic eraser! those things are awesome

lol.. yea they are.. did the white int of my mustang that i didn't thing was that dirty with one of them. holy crap its blinding white now..lol
 
With those fenders,maybe run rallyes on one side and steelies on the other ? :D
 
With those fenders,maybe run rallyes on one side and steelies on the other ? :D

she is bi-polar. we have have some good days and some bad days. lol. i personally like the mis-matched fenders. gives her some character. its like an inside joke. nobody has noticed till i pointed it out yet.
 
Actually I really like your wooden stands that you built to keep your car elevated so you can work underneath.

Is there thread with dimensions on building your own? Have you used these before on other builds? Any drawbacks? i am interested in doing the same thing. I will need to keep my car elevated for a while and jack stands still make me uneasy.

Enjoying this thread.


they are just 4X4 lumber that a drug home from work. i screwed them together with 4" deck screws. the tops are made from 2x12" lumber from the local lumber yard. they are flat on top. i put the blocks on the front and back of the tires to keep the car from rolling. they are screwed in too. I made them a couple years ago and they work awesome. the rockers are now 24" from the floor. I originally built these so i could set my pinion angle on my dart but they have since become one of my best home brewed tools.


Nice job on the floors. I had bought my pans from auto body specialties and they looked great to me. Im no professional body guy though.

Subframe connectors turned out well. Good for u!
 
Nice job on the floors. I had bought my pans from auto body specialties and they looked great to me. Im no professional body guy though.

Subframe connectors turned out well. Good for u!


the floor pans did the job but it the rust had been anymore extensive they would have taken quite a bit more work. the frame ties aren't quite done but i should have the one done and in tonight after work. then i can move onto the mini tub. planning to run 15x8 rear wheels with 295/50/15s. gonna drop the car down ALOT and tuck them up into the wheel well.
 
got some more done last night after work. got the frame connectors all done and ready to weld in. here is a pic.


then i got the mounting surfaces all cleaned up for welding.


while under the car i noticed the what looks like under coating is flaking off on the entire under side of the car. i picked at one little edge and the stuff started to come off in sheets. looks like i will be stripping the under coating and painting the under side with rustoleum. here are a few pics.


then i got the passenger side connector all welded up.


well the frame connectors are completely done. they went in easy and made a hell of a difference. the new welder sure is making my work presentable. lol here are some pics.


Nice work on the frame connectors. I like how you got them to clear the floor pans, this awesome for a street car.
I think I need a new welder too so my welds can look as good as yours.
 
Nice work on the frame connectors. I like how you got them to clear the floor pans, this awesome for a street car.
I think I need a new welder too so my welds can look as good as yours.

this is a street car and floor pan intrusion was not an option. this car will see alot of asses in the seats. i ran the connectors up thru the floor on my dart and the carpet is kinda wonky now in the rear passenger foot well. the dart will most likely never see a passenger in rear seat again so no big deal but the valiant will be a fun cruiser so i want it to remain functional.

******every mopar uni-body needs frame ties.****** i dont care if its a 10 sec. strip car or a weekend parade car. These cars sag and loosen up over time and will start to create other problems with the chassis. I can already notice an extreme difference in the valiant with my ties installed. when i was jacking up the car to get it on my stands the passenger side door opened itself when i was jacking the front of the car up.
 
-
Back
Top