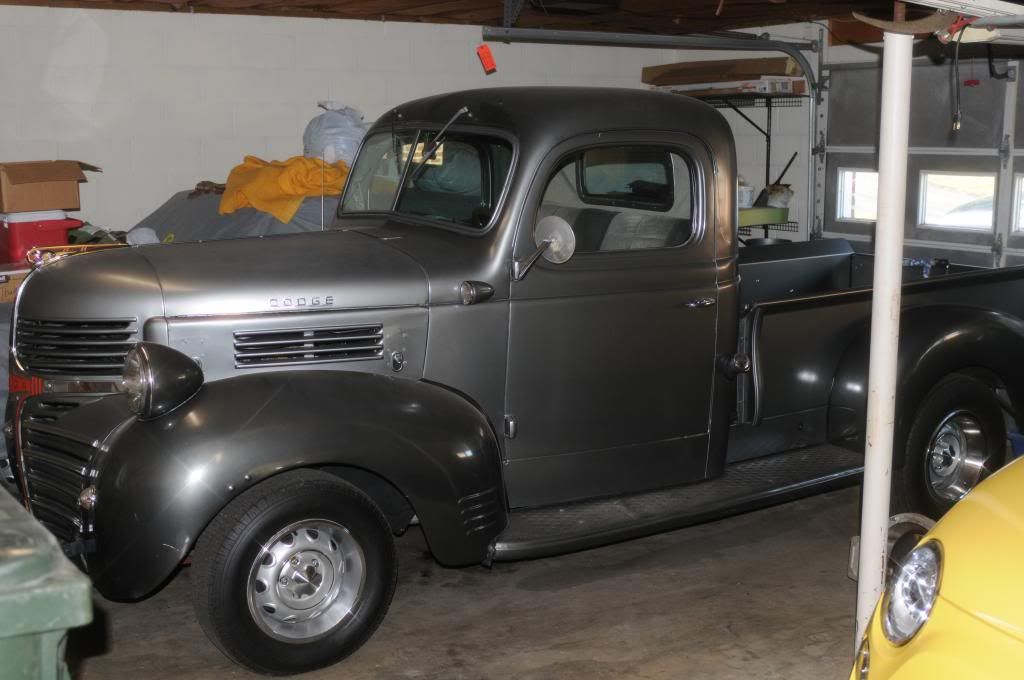
Am I nuts? 1940 Plymouth Commercial Car (Truck)

Am I crazy

  • Yes, you will never get it done in time

    Votes: 7 3.4%
  • Yes, she will think "why do we need another car"

    Votes: 10 4.9%
  • No, Go for it, you can get it done!

    Votes: 75 36.9%
  • No, she will love it even if it is not finished in time

    Votes: 115 56.7%

  • Total voters
    203
-
Sub here also. This is way too cool! Excellent work btw! Question, since you are using the keys from the Dak , it does have a fob right? Could you fab the keyless entry into the old doors?

No key fob for a truck this old. I am using a kit I found on E-bay that I used on my daughter's Scamp. Comes with a fob, unlocks both doors and also has a sensor so if one door is unlocked or locked with the key, it does the other one for you.
 
Nice work! The rear bumper for a 48 Chevy fits the front end nicely. Picking both up at the swap meet for $40 was a good deal. Also new one are like $159 new from LMC truck parts.

What are you going to run for wheels? The standard 60s' cap fits the spare steel wheels but isn't too blingy. Gonna do the rotor and axel swap to get 5 on 4.5" bolt pattern on mine. They make torq thrusts 5" wide with a 3.2 backspace.

The rear fenders need a big tire to fill it up. Have you done a mock up on this yet?

We got four spare tire steel wheels from a few trips to the junkyards and are going to run 1950, "Plymouth" script dog dish full caps. For anybody wondering, the Dakota uses 6 lug wheels, so the normal 5 on 4 1/2 won't work. We are going to use the tires that came with the truck and are sitting under it right now. They fill up the wheel wells pretty well.

Thanks for the info on the bumpers. I will take a look at LMC and see.

The picture is the steel wheels on my 49 Plymouth with wide whites, but you can see what the "Plymouth" script hubcaps look like.
 

Attachments

  • DCP_3224.jpg
    92.2 KB · Views: 756
I am pretty sure that the real early dakotas had 5-lug wheels.
Might be worth checking into...
 
I almost bought a set of those at the last swap meet.

Yes the early dakotas were five lug. Problem is our pull a prts take the wheels and tires off before they hit the yard.
 
I bought the bed sides from Horkey's instead of messing with the old bed sides that were all goobered up and patch welded with rebar. Starting to come together.
 

Attachments

  • DSCN1556.JPG
    131 KB · Views: 714
  • DSCN1555.JPG
    110.2 KB · Views: 709
  • DSCN1552.JPG
    125.5 KB · Views: 732
  • DSCN1550.JPG
    130.1 KB · Views: 715
  • DSCN1549.JPG
    124.5 KB · Views: 723
  • DSCN1546.JPG
    124.5 KB · Views: 730
  • DSCN1543.JPG
    116.7 KB · Views: 721
  • DSCN1541.JPG
    129.3 KB · Views: 722
you have done fantastic work,man i gotta go turn a wrench, can't wait too see more !!!
 
Since the Dakota frame sweeps up isn't the wood going to hit the frame making the bed sit higher? I'm using the metal from the Dakota bed, from the bed to the bend in the bed side is 9". How tall the wood to the bend on your bed?
 
Since the Dakota frame sweeps up isn't the wood going to hit the frame making the bed sit higher? I'm using the metal from the Dakota bed, from the bed to the bend in the bed side is 9". How tall the wood to the bend on your bed?

Yes, the bed is going to be higher than the stock 40 placement. The wood will be sitting on the rear frame member. I have not measured yet to see just how high the bed will be raised. We are going to try it with the wood where it is right now, and if the bed sits too high, then we can remove the metal side strips and re-weld them higher on the bed sides. We are planning custom side pieces that tie the bed to the running boards, so that is no problem. I got the bed sides without the holes drilled for the rear fenders so we can do the adjustment and then finalize where the fenders will sit on the bed sides.
 
There's always more than one way to skin a cat. My project has stalled due to me going back to work. But that means more cash for parts when I need some parts.
 
Awesome work man! I love these trucks! I grew up cruising car shows in mine. Lots of great memories. Keep up the good work. I thought I had to share this with you.

GA1_7271.jpg
 
Josh, that is a sweet ride you have there! My wife is really looking forward to cruising in her pickup, so we have some good motivation to press on and get her done!
 
We brought the truck back to my dad's shop and I am working on installing the wiring harness from the Dakota, hooking up the Vintage Air A/C and getting the bed attached to the frame.

These pictures show the tail light stands I made so that the wires run internally and the lights are a bit closer to the fenders.

The bed attaching system with carriage bolts sandwiched between a cross piece and the floor so no bolts are exposed on the bed.
 

Attachments

  • DSCN1700.jpg
    96.4 KB · Views: 568
  • DSCN1698.jpg
    74.6 KB · Views: 557
  • DSCN1696.jpg
    98 KB · Views: 576
  • DSCN1694.jpg
    82.8 KB · Views: 559
  • DSCN1688.jpg
    70.3 KB · Views: 578
  • P1160067.JPG
    178.1 KB · Views: 569
  • P1160066.JPG
    176.5 KB · Views: 598
  • P1160065.JPG
    183.8 KB · Views: 537
  • P1160063.JPG
    133.9 KB · Views: 571
Been awhile since I posted. I have put turn signals on the headlights, installed bed roll lights and figured out the steering connection. I had to use a combination of the Dakota steering shaft coupled from a donor older Mopar as I needed a bit more length since the new firewall is back farther than the original Dakota firewall. By using both the shafts, I was able to increase the length, but still have the sliding feature that accounts for flex between the frame and body. Also, the Dakota shaft has a damper on the base by the rack and pinion, so I don't have to use a rag joint dampener. I had to move the steering column a bit to gain the needed clearance from the exhaust manifold, but since it is a tilt column I could put a little angle on it without anybody being the wiser. I also found a 1 inch ID / 2 inch OD heavy duty bearing to put in the column since I have to have a few inches sticking out in the breeze to gain the clearance. This will hold up to any load on the steering shafts. And if anybody in curious, the wheel is from a Plymouth Neon. I am using the steering column from the Dakota because the left stalk is the turn signals, wiper/washer control and headlight dimmer, and the column has a four way flasher built in. Since I am using the Dakota wire harness, I figured this was the easiest way to get it all done.
 

Attachments

  • DSCN1893.jpg
    51.6 KB · Views: 521
  • DSCN1892.jpg
    82.3 KB · Views: 490
  • DSCN1891.jpg
    68.7 KB · Views: 506
  • P5230163.jpg
    55.3 KB · Views: 485
  • P5230160.jpg
    43.8 KB · Views: 502
  • P5230159.jpg
    46.6 KB · Views: 516
  • DSCN1851.jpg
    50.1 KB · Views: 522
  • DSCN1840.jpg
    42.2 KB · Views: 523
  • DSCN1839.jpg
    60 KB · Views: 498
  • P5240171.jpg
    65.2 KB · Views: 538
After things have settled down from summer vacations, I have accomplished a few things on the truck. I took the cab off the frame one more time so I could do the manual transmission swap. I was a bit concerned that it wouldn't work as the ring gear for the manual flywheel is bigger than the automatic. I was afraid it would not fit in the bell housing, but it all worked since the starter is attached to the manual bell housing so gets held in the proper position. The things I did have to change was to install a big bushing in the crank for the tranny nose piece, get a new crank angle sensor since the automatic flexplate and manual flywheel position notches are a little different. I also had to fabricate a splash shield since my donor tranny did not come with one and the automatic one is slightly smaller. I searched high and low for a new one, but wound up making one out of two donors. I also had to modify the shift lever to decrease the rearward angle so it did not hit the seats in the smaller Plymouth cab.

I fabbed up the finalized cab mounts as we had to raise the back of the cab by 1/2 inch. I also had to malletize the firewall slightly to clear the distributer. The cab is now sitting in it's final position on the frame and now I am re aligning all the body panels. Next up is the position of the running boards and rear fenders. Hopefully I can get to that in two weeks when I am back in town.

I picked up a new drive shaft from Driveslines NW, so now the tranny is connected to the differential. Just need to order a radiator that will fit in the nose.

Oh, and I got the new "Plymouth" script for the nose from a guy back east who had sold his truck. I also got the nose trim straitened. Turns out it is chrome plated brass and not stainless as I thought. I had him extent the trim past the old hand crank hole, and now it is off at the platers.
 

Attachments

  • DSCN1955.jpg
    60.5 KB · Views: 418
  • DSCN1949.jpg
    78.7 KB · Views: 437
  • DSCN1948.jpg
    60.5 KB · Views: 435
  • DSCN2149.jpg
    58.7 KB · Views: 456
  • DSCN2468.jpg
    54.2 KB · Views: 412
So glad to see more progress on the truck. Really like the turn signals. I am still looking for a 40's- 50's truck for my next project.
 
-
Back
Top