Gerahead's 71 Dart

-
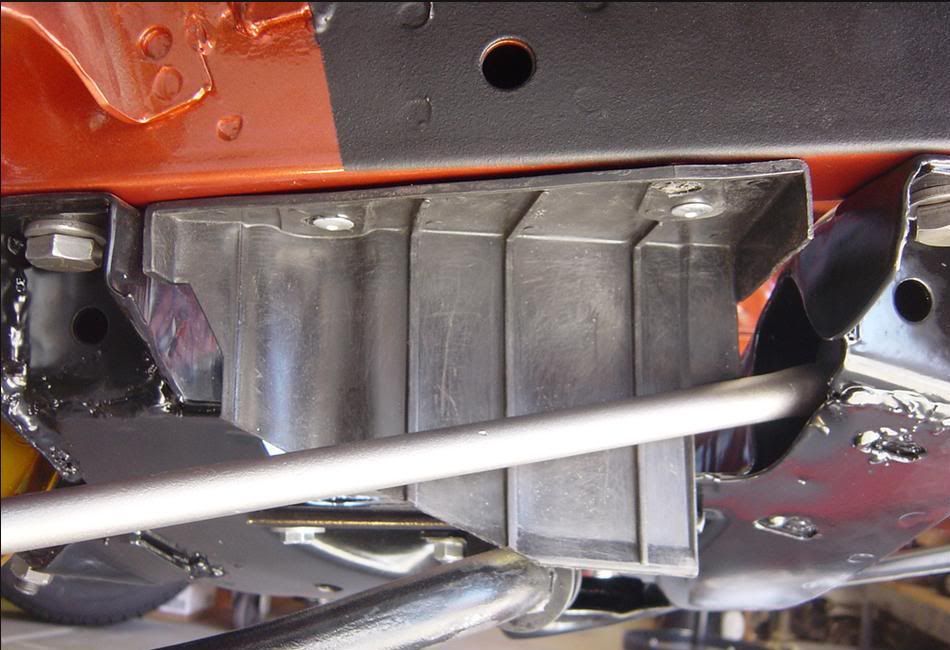
Hey Jim, I just recently pulled mine off while prepping for my engine swap. This is NIOT my car, but a picture of what they look like installed. they usually come with rivets, although mine were curently held on with bolts.
spalshshield.jpg
 
wow.. nice work, i'm finally able to get started properly on my 71 dart sedan, and i just read this whole thread. given me some great tips!

-cricket
 
Hey Jim, I just recently pulled mine off while prepping for my engine swap. This is NIOT my car, but a picture of what they look like installed. they usually come with rivets, although mine were curently held on with bolts.
spalshshield.jpg

Rocker,
Thanks for the pic. Now I know that I definitely don't have either of those with the pile of parts that came with the car. This helps a bunch. It looks like those are on a very nice car! L8r

Jim
 
wow.. nice work, i'm finally able to get started properly on my 71 dart sedan, and i just read this whole thread. given me some great tips!

-cricket

Thanks Cricket. The beauty of this forum is that we can all learn from others, without having to figure it out the hard way. Glad to be of help. L8r

Jim
 
i have a question about the por-15.. i've looked at their website, and read comments here, but am somewhat unclear. what products are you using? when i sand down, do i just need the basic por-15 rust paint, or primer? i'm getting a bit overwhelmed by all the products, i think.

-cricket
 
i have a question about the por-15.. i've looked at their website, and read comments here, but am somewhat unclear. what products are you using? when i sand down, do i just need the basic por-15 rust paint, or primer? i'm getting a bit overwhelmed by all the products, i think.

-cricket

Cricket,
What I did on the Dart was.......... I used a twisted wire wheel on an offset grinder to get rid of all the paint and other crap that was in the area to be painted. In the areas done so far, there was seam sealer remnants and just junk to clean out. I then went over the whole compartment with wax and grease remover (PPG stuff, don't recall the p/n offhand) applied with a spray bottle (chemical resistant) and scrubbed it with a red scotchbrite pad. Cleaned again with the same remover and paper towels. I then applied the POR-15 paint with a cheap, throw away brush. I knew that I was going to top coat these compartments, so while the POR was still tacky (about 1 hour after brushing), I sprayed two coats of PPG Omni epoxy primer over the POR. You have to do this before the POR fully cures so that the two layers bond together. I can now treat the surfaces as if I was starting with primer over bare metal. I intend to use the same procedure on the under side of the body, but with all the extra nooks and crannies, I will be sandblasting those areas that I can't readily clean with the wire wheel and grinder. Kinda got off on a tangent there, but I hope this answered your question. L8r

Jim
 
After taking a week vacation last week to recoup, I have been back at it. I have 3 of the 4 wheel wells pretty much stripped, at least as much as will come off easily with the scraper. I honestly don't know how I would've gotten all of this stuff off without herniating a disc if I didn't have the spinner. The fronts cleaned off pretty easily with the larger flat surfaces. The rears take a little longer. Man, in some places that stuff is about 3/16" thick. Looks like maybe the seam sealer isn't the only thing that they put on with a fire hose at the factory. What is left after going over it with the scraper comes off pretty easily with the wonder solvent, Naptha. A couple of wipes with a clean rag and the solvent and it is clean down to the paint. YOu can see the difference pretty easily in the two photos. One is after scraping (driver side) and the other is scraped and wiped (pass side). I sure will be glad when I am done with all of this really dirty, grimy crap and can get to the stuff that starts making her look better\\:D/. L8r

Jim
 

Attachments

  • IMG_2808.JPG
    81.8 KB · Views: 812
  • IMG_2809.JPG
    81.2 KB · Views: 747
looks great! Im in the process of stripping my interior,and u took alot of the guess work out for me. Keep the pics coming!
 
looks great! Im in the process of stripping my interior,and u took alot of the guess work out for me. Keep the pics coming!

I have and will continue, to learn much from this forum. I am happy to help anywhere I can. L8r

Jim
 
Finally got the undercoating off :rock: The rears took about 4x the time as the fronts. It was absolutely miserable in the garage yesterday. I got all of the metal adjusted that could be reached from one side or the other. I borrowed a stud welder from a co-worker to try to straighten some depressed metal areas in the underbody framework. Didn't work. The slide hammer is pretty cheezy and doesn't grip the studs well at all. The studs did not seem to weld very well either, even with really clean metal underneath. They broke off at the interface really easily, I thought. Tried longer weld times with no change in how well they held. I'll do a little research and see what I can come up with, but maybe I'll just leave those areas alone. I suppose I could cut the dented metal out and weld in patches................

I noticed that on the quarter panel that had been "finished" prior to my acquistion, there is some bubbling under the primer. I guess I am going to have to sand that down and take a peek. I think that I already know what I am going to find. Maybe I'll be doing a little more patch work than I had planned.

The heat and humidity were worse today than yesterday so I did a few things around the house that Mama has been reminding me about. Stayed cool and earned a few points. L8r

Jim
 
Even though I haven't posted much in the last week, I have been plinking away. Wiping off the undercoating left behind by the scraper, tweaking sheet metal, you know, stuff like that. I badly wanted to be ready to get started on the body work to prep for paint, picked up a gallon of primer over the weekend just so I would be ready to rock :eek:ccasion: I had noticed a couple of bubbles in the primer on the left lower rear quarter since I have had it up on the spinner. I pretty much knew what that would mean, but you know................maybe it isn't so bad. WRONG! There had been some cancer behind the wheel well and along the bottom of the quarter and instead of fixing it, the PO mudded over it, smoothed it and primed it to make it look pretty. I got a whole new meaning for skim coat..... in some places the filler is over 1/8" thick! I tried to get a pic of it in the last shot, but it is still hard to see. Wow! I have to give them credit, they did a good job of making is look pretty good. Kind of surprised it is such a hack job cuz it looks like it might have been a pretty well equipped shop because the rocker trim holes were brazed shut. There are a bunch of dents just in front of the wheel well and the flange between the 1/4 and the outer wheel house looks very solid so it really shouldn't be too tough a fix. It does look like the style line just above the wheel opening has kind of disappeared toward the front of the car, so it looks like I will have to replace more of the panel than just where the rust is. Time to dig into the wallet!!! I will have to dig (literally) into the same area on the other side to see what surprises might be waiting for me there. I hope that it isn't any worse.

I have seen many good comments on this forum about the AMD sheet metal, so I'm thinking that's the place to go. Where do you guys buy their stuff from? Any idea what shipping costs for a 1/4 skin? Just trying to get a ball park figure for the total. L8r

Jim
 

Attachments

  • IMG_2820.JPG
    64.6 KB · Views: 722
  • IMG_2821.JPG
    61.9 KB · Views: 712
  • IMG_2823.JPG
    55 KB · Views: 680
Very cool! I am new to FABO as well. Seems like the only place to be for A body knowledge.
 
That actually doesn't look too bad. I have seen and replaced much worse such as that on my personal restoration project. May I suggest that you finish stripping all filler and primer from your lower quarters and excise the worst visible rust area leaving 1/8" sheet metal around all formed edges so that you may do a more comprehensive examination of backing metal before you purchase your replacement panels. If the visible exterior looks the way it does, chances are you may or may not get lucky with the inner quarter panel steel. This is assuming you have not completed this typr of work before and if so, please disregard the afformentioned :). Keep in touch with any questions if necessary. I have been doing paint and body for a while and am willing to assist if need be.
 
132068,
Thanks for the offer of assistance, I will keep that in mind. I am planning to do just as you suggested. Now that I know that the PO tried to hide this crap on this side, I can only assume that it is present on the other side as well. There is a slab of mud there too, but it hasn't been smoothed yet. Now that I know as well how thick it is on there, I can be a little more aggressive with my means of getting it off :joker:. You are correct, this really isn't too bad......... I have certainly seen worse on other peoples' projects here on FABO!! I am really fortunate in the condition of my starting point, I just wasn't expecting to find it. I was initially thinking that I could just replace the small sections that are rusted through until I noticed that the body lines near the front of the wheel well seem to have gotten flattened. I thought about maybe just rebuilding it when I fill it, but that looks like a pretty vulnerable area and if it gets dinged, it would likely chip out a chunk o' junk. So I thought it would probably be best to replace that section just to restore the lines. Still thinkin' haven't placed any orders for anything yet. L8r

Jim
 
Tonight I tore into the passenger side. I wanted to see if the same sins were hidden over there. The good news............... not rust throughs. There were a bunch of dents that were covered up, but all of the metal seems solid. Same as on the driver's side, the crease over the lip of the wheel well seems to have been flattened. I don't really have a theory on how that happened. Since the metal is all in good shape, I might just see what kind of magic I can pull off with the stud welder and a hammer/dolly. Otherwise it seems that the least painful of the options would be a patch panel. I guess that it all depends on how much metal working I want to tackle.
The mud on the passenger side of the car was even thicker, if that is at all possible. I now know why the PO sold the car, he spent all of his funds on filler! It was a treat plowing through the rainbow of colors; blue, tan and pink...... all in the same area! I used a really slick way to remove the mortar tonight. A propane torch and a 3" scraper. A torch just like you would use to sweat copper pipe fittings together. Just heat up a section of the filler (a playing card sized area worked good for me cuz it was so thick in areas) until it starts to bubble and then scrape it away. It is a ton cleaner than sanding it off because it doesn't create the dust cloud like I did last night. You end up with a pile of shavings that are easy to sweep up. The filler does burn, so wear gloves cuz the gooey chunks can be hot if they land on the back of your hand! It comes off pretty clean so there isn't much clean up to do afterward.

Now I just need to decide how to proceed. L8r

Jim
 
Hello gerahead,
Chances are the PO kept adding to fill low spots instead of sanding to level with original metal. I've seen that happen a lot on prior resto's that my Dad and I performed (Old Bentley's Rolls, Jags, etc...) When we were finished working metal back into shape, we ended up with an absolute minimum of filler, in many cases skim coating and a light bolck was enought to quell previous issues. Long blocks such as those developed by AFS and durablock go a long way to truly flattening filler and primer. Our vehicles have some pretty long and flat surfaces and the longer the block the better. Sometimes in a pinch you can use some metal to metal by evercoat to initiate restructuring of body lines and due to its inclusion of aluminum into the resin and polymer, the repair will shape and hold as nice as led. I am a firm believer in re-leding where the factory originally performed led work. Nothing lasts longer! Keep up the good work. A great paint job isn't necessarily about the paint itself. It's all in the detail and prep.

132068Dart,
New avitar....looks good. While this is the first complete body re-do that I've done, I have done my homework. Don't have 'erm yet but a set of the durablocks is in the plan, including the very long one. I am baffled by what happened to the body lines around the wheel wells. It is almost like the crease above the opening was hammered pretty flat. Maybe someone side-swiped a post or something in its earlier life. I may try my hand at recovering it, I can't make it any worse right? I'll see how much progress I can make easily, its not like this is irreplaceable metal that I have to save. It might be good practice, its just that where this damage is.....makes it a little more daunting to do a nice job by a rookie. Thanks again, L8r

Jim
 
Hi Jim,
Took me a while to get back to you. Practice is always good and the durablocks are great. I used a combination of those and the 27" AFS (adjustable flexibility sander). I don't know how far you have gotten with the quarter panel but use of a good 4 foot level would be a great place to start just to see how bad the previous damage really is and to consistently check you progress for accuracy against the other side. Hopefully it wasn't bad enough to compress the inner wheel housing! If so, that adds a bit of time and fabrication skills into the fray. Sounds like someone sideswiped the PO or he got into a pole. Good call on that one :). Keep in touch. I would love to see some pictures of your current progress and maybe one with a flat edge against your damaged panel stripped to bare metal. There is a chance you may be able to salvage the quarter with some righteous metal work :).
Chris

Chris,
You must be clairvoyant! Between last night and tonight, I scraped the mud out of both quarters to see what I really had to work with. I'm afraid it ain't purty! The right side has been caved in between the middle and lower body lines. In the series of pix, you can see from the straight edge in the first one that the area between the lines near the door jamb is convex. Moving back toward the bumper, just in front of the wheel well and just behind the wheel well it is concave. There is also what looks like a lateral crease from about the rear of the wheel opening to just in front of the marker light hole. It is tough to see in the pic, but there is a buckshot arrangement of some serious heat shrinking marks goin' on. The flange where the wheel house is welded to the quarter is also pinched together with the middle of the lip forced upward. It really doesn't look like the outer wheel house got dinged. The driver side isn't as bad and if it wasn't for the rot at the bottom rear of the panel, it could probably be saved. Both sides have some pretty good oil canning going on now. I think this would be a PhD level exercise in metal work! I have pretty much resigned myself to the realization that new quarter skins are now in the plan.

The last pic is of some stuff that fell out of the nooks and crannies while I was scraping the undercoating off the underside. Nothing quite like a good vibration while on its side to uncover treasures! Does anyone have any idea what the bolt might be for (I'm thinking it looks like it might be from an exhaust manifold?). I also have no idea what the other parts might be from, if they are even from this car. The larger flat piece looks like it could be an inspection cover from a bell housing? Any thoughts on what the spring clip might be from? Looks like it could be used on a square shaft, but I can't think of any of those located anywhere.
 

Attachments

  • IMG_2828.JPG
    69.2 KB · Views: 640
  • IMG_2827.JPG
    64.8 KB · Views: 611
  • IMG_2826.JPG
    81.1 KB · Views: 628
  • IMG_2824.JPG
    80.3 KB · Views: 675
more..............
 

Attachments

  • IMG_2829.JPG
    74.8 KB · Views: 617
  • IMG_2831.JPG
    73.8 KB · Views: 588
  • IMG_2832.JPG
    72.1 KB · Views: 588
  • IMG_2833.JPG
    79 KB · Views: 617
-
Back
Top