How to Repair a Couple of Wiring Harness Problems

-

1969VADart

Well-Known Member
Joined
Aug 19, 2013
Messages
2,498
Reaction score
811
Location
Fredericksburg, VA
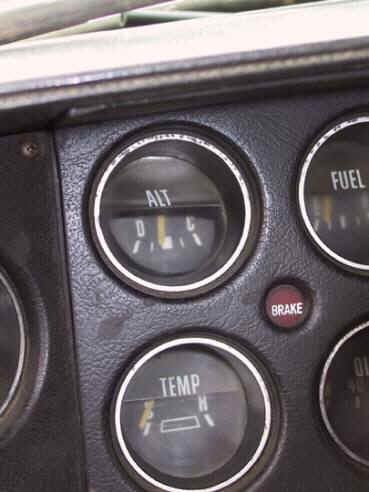
Today I started pulling my dash apart so that I can paint it and put on the new dash pad. I tried to inspect the wiring harness very carefully as I pulled everything apart. The guy doing my body work pulled the dash out with the harness still attached to most of the important stuff. Most of the wires and connections look pretty good, including at the fuse panel. However, I discovered two problems that I am wondering how best to fix. The first picture shows where one of the connections is busted on the bulkhead connector. Can this be repaired or should I try to find a replacement bulkhead connector. The wire going into this terminal is a fairly large red wire (I think). If I go the new bulkhead connector route, is it pretty easy to install all the new pin connections?

http://s1364.photobucket.com/user/W...7-4E2A-BF8F-3960010500E4_zpsudahz1kf.jpg.html

The other problem was this three point connector. I am not sure what it goes to because it was disconnected and hanging free from the dash, but it obviously got hot at some point. Are there replacement connectors of this type so I can fix this?

http://s1364.photobucket.com/user/W...F-41AE-B4C7-473298D78491_zpsyfqevscv.jpg.html

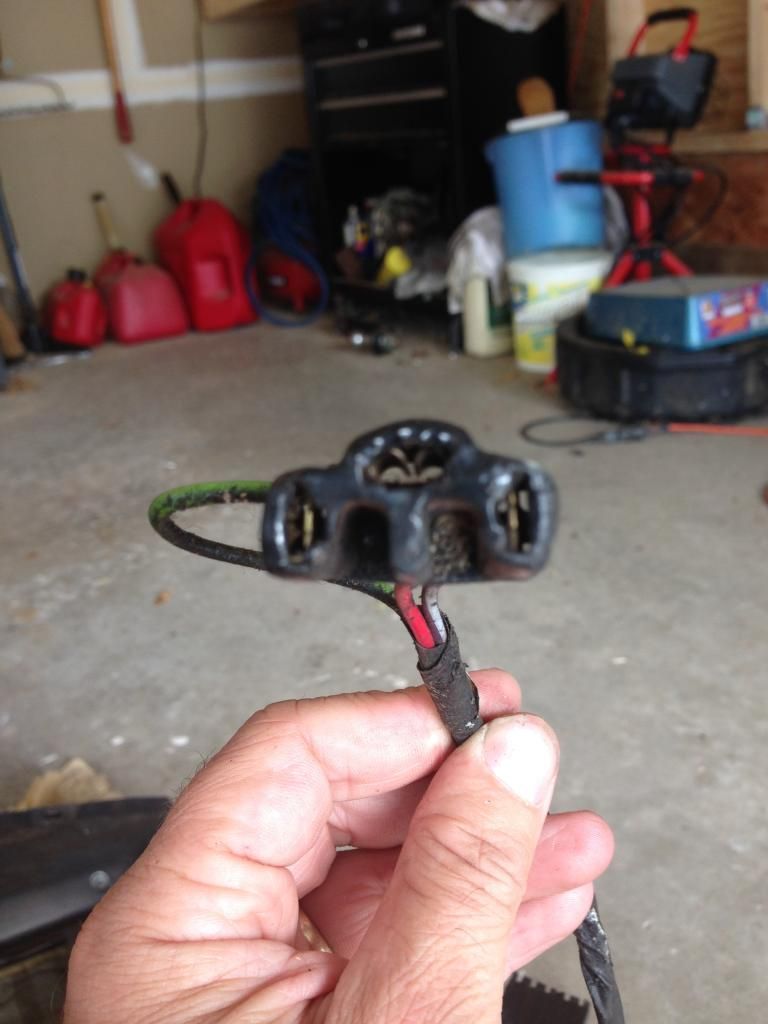
http://s1364.photobucket.com/user/W...E-4D29-83D6-2C08093198DF_zpsdlh5d46r.jpg.html

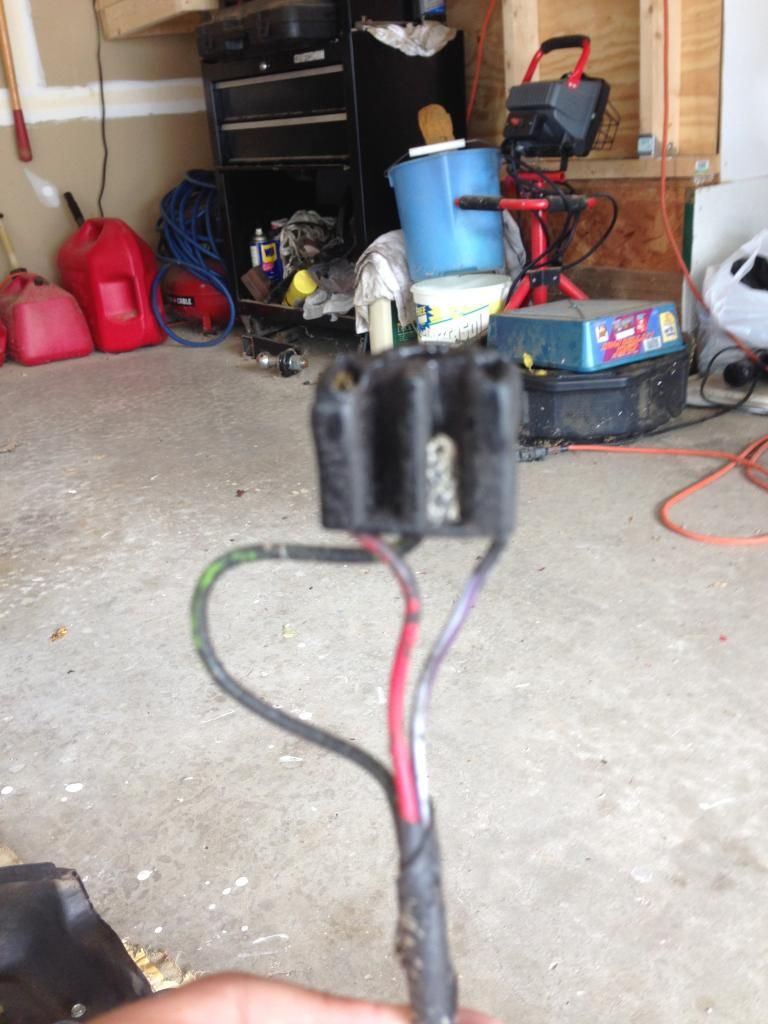
http://s1364.photobucket.com/user/W...7-4EB1-8072-D6F00CE6B127_zpsgku6xeci.jpg.html

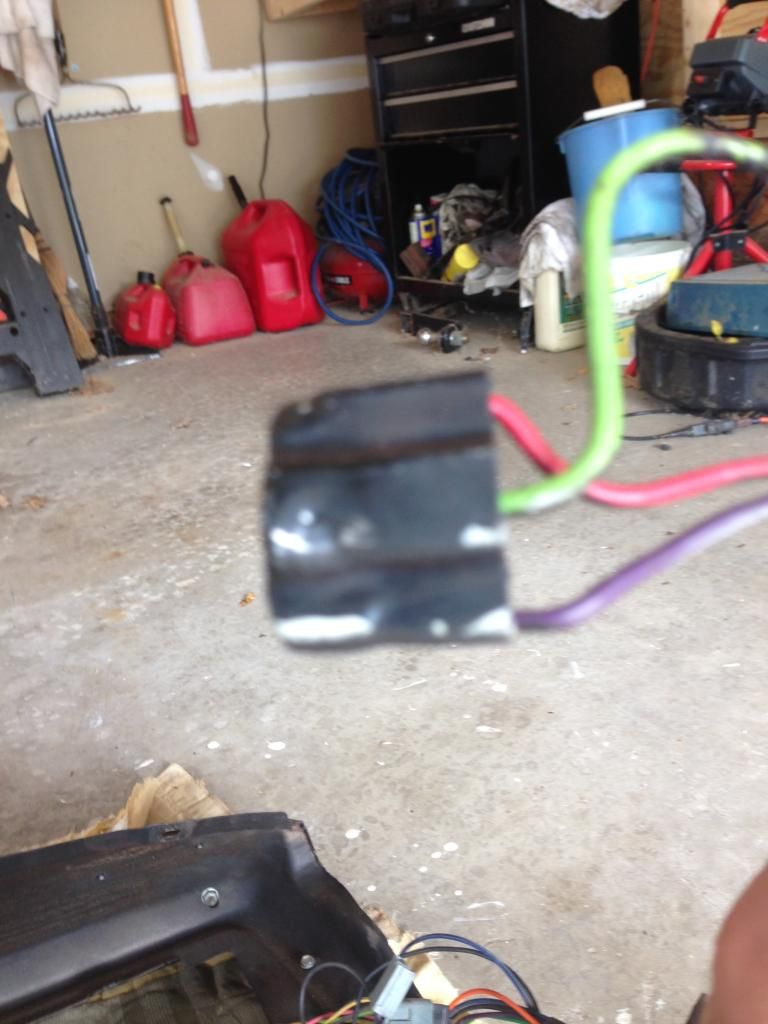
I am keeping the factory harness because it is all in good shape aside from these two problems. Also, does anyone have any advice on how best to clean the terminals and connections for the switches (wiper, headlight, flasher)? Any thoughts would be greatly appreciated. Thanks.
 
Start by reading this article. These have been known problems for years and in fact Ma herself knew it, because the optional 60A alternators had what is known as "fleet wiring."

http://www.madelectrical.com/electricaltech/amp-gauges.shtml

Your 3 terminal connector I believe is for the dimmer switch. Start by reading this:

http://www.madelectrical.com/electricaltech/brighter-headlights.shtml

and looking for "Crackedback" on here, who has come up with a great little headlight relay kit

Also, you can get the replacement terminals for the connectors at NAPA. I can never remember what they are called
 
I am so glad I went online today. I have the same problem with my dash connection on my 73 Dart. The same red wire in the same plug in the engine compartment has melted. And the part about the Alt. Fixed my other headache. I printed both of those web pages Tomorrow I start on that problem. Thanks again.:cheers:
 
The large red wire that is the problem is the main power feed into the car...so this needs a lot of attention!

With the greenish corrosion on the connector surface and dirt in some connections, I would reccommend a wholesale removal and inspection of each connection here. The little slots on the edge of each connector give access to a release; put a tiny flat blade screwdriver in each side slot and lever towards the connector to release the spade connector and pull it out the back. Clean each connection and replace any connection with corrosion; getting a good crimp is the hard part. Use dielectric grease like Dow 4 for protection afterwards.
 
Given the situation with my car, the ammeter bypass referenced in the article above may not be in the cards immediately. But I certainly appreciate the heads up and information. I have a new bulkhead connector from a previous project so I may disassemble this one and swap all of the wiring over inspecting each one as I go. I also have some new connectors.
 
The other problem was this three point connector. I am not sure what it goes to because it was disconnected and hanging free from the dash, but it obviously got hot at some point. Are there replacement connectors of this type so I can fix this?

http://i1364.photobucket.com/albums...E-A5DF-41AE-B4C7-473298D78491_zpsyfqevscv.jpg

http://i1364.photobucket.com/albums...3-01BE-4D29-83D6-2C08093198DF_zpsdlh5d46r.jpg

http://i1364.photobucket.com/albums...C-BFE7-4EB1-8072-D6F00CE6B127_zpsgku6xeci.jpg

That connector could also be for the heater or A/C. I have a junk harness here and I believe it has some of those connectors on it. I'll take a look tomorrow and if it does I'll pop one off and send it to you if you still need it.
 
A red, a green, and a purple. Should be easy enough to find on a wiring diagram. My best guess is heater blower, either at the blower switch, or the blower speeds resistor bank mounted in the plenum.
 
I usually pull the harness and remove each female connector, wire brush eacg with a small dremel wire wheel , bend the catch tang back up, grease it and slide it back into place til I hear it snap into place. Good to go for many more miles. The heavy black from the alternator and heavy red from the battery usually have that melted hole issue. You can bypass them both like the factory did. And I do not understand the big deal about bypassing the alternator. The gauge really is like a big bypass anyway - internally there is a brass strip the connects the two terminals. The amp gauge needle isn't connected to anything - it moves due to the flow of current through the wire like one of those current testers you just hold over a wire to look for a short.
 
And I do not understand the big deal about bypassing the........ gauge....... really is like a big bypass anyway - internally there is a brass strip the connects the two terminals. ..................

Ok, because you don't understand, I will explain.

There IS NO brass strip connecting the two terminals. At least not guaranteed to be. THAT is the problem

I assume you have glanced at.........but not read.......this?

http://www.madelectrical.com/electricaltech/amp-gauges.shtml

Does this look like a good connection between two terminals and a brass strip to you?

http://www.madelectrical.com/electricaltech/images/amp-ga19.jpg

Didn't think so. As soon as I saw that photo a few years ago, I was instantly transported back in time........to the mid to late 70's.........when everybody "up here" was throwing heavier alternators on their pickups............and winches.........and electric / hydraulic snowplow hoists.......and pulling RVs.......with trailer / RV battery charging lines.

The fact is, there is NOTHING except luck connecting the two terminals and the brass strip which are three separate pieces. they are not crimped, soldered, brazed, or even, really, bolted together. The bolts (depending on the year) are sandwiched between a layer of the THERMOPLASTIC that forms the cluster housing. In the photo above, I can tell you exactly what happened............the terminals got a little loose in the plastic, then got warm.......and then.........

I'm not even a commercial mechanic, but years ago, I "got" a reputation and found myself tearing clusters out of local pickup trucks
 
Here is a good article on some of the Mopar ammeters and how to make them work right. IMO is a lot more informative than the MAD info. It does have a brass strip, just not as a resistive shunt.....

http://www.dodgetalk.com/forums/showthread.php?t=252130

BTW, small aricraft form the 50's, 60's, and 70's used ammeters with good reliablity. No reports of frequent fires and palnes falling from the skies. But the quality is no doubt higher. And most/many folks don't know how to read them for diagnotic purposes...but then again, most/many folks don't know how to read a voltmeter for diagnositcs either!
 
Given the situation with my car, the ammeter bypass referenced in the article above may not be in the cards immediately. But I certainly appreciate the heads up and information. I have a new bulkhead connector from a previous project so I may disassemble this one and swap all of the wiring over inspecting each one as I go. I also have some new connectors.

Are you saying you have a brand new Bulkhead connector or a new "used" connector from another project?

If it's the later then be sure to make confirm each terminal fits snugly and securely into the used bulkhead. When I replaced the Bulkhead connector in my car I went with a new unit just to make sure there were no issues.

I also replaced the wire in the harness between the bulkhead and the connnector for the ignition switch.

I went through a dash harness repair few months back.
http://www.forabodiesonly.com/mopar/showpost.php?p=1970195180&postcount=39

After all of that, I'm now considering a Ron Frances Kit for the whole car and Crackedbacks headlight relay setup lol


AlV
 
A red, a green, and a purple. Should be easy enough to find on a wiring diagram. My best guess is heater blower, either at the blower switch, or the blower speeds resistor bank mounted in the plenum.

I checked my manual and the colors match the wiring for the dimmer switch. Given the location on the harness that makes sense (those wires were routed similar to the direction on the harness for the door jam switch). It was definitely not the heater blower and switch because I pulled those apart myself and took pictures and they were good.

Are you saying you have a brand new Bulkhead connector or a new "used" connector from another project?

If it's the later then be sure to make confirm each terminal fits snugly and securely into the used bulkhead. When I replaced the Bulkhead connector in my car I went with a new unit just to make sure there were no issues.

I also replaced the wire in the harness between the bulkhead and the connnector for the ignition switch.

I went through a dash harness repair few months back.
http://www.forabodiesonly.com/mopar/showpost.php?p=1970195180&postcount=39

After all of that, I'm now considering a Ron Frances Kit for the whole car and Crackedbacks headlight relay setup lol


AlV

I have a brand new bulkhead connector. I think I am going to put all new connectors on when I rewire it. Someone mentioned also using grease to put the connectors back in. What exactly should I be using for that?
 
I don't know where you get the special automotive stuff, Ford was the first I ever saw that used it, you might try a dealer

Otherwise, just waltz into some place that sells household electricals and ask for "aniti ox" grease. It's used for stuff like aluminum terminals
 
I don't know where you get the special automotive stuff, Ford was the first I ever saw that used it, you might try a dealer

Otherwise, just waltz into some place that sells household electricals and ask for "aniti ox" grease. It's used for stuff like aluminum terminals

Would I be asking for something like di-electric grease, or is that not the same thing? By the way, thanks for all the input. It is much appreciated.
 
I checked my manual and the colors match the wiring for the dimmer switch. Given the location on the harness that makes sense (those wires were routed similar to the direction on the harness for the door jam switch). It was definitely not the heater blower and switch because I pulled those apart myself and took pictures and they were good.


I have a brand new bulkhead connector. I think I am going to put all new connectors on when I rewire it. Someone mentioned also using grease to put the connectors back in. What exactly should I be using for that?
You'll want to pick up dielectric grease. After you seat each terminal give it a firm tug to make sure the tang grabs the connector.
 
Silicone di-electric grease at any auto parts and maybe Ace Hardware. I use a small flat file (Harbor Freight kit) w/ sandpaper wrapped around it to clean the female terminals. The males can be removed (squeeze at base longitudinally) for easier cleaning.

Melted ALT and BAT terminals are common in all cars except 63 & 65 (why?) and those w/ "fleet bypass" (taxis, police). Bypass the ammeter or use my diode shunt method to keep it active at lower currents.
 
-
Back
Top