My "new" '74 Duster- or why I need a project like a hole in the head

-
Your build is exactly what I am shooting for. Thank you for doing all the hard work. LOL, but really, I am stoked to see that the builds on Dusters has exploded in the past decade. It is a good time to be an A Body owner.
 
Hey Blu wanted to pick your brain a little ref. your 1.12 TBs and Fox shock combo plus you've had experience with 1.00 and Bilsteins. I was planning to go with FF 1.06s with my Fox shocks but there is a contingent on the handling forum on Moparts that insist bigger is better and 1.12 at a minimum, 1.18 even better. I want the car to handle well for track days and autox but... I'm also planning on some NW road trips, possibly to Vegas for MATS in the future, so I want to be able to make 8-10 hour runs without having my spine slowly driven into my skull. You and I seem to have similar goals and are building our cars as such. Sooo.....
1. Ride quality/handling of 1.00/Bilsteins vs 1.12/Fox?
2. Effect of the shorter stiffer sidewalls of the new 18s ref. #1.
3. I'm thinking my car is going to be a couple hundred lbs heavier than yours (pwr steering, pwr brakes, Lakewood bell, cast iron cased 833 OD) so I'm thinking I would benefit from larger bars but, crap, I'm hesitant!

Keep the shiny side up, thanks Rapom.
 
I think the 1.06" FFI bars would be a good choice for what you're going to be doing, especially with the Fox shocks.

I was surprised just how soft the Just Suspension 1" bars were. Don't get me wrong, they're a huge step up from stock V8 bars, but not even close to what I was looking for. Even with the 1" bars there was still a decent amount of body roll (no sway bars at that point). Bilsteins worked fine, but there just wasn't enough spring rate for me.

The 1.12" bars with Bilsteins was a big improvement in both handling and ride quality as far as I'm concerned. Keep in mind at that point I was still running 225/60/15's. Handling was very much improved, car was pretty flat in the corners even without sway bars, and the ride was pretty good. Pretty comparable to my g/f's 2013 premium package Mustang. Not harsh, but a pretty firm ride.

The 1.12" bars with Fox shocks and the 18's were another big step up in handling, mostly because of the huge increase in tire size. I actually got some body roll back in harder cornering because of the extra grip. The ride got a little firmer, probably because of the shortened sidewalls. I still wouldn't say its a harsh ride, but there's definitely a lot of road feel, and not a lot of cushion. I also added in my sway bars finally, which took away the bit of body roll that I was starting to get, especially in the back where I went with a 7/8" E-body bar. I have Hellwig's 1 1/8" hollow bar up front (55905), but went with the larger E body bar in back (6908).

Honestly, I think if your primary use is going to be the street you'll be fine with 1.06" bars. I like how my car rides with the 1.12" bars, but I can definitely see how I might get tired of it by the end of a long trip. Don't get me wrong, I don't regret putting the 1.12" bars on my Duster, I think they fit the build pretty well. But I also don't plan on using them on my other A-bodies. My Duster definitely isn't my "long trip" car, what with the manual steering, manual brakes, no A/C, and fairly horrible gas mileage. But I have a few Mopars, and my EL5 GT will not be getting 1.12" bars. Just like its keeping its power steering, possibly its A/C, etc.

As far as heavy, I actually have a fully cast iron 833 on my Duster. It does have an aluminum bell and manual everything though, and will eventually have '71 doors and a '71 Dart front end.
 
Blu thank you for the detail responses to my questions. After considering what you said I'm balanced on that razors edge between the 1.06s and the 1.12s. It's got me thinking that I could live with the 1.12s as the vast majority of my events would be within 2.5 - 4 hours driving time. The full day runs would only be to Vegas and after really giving it some thought that would be a one time event but most likely just a dream. I'm not building a Power Tour type car. It is going to be more performance oriented than that. Wow sounds like I just made the case for 1.12s!
 
Ok, so I guess it's time to wake this thread up from the dead. :D I have in fact been working on my Duster. Unfortunately for the thread, most of what I've been doing has been pretty boring. Carb tuning for one. After trying and trying to get my car dialed in with the 770 street avenger I had on it, I decided that I was trying to fight with too big of a carb and switched down to a 670. A few minor changes later and I'm pretty close to where I want to be with the carb.

I also swapped out my stock mopar electronic dizzy with welded up advance slots for a much easier to adjust Mallory electronic distributor (thanks Tracy!!! :thumbup: ). A quick adjustment on the advance and I'm pretty well set, now sitting at 23* advanced at idle and about 11* of mechanical advance, for an all in of ~34* at about 2,600 rpm. Seems to like that better. :D

I also made a pretty big cosmetic change, swapping out the stock '74 Duster tail panel for an AMD Demon tail panel. :snakeman:

I started with the good old stock rear end of a '74 Duster (well, except for the bumper)

IMG_5222_zps27c2398d.jpg


Stripped everything down...

IMG_1845_zps7b4b02a4.jpg


And got to work drilling spot welds
IMG_1849_zps722a3514.jpg
 
Last edited:
Now, there are a few differences between the '74 Duster and '71 Demon parts. The quarter supports and tail light brackets are a the big one, the '73+ Duster's didn't have tail light brackets like the Demons did, but the did have supports for the quarter/trunk gutter. The Demon's had them too, but they were incorporated into the tail light bracket.

Burntorange70 did a GREAT write up of the differences here, so I'll reference his thread and borrow a couple of pictures...Duster to Demon Tail Panel Swap

'73+ braces...
Duster to Demon Swap 2-1.jpg

attachment.php


Demon tail light brackets and braces...
Duster to Demon Swap 2-2.jpg

attachment.php


But this is where I'm going to part ways from burntorange's conversion. I've converted my car to have a fold down seat, and the trunk trim panel that covers the tail lights mounts to the later quarter supports. So, I'm keeping them, and deleting the brace from the tail light bracket.

IMG_1846_zps9c3aef3a.jpg


Ta-daaa
IMG_1848_zps1c0e9c5c.jpg
 
Last edited:
And more borrowing from burnt's thread because I forgot to take some pictures....

So basically, after a lot of spot weld drilling, you get here. Or almost. I left the tail latch brace in place, just removing the spot welds where it attached to the tail panel, leaving it attached to the floor. I did this to help locate the new tail panel, so I wouldn't have to mess with the trunk latch as much. But I forgot to take the picture, so you get his one from the other thread.

Duster to Demon Swap 1-6.jpg

This is also the part where you realize that if you have a shock mount bumper car, you have some additional differences...

Duster to Demon Swap 3-1.jpg

The shock mount trunk floor has these indents in it that the earlier cars don't have. But, here's the thing. If you look at my earlier "spot weld" picture, you see the the later panel is just dented in to match these indents in the floor. The later 74+ panels started out flat, they just clamped or bent them in when they spot welded them to the floor. So, you can do the same. Or, if you want the tail panel to be flat like the earlier cars, you can beat the floor out even with the panel. I had another problem, which was the only rust I have in my car...

IMG_1853_zpsc7d885ed.jpg


So on this side, I just made a small patch panel that came out flush with the new AMD tail panel. On the other side, I got out the BFH and beat the floor out to meet the new tail panel, so the tail panel from the outside is flat. I also welded in the new tail light brackets, after carefully lining them up using my new demon tail lights and buckets. Yeah, I forgot to take a few pictures...

Patched side with brackets installed
IMG_1869_zps741c9f6f.jpg


Non patched, bent to fit side with ugly weld at the seam...
IMG_1870_zps1b7d83ee.jpg


And now from the outside. Lots of spot welds. Because I had a new panel, I drilled holes in the new panel to facilitate spot welding to the old panels. I also ground down the little left over circles from the spot weld cutter, so the old panels didn't have those bits of extra metal. And yeah, once again, I skipped some pictures when I was aligning the panel with the quarters and the trunk...

IMG_1866_zps136d1a37.jpg


And we end up here, after the bumper, trunk latch, and tail lights are installed.

IMG_1879_zps84b455c6.jpg


Because I'm still doing bodywork, I just sprayed some rattle can primer where I attached the tail panel. I still need to do the leadwork to cover the transition from quarter to tail panel. And I am going to actually do this in lead, just like the factory. I'm not a leadworking expert, but I have done it before so this will get the correct finish when I get to bodywork on the tail section of the car. But for now, that's the update!
 
Last edited:
good progress for sure. looks way better to me :thumblef:

Haha, says the guy with a Demon. ;)

I'm trying to get the front end swapped over, I'm about half way there. But the rainy weather and suddenly being as sick as dog isn't helping my cause. #-o :sad4:
 
Let us know how you set up your clutch pedal spring(linkage) with that diaphragm style clutch
 
Let us know how you set up your clutch pedal spring(linkage) with that diaphragm style clutch

You mean the overcenter spring on the clutch pedal? It's sitting in my shop somewhere. Don't need it with a diaphragm clutch. Linkage is the same otherwise, just no giant spring under the dash.
 
I'm working on it, I swear!!!

I had an minor issue with the paint, it was too cold when I shot it so the top finish didn't lay out the way it should. It color sands and buffs out just fine, but it's a bit more labor intensive than it should have been. Good thing I'm better at bodywork and sanding than I am at painting.

Front clip is mounted, so I guess it's not much of a Duster anymore! ;) Other than the paint, the only thing I had to address were the lower front wheel opening corners. I lengthened the fender to bumper braces by 2" to push the corners out further to keep them from interfering with the tires, and trimmed the flanges on the corner back at a 45* angle or so. That took care of the change in the wheel opening going from Duster to Dart fenders. So far no other issues, the rest of the fenders clear just fine. I'll get the grille and emblems all installed when I finish cutting and buffing. I had to get the rest of everything installed so it would be driveable.

IMG_1955_zps2fb5edca.jpg


IMG_1950_zps72a4664c.jpg
 
Last edited:
Looking good Blu.... brings back memories of my old '72 Demon. I got too carried away with the drag modifications and ruined it for street use. Live and learn.
 

Attachments

  • IMG_0117.jpg
    50 KB · Views: 1,021
  • IMG_0109.jpg
    54.2 KB · Views: 1,096
  • IMG_0103.jpg
    58.1 KB · Views: 1,110
Can you give me info on the pulleys and belt you used, part numbers, how/where to buy for my Dart? Really like the set up. I finally got the electric fan installed but need to have my alternator beefed up to handle extra electrical needs.

Regards;

Gary

Alright, next installment. Wiring hell.

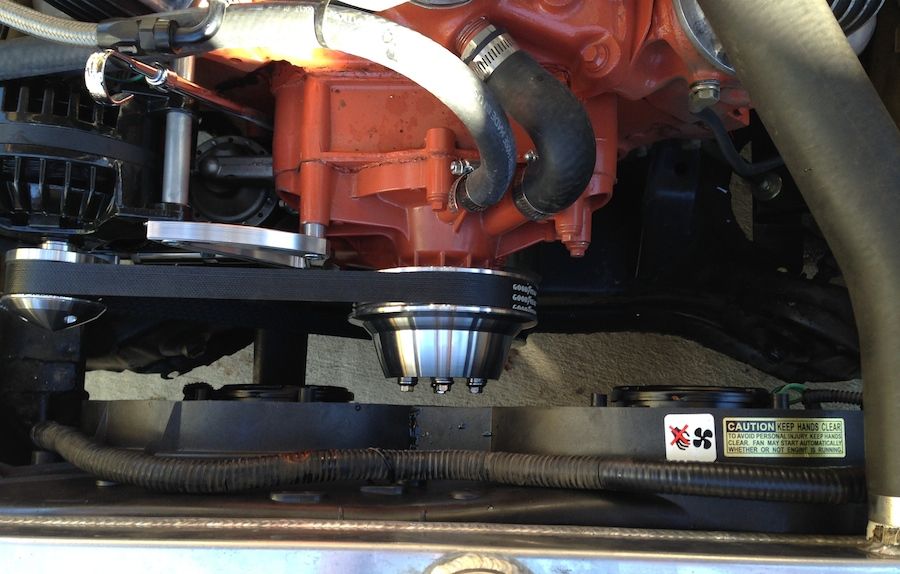
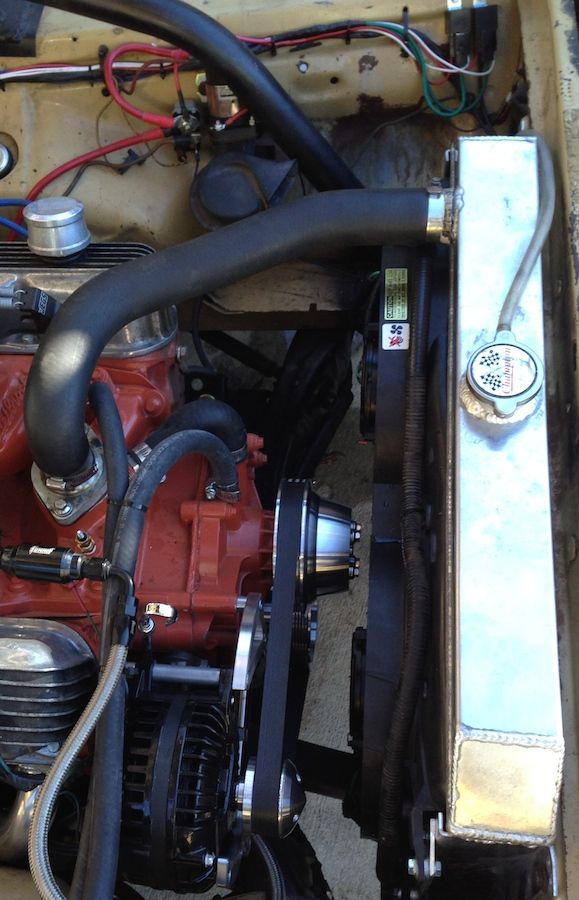
I had a mechanical flex fan and the stock skinny fan belts on my 340 to start out with. I quickly found that no matter how I shimmed the pulley's or how tight I made the belt I would toss it whenever I really stabbed the throttle. Probably because of the stupid flex fan grabbing a tremendous amount of air. Not good! I was also having a hard time warming the car up and keeping it at temperature, the combination of flex fan, 26" aluminum radiator, and high flow water pump was actually cooling the car TOO well.

So, I bought a March serpentine conversion with alternator bracket, and upgraded to a 100amp Tuff Stuff alternator to handle the load from my new electric set up. Goldduster318 was kind enough to post up his conversion to dual electric fans using a set up from a Contour, so I did a little research and decided that was the way to go!

The fans come courtesy of a 1995-2000 Ford Contour. Dual electric fans, high and low speed, with a shroud that just about fit my 26" Champion radiator like it was made for it. To get it mounted I added a couple of 1/8" by 2" aluminum bar, and used the original mounting brackets on the fan.

IMG_1558_zps3b79216a.jpg


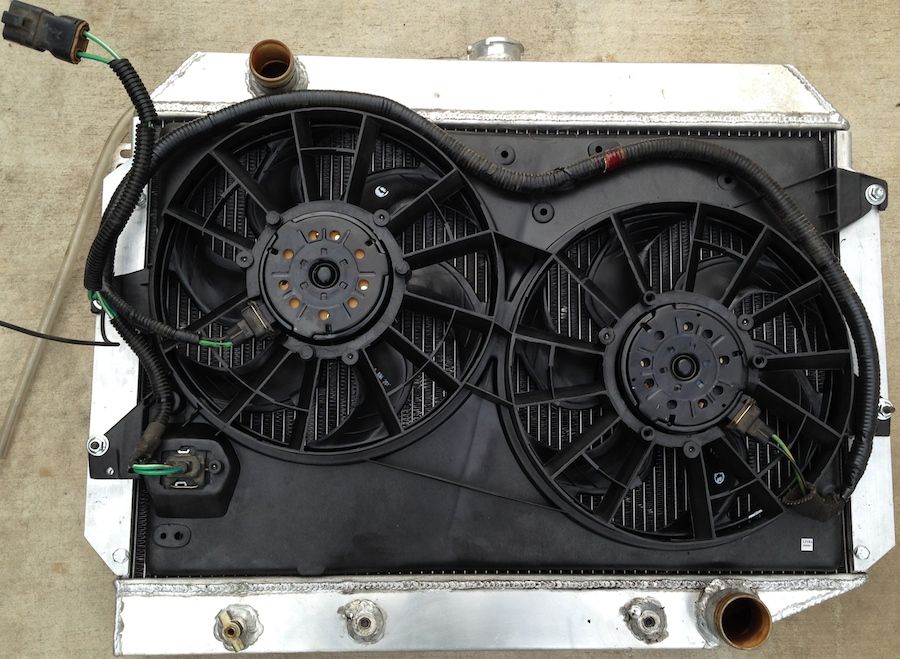
I bought the fans new (Dorman 620-104), but hit the local PickNPull and picked up a spare set up that had the complete harness still attached. The entire set up is routed through a Dakota Digital controller, PAC-2750. It lets you program all the on/off temps, uses my autometer water temp gauge sending unit, and even allows me to program the fans to run after shut down for up to 5 minutes (and kills the fans if the battery gets low).

http://www.summitracing.com/parts/dak-pac-2750/overview/

I did have to buy an extra relay for the dual fan set up http://www.summitracing.com/parts/dak-rly3/overview/

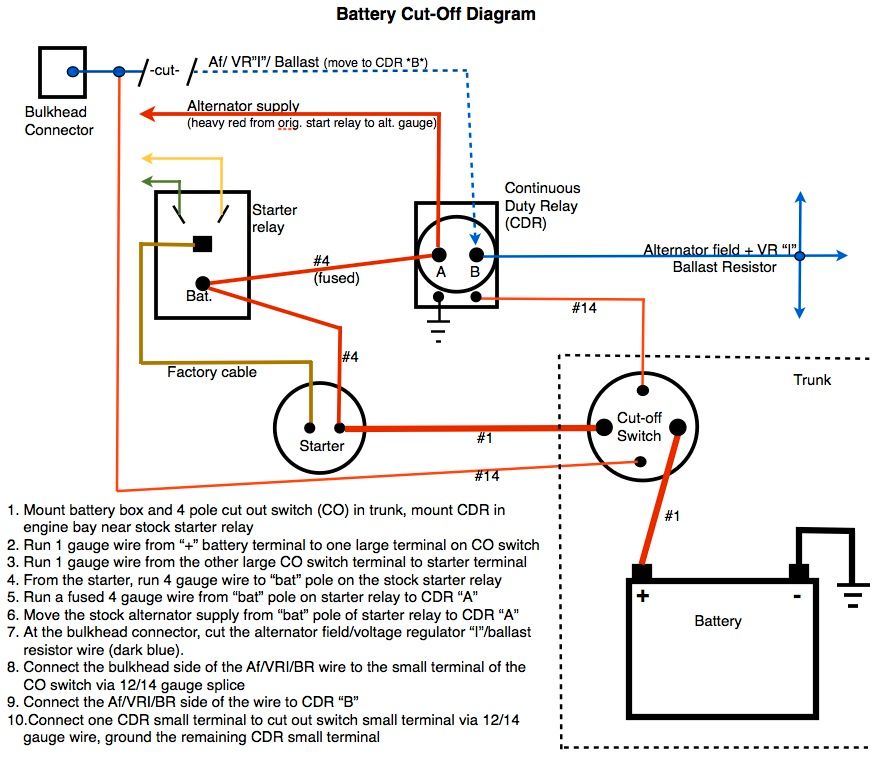
Followed by what I like to do LEAST, I wired this whole set up, along with finishing my battery cut off switch and relay to finally complete my battery to trunk relocation. I had been driving the car, just not with the cut off.

Anyway, the final product. Pulley's installed, no more belt throwing. Fan installed with 180* thermostat. No more flex fan, more horsepower, and shorter warm up times.

IMG_1559_zpse3b2d10c.jpg


IMG_1563_zpsdd343921.jpg


Special thanks to goldduster318, he made up an AWESOME pdf presentation about how to set up the whole fan installation and wiring. :thumbup:

And just as a bonus, the diagram I made up for my battery relocation, cut off, and relay...

batt-cuttoff_zps468a9a9f.jpg
 
Don't know how I missed this thread, but from reading your posts on other threads it isn't hard to tell you know your Mopars....so when I saw it was yours I knew I better check it out.

No disappointment....lots of great ideas and info.

Best dash mod ever!.....and it looks factory.

Mopar to ya'
Denny
 
Can you give me info on the pulleys and belt you used, part numbers, how/where to buy for my Dart? Really like the set up. I finally got the electric fan installed but need to have my alternator beefed up to handle extra electrical needs.

Regards;

Gary

The pulleys are March's serpentine conversion kit, part#10300

http://www.summitracing.com/parts/mch-10300/overview/make/dodge

The belt is a Goodyear Gatorback, 45" length #4060450

http://www.summitracing.com/parts/gtr-4060450/overview/

If you're upgrading your alternator anyway, it would be easier to just get one with a serpentine belt pulley on it already, or ever better convert to a Denso or similar and add a continuos duty relay to run the power somewhere other than directly into the bulkhead connector.

Don't know how I missed this thread, but from reading your posts on other threads it isn't hard to tell you know your Mopars....so when I saw it was yours I knew I better check it out.

No disappointment....lots of great ideas and info.

Best dash mod ever!.....and it looks factory.

Mopar to ya'
Denny

Thanks Denny! :thumbup: Appreciate it.

I really pretty new to Mopars really, I didn't know much about them at all before I bought my Challenger in 2008. I grew up working on old Brit iron in my old man's restoration shop, so I had plenty of mechanical skills. Forums like these, and the fact that I was using my car as a daily and doing all my own work led to a pretty quick education. I had done some autoX with Austin Healey's, and I take my sportbike to trackdays so I like my cars to handle. I spend a lot of time talking to the guys that do autoX and road race stuff with their Mopars to get the torsion bar stuff figured out. And I still did a lot of trial and error type work, my Challenger has been through at least 4 different suspension set ups since I've had it. Even my Duster has been through a couple, and that was after I thought I had things figured out with the Challenger.

Still very much a learning experience! I just try to be practical about things, especially since I have more skills/time than I do cold hard cash for my projects.
 
Special thanks to goldduster318, he made up an AWESOME pdf presentation about how to set up the whole fan installation and wiring.

I'm saving this thread .... can somebody post a link to that pdf file ... I plan on doing this very install .... thanks for doing the hard work .... DTM
 
Special thanks to goldduster318, he made up an AWESOME pdf presentation about how to set up the whole fan installation and wiring.

I'm saving this thread .... can somebody post a link to that pdf file ... I plan on doing this very install .... thanks for doing the hard work .... DTM

Pm me your email address and I'll mail it to you, don't think its hosted online anywhere.
 
Pm me your email address and I'll mail it to you, don't think its hosted online anywhere.

https://www.dropbox.com/s/wdvxqfd1tnhcpy3/Electric Fan 26in Radiator.pdf?dl=0

My pleasure. Once I figured it out I just had to share it. I think each person has done something a bit differently for mounting the actual fan shroud but overall, it works amazing.

72bluNblu will get to help me out when it comes time for my 18's...which will be after I get the remaining Hotchkis parts installed, new driveshaft, and the EFI. So...hopefully this year.
 
Thanks for the link......I'll start looking for the parts as soon as I'm able.... looks like it's works killer .... thanks again .... DTM :D
 
https://www.dropbox.com/s/wdvxqfd1tnhcpy3/Electric Fan 26in Radiator.pdf?dl=0

My pleasure. Once I figured it out I just had to share it. I think each person has done something a bit differently for mounting the actual fan shroud but overall, it works amazing.

72bluNblu will get to help me out when it comes time for my 18's...which will be after I get the remaining Hotchkis parts installed, new driveshaft, and the EFI. So...hopefully this year.

Hey there he is! :D Yeah that PDF is awesome. I did a couple things a little different, but only because I was able to look at the diagrams and get a MUCH better idea of what I was doing.

18's!!! Don't tell the big wheel haters! :protest: :D

But yeah, I'd love return the favor and help out all I can. :thumbup:
 
awesome build, i'm impressed! us big wheel hates will probably learn to embrace them as time goes on, and supply of 14's and 15's dry up! LOL

my 3500 ram, 1995 vintage, its hard to find decent used 16's for it..... tight ***, run used tires on truck till bald, then run them on stock trailer till they blow..... LOL really!!!

Thanks!

Yeah honestly I never had a problem with 15's, and I actually would prefer to run 17's for the proportion of sidewall/rim. But tire selection is pretty much nil for 15's in anything wider than 225 unless you like BFG T/A's. For modern compound tires you really have to go to at least a 17" rim. Even the selection for 17's has started to drop off. And of course on A-bodies going to an 18" rim gets you a much wider tire up front because of the outer tie rod clearance they add.
 
Hey there he is! :D Yeah that PDF is awesome. I did a couple things a little different, but only because I was able to look at the diagrams and get a MUCH better idea of what I was doing.

18's!!! Don't tell the big wheel haters! :protest: :D

But yeah, I'd love return the favor and help out all I can. :thumbup:

Yeah, I think that part is kinda open, as is the wiring design, as mine is custom and on the bottom.

The big wheel haters are welcome to buy my 15's. Like you, I want to go 18's because you can fit very wide tires and 17's don't clear the tie rod end enough to go 275's.

I'm looking to do 275-35-18 all the way around. Was looking at some anthricite center torque thrust looking wheels that were on Discount Tire and Summit. 18x9 +35. I also have the B-body 8.75 ('68) and the offset shackles. I don't mind a less than 1/4" spacer either so it will probably end up similar to yours in that regard. My friend (MrAndrewLitt) bought a 71 Demon that will probably eventually get a very similar treatment as well. I haven't busted out the wheelrite yet for those exact wheels in my case.
 
-
Back
Top