Any interest...?

-
Well, I got a few things done and I figured I'd post 'em up since a few of you have asked for updates here and in PM. I was wanting to get the air box done, but don't know how much I'll be working tomorrow since I've got to do what the doctor ordered for surgery on Friday.

So, here goes. This is the basis for building a scooped hood. I'm keeping this air cleaner, but will get a small lid that will just fit the air filter itself. I've already done the measurements for it. Since the engine has the wrinkle black Mopar Performance valve covers on it, I'll use the matching lid.

basis of the build.JPG

Had to rehang some of the front end. The fender I bought from John, 3404speed and the almost complete header panel. Still have a little shaping in a few spots on it to get it in primer.

test fit.JPG

basis of the build.JPG


test fit.JPG
 
...So, here goes. This is the basis for building a scooped hood. I'm keeping this air cleaner, but will get a small lid that will just fit the air filter itself.
Give us specifics on the air cleaner pieces-parts. I'm wanting to do something very similar but need to find a cheap air cleaner base. What car is your base from? How far is the drop on that base and what is the outside diameter?
 
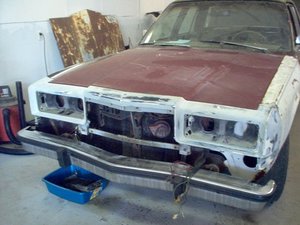
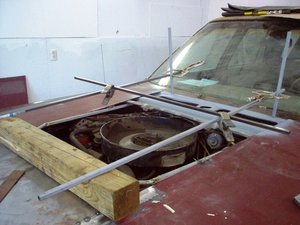
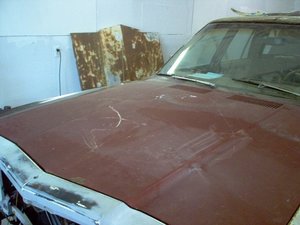
For those who might be unfamiliar with the shape of an M-body hood, this is what I have to start with. Notice the taper on the center body line going front to back, getting smaller as it does. I've seen some of the Mopar scoops on these hoods and wasn't too thrilled with the looks of 'em. The dual snorkel scoops seem way out of place. But why not work with what the factory gave me and do a cowl hood? After searching all the catalogs and websites I couldn't find one pre-fabbed in 'glass that I thought would suit me. So, I'll build me own.

starting out.JPG

Once the front sheetmetal (and fiberglass) was all on and the body lines and gaps were good, I took a can opener to it.

can opener.JPG

From this next pic you can tell that Ma Mopar never designed this hood for a functional scope. Look where the bracing is. I suppose I could have modified I pre-fab, but like I said, wasn't really thrilled with any of 'em. Either too wide or way too narrow on the center section.

starting out.JPG


can opener.JPG


different view.JPG
 
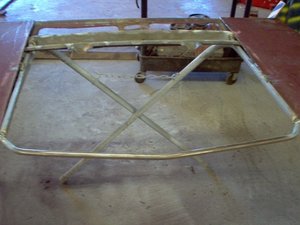
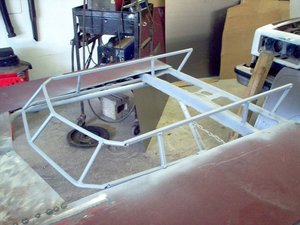
After I cut some of the support structure out of the way I built a base out of 1/2" square tube and 1/2" round tube that sits level with the top of the air cleaner, about an inch above. There will be a piece of 18 gauge that will be spot welded to this, with a 16" diameter hole in it to seal against the air cleaner.

base 2.JPG

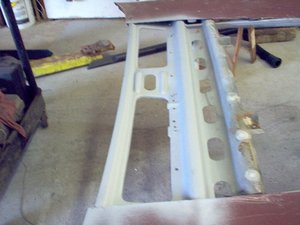
While the skin was off I took the opportunity to blast the exposed inner structure and prime it.

cleaned.JPG

cleaned 2.JPG

base 2.JPG


cleaned.JPG


cleaned 2.JPG
 
I cut some of the skin I took off to be able to get a radius I need and the measurements to start with the skin. Here is it going back on.

reskinning.JPG

radius.JPG

reskinning.JPG


radius.JPG
 
This pic you can see that the base of the scope is actually higher than the skin ahead of it as it sits level above the air cleaner.

depth.JPG

Now time to get on with the structure of the scope. I recruited Pop to help me with this. I could see it all in my mind's eye, but not the practical way of doing it. Pop walked in the door and had it. Nice having a partner with all that experience.

angles.JPG

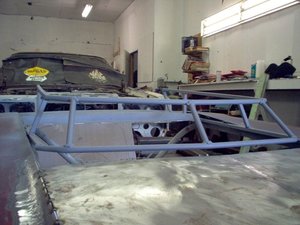
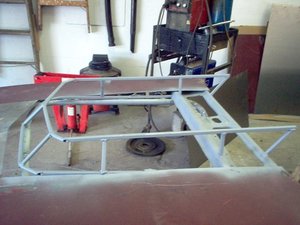
These next pics are of the structure for the air box. Again, this all 1/2" square and round tube. The rear opening sits above the cowl at 4" and tapers to 3 1/2" to the front. There will be more supports at the top, but I'm want to lay in the sides of the air box before I top it. That I way I can reach everything easier with the welder.

structure.JPG

structure 2.JPG

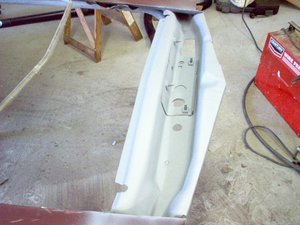
This last shot, I think you can see where I cut off some the remaining support structure over hanging the rear of the air cleaner. The base will be welded tight along here. I've also made sure to leave the cowl vent openings open. The louvers from the original skin won't be re-used, but a blend air can be handy for defrost, etc.

structure three.JPG

depth.JPG


angles.JPG


structure.JPG


structure 2.JPG


structure three.JPG
 
Tomorrow I'll have some of the interior sheetmetal running on it. The idea is make this completely air tight to the carb, no leakage into the rest of the hood. After that, I'll start rebuilding some of the support structure and skinning it.
 
Give us specifics on the air cleaner pieces-parts. I'm wanting to do something very similar but need to find a cheap air cleaner base. What car is your base from? How far is the drop on that base and what is the outside diameter?


This air cleaner is original for the 318 4BBL that was in the car. I've taken the snorkel off and need to weld the hole shut. I measured this at 16.5". If you're looking for a cheap one, the M-body cop car air cleaners can be had, cheap. As far as the drop...got me. Talking the drop around the carb or the depth for the filter element? Never measured the one for the carb and can't remember the one for the element.
 
... Talking the drop around the carb or the depth for the filter element? Never measured the one for the carb and can't remember the one for the element.

The drop around the carb. Hope this make sense...here goes...If you sit the air cleaner base on a flat surface if carb opening sits higher than the outside of the base it has a drop base. You can measure from the carb opening to the flat surface to determine the drop distance.
 
The drop around the carb. Hope this make sense...here goes...If you sit the air cleaner base on a flat surface if carb opening sits higher than the outside of the base it has a drop base. You can measure from the carb opening to the flat surface to determine the drop distance.


I'll get it measured up for you.
 
I'M INTERESTED!! But you probably already knew that. Glad to see you are back at it, looking forward to progress. I like what you are doing to the hood, I thought of doing something very similer to mine. I even bought an extra hood last year to modify. The way the center of the hood is shaped raising the back of looks like it will fit the style well. good luck and keep us posted. I'll park next to you in the M body section at Carlisle in 2012.
 
I'M INTERESTED!! But you probably already knew that. Glad to see you are back at it, looking forward to progress. I like what you are doing to the hood, I thought of doing something very similer to mine. I even bought an extra hood last year to modify. The way the center of the hood is shaped raising the back of looks like it will fit the style well. good luck and keep us posted. I'll park next to you in the M body section at Carlisle in 2012.


Yeah, it would be cool to see 'em side by side, that's for sure.

Didn't get any pics today, but did start cutting and shaping sheetmetal for the air box. Once I'm back at it and the doc clears me from surgery I'll ready be to weld it up.
 
Wow :tongue9: You are getting after it :cheers: And looking good :thumleft::thumleft:
Looking forward to seeing it all skinned and primed in, You are making some cool and good calls here :happy10:
You take care and don't over do it brother. I hope you are doing well, I see your hood scoop is =P~:thumleft:

Thanks, Mike. There's so much I could be doing, besides the hood. But I want to get the customizing out the way while the engine is still in place. Need the engine there for all the measuring for the box and up next will be pulling the 727 and modifying the floorpan and trans mount for the A500. Then I can rip her to pieces and really haul ***. :-D
 
there will be no hauling of the *** till the good Dr says *** can be hauled, good luck with the surgery, prayer sent.
 
You're making a Donkey hauler?!!8):bootysha:

Yeah, it's gonna haul my "donkey" from point "a" to point "b" rather quickly. :-D

This kinda reminds me of all those guys who used to tell me to put a 460 in my pick up instead of leaving the 300 in it. "Yeah, but it would haul *** with the 460 in it!" they would say. "I'd say, yeah, but with the 300 in it and the torque I can build it'll haul ***, and cows, and horses, and pigs, and cars, and..." :-D
 
Thanks, bro. No where near complete yet, but it's getting there. Once I'm back in form, it should take about a week to finish it up.

ya healed up yet? or do you have so hot little red headed nurse stopping by everyday, to um.....check things out:toothy10: it's been a month since you last posted, so send the nurse my way and get back to work.
 
ya healed up yet? or do you have so hot little red headed nurse stopping by everyday, to um.....check things out:toothy10: it's been a month since you last posted, so send the nurse my way and get back to work.


Let's not go there about the hot nurse...:toothy10:

All healed up and running myself ragged, but not on the Dip. Might be able to hit it hard again next week. Been quite a bit of activity at the shop lately, which is a good thing. Honda with a bad clutch master and various driveability issues, plus the owner wanted a new timing belt installed. An Audi A4 with a seized turbo. An Intrepid that needed a lot of brake and suspension work. A carb rebuild on a Caddy. A Bravada that needed a heater core. And these are the high ticket items. Been a lot of little things going on, too.
 
Nice to see the "M" bodies getting some well deserved loving!!!!! I always liked the 5th Avenue, Diplomat's and Fury's of the 80's, actually used to have one. These were the nicest of the V8 models offered by Chrysler at the time and were definatley luxury in nature but still retained the V8 power. Great job on your transformation/restoration. The scoop looks sweet and you have made a lot of progress on this one. Do not over do it though. Prayers for a quick recovery sent your way Robert.
 
Nice to see the "M" bodies getting some well deserved loving!!!!! I always liked the 5th Avenue, Diplomat's and Fury's of the 80's, actually used to have one. These were the nicest of the V8 models offered by Chrysler at the time and were definatley luxury in nature but still retained the V8 power. Great job on your transformation/restoration. The scoop looks sweet and you have made a lot of progress on this one. Do not over do it though. Prayers for a quick recovery sent your way Robert.


No worries of over doing it. Back to 100%, just need to make my final follow up appointment next week and we're golden.

Thanks, DM, on the words for the Dip. If you do a search in the jokes section (it's also "other stuff"...:iconbigg:) for Bad Penny you'll see the story on this one. I've always felt the M's were overlooked as far as builds go, but they do have a devoted following, hence dippy.org.

This one will be a blend of custom touches as well as remaining true to her roots in the family, but done my and Pop's way.
 
-
Back
Top